Operations
After Bookings (setup step 14) and Categories (setup step 9), use Tickets and check-in/out queues before your first turnover week — see Getting Started — Operations, tickets & cash flows (optional). Arrival workflow: Managing a Check-in. Complete Getting Started — Recommended Setup Sequence steps 1–12 first. Workflow pairing: Modules — Setup sequence after go-live.
Start with Overview tab for portfolio scope, then Tickets Tab for maintenance work and Check-in & Check-out Tab for arrivals/departures. Expense rows: Cash Flows Tab. Vivin internal: Schedule tab (Vivin internal). Guide subsection map: Operations guide subsection index (tab sections + Related subsections). Non-linear operator habits (Lockout catch-up, Pending manual receipt approval, Reject/revert mistaken receipts, Notification row-click navigation, Payment alert to receivables triage, Confirmation alert triage, Finance debt receivables triage, Finance Income status drill-down, Cash flow forecast drill-down, Partly collected security deposit, Portfolio segmentation by tenant category) have matching Related subsections below. Full pairing matrix: Operations section cross-reference · Modules — Module cross-reference.
The Operations module centralizes day-to-day operational coordination across your properties.
Open the Operations module at platform.vivin.app/operations. Tab routes include /operations/tickets, /operations/check-in-out, /operations/cash-flows, and /operations/schedule (Schedule is shown only to Vivin internal accounts; other roles keep normal module permissions). See Deep Links for all routes.
Unknown Operations tab slugs redirect to /operations (Overview). Legacy bookmarks using check-in or check-out alone are rewritten to /operations/check-in-out when your role includes that tab. See Deep Links — Invalid, legacy, and mistyped URLs.
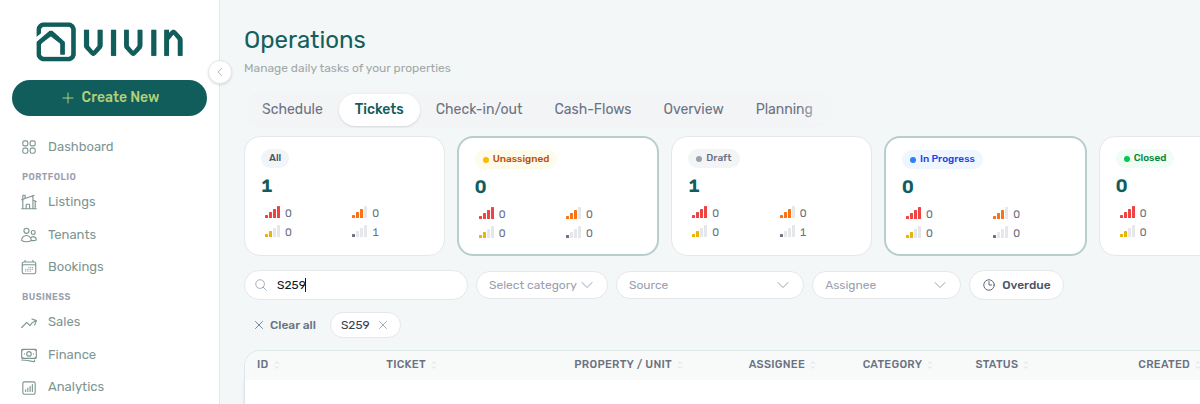
Open booking context from Bookings; settle tenant balances in Finance; verify keys and access in Listings. Paste the full sequential ticket ID (for example S259) in toolbar Search — see Tickets toolbar search. Portfolio lookups via AI Chat share the landlord tool catalogue — poll AI usage API (landlord_chat) when assistant volume spikes during turnover week. During turnover week, clear payment overdue alerts on arrivals or departures with Handling a Late Payment — Step 1 before key handover — scope unpaid move-ins by Bookings — Other filters tenant category or Tenants — Tenant category filter when portal rules differ by segment (Settings > Tenant categories). Section-to-doc pairing: Operations section cross-reference. Hub tab matrix: Modules — Module cross-reference.
Directory load failures
Tickets and Cash Flows each load their own ledger when you open the tab. When the first request for the active tab fails, that tab shows a red alert card — Failed to load tickets. or Failed to load cash flows. Please try again. — with optional server detail and Retry. Other Operations tabs (Overview, Check-in & Check-out, Schedule) are unaffected — switch tabs or retry on the failing tab after connectivity recovers.
A successful fetch with zero rows for your filters is the normal empty state, not this error. See Glossary — Directory list load failures and FAQ — list page load failures.
Mobile and narrow layouts
Operations uses two mobile patterns — do not confuse them:
| Pattern | When it applies | What changes |
|---|---|---|
| Narrow viewport | Browser width below 768px (any device) | Operations shows a fixed bottom tab bar instead of the desktop pill strip; floating + for quick ticket or cash-flow entry. Other modules keep their normal narrow-layout drawer (unless the phone-only rule below also applies). |
| Phone-only shell | Actual mobile phone user agent (iPhone, Android phone, etc.) and Operations module permission | Route guard sends non-Operations URLs to /operations; the mobile menu lists Operations only. iPads/tablets and desktop browsers snapped narrow are not locked this way. |
Phone-only operations shell
When both conditions above match, field staff get a reduced shell focused on operational work:
| Behaviour | Detail |
|---|---|
| Route guard | Navigating to Dashboard, Listings, Bookings, or other modules redirects to /operations. Exceptions: /settings/support and /settings/support/:ticketId still open for Support deep links. |
| Sidebar | The mobile menu lists Operations (not the full desktop nav). Account and Logout remain at the bottom; a compact language control sits beside Logout. |
Bottom tab bar (narrow viewport)
On viewports below 768px, inside Operations:
| Control | Detail |
|---|---|
| Tab switching | Bottom tab bar for Overview, Tickets, Check-in & Check-out, and Cash Flows. |
| Quick add | Floating + on Tickets opens New ticket; on Cash Flows it opens Add cash flow. |
| Schedule | Not on the bottom bar — use desktop width or bookmark /operations/schedule (Vivin internal only). |
Roles without Operations permission keep the standard mobile drawer (subject to each module’s own access rules) and are not locked to /operations. Troubleshooting when field staff expected Bookings or Finance on a phone: FAQ — Phone shows Operations only and Glossary — Operations-only phone shell.
On mobile layouts where the full drawer is available, you may also see Install app at the bottom of the menu (home-screen PWA shortcut). That is separate from the Operations-only redirect — it does not unlock desktop modules on a phone. See Getting Started (narrow viewports) for install prompts, dismiss timing, and routes where prompts are suppressed (/login, /reset-password).
It brings together maintenance tickets, check-in/check-out planning, and operational cash flows so your team can manage work from one place. Those tickets are your organisation’s operational tasks on the portfolio — not Vivin support tickets to the Vivin product team (those live under Account Settings when your role has the Support permission).
Overview tab
Overview KPI cards pair with Dashboard and Analytics — Maintenance tab; segment weak metrics with Finance — Tenant category filter — Portfolio KPI review — Step 5. Full pairing matrix: Operations section cross-reference.
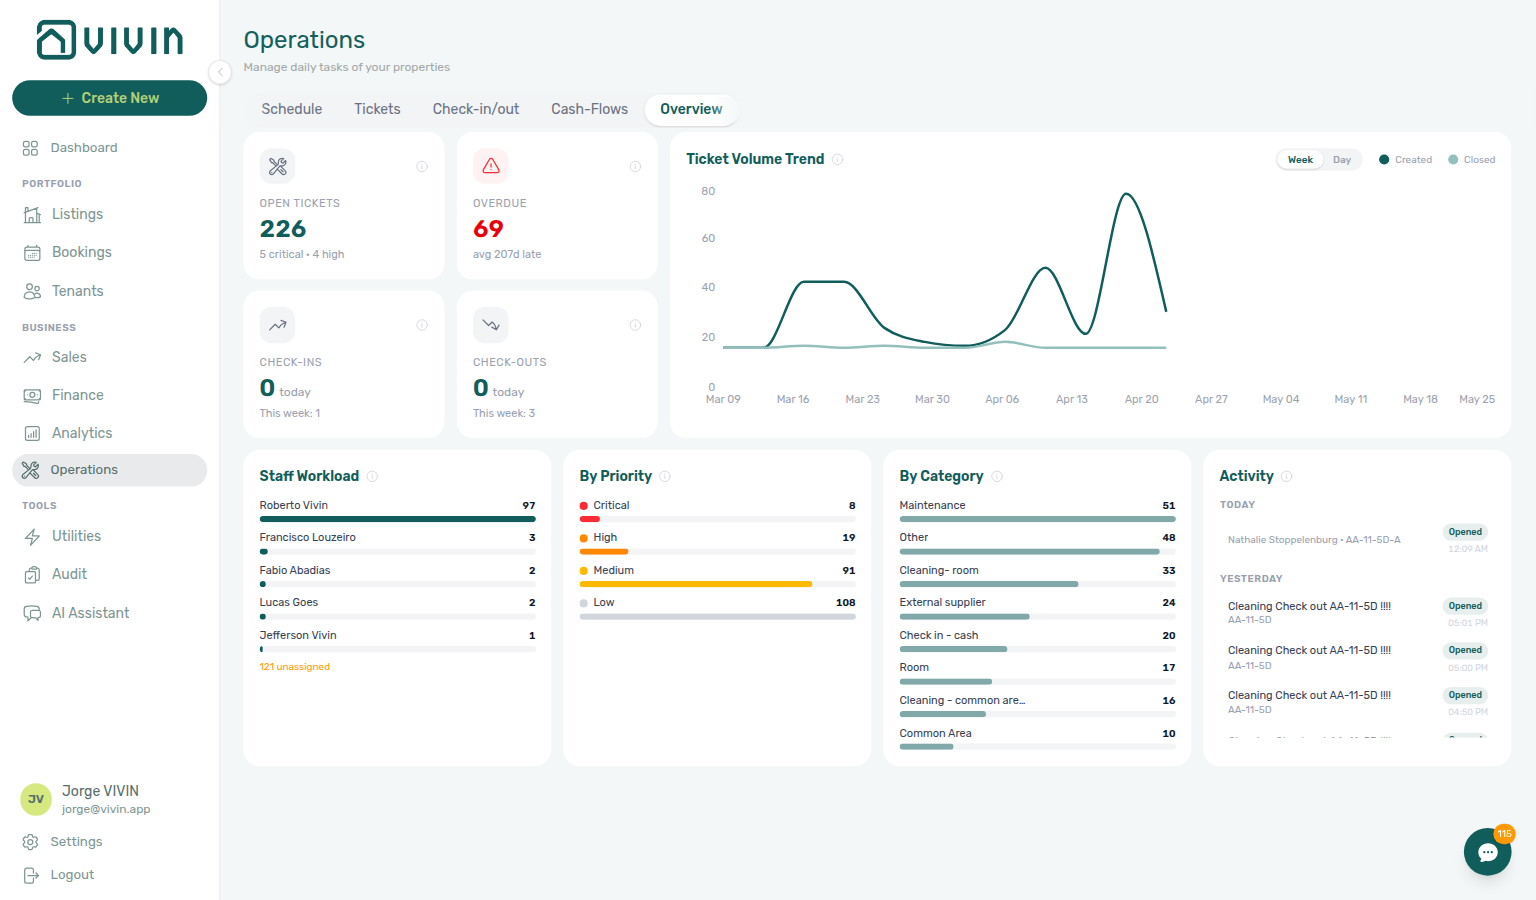
The default /operations view is an operational dashboard for maintenance and turnover planning. It combines ticket health, arrival/departure counts, and workload breakdowns in one scrollable page.
KPI cards (top row)
Four compact cards sit in a 2×2 grid on the left (same visual pattern as the Dashboard KPI row). Each card is clickable and jumps to the relevant tab with a sensible preset:
| Card | Headline | Subtitle (typical) | Opens |
|---|---|---|---|
| Open Tickets | Count of non-closed tickets | Critical/high split, or unassigned count | Tickets tab |
| Overdue | Tickets past due date | Average days late, or “No overdue tickets” | Tickets tab (overdue context) |
| Check-ins | Arrivals today | Tomorrow’s count, or This week total when tomorrow is zero | Check-in & Check-out tab (check-in view, today filter) |
| Check-outs | Departures today | Same subtitle pattern as check-ins | Check-in & Check-out tab (check-out view, today filter) |
Hover each card’s info icon for the in-app definition. Open Tickets and Overdue are derived from the ticket list loaded for the Overview (open = not Completed or Cancelled). Check-ins and Check-outs use a server-side operations stats payload (bookings plus short-term iCal-style stays where applicable); canceled bookings are not counted in those arrival/departure buckets.
Check-in and check-out headline numbers are served from the same precomputed cache pattern as Dashboard and Sales overview stats (refreshed on a short staggered schedule and invalidated after relevant mutations). They are meant to match the Check-in & Check-out tab for the same account; if you just changed a booking, allow a moment or refresh before comparing card totals to a filtered export.
Ticket volume trend
To the right of the KPI grid, Ticket Volume Trend plots created vs closed tickets over time. Toggle Week (last 12 weeks) or Day (last 30 days). When closed exceeds created in a period, your backlog is shrinking for that window.
Lower panels
Below the first row, Overview continues with:
- Staff Workload — open tickets per assignee (plus an Unassigned line)
- By Priority and By Category — distribution of open work
- Activity — a scrollable recent ticket timeline (see below)
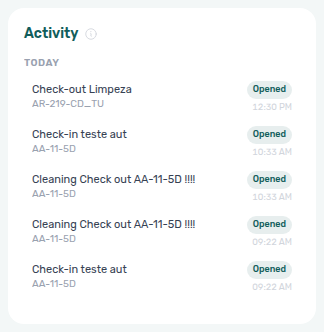
Activity panel
The Activity card in the lower row is a read-only feed of the latest maintenance-ticket events across the portfolio (respecting the same property scope as the rest of the Overview until you change Other filters). Hover the panel’s info icon for the in-app definition.
Each row shows the ticket title, property (internal name when available), an optional actor line (who opened, assigned, or commented), and a relative time. Events are drawn from each ticket’s timeline when the API returns it; otherwise the product falls back to created / closed timestamps only.
| Event kind (product data) | What you typically see in the list |
|---|---|
| Created | Ticket opened (with opener when known) |
| Closed | Ticket completed or cancelled |
| Status changed | Workflow move (for example Open → In Progress) |
| Assigned | Assignee added or changed |
| Comment | New message on the ticket thread |
| File added | Attachment uploaded on the ticket |
The feed keeps up to 30 events, newest first, grouped under Today, Yesterday, or a calendar date. The list scrolls inside the card (about 240px tall on desktop) so long histories do not stretch the page. When nothing matches the current filters, the panel shows No recent activity — widen property scope or create ticket activity on the Tickets tab, then return to Overview.
Capture re-verified 2026-06-11 13:12 UTC (VIVIN_DOCS_BASE_URL=http://localhost:5173 VIVIN_DOCS_RECORD_API=$VITE_API_BASE_URL npx tsx tools/capture-operations-overview-activity.ts).
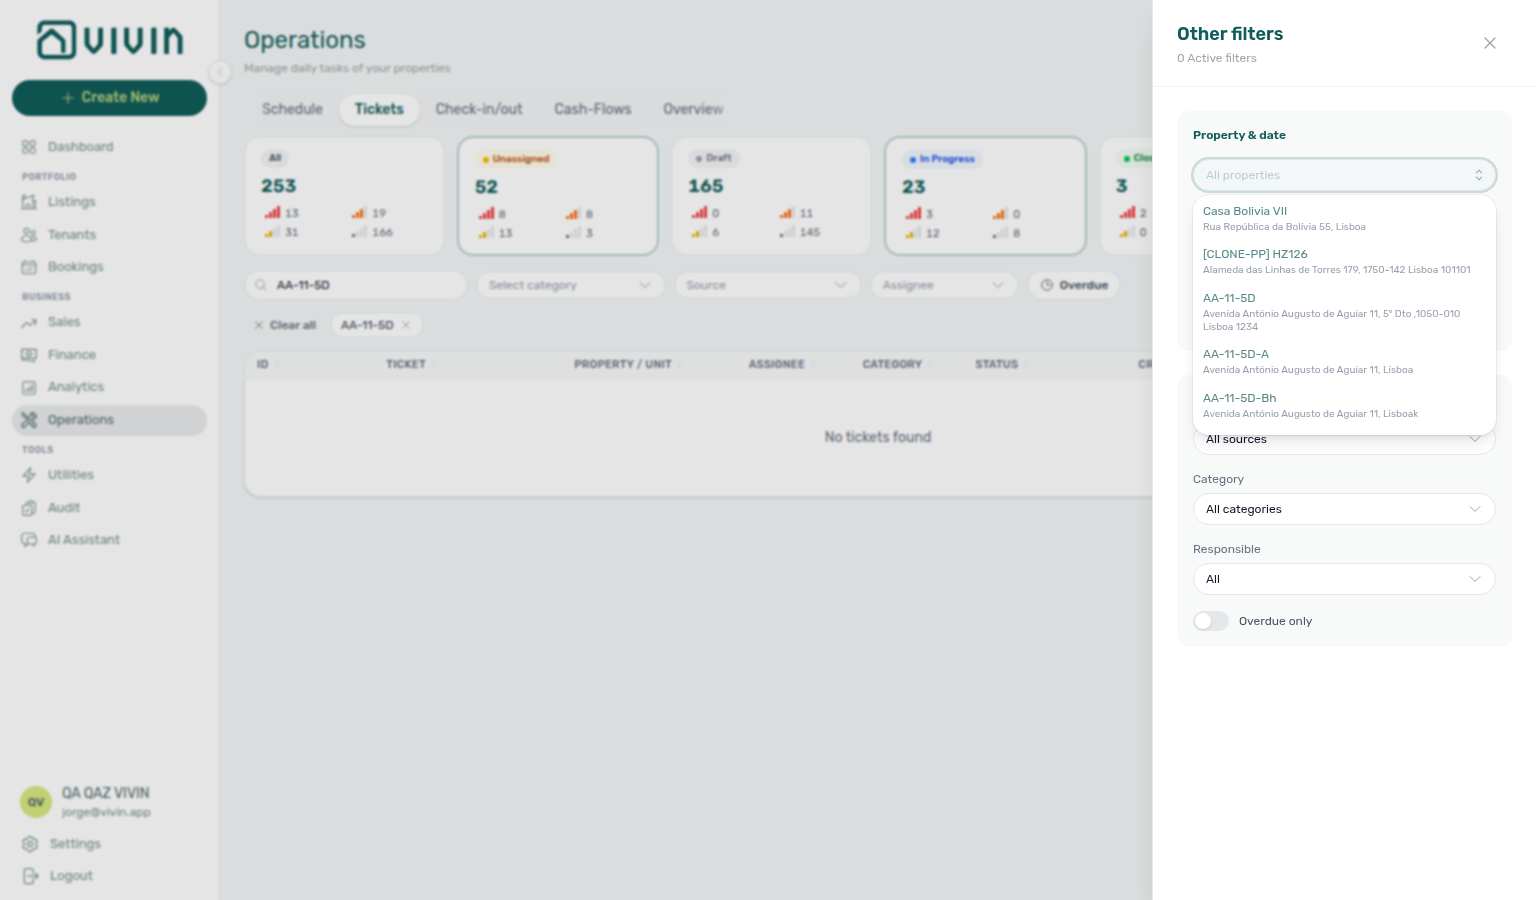
Use Filters in the Operations tab bar to open the shared Other filters drawer. Property is a multi-select built on the server-driven search picker: open the control, type to search buildings on the server (debounced), and scroll the menu for more matches in chunks — the same paged pattern as Finance → Other filters → Property and Utilities → Select properties. With an active query, internalName matches rank above address-only hits before pagination — see Glossary — Picker search ranking. Add one building at a time; the menu stays open until you dismiss it. The placeholder shows All properties or a count such as 2 properties. Selected buildings appear as removable chips inside the drawer (desktop) and on tab toolbars on mobile (for example the Tickets filter row). Property scope applies across Overview, Schedule (Vivin internal), Tickets, Check-in & Check-out, and Cash Flows until you clear selections — optional From / To dates in the same drawer further narrow Overview, Schedule, and Cash Flows. Export and deep ticket work still happen on the Tickets and Check-in & Check-out tabs.
![]()
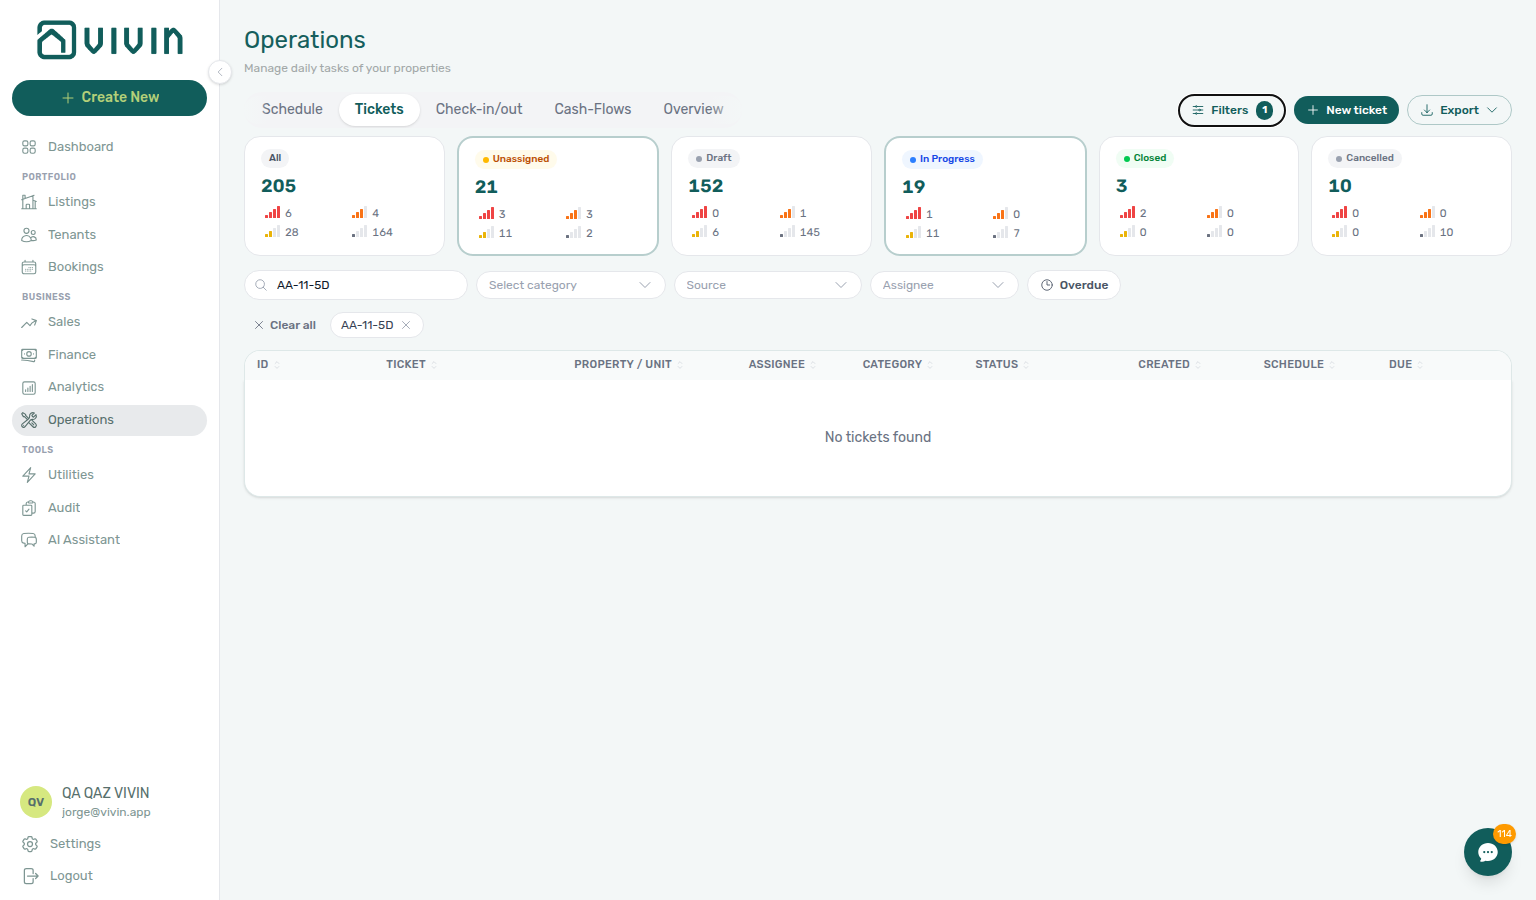
Property picker capture refreshed 2026-06-13 02:00 UTC (VIVIN_DOCS_BASE_URL=http://localhost:5173 VIVIN_DOCS_RECORD_API=$VITE_API_BASE_URL VIVIN_DOCS_PROPERTY_SEARCH=AA-11-5D npx tsx tools/capture-operations-other-filters-property-picker-screenshot.ts).
Property picker search-ranking capture refreshed 2026-06-17 17:05 UTC (VIVIN_DOCS_BASE_URL=http://localhost:5173 VIVIN_DOCS_RECORD_API=$VITE_API_BASE_URL VIVIN_DOCS_PROPERTY_SEARCH=António npx tsx tools/capture-operations-other-filters-property-picker-search-rank-screenshot.ts).
Property chip-in-drawer capture refreshed 2026-06-13 05:12 UTC (VIVIN_DOCS_BASE_URL=http://localhost:5173 VIVIN_DOCS_RECORD_API=$VITE_API_BASE_URL VIVIN_DOCS_PROPERTY_SEARCH=AA-11-5D npx tsx tools/capture-operations-other-filters-property-chips-drawer-screenshot.ts).
Schedule tab (Vivin internal)
Schedule pairs with Listings — Maintenances tab for property-level maintenance context and Deep Links — Operations for Vivin-internal bookmark routes. Full pairing matrix: Operations section cross-reference.
The Schedule tab (/operations/schedule) is available only when you are signed in with a Vivin internal operator account (the same rule as AI Assistant). Customer property managers and other tenant accounts do not see this tab; opening the URL directly is redirected back to the Operations overview.
It is a desktop-first timeline: maintenance tickets are grouped by property on the vertical axis, and each ticket is drawn as a horizontal bar across calendar days. The horizontal range starts from the ticket’s Schedule date when set, otherwise Scheduled at or Created at, and runs through the due date (or due at) when the ticket is still open, or through Closed at when it is completed or cancelled. Overdue tickets use a stronger warning tint; closed or cancelled tickets render in a muted grey. A coloured dot on each bar reflects priority (Critical, High, Medium, Low). Click a bar to open the same ticket detail sidebar used on the Tickets tab.
Toolbar
- Today — scrolls the grid so the current date is centred when possible.
- Day / Week — switches column width on the horizontal axis (pill control in the grid header, beside Today):
| Mode | Column width | Best for |
|---|---|---|
| Week | ~34px per day (default) | Scanning several months of ticket bars across many properties at once |
| Day | ~80px per day | Aligning due dates, schedule dates, and Today when bars overlap on the week zoom |
The grid covers roughly six months in the past through eighteen months ahead so you can plan seasonal work and long lead times. Use Filters in the Operations tab bar (same property scope as other tabs) to limit the chart to specific buildings when portfolios are large.
The Schedule tab is listed in the desktop tab strip for Vivin internal users. On narrow viewports, the bottom navigation used for Operations does not include Schedule — use a tablet or desktop width, or bookmark /operations/schedule, when you need this view in the field. See Mobile and narrow layouts for the full operations-only phone experience.
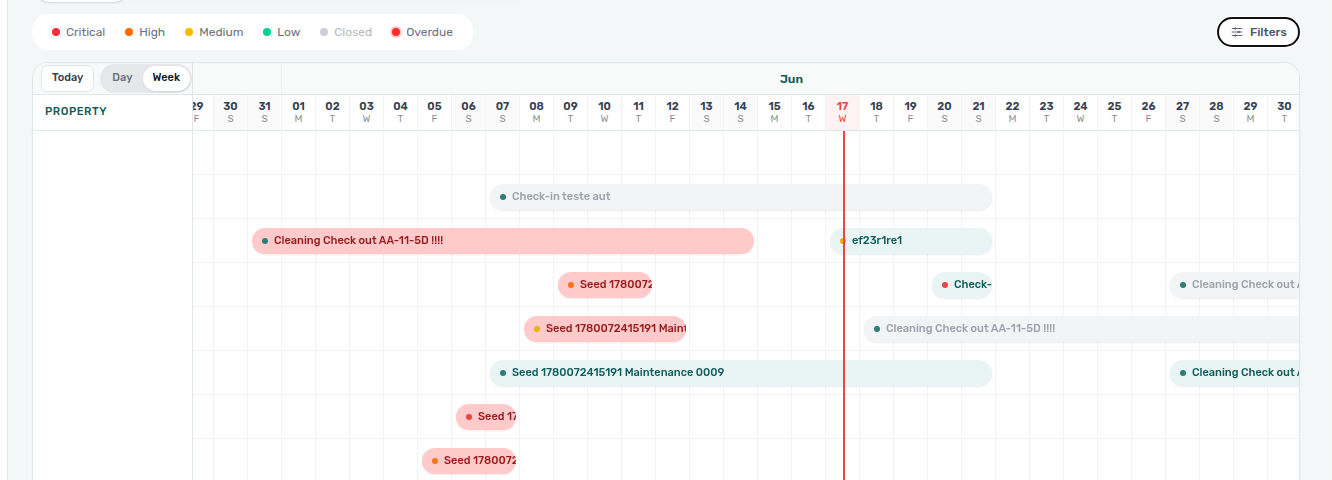
The capture above uses Week mode at desktop width (~1536px): each horizontal bar is a ticket on the property row, coloured by priority (see the legend). Use Today to centre the grid on the current date, then switch to Day when you need wider columns for overlapping bars on the same property row.
Schedule Week + Day captures re-verified 2026-06-17 07:12 UTC (VIVIN_DOCS_BASE_URL=http://localhost:5173 VIVIN_DOCS_RECORD_API=$VITE_API_BASE_URL VIVIN_DOCS_PROPERTY_SEARCH=AA-11-5D npx tsx tools/capture-operations-schedule-screenshots.ts). Capture script scopes Day / Week to the Schedule grid (not other Operations zoom pills) and includes the legend + ticket bars. Property scope is narrowed to example building AA-11-5D via Filters so the grid stays publication-clean.
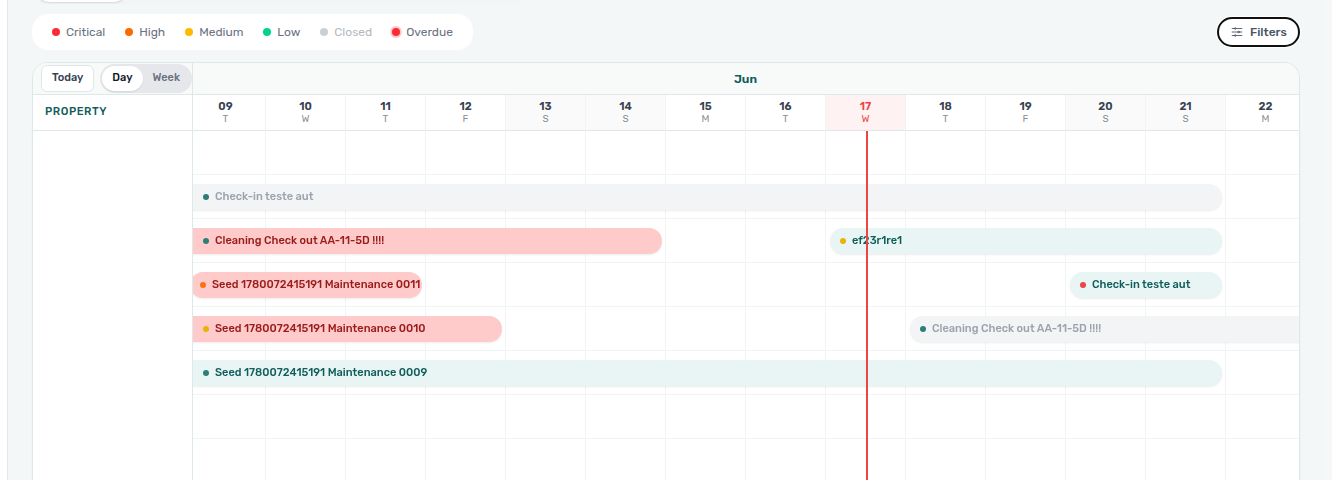
Day mode (~80px per column) makes due dates and overlapping bars easier to read on one property row. Combine Filters → Property with Day when a large portfolio would otherwise show clone or test rows you do not want in screenshots or planning handoffs.
Tickets Tab
Tickets pairs with Bookings — Tickets tab for booking-linked work and Settings > Categories — Tickets for taxonomy — see Glossary — Draft ticket (display status). Full pairing matrix: Operations section cross-reference.
The Tickets tab is a full maintenance management system. You can create, assign, and track tasks for any operational need: cleaning, repairs, inspections, tenant requests, and more.
Understanding the Ticket List
Each ticket in the list shows:
- Title and description of the task
- Property and unit it relates to
- Priority (Low, Medium, High, Critical)
- Category (e.g., Cleaning - Check-in, Plumbing, Electrical)
- Assigned team member
- Status (Unassigned, Open, In Progress, Completed, Cancelled, Duplicate — plus Draft in the list UI; see below)
- Due date and optional Schedule date (when the work is planned to start)
In product data and API payloads, Completed is stored as closed.
Draft status (far-future schedule dates)
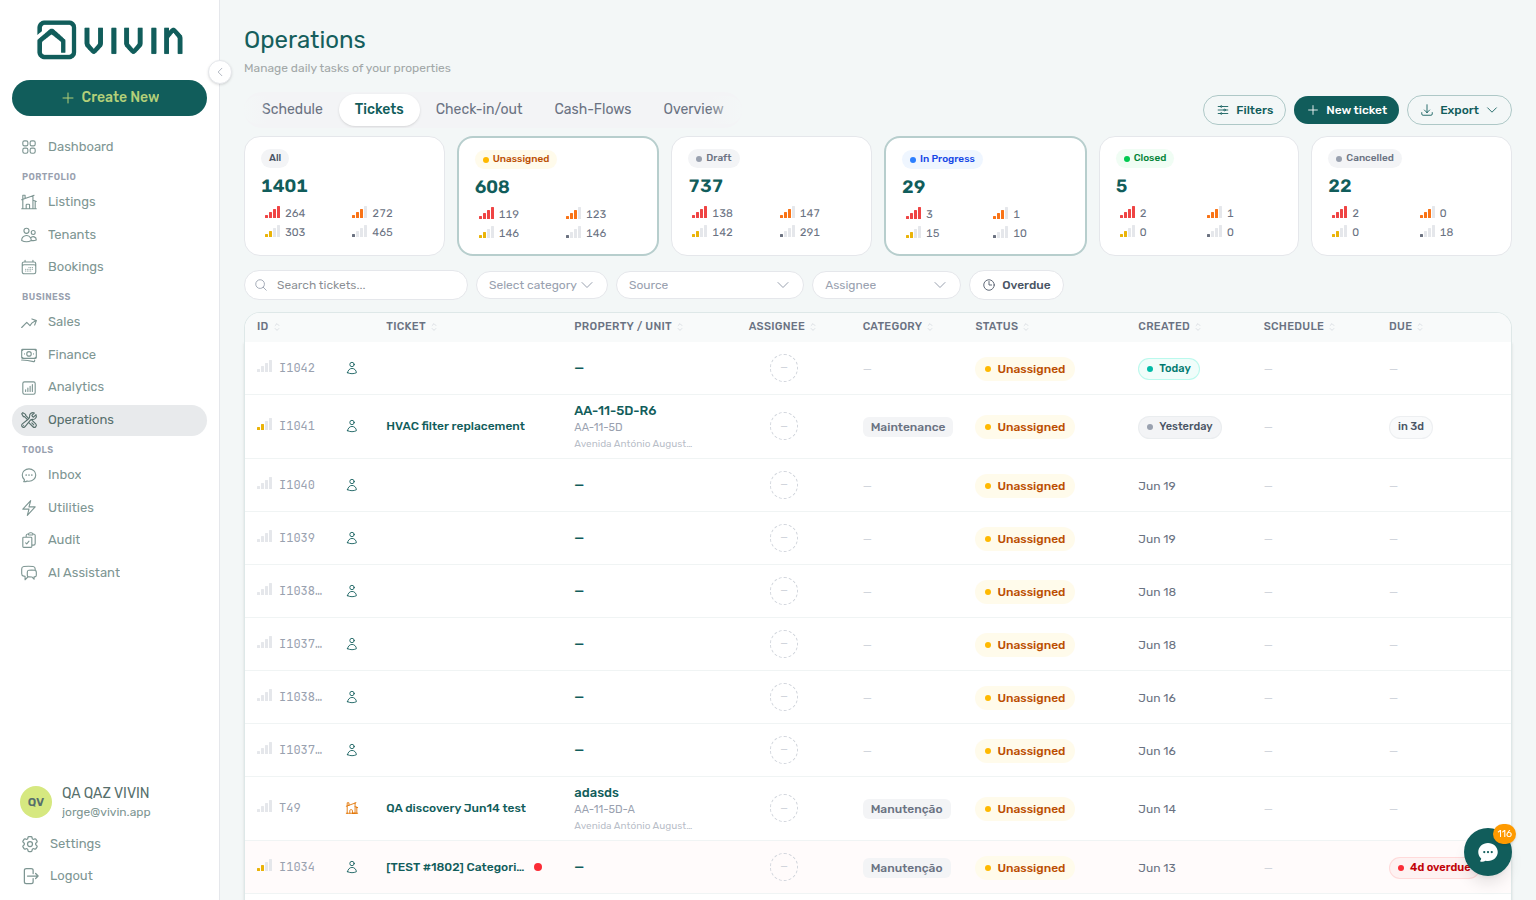
The Tickets tab can show a Draft badge on rows that are still Unassigned or In progress in the database but have a Schedule date more than 30 days in the future. This is a display-only label so long-lead work (for example seasonal deep cleans or move-in prep booked months ahead) does not look like an open operational queue item before it is actionable.
| What you see | What it means |
|---|---|
| Draft badge on the row | Schedule date is 30+ days ahead; hover the badge for Scheduled 30+ days ahead — shown as Draft. Will become active as the date approaches. |
| Draft summary card / status pill | Count of tickets in that far-future bucket; card title explains they are not yet actionable |
| Underlying status in the sidebar | Still the saved workflow value (Unassigned or In progress) until you change it — Draft is not a separate API status you assign manually |
| Status filters and KPI cards | The Draft, Unassigned, In progress, and related summary pills filter and count tickets by this display status, not the raw database value alone — a ticket saved as Unassigned with a schedule date 30+ days ahead appears only under Draft, not Unassigned, until the date moves inside the window |
![]()
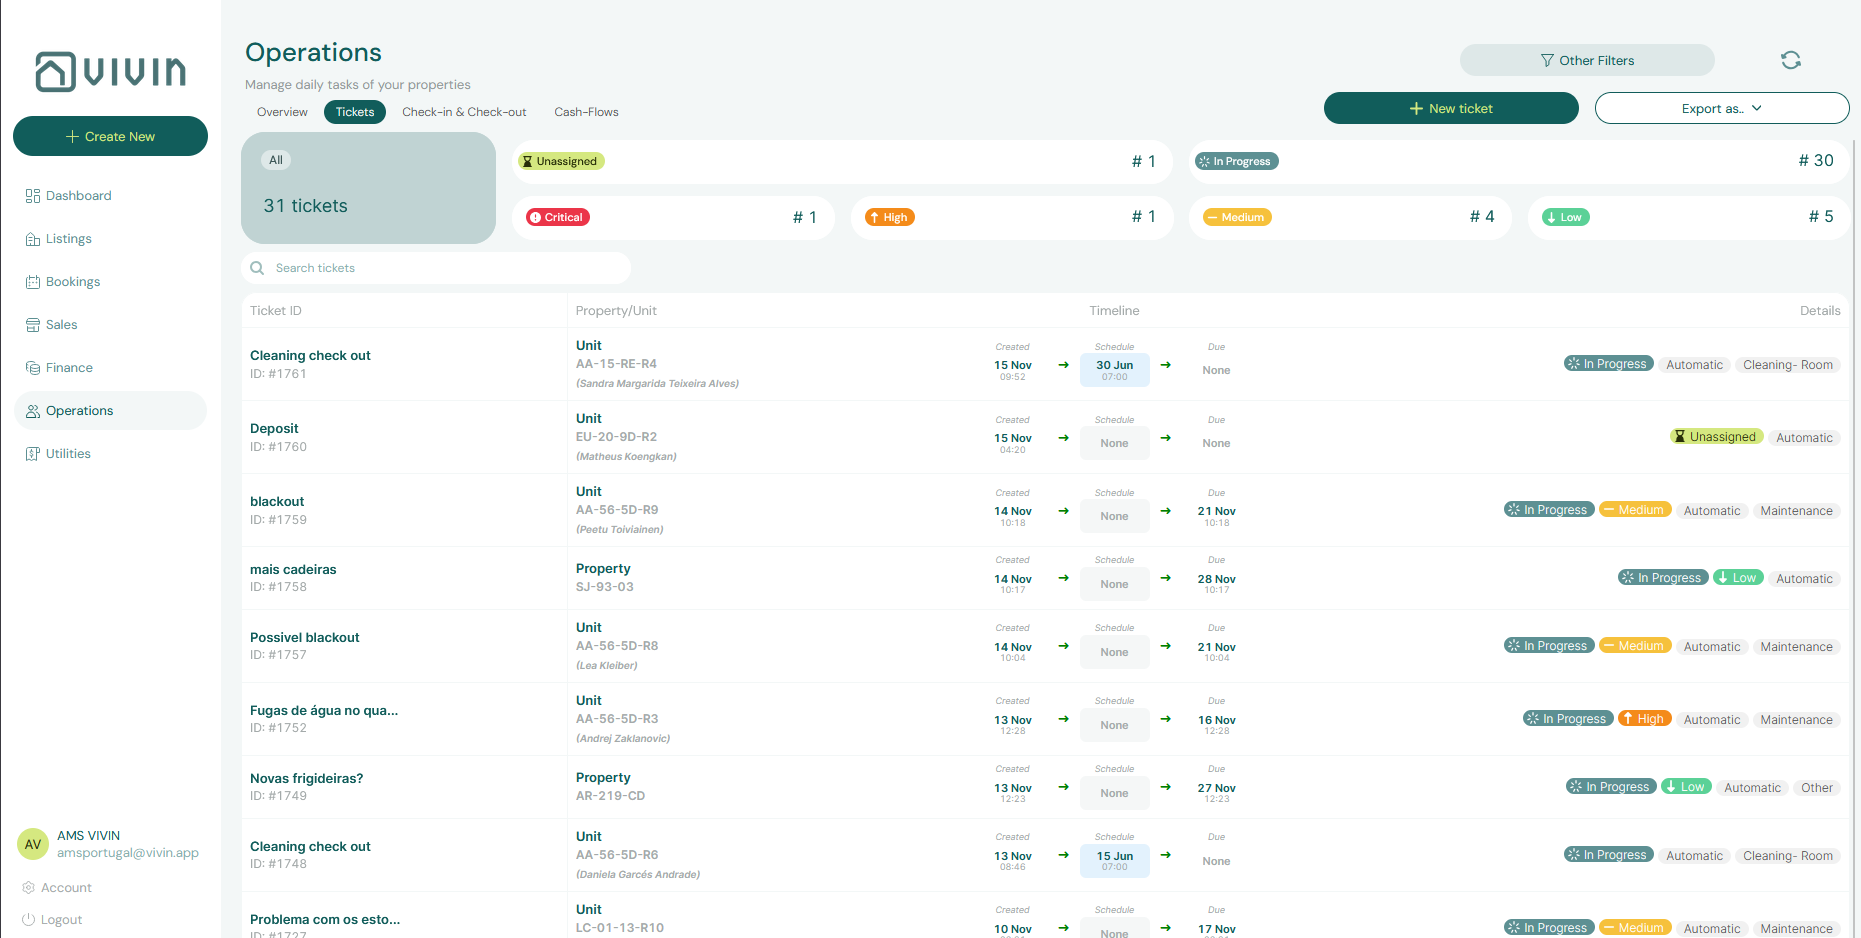
The capture shows the Draft KPI card (count of tickets with a Schedule date 30+ days ahead) in the same status strip as All, Unassigned, and In progress. Click the card to filter the table to that bucket; individual rows still show a Draft badge in the Status column when the schedule date qualifies, even though the saved workflow status remains Unassigned or In progress.
As the schedule date moves inside the 30-day window, the row returns to showing the real status (Unassigned, In progress, and so on). Use Schedule date when creating or editing a ticket if you want this behaviour; tickets without a schedule date are never shown as Draft.
You can filter the ticket list from the main toolbar (property, status, assignee, priority, category, and search) to focus on what matters most to your team right now — include the Draft status pill when you want to review only far-future scheduled work. Status pills and the KPI strip share one display-status rule on the server (long-scheduled Unassigned / In progress rows bucket as Draft), so the row count on a pill always matches the tickets you see after the list reloads — you do not need a second client-side filter to reconcile badges with the table.
Draft filter walkthrough recorded 2026-06-20 14:08 UTC (VIVIN_DOCS_BASE_URL=http://localhost:5173 VIVIN_DOCS_RECORD_API=$VITE_API_BASE_URL npx tsx tools/record-operations-ticket-draft-filter-mp4.ts). See also Glossary — Draft ticket (display status).
Tickets toolbar search
The debounced Search box on Operations → Tickets is sent to GET /maintenance/page (same filter set as Export and the status summary cards). Matches are case-insensitive substrings on:
| Field | Examples |
|---|---|
| Ticket ID | Sequential id shown on the row (for example S259, T27) — added in #2074 |
| Title | Subject line you typed when creating the ticket |
| Description | Body text in the ticket sidebar |
| Category | Maintenance category value (for example cleaning_check_in) |
| Property internal name | Building label on the ticket row |
| Unit internal name | Listing label on the ticket row (for example AA-11-5D-R2) |
| Listing room number | Room number stored on the ticket’s listing snapshot |
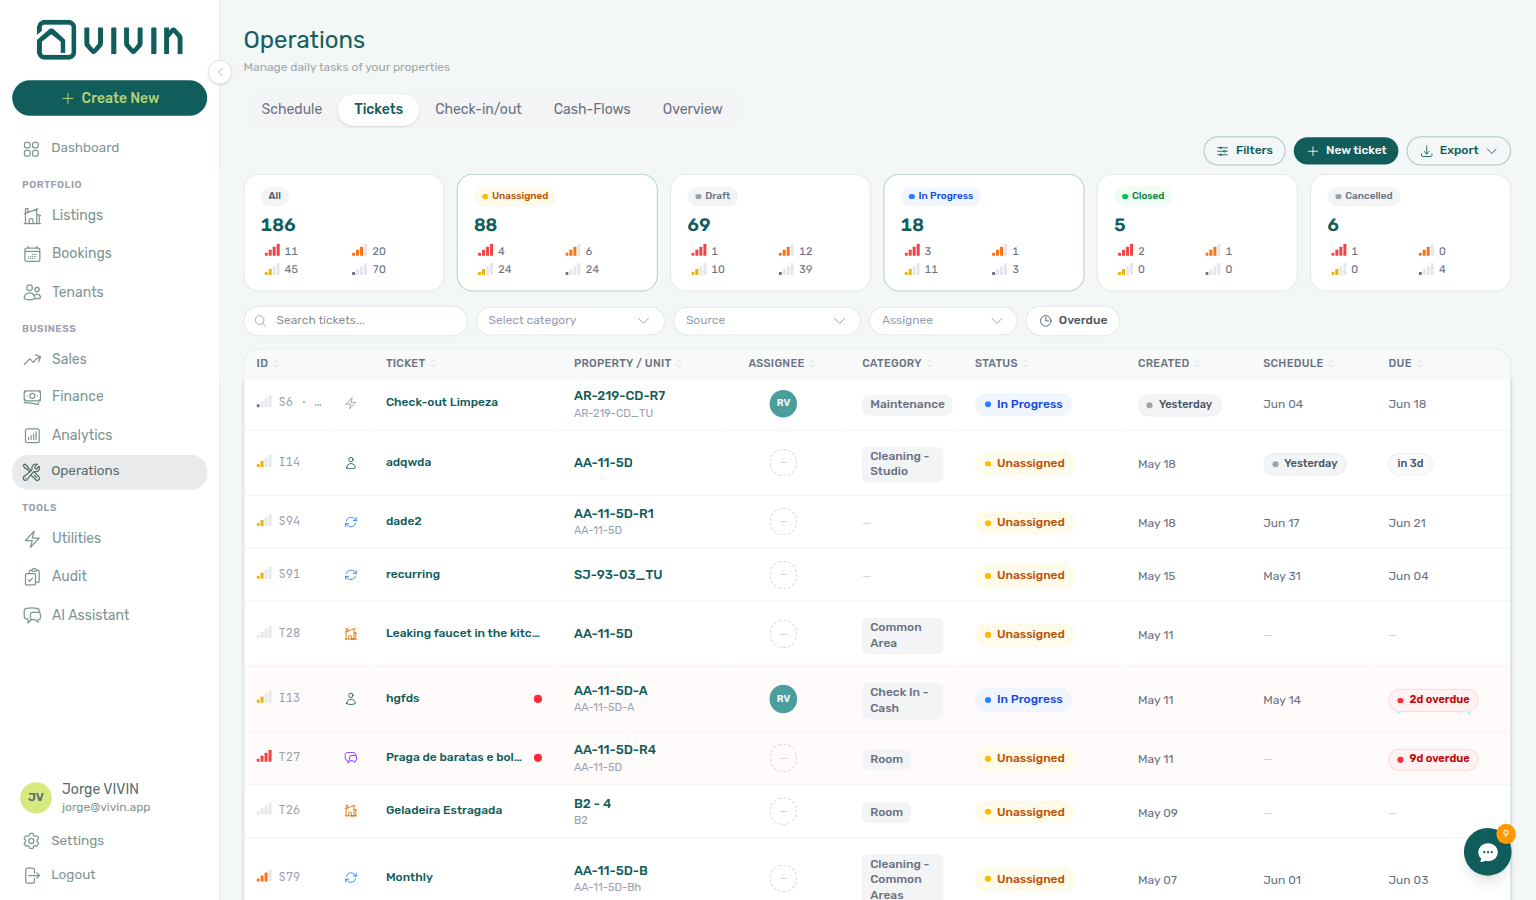
When several fields match, unit / room hits and property internal name hits share the top relevance tier (#2089) — paste a unit code to surface room-scoped work first, or paste the building code when the task applies to shared space. Matches on title, description, or category alone rank below those unit/property hits. Property-level tickets (for example common area categories with no unit on the row) still match Property internal name and are no longer buried after every unit ticket on the first page. With an active Property filter chip and the default column sort, building-scoped rows (listingId null) float to the top of that property’s slice; choosing an explicit column sort (for example Title) orders purely by that column instead. On the row, property-level work shows the building internal name only in the location column (no -R / room suffix); unit-scoped tickets show a listing code such as AA-11-5D-R39 before the property name. Paste the full ticket ID (prefix + number, for example S259) when support or email references #S259 — partial numeric-only queries can match unrelated rows.
![]()
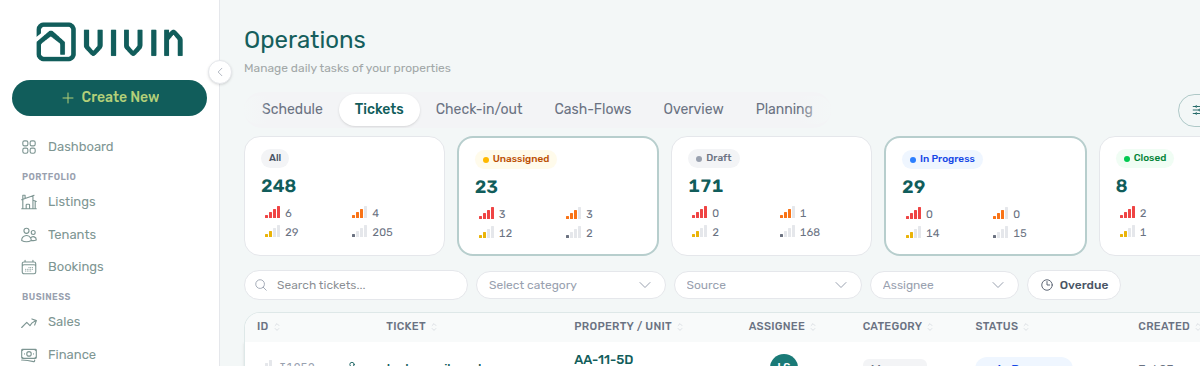
Ticket ID search capture added 2026-07-07 20:07 UTC (VIVIN_DOCS_BASE_URL=http://localhost:5173 VIVIN_DOCS_RECORD_API=$VITE_API_BASE_URL VIVIN_DOCS_TICKET_ID=S259 npx tsx tools/capture-operations-tickets-search-id-screenshot.ts). Property-level row capture added 2026-07-08 16:10 UTC (VIVIN_DOCS_BASE_URL=http://localhost:5173 VIVIN_DOCS_RECORD_API=$VITE_API_BASE_URL VIVIN_DOCS_PROPERTY_SEARCH=AA-11-5D npx tsx tools/capture-operations-tickets-search-property-level-screenshot.ts). See FAQ — Find a ticket by its ID and Glossary — Directory search ranking.
Tenant note and Resolution description are not in the server search index — narrow with Property filters, paste the ticket ID, or scan title / description instead.
Open Filters in the Operations tab bar to use the Other filters drawer for finer control on the Tickets tab (property scope is shared with other Operations tabs — see Overview):
- Property (multi-select) — add buildings one at a time; clear individual selections from the dropdown or use Clear all filters at the bottom of the drawer. The property list uses natural numeric sort on internal names (for example Room 2 before Room 10). Selected buildings appear as removable chips inside the Other filters drawer (desktop) and on the Tickets toolbar (mobile).
Property filter chip capture refreshed 2026-06-11 12:06 UTC (VIVIN_DOCS_RECORD_API=$VITE_API_BASE_URL npx tsx tools/capture-operations-tickets-property-filter-chips.ts).
- Optional created date range (From / To) in the Property & date block
- Source — for example all tenant-originated channels, Tenant Portal, Chatbot, Property manager, or tickets created by automatic check-in/out or automatic recurring rules
- Category (from your account’s ticket categories in Settings) and Responsible (assignee)
- Overdue only — show tickets whose due date is before today
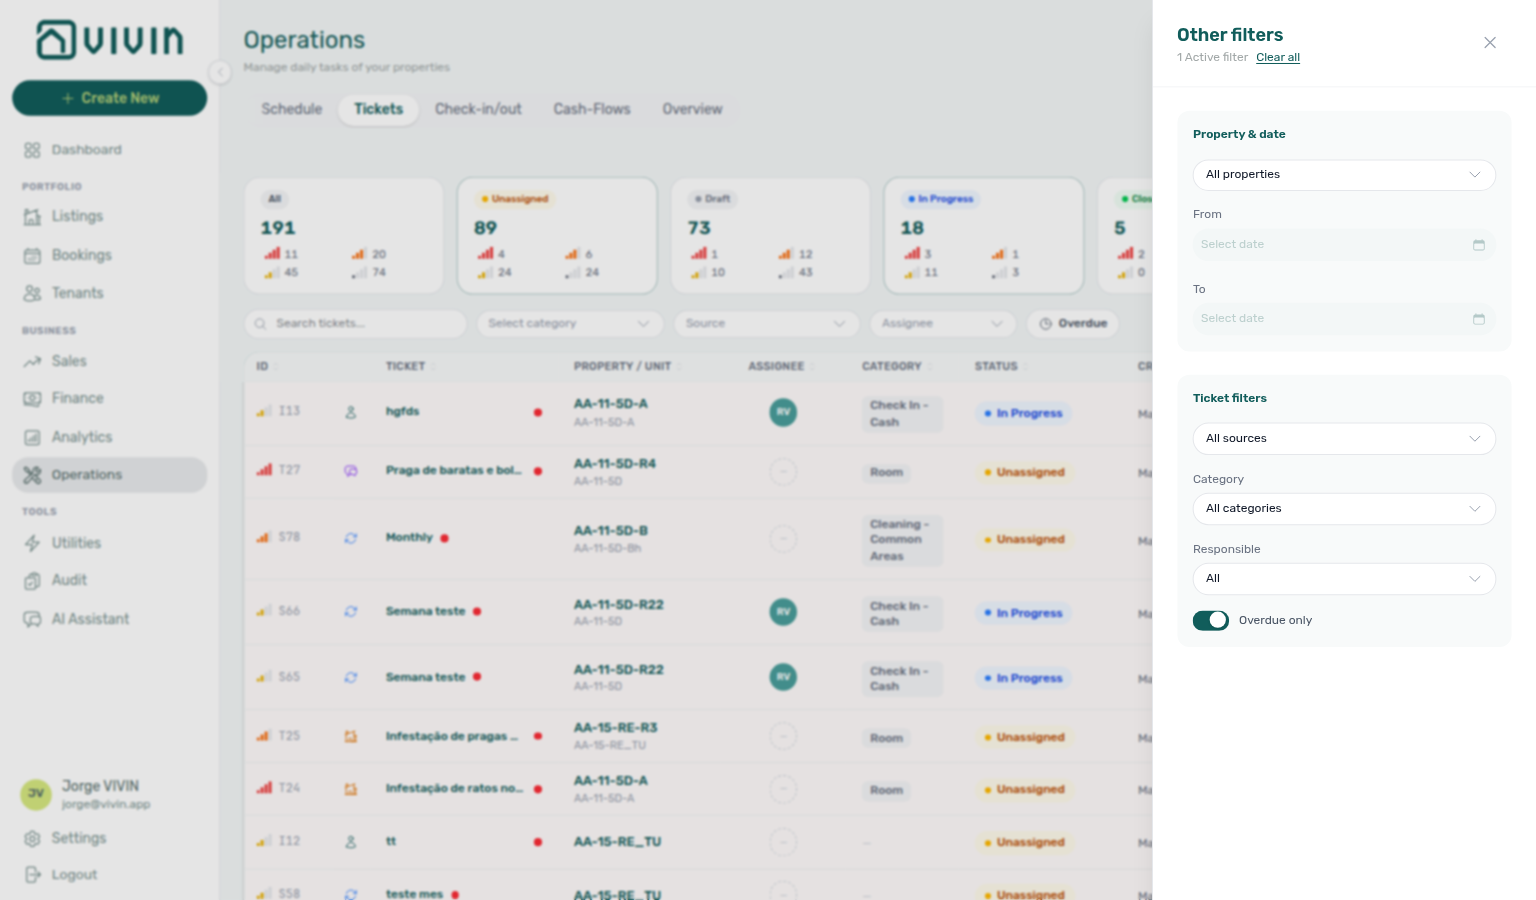
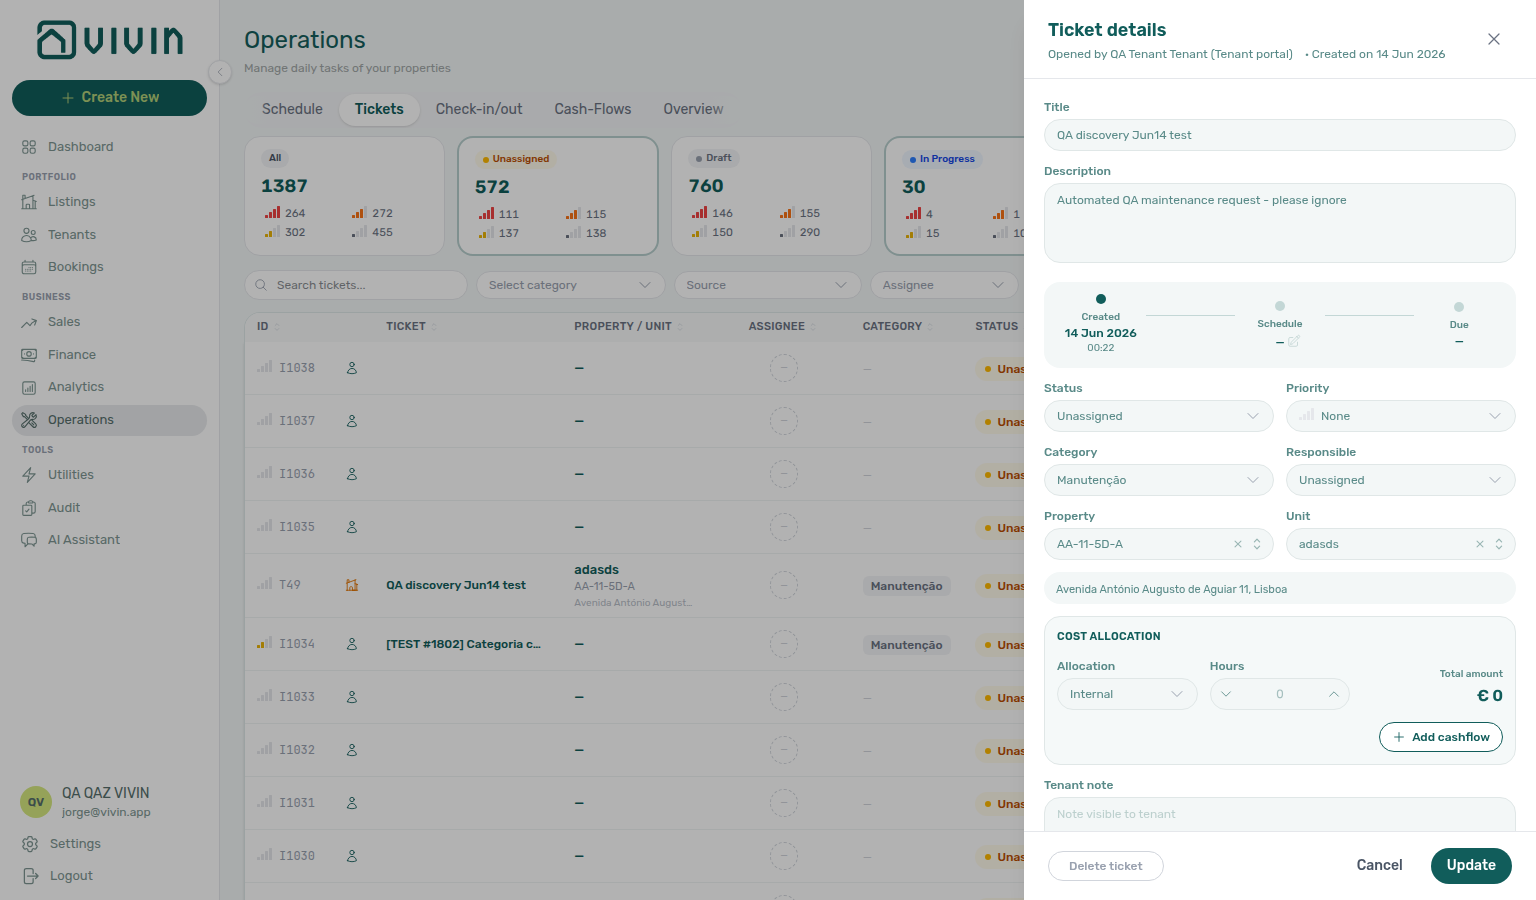
The capture shows the drawer title Other filters, the Property & date block, and the Ticket filters section including Overdue only (with the toolbar Overdue chip active on the list behind the drawer).
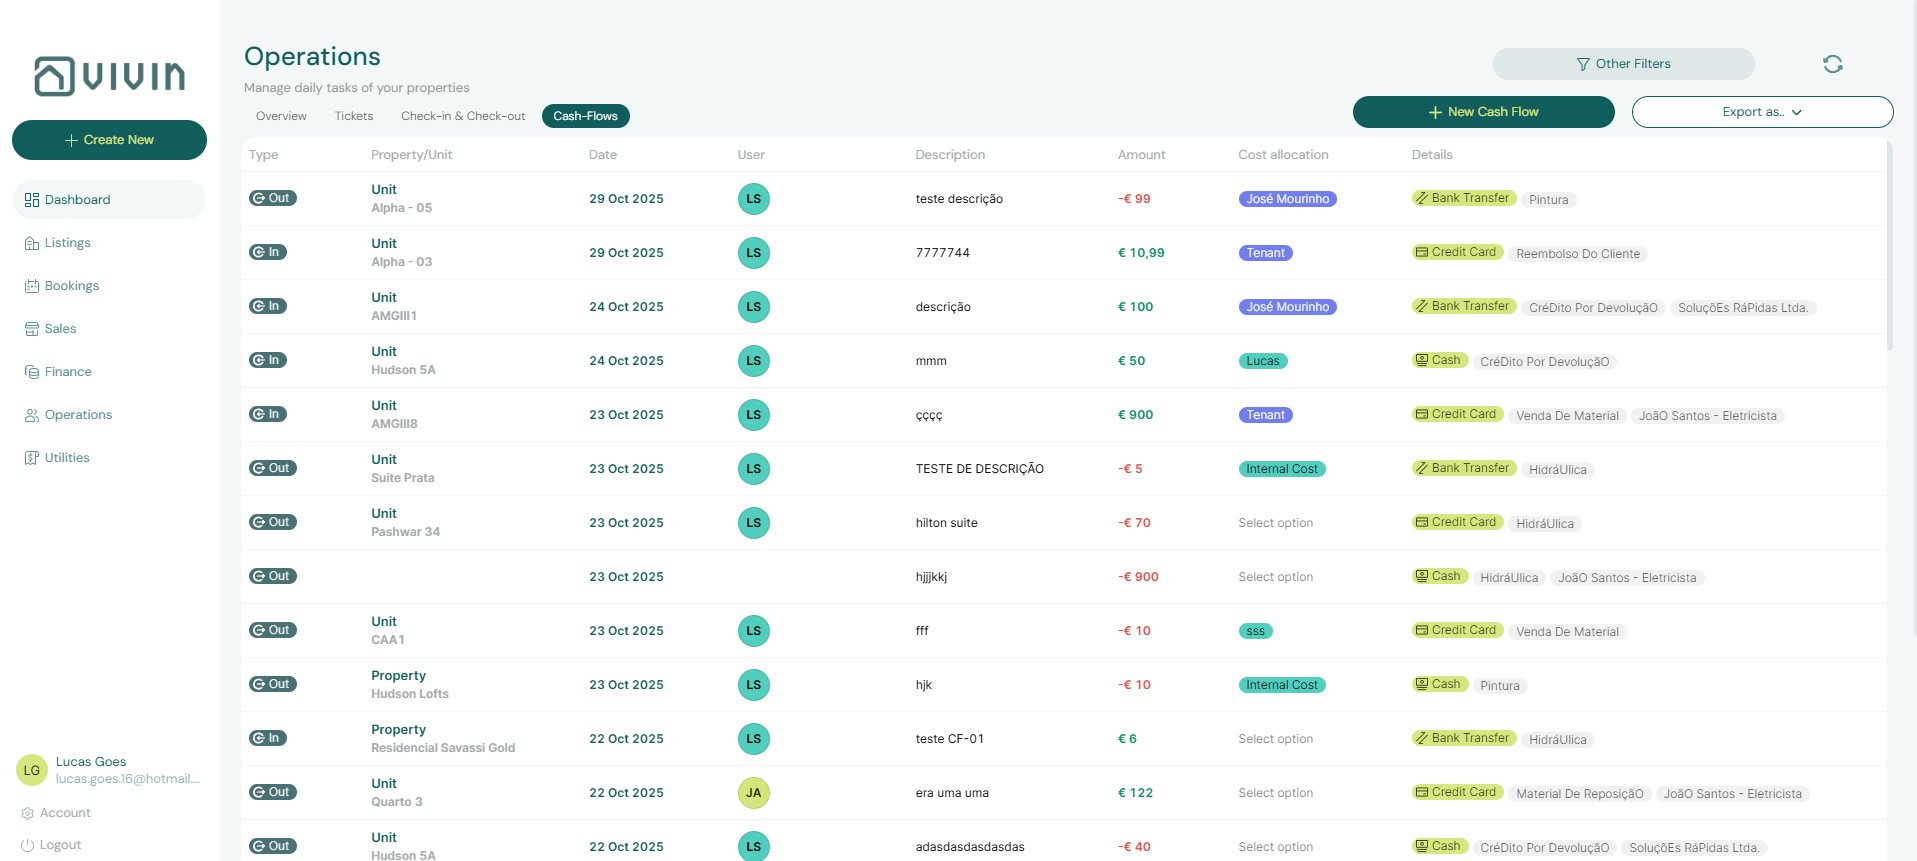
Tickets list overview re-captured 2026-06-21 21:12 UTC (VIVIN_DOCS_BASE_URL=http://localhost:5173 VIVIN_DOCS_RECORD_API=$VITE_API_BASE_URL npx tsx tools/capture-operations-tickets-list-screenshot.ts).
Due dates in the list use human-friendly labels where it helps — for example Today, Tomorrow, Yesterday, or an overdue count — so the queue is easy to scan without reading raw dates.
Tickets list loading (infinite scroll)
The ticket table is server-paged like Listings and Bookings: the first request loads about 10 rows, and scrolling near the bottom fetches the next batch (about 5 rows per request). A small loading line appears under the table while the next page is in flight.
| Behaviour | Detail |
|---|---|
| Filters and search | Toolbar pills, Other filters, and debounced Search are sent to the server on every change — the list resets from the first batch when you adjust them. |
| Sort | Column sort (for example Due, Created) is also server-side; changing sort reloads from the top. |
| Status summary cards | The All, Unassigned, Draft, In progress, and related KPI pills at the top use server-side counts for the current filter set — they stay accurate even when you have not scrolled through every loaded page yet. |
| Export | CSV / Excel downloads the full filtered ticket set from the server — not only the rows already scrolled into the on-screen list (see the export note below). |
Load failures — When the first tickets request fails, the tab shows the module-level directory load failure card instead of an empty table. See Glossary — Directory list load failures.
Users without See all maintenances still see only tickets assigned to them; the same infinite-scroll rules apply to that scoped list.
Use Export on the Tickets toolbar to download whatever matches your current filters, search, and sort — not only the tickets visible in the first on-screen page.
Open Export, then choose CSV or Excel (.xlsx). Vivin loads the full filtered ticket set from the server when you start the download (including closed and cancelled tickets that match the filter), then builds the file once that data is ready. On large accounts you may see a brief Exporting… state on the button while the export fetch runs; the on-screen list itself stays paginated for everyday browsing. Downloads use a dated filename: vivin-tickets-YYYY-MM-DD.csv or vivin-tickets-YYYY-MM-DD.xlsx. If nothing matches the current filters, the app shows a no data warning instead of an empty file.
Each row includes the main ticket fields (for example ID, title, description, status, priority, property, unit, category, assignee, due date, schedule date, tenant note, resolution description, overdue yes/no, created, and closed timestamps — with column labels following your interface language.
Creating a Ticket
Click + New ticket to open the ticket creation modal.
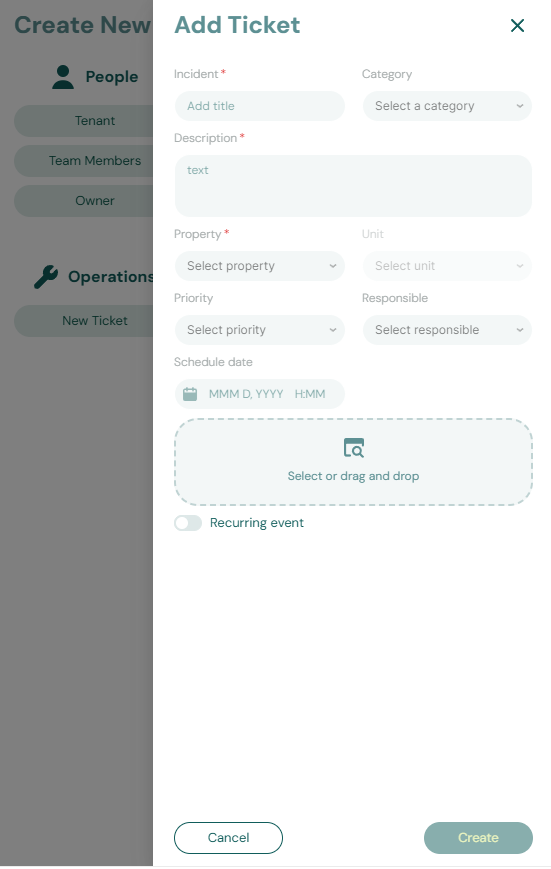
Fill in the following fields:
- Title — a short, descriptive name for the task
- Property and Unit — where the task needs to be done. Both pickers are server-paged: open Property to search and scroll for buildings (large portfolios load in batches instead of one dropdown dump). After you choose a property, Unit lists only that property’s listings with the same search-and-scroll pattern. Common area ticket categories hide Unit because the task applies to shared space, not a single listing.
- Category — the type of task (configured in Settings > Categories > Tickets)
- Priority — Low, Medium, High, or Critical
- Assigned To — the team member responsible
- Due Date — when the task must be completed
- Description — detailed instructions or notes for the assignee
Click Submit to create the ticket. The assigned team member will receive a notification.
Ticket details sidebar
Click any row in the Tickets table (or a bar on the Schedule timeline) to open the Ticket details panel on the right. This is where operators edit the live ticket — distinct from Vivin support tickets under Account Settings.
The sidebar typically includes:
- Header — title, source (tenant portal, chatbot, property manager, automatic check-in/out, and similar), and created / closed timestamps
- Inline fields — status, priority, category, assignee, property and unit, due date, schedule date, and description
- Cost allocation — split repair or service cost across Owner, Tenant, and Internal buckets, link operational cash flows, and review totals before you save (see Linking cash flows to a ticket below)
- Tenant note — optional free-text note visible to the tenant when the ticket originated from or is shared with the tenant portal (placeholder: Note visible to tenant). Use it for instructions or status the tenant should read on the portal.
- Resolution description — optional internal-only note for how the issue was resolved (placeholder: Internal note — not visible to tenant). Record vendor names, root cause, or handover context for your team without exposing it on the tenant-facing side. Not included in the Tickets toolbar search index.
Tenant note is the only free-text field on the ticket that tenants may see when the ticket is shared with the portal. Resolution description never appears on the tenant side — use it for internal handover, vendor references, or root-cause notes your team needs after close.
- Files — attach photos or documents; use Add file for evidence
- Timeline — chronological audit trail for this ticket (newest first). Each row is a plain-language line from the ticket’s change log (for example Ticket created by …, status or priority updates, assignee changes, and comment-related events) with a locale-formatted timestamp. The Tickets list API omits these entries for performance — open the ticket sidebar (or refresh after an edit) so the detail request loads
entityChangeLogEntries. When nothing is logged yet, the panel shows No activity recorded yet.
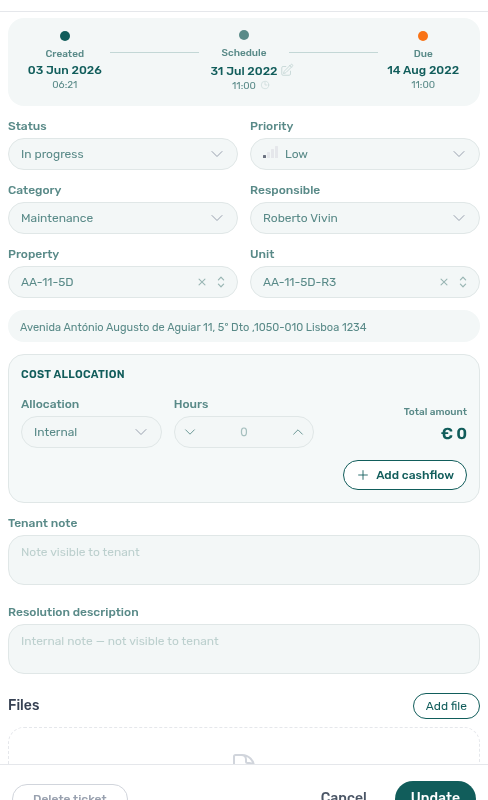
The capture shows a ticket with multiple logged events (creation, status or assignee updates, and related workflow lines). Scroll the sidebar to Timeline after opening a row — it sits below Files and above the sticky Update control. When a ticket has no change-log rows yet, the panel shows No activity recorded yet. instead of an empty list.
Capture refreshed 2026-06-11 17:11 UTC (VIVIN_DOCS_BASE_URL=http://localhost:5173 VIVIN_DOCS_RECORD_API=$VITE_API_BASE_URL npx tsx tools/capture-operations-ticket-timeline-screenshot.ts).
Unit search capture refreshed 2026-06-13 18:25 UTC (VIVIN_DOCS_BASE_URL=http://localhost:5173 VIVIN_DOCS_RECORD_API=$VITE_API_BASE_URL VIVIN_DOCS_UNIT_SEARCH=AA-11-5D-R6 npx tsx tools/capture-operations-tickets-search-unit-rank-screenshot.ts). See Glossary — Directory search ranking.
Linking cash flows to a ticket
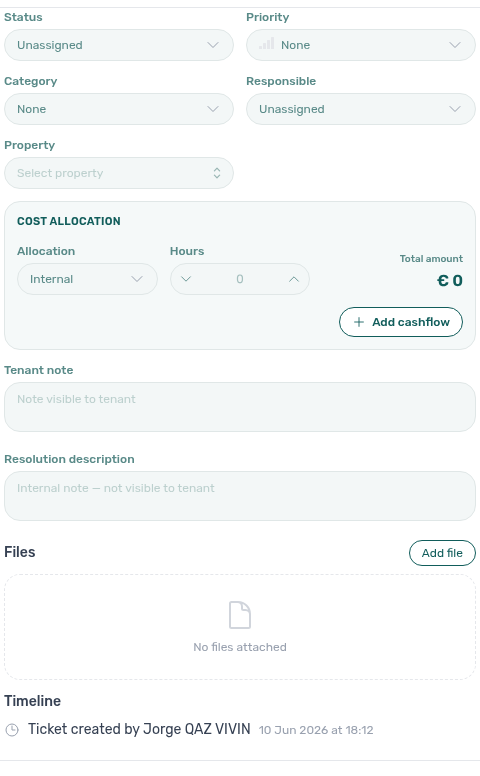
The Cost allocation panel in the ticket sidebar connects maintenance work to the Cash Flows ledger:
| Control | Purpose |
|---|---|
| Allocation | Dropdown — classify who bears the cost (Owner, Tenant, Internal, and other values configured for your account). |
| Hours | Optional labour hours (stepper + free-text field) for time-based jobs. |
| Total amount | € headline on the right — when one or more cash flows are linked, this is the signed net of those rows (inflows add, outflows subtract). When nothing is linked yet, the figure follows the ticket’s stored total. |
| + Add cash flow | Opens Add cash flow with this ticket pre-selected (maintenanceRequestId filled). Save the new expense from the modal; it appears in the linked list and on the Cash Flows tab. |
| Linked rows | Each linked entry shows category (amber chip), date, and amount (green for inflow, red for outflow). Click a row (or press Enter / Space when focused) to open the same Cash flow detail sidebar used on the Cash Flows tab — preview attachments, edit fields, or review payment method without leaving the ticket. |
| Info icon on a row | Hover or focus the i control for a tooltip with type, payment method, supplier, description, and attachment count. |
Linked cash flows persist on the ticket record. The Tickets list API may omit full cashflows arrays for performance — opening the ticket sidebar (or refreshing after you add a link) loads the complete set from GET /maintenance/:id.
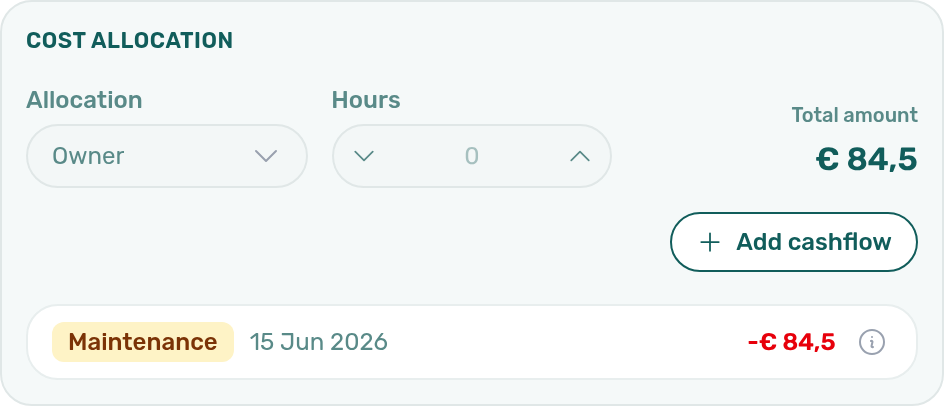
Linked cash flow capture refreshed 2026-06-20 13:06 UTC (VIVIN_DOCS_BASE_URL=http://localhost:5173 VIVIN_DOCS_RECORD_API=$VITE_API_BASE_URL npx tsx tools/capture-operations-ticket-cashflow-linking-screenshot.ts — docs account ticket HVAC filter replacement on AA-11-5D-R6 with supplier outflow €84.50).
Use the sticky Update control at the bottom to persist edits. Closing the panel returns you to the list without leaving the Operations module.
Ticket detail sidebar overview refreshed 2026-06-17 05:10 UTC (capture-docs-enrichment-media.ts). Tenant note / Resolution description captures remain from 2026-06-12 10:15 UTC (capture-operations-ticket-notes-screenshot.ts).

Managing Ticket Priority
Priority levels have configurable default deadlines set in Settings > Preferences > Tickets Priorities. For example, Critical tickets might have a 1-day deadline while Low tickets might have 7 days. The system uses these defaults when you create a ticket, but you can always set a custom due date.
Cost Tracking
Each ticket supports cost tracking from report to resolution:
- Record the cost of repairs or services directly on the ticket.
- Attach photo evidence and notes for full context.
- Track the workflow status from initial report through to completion.
- View cost history per property or vendor for budget planning.
Tickets without an assignee appear in the Unassigned tab on the Dashboard. Managers should review unassigned tickets daily and delegate them promptly.
Automatic Ticket Creation
You can configure the system to automatically create tickets when check-ins or check-outs occur for a property. This is set up in the Maintenances Tab of the Property edit view (see Maintenances Tab).
For example, you might configure an automatic "Pre-arrival Cleaning" ticket to be created 2 days before every check-in, assigned to your cleaning team with High priority.
On Add booking, operators can skip automatic CI/CO tickets for one reservation without changing the property rule — turn off Use unit contract rents and other contract details on the rent step, then uncheck Create check-in ticket and/or Create check-out ticket. See Glossary — Per-booking maintenance ticket opt-out and Bookings — Creating a New Booking.
Check-in & Check-out Tab
Turnover rows pair with Managing a Check-in / Managing a Check-out; clear payment overdue before key handover — scope by Bookings — Other filters tenant category or Tenants — Tenant category filter. Full pairing matrix: Operations section cross-reference.
The Check-in & Check-out tab provides a chronological list of tenant arrivals and departures across your portfolio, grouped by event date. Use the Check-ins / Check-outs pills at the top of the list to show only arrivals or only departures (counts on each pill reflect your current search, responsible filter, and date quick filter). Each row shows tenant, property/unit, scheduled date and time, responsible assignee, guest count, turnaround gap (when a same-unit check-out precedes a check-in), and whether a check-in/out email was sent.
Before you hand over keys or release a deposit, confirm unpaid move-in or departure-week charges are not still open — payment overdue rows on /notifications row-click into the related booking; continue with Handling a Late Payment — Step 1 or open Bookings → Payment Plan from the row. When the blocker is a security deposit shortfall (Partial Paid on depositStatus), also triage on Finance → Deposits — see Glossary — Deposit lifecycle status.
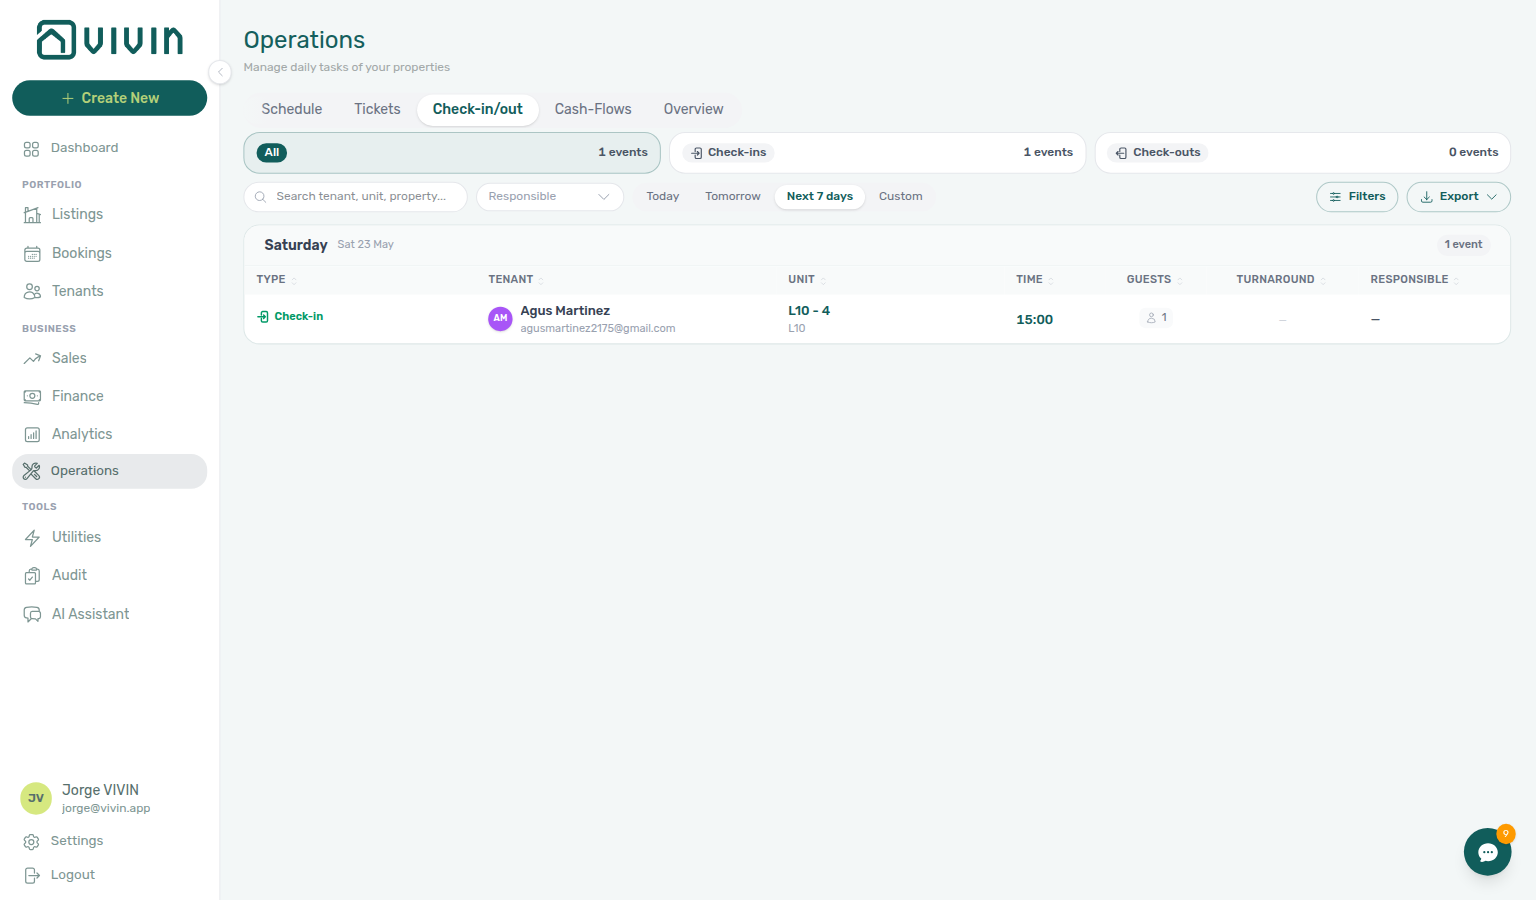
Check-ins only — weekly arrival planning with Next 7 days (same framing as Managing a Check-in):
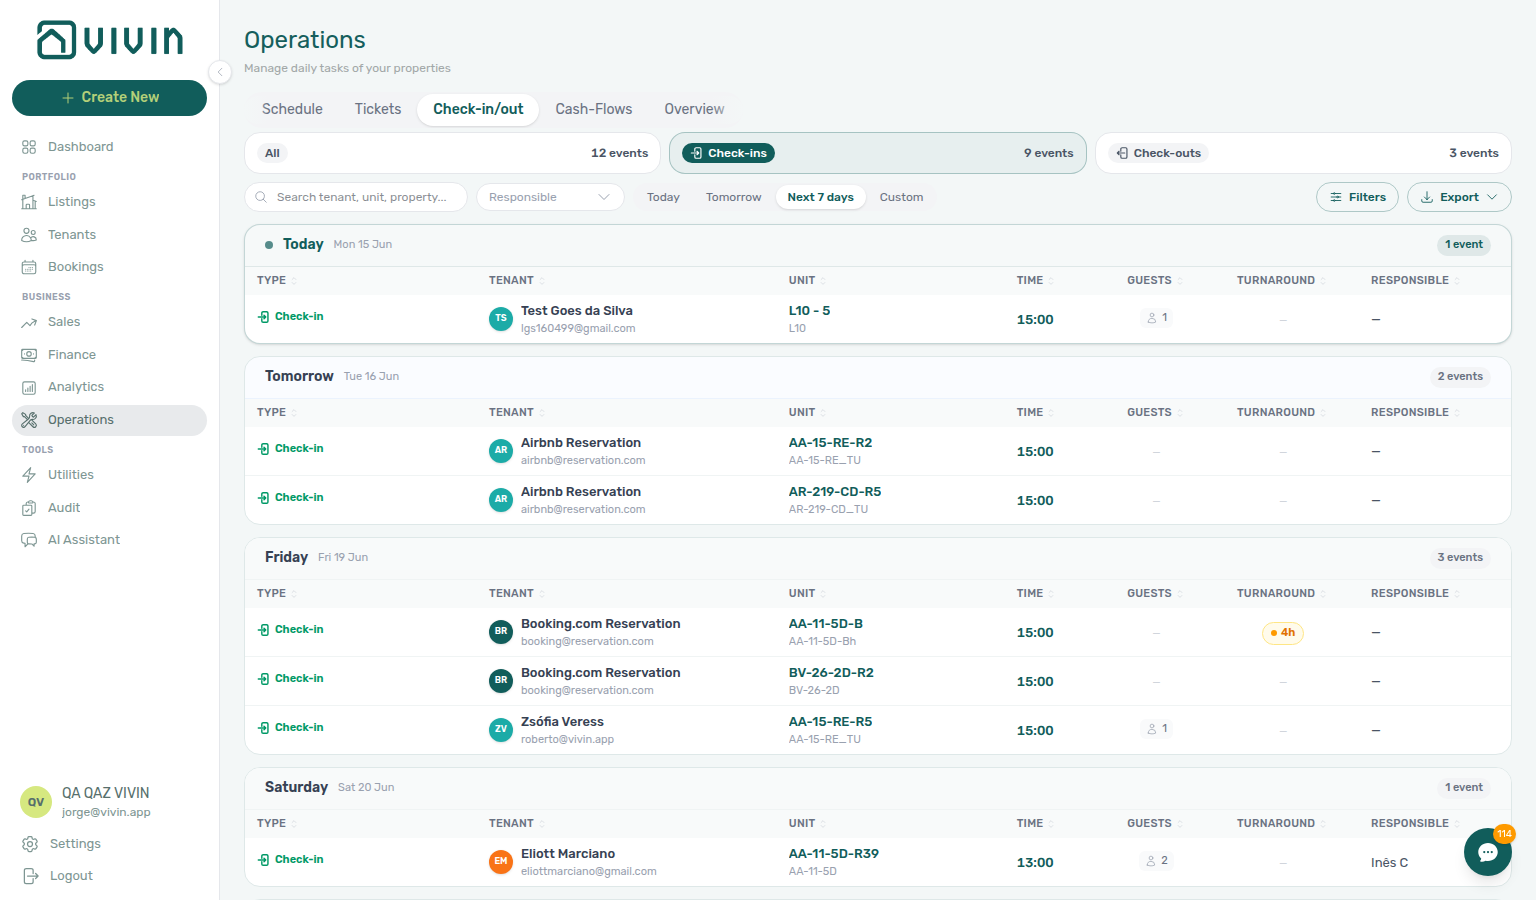
If Check-ins + Next 7 days shows no rows, widen the horizon with Custom (for example the next 14 or 30 days) or switch to Check-outs to review departures in the same window.
Check-in/out planning captures re-verified 2026-06-15 03:09 UTC (VIVIN_DOCS_BASE_URL=http://localhost:5173 VIVIN_DOCS_RECORD_API=$VITE_API_BASE_URL npx tsx tools/capture-operations-check-in-out-views.ts — Check-ins, Check-outs, and workflow alias PNGs refreshed). Script captures Check-outs first so /app-loader/operations/check-in-outs hydrates before the Check-ins pill runs.
The alias workflows-operations-check-in-out-planning-view.png is kept for workflow pages that reference the same framing.
Check-outs only — departure planning with Check-outs + Next 7 days (same toolbar as check-ins; rows show move-out dates and turnaround context). Use this pill when you are running the Managing a Check-out workflow instead of mixing arrivals and departures in one list.
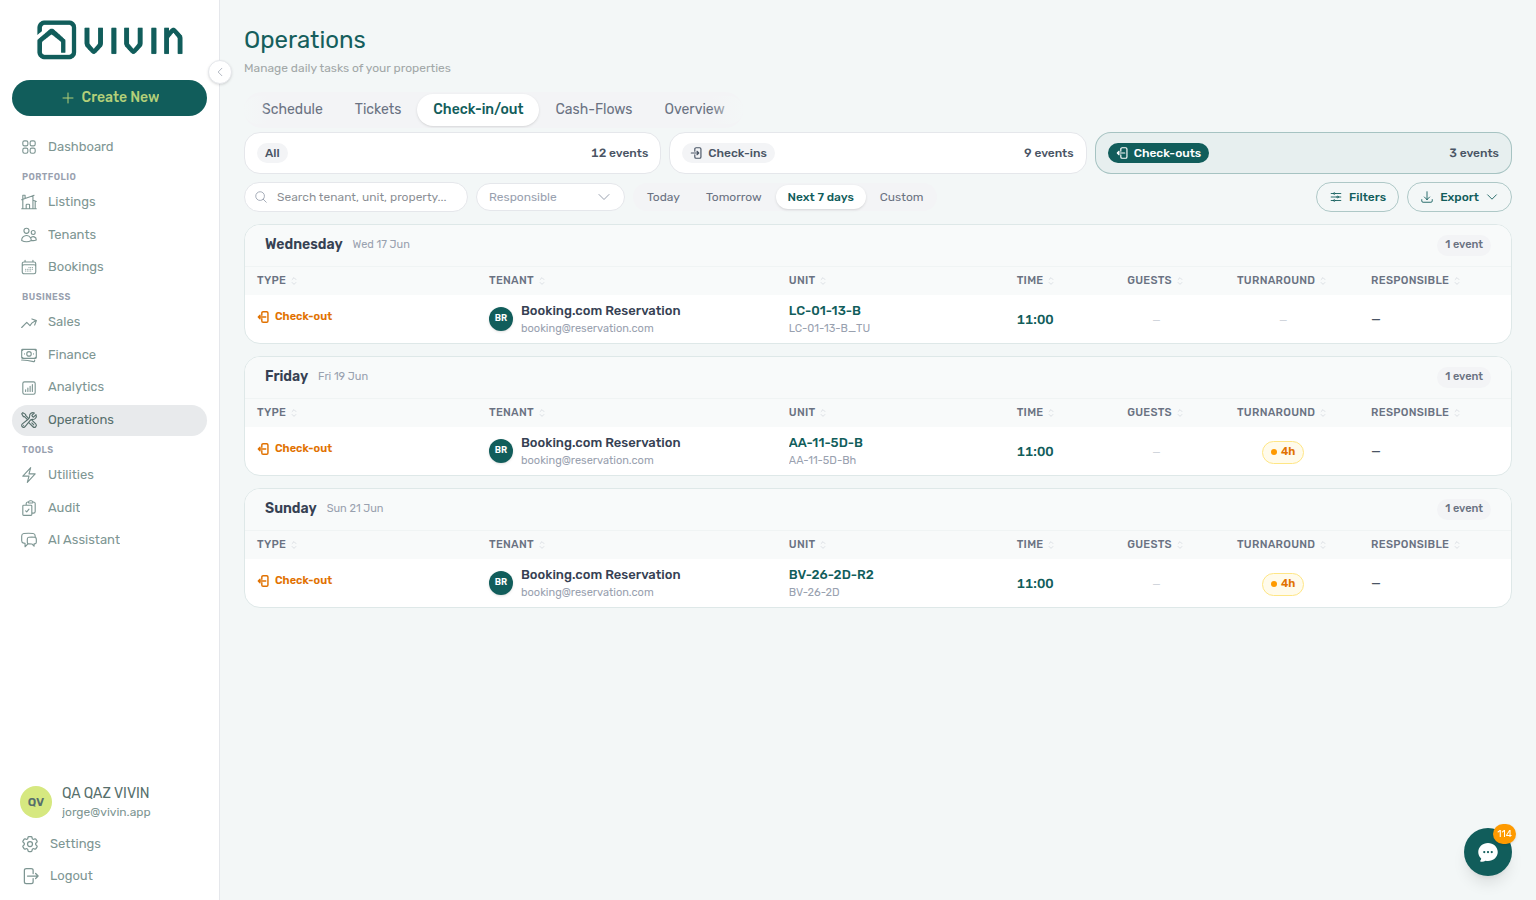
If Check-outs + Next 7 days shows no rows, your portfolio may simply have no departures in that window — widen the horizon with Custom (for example the next 14 or 30 days) or switch back to Check-ins to compare same-day turnovers on shared units. Short-term iCal imports can surface as pseudo Booking.com Reservation (or similar) departure rows even when no mid-term booking check-out exists in the window — see Glossary — Short-term iCal pseudo check-in/out. Export still downloads whatever slice your filters match.
For each event, you can see:
- Tenant name and email
- Property and unit (listing)
- Event type (Check-in or Check-out)
- Scheduled date and time (when recorded on the booking)
- Responsible assignee for the handover
- Turnaround — hours between a prior check-out and the next check-in on the same unit (when applicable)
- Platform — short-term channel when relevant
This view is the primary coordination tool for your operations team. Use it to:
- Plan cleaning schedules — identify which units need preparation before an arrival
- Coordinate key handovers — ensure someone is available to meet each tenant
- Spot back-to-back bookings — units with a check-out and a check-in on the same day require same-day turnover coordination (cleaning, keys, deposit timing on departure); see FAQ — How do I handle same-day turnovers?
Toolbar
| Control | Purpose |
|---|---|
| Search | Matches tenant name, unit (listing) name, tenant email, or property internal name (client-side on the loaded slice; debounced). See Check-in & Check-out toolbar search. |
| Responsible | Multi-select team members assigned to the event. |
| Today / Tomorrow / Next 7 days / Custom | Limits which event dates appear in the list; Custom opens a from–to range picker. |
| Filters | Opens the Other filters drawer (property scope and check-in/out-specific toggles below). |
| Export | Downloads the currently filtered rows as CSV or Excel. |
Other filters (Check-in & Check-out)
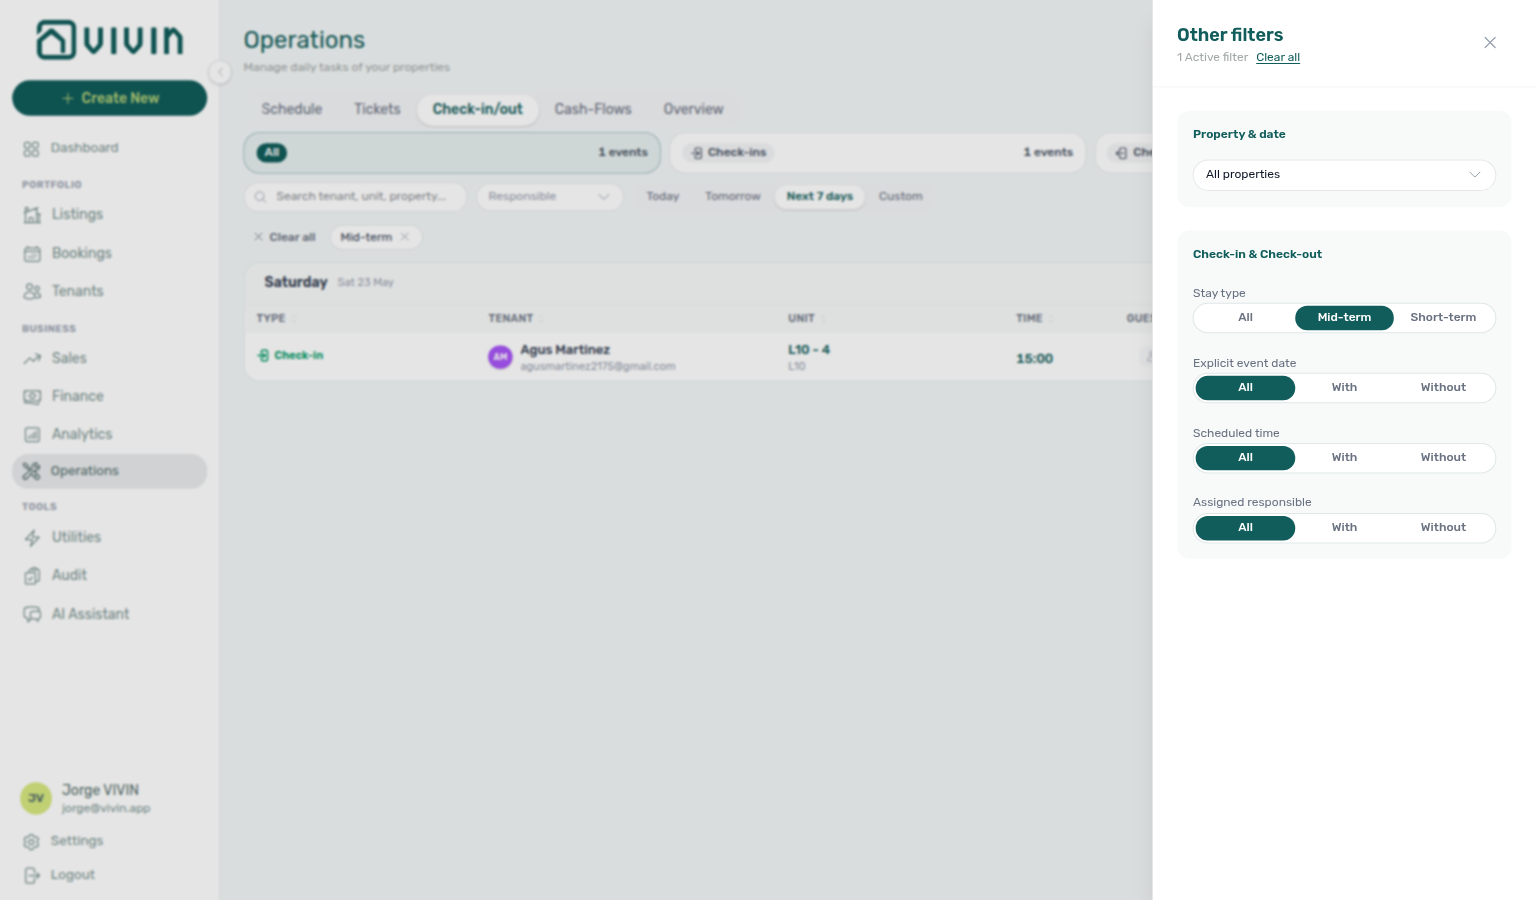
Open Filters in the tab toolbar. The drawer title is Other filters. Property uses the same multi-select control as other Operations tabs (see Overview). Besides property scope, the Check-in & Check-out section includes:
| Filter | Options | Use when |
|---|---|---|
| Stay type | All, Mid-term, Short-term | Focus on long-stay vs iCal/short-stay bookings. |
| Explicit event date | All, With, Without | Find bookings that have (or lack) a stored check-in/out date on the reservation. |
| Scheduled time | All, With, Without | Find events with (or without) a scheduled time of day. |
| Assigned responsible | All, With, Without | Queue handovers that still need (or already have) a responsible assignee. |
Active drawer choices combine with search, responsible chips, and the date quick filter. Use Clear all filters at the bottom of the drawer to reset drawer-only fields.

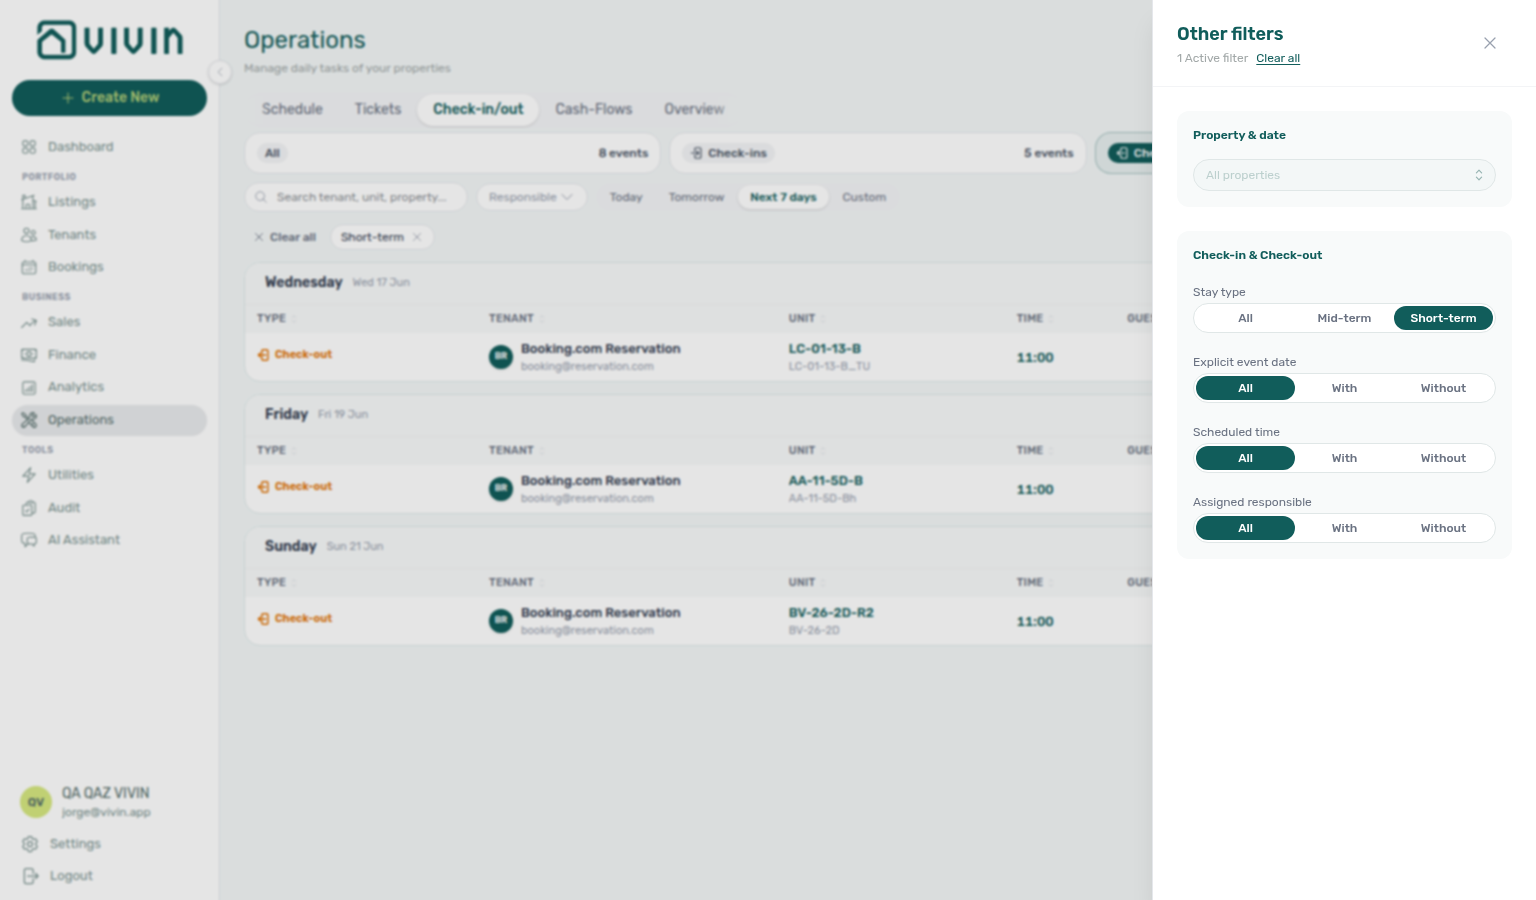
Short-term filter capture refreshed 2026-06-15 07:12 UTC (VIVIN_DOCS_BASE_URL=http://localhost:5173 VIVIN_DOCS_RECORD_API=$VITE_API_BASE_URL VIVIN_DOCS_STAY_TYPE=short_term_ical npx tsx tools/capture-operations-check-in-out-other-filters-stay-type-screenshot.ts). Use Short-term when reconciling channel-only calendar blocks with Sales > Multicalendar or unit calendars — see Glossary — Short-term iCal pseudo check-in/out.
Export
Use Export on the Check-in & Check-out toolbar when you need a spreadsheet of the same slice you are reviewing (view toggle, search, responsible filter, date quick filter, and Other filters all apply before download).
Open Export, then choose CSV or Excel (.xlsx). Filenames are operations-check-in-out-YYYY-MM-DD.csv or operations-check-in-out-YYYY-MM-DD.xlsx. If nothing matches the current filters, the app shows a no data warning instead of an empty file.
Typical export columns include Type, Tenant, Tenant Email, Listing, Date, Time, Responsible, Guest Count, Turnaround, Email Sent, and Platform.
Review this tab at the start of each week: set Next 7 days (or Custom for your planning window), scan Turnaround for same-day turnovers, then Export for offline handoff to cleaning or front-desk partners.
Check-in & Check-out toolbar search
The debounced Search box filters the currently loaded check-in and check-out rows (after your date quick filter and Other filters). Matches are case-insensitive substrings on:
| Field | Examples |
|---|---|
| Tenant name | Display name on the handover row |
| Tenant email | Contact email on the booking |
| Unit / listing name | Internal listing label (for example AA-11-5D-R2) |
| Property internal name | Building label when the property name matches |
When several fields match, unit / listing name hits are ranked above tenant name or email, and tenant hits above property-only matches — paste a unit code to surface the right handover first within each date group. See Glossary — Directory search ranking.
![]()
Unit search ranking capture refreshed 2026-06-13 17:20 UTC (VIVIN_DOCS_BASE_URL=http://localhost:5173 VIVIN_DOCS_RECORD_API=$VITE_API_BASE_URL VIVIN_DOCS_UNIT_SEARCH=AA-11-5D-R6 npx tsx tools/capture-operations-check-in-out-search-unit-rank-screenshot.ts). See Glossary — Directory search ranking.
Cash Flows Tab
Operational expenses here are not tenant receipts — reconcile tenant payments in Finance; categorize lines with Settings > Categories — Cash flows. Full pairing matrix: Operations section cross-reference.
The Cash Flows tab (also called Operational Cash Flows) tracks day-to-day operational expenses that are not tied to a specific booking — for example, supplies purchases, contractor invoices, building repairs, or administrative costs.
Cash Flows list loading (infinite scroll)
The cash-flow ledger uses the same chunked pattern as the Tickets tab: about 20 rows load first, then about 5 more per scroll near the bottom of the table. A loading line appears under the list while the next batch fetches. Changing search, Other filters, or sort reloads from the first batch.
Load failures — When the first cash-flow request fails, the tab shows the module-level directory load failure card instead of an empty ledger. See Glossary — Directory list load failures.
Export on this tab writes only loaded rows — scroll through the full filtered list before downloading if your account has more cash flows than fit in the first few batches.
Each cash flow entry shows:
- Title and description of the expense
- Amount
- Date
- Property it relates to
- Cost allocation category — how the expense is classified for reporting
Cash Flows toolbar search
The debounced Search box is sent to GET /cashflow/page (same filter set as the infinite list and Export). Matches are case-insensitive substrings on:
| Field | Examples |
|---|---|
| Unit / listing name | Internal listing label stored on the cash flow (for example AA-11-5D-R2) |
| Title | Short label you typed when creating the entry |
| Description | Longer notes in the cash flow sidebar |
| Property internal name | Building label on the row |
When several fields match, unit / listing name hits are ranked above title, description, or property-only matches — paste a unit code to surface expenses tied to that room first. See Glossary — Directory search ranking.
![]()
Unit search ranking capture refreshed 2026-06-13 17:21 UTC (VIVIN_DOCS_BASE_URL=http://localhost:5173 VIVIN_DOCS_RECORD_API=$VITE_API_BASE_URL VIVIN_DOCS_UNIT_SEARCH=AA-11-5D npx tsx tools/capture-operations-cashflows-search-unit-rank-screenshot.ts). See Glossary — Directory search ranking.
Comprehensive Cash Flow Dashboards
The Cash Flows tab provides detailed financial visibility:
- Per property, unit, or portfolio — track every euro in and out in real time.
- Detailed cost allocation — assign operational expenses (maintenance, cleaning, supplies, contractor fees) to specific properties, units, or tenants.
- Supplier and contractor cost history — track spending per vendor over time for better negotiation leverage.
- Exportable reports — generate cash flow statements and cost reports for owners, investors, and accountants.
Use Export on the Cash Flows toolbar the same way as on tickets: pick CSV or Excel (.xlsx). The download reflects current filters and sort on the tab and includes every row the infinite list has loaded so far (see Cash Flows list loading). Filenames are cashflows-YYYY-MM-DD.csv or cashflows-YYYY-MM-DD.xlsx. If nothing is loaded yet, you get a no data warning instead of a file.
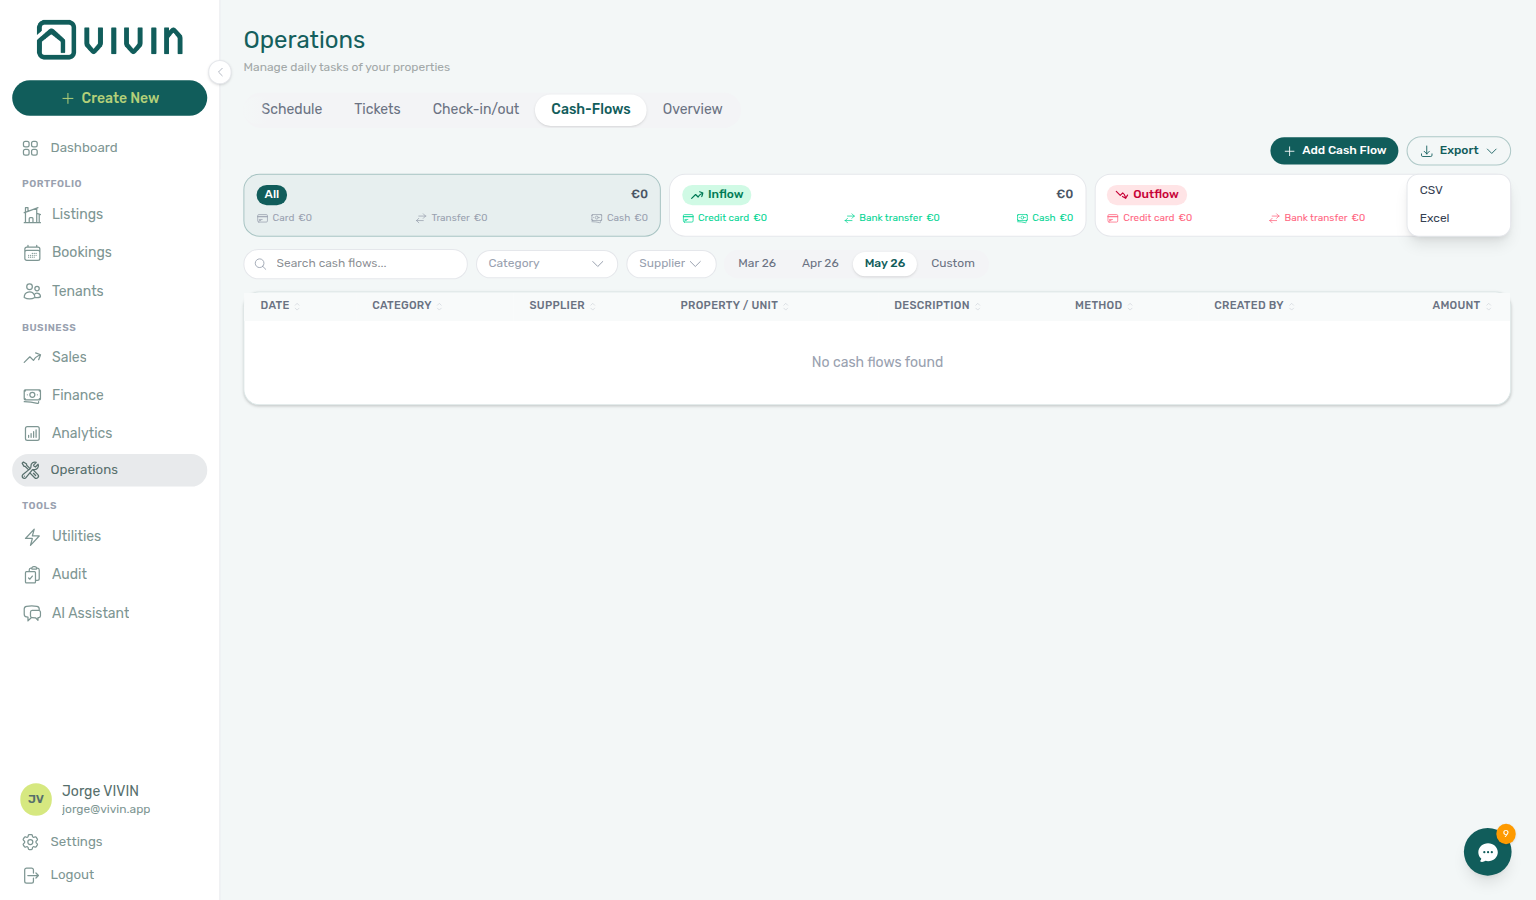
Spreadsheet columns typically include Date, Description, Category, Supplier, Property, Created by, Method, Type, and Amount (outflows appear as negative amounts in the export).
Cost Allocation
When you create or edit a cash flow entry, you can assign it to a cost allocation category:
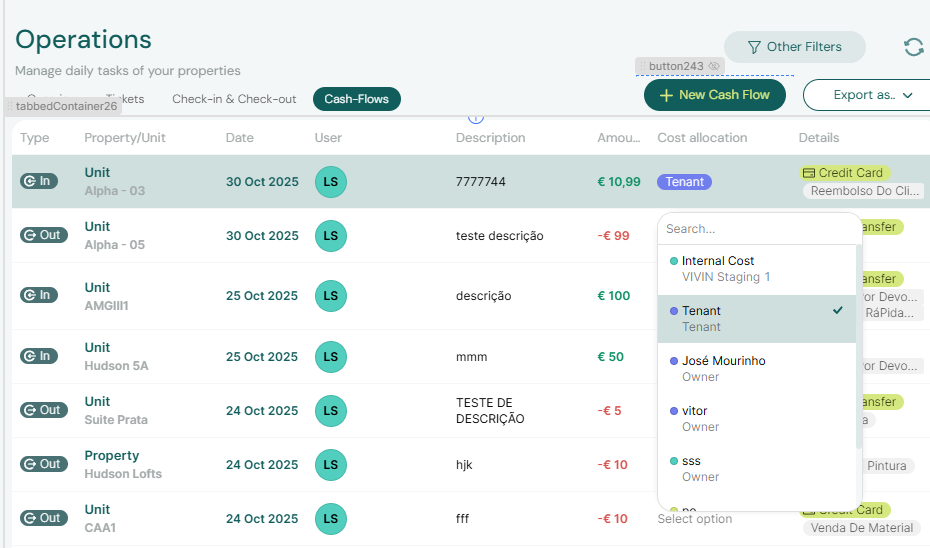
Cost allocation allows you to categorize operational expenses for reporting purposes. For example, you might create categories like "Cleaning Supplies," "Plumbing Repairs," "Administrative," or "Insurance." This makes it possible to generate reports showing where your operational budget is being spent.
Cost allocation categories are configured in Settings > Categories > Others Items Categories. Create your category structure before adding cash flow entries so that all expenses are consistently classified.
Adding a Cash Flow Entry
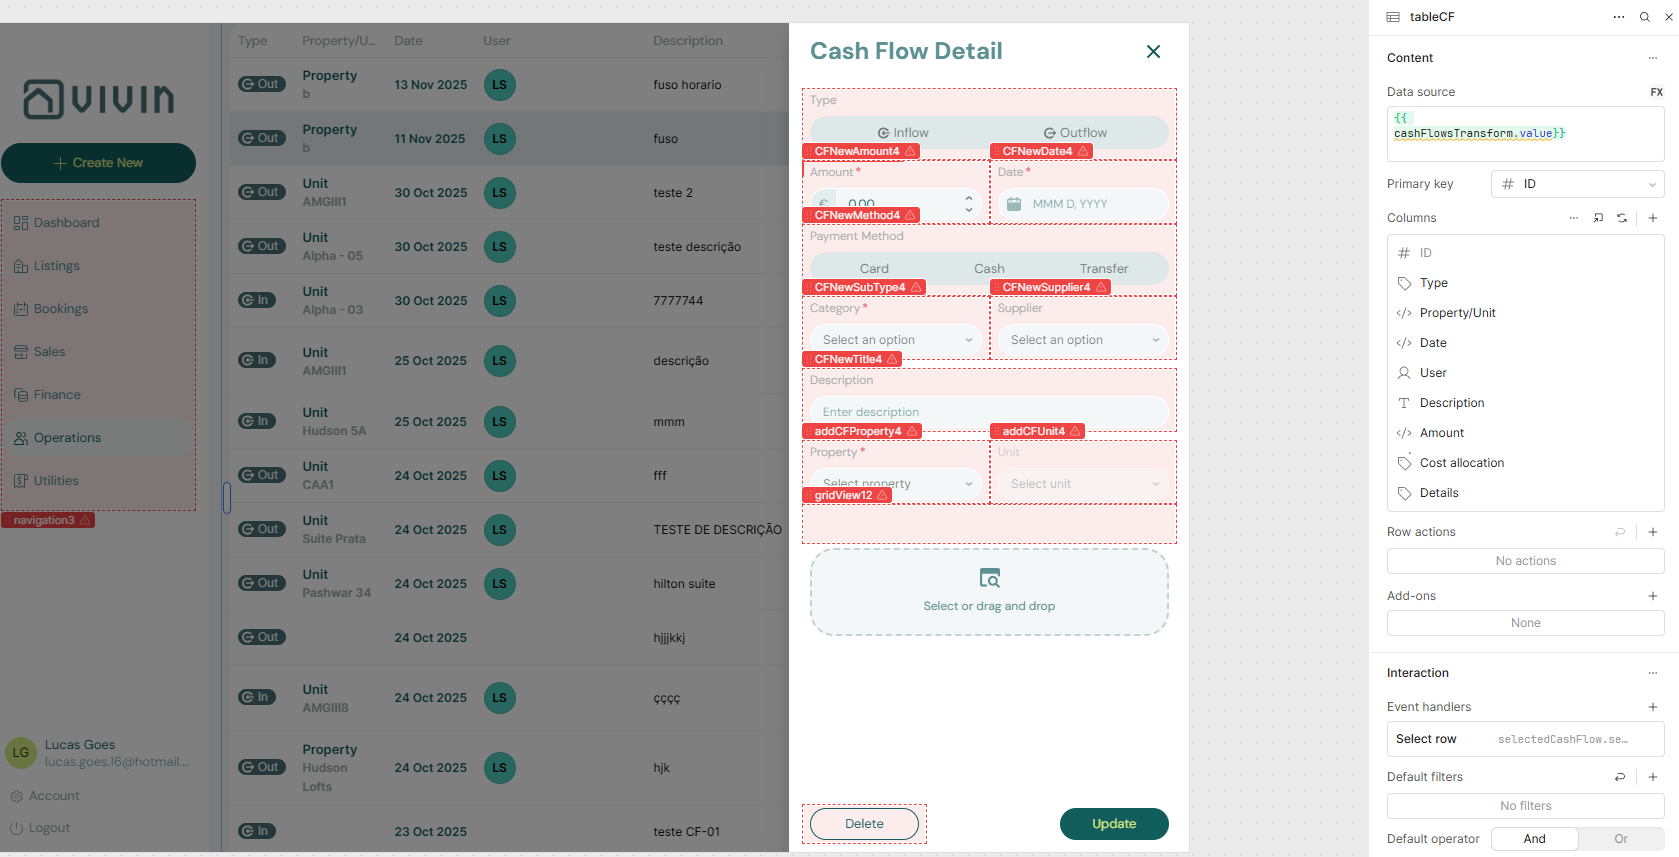
To record an operational expense, click + New Cash Flow and fill in:
- Title — what the expense is for
- Amount
- Date of the expense
- Property — which property this expense belongs to
- Cost Allocation — the expense category
- Notes — any additional context
- Attachments — upload receipts or invoices for record-keeping
Attaching Documents to a Cash Flow
Every cash flow entry supports file attachments — use this to keep receipts, contractor invoices, and supplier quotes directly alongside the expense record. Click the Attachments section within any cash flow entry to upload files:
Having receipts attached directly to each cash flow entry makes audits, owner reports, and expense reconciliation significantly easier — everything is in one place.
Key Business Rules for Operations
-
Unassigned tickets need immediate attention. Tickets without an assignee are visible on the Dashboard's Unassigned tab. Managers should delegate these daily to ensure nothing falls through the cracks.
-
Ticket categories must be configured first. Before creating tickets, set up your category taxonomy in Settings > Categories > Tickets Categories. This ensures consistent classification across your team.
-
Automatic tickets reduce manual work. Use the property Maintenances tab to configure recurring check-in and check-out tickets. This eliminates the need to manually create preparation tasks for every turnover.
-
Cash flows are separate from booking payments. The Cash Flows tab tracks operational expenses, not tenant payments. Tenant payments are tracked in the Finance module.
-
Cost allocation categories drive expense reporting. Consistently applying cost allocation categories to cash flow entries enables accurate property-level expense reporting and owner statements.
-
Supplier cost history aids negotiation. Track spending per vendor over time to build leverage for contract renegotiations and identify cost-saving opportunities.
Operations guide subsection index
This index pairs Operations tab sections with Related subsections — use it when turnover week tickets disagree with Bookings context or Finance tenant receipts. Full pairing matrix: Operations section cross-reference.
Operations section cross-reference
Use this table when one Operations tab or control naturally leads into another module, workflow, or concept — each row links to the docs you should read before or after acting in that section.
Related
Related below links this module to settings, concepts, workflows, and escalation paths. Pair Documentation map & escalation with Modules hub — Documentation map & escalation; pair Upstream & downstream workflows with Common Workflows — Workflow cross-reference. Topic-to-section pairing in sections above: Operations guide subsection index · Operations section cross-reference. Full hub matrix: Module cross-reference · Modules hub subsection index.
Documentation map & escalation
Documentation-map bullets pair with Introduction — Section cross-reference and FAQ — Section cross-reference. Hub parity: Modules hub — Documentation map & escalation. Full pairing matrix: Operations section cross-reference · Module cross-reference.
- Modules hub — Hub pairing matrix across operator workspaces
- Using in-app support — Vivin product tickets distinct from internal Operations maintenance tickets
- Glossary — Term definitions used across turnover and ticket workflows
- FAQ & Troubleshooting — When Operations tabs fail to load or mobile redirect surprises field staff
- Get Help & Support — Escalate when ticket or cash-flow permissions block access
Upstream & downstream workflows
Workflow bullets pair with Common Workflows — Workflow cross-reference. Full pairing matrix: Operations section cross-reference · Module cross-reference.
- Create New menu — New Ticket — Open the ticket wizard from any screen
- Management Frontend Deep Links — Bookmark
/operations/ticketsand Draft KPI filter state - Manual block hygiene (section cross-reference; Deeper workflow reads; hub) — Audit manual blocks distinct from maintenance tickets but often reviewed during turnover prep
- Managing a Check-in (section cross-reference; Deeper workflow reads; hub) — Coordinate tenant arrivals
- Managing a Check-out (section cross-reference; Deeper workflow reads; hub) — Handle departures and turnovers
- Notifications — Payment overdue alerts — Operator Payments category rows during turnover week before key handover or deposit release
- Handling a Late Payment — Step 1 (section cross-reference; Deeper workflow reads; hub) — Collections follow-up when Check-in & Check-out planning surfaces unpaid move-in or departure-week charges
- Cancelling a Booking (section cross-reference; Deeper workflow reads; hub) — Close or cancel prep tickets when a reservation is voided (Step 6 in cancellation workflow)
- Entering Monthly Utility Bills (section cross-reference; Deeper workflow reads; hub) — Damage or meter tickets that sometimes follow landlord bill ingestion
- Portfolio KPI review (section cross-reference; Deeper workflow reads; hub) — Reconcile Maintenance heatmaps with ticket spend and linked cash flows during month-end review
Deeper workflow reads
Workflow reads pair with Common Workflows hub subsection index and Workflow cross-reference. Each workflow sub-guide reciprocates with [Deeper workflow reads](../modules/operations/index.md#deeper-workflow-reads) anchors on Module documentation hubs bullets — hub parity: Modules hub — Deeper workflow reads. Full pairing matrix: Operations section cross-reference · Module cross-reference.
- Managing a Check-in — Check-in & Check-out tab arrivals, prep tickets, and unpaid move-in charges (section cross-reference; Deeper API reads; hub)
- Managing a Check-out & Deposit Refund — Damage tickets, linked cash flows, and turnover coordination (section cross-reference; Deeper API reads; hub)
- Handling a Late Payment — Clear payment overdue before key handover during turnover week (section cross-reference; Deeper API reads; hub)
- Cancelling a Booking — Close or cancel prep and damage tickets in Step 6 (section cross-reference; Deeper API reads; hub)
- Manual block hygiene — Maintenance tickets that sometimes leave forgotten holds on the calendar (section cross-reference; Deeper API reads; hub)
- Entering Monthly Utility Bills — Damage or meter tickets after landlord bill ingestion (section cross-reference; Deeper API reads; hub)
- Portfolio KPI review — Maintenance heatmaps, Draft ticket buckets, and linked cash flows in Step 5 (section cross-reference; Deeper API reads; hub)
- Using in-app support — Vivin product tickets distinct from internal maintenance tickets (section cross-reference; Deeper API reads; hub)
Navigation & bookmarks
Bookmark routes pair with Management Frontend Deep Links and Create New menu. Full pairing matrix: Operations section cross-reference · Module cross-reference.
- Management Frontend Deep Links — Operations — Tab routes including
/operations/schedule(Vivin internal)
Settings that shape Operations
Settings bullets pair with Account Settings — Tab cross-reference. Full pairing matrix: Operations section cross-reference · Module cross-reference.
- Settings > Categories — Configure ticket and cash flow categories
- Settings > Tenant categories — Portal modules and move-in rules by segment during check-in/out prep
- Settings > Preferences — Set default ticket deadlines by priority
- Settings > Preferences — In-app notifications — Account-wide Service requests and booking alert masters during turnover triage
- Settings > Emails — Turnover reminder Communication Rules distinct from internal maintenance tickets
Deeper concept reads
Concept reads pair with Concepts hub subsection index and Concept cross-reference. Full pairing matrix: Operations section cross-reference · Module cross-reference.
- Tenant Portal — Tenant-submitted maintenance requests (section cross-reference; hub)
- FAQ — Tenant contract signing blocked — No PDF yet, mandatory Your Details gates, category locks, or Lease purpose; portal signing vs paper upload on Contract Info
- Payment Allocation — Two-layer receipts, invoiced-floor rent edits, and credit note reject/revert warnings (section cross-reference; hub)
- Booking Lifecycle — Computed Upcoming → Ongoing → Ended / Canceled status model, list filters, and Timeline (section cross-reference; hub)
- Integrations & Distribution — Short-term iCal imports surface as channel-labelled pseudo check-in/out rows on Check-in & Check-out (section cross-reference; hub)
- Services Marketplace — Fulfilment or damage tickets when portal Request Service orders need operator follow-up (section cross-reference; hub)
- Landlord MCP — External automation for ticket and cash-flow writes gated by
operations.module(section cross-reference; hub) - Tenant MCP — Booking-scoped maintenance tools that create or escalate tickets from tenant channels (section cross-reference; hub)
Operator modules (pairing surfaces)
Module hub bullets pair with Modules — Module cross-reference. Full pairing matrix: Operations section cross-reference · Module cross-reference.
- Bookings — Tickets tab — Read-only ticket list on the booking sidebar; Open Operations — Tickets header link
- Listings — Maintenances tab — Configure automatic ticket creation
- Finance — Deposits tab — Deposit disputes and refunds coordinated with check-out tickets
- Finance — Transactions tab — Ledger rows linked through ticket linked cash flows
- Audit — Discounts tab — Cross-portfolio discount lines when damage tickets coincide with goodwill reductions on Contract Values
- Analytics — Maintenance tab — Portfolio ticket-count trends when Operations volume spikes during KPI review
- Sales — Overview tab — Occupancy heatmap after turnover tickets release holds
- Inbox module — Portfolio WhatsApp triage when turnover tickets need tenant message context
Lockout catch-up after password recovery
Operational backlog after sign-in recovery pairs with Resetting a Management User Password — Step 3. Hub parity: Common Workflows — Lockout catch-up after password recovery. Full pairing matrix: Operations section cross-reference · Module cross-reference.
- Common Workflows — Lockout catch-up after password recovery — Hub matrix when sign-in was restored and Check-in & Check-out or Tickets backlog accumulated during lockout
- Getting Started — Lockout catch-up after password recovery — Canonical operational backlog mesh
- Check-in & Check-out Tab — Arrival/departure queues delayed by lockout before turnover week
- Notification triage — Clear Payments category alerts before key handover prep
- Pending manual receipt approval — Unpaid move-in charges may linger until Finance clears Pending receipts
Pending manual receipt approval
Receipt approval pairs with Finance — Pending manual payments and Bookings — Transactions tab. Hub parity: Common Workflows — Pending manual receipt approval. Full pairing matrix: Operations section cross-reference · Module cross-reference.
-
Common Workflows — Pending manual receipt approval — Hub matrix when turnover prep shows unpaid move-in lines until Approve payments confirms recorded transfers
-
Finance — Pending manual payments — Amber Pending chip on Finance → Transactions
-
Check-in & Check-out Tab — Arrival-week planning when payment overdue alerts still cite pending receipts
-
Bookings — Transactions tab — Per-row Approve payment on linked booking receipts
-
Handling a Late Payment — Step 1 — Re-triage before key handover when debt visibility lags
-
FAQ — Pending manual receipt approval hub — Symptom table for Approve payments / amber Pending
Reject/revert mistaken receipts
Receipt cleanup pairs with Finance — Row actions on in-payment rows and Bookings — Row actions on in-payment rows. Hub parity: Common Workflows — Reject/revert mistaken receipts. Full pairing matrix: Operations section cross-reference · Module cross-reference.
-
Common Workflows — Reject/revert mistaken receipts — Hub matrix when duplicate receipts block check-out settlement or deposit release
-
Finance — Row actions on in-payment rows — Portfolio Reject selected after turnover triage
-
Managing a Check-out & Deposit Refund — Step 6 settlement receipts that may need reject/revert before deposit refund
-
Payment Allocation — Correcting mistaken receipts — Two-layer model and credit note follow-up
-
Cash Flows Tab — Operational expenses distinct from tenant receipt reject/revert on Finance Transactions
-
FAQ — Reject/revert mistaken receipts hub — Symptom table for Reject / Revert / Issue credit notes
Check-out ledger cleanup before refund
Duplicate-transfer cleanup pairs with Reject/revert mistaken receipts and Managing a Check-out. Hub parity: Common Workflows — Check-out ledger cleanup before refund. Full pairing matrix: Operations section cross-reference · Module cross-reference.
-
Common Workflows — Check-out ledger cleanup before refund — Hub matrix when duplicate receipts block check-out settlement or Ready To Refund during turnover week
-
Reject/revert mistaken receipts — Reject / Revert duplicate before Ready To Refund
-
Managing a Check-out — Step 6 — Canonical departure-week duplicate cleanup before refund
-
Common Workflows — Check-out collections before refund — Real arrears contrast (tenant did not pay)
-
Check-in & Check-out Tab — Departure-week planning when In Debt is phantom duplicate
-
Managing a Check-out & Deposit Refund — Step 6 / Step 6b before deposit refund
-
Finance — Row actions on in-payment rows — Portfolio Reject selected after turnover triage
-
FAQ — Check-out ledger cleanup before refund hub — Symptom table for phantom In Debt / Ready To Refund blocked when tenant paid once
Utility overage collections
Turnover-week utility overage arrears pair with Managing a Check-out and Entering Monthly Utility Bills. Hub parity: Common Workflows — Utility overage collections. Full pairing matrix: Operations section cross-reference · Module cross-reference.
-
Common Workflows — Utility overage collections — Hub matrix when departure-week overage lines block turnover before collections
-
Managing a Check-out — Step 6 — Final overages before deposit release
-
Entering Monthly Utility Bills — Step 4 — Upstream posting before collections
-
Handling a Late Payment — Steps 1–4 — Collections when overage stays unpaid
-
Common Workflows — Same-day turnover coordination — Overage arrears during turnover week
-
FAQ — Utility overage collections hub — Symptom table for unpaid utility overage on Payment Plan after bill posting
Cancellation collections before void
Pre-cancel arrears pair with Cancelling a Booking — distinct from departure-week Managing a Check-out. Hub parity: Common Workflows — Cancellation collections before void. Full pairing matrix: Operations section cross-reference · Module cross-reference.
-
Common Workflows — Cancellation collections before void — Hub matrix when mid-stay policy void is blocked by pre-cancel rent arrears (not departure Step 6 mesh)
-
Cancelling a Booking — Step 2 — Settle before Step 4
-
Check-in & Check-out Tab — Turnover planning when tenant backs out before arrival
-
Handling a Late Payment — Steps 1–4 — Collections on move-in arrears
-
Common Workflows — Check-out collections before refund — Departure-week contrast
-
Managing a Check-in — Move-in arrears before policy void
-
FAQ — Cancellation collections before void hub — Symptom table for In Debt blocking Cancel booking until Payment Plan settles
Check-out collections before refund
Turnover-week Ready To Refund blocked by rent arrears pairs with Managing a Check-out and Handling a Late Payment. Hub parity: Common Workflows — Check-out collections before refund. Full pairing matrix: Operations section cross-reference · Module cross-reference.
-
Common Workflows — Check-out collections before refund — Hub matrix when turnover-week In Debt blocks deposit release before next arrival
-
Check-in & Check-out Tab — Departure-week settlement during turnover planning
-
Managing a Check-out — Step 6 — Canonical settlement before refund
-
Handling a Late Payment — Steps 1–4 — Collections on departure-week arrears
-
Managing a Check-in — Same-day turnover when outgoing In Debt blocks incoming key handover
-
Common Workflows — Check-out ledger cleanup before refund — Duplicate transfer contrast during turnover
-
Common Workflows — Cancellation collections before void — Mid-stay policy void contrast
-
FAQ — Check-out collections before refund hub — Symptom table for rent/fee In Debt blocking Ready To Refund before deposit release
Handling a Late Payment collections
Unpaid move-in / turnover-week arrears on Check-in & Check-out planning pair with Handling a Late Payment after portfolio triage surfaces. Hub parity: Common Workflows — Handling a Late Payment collections hub. Full pairing matrix: Operations section cross-reference · Module cross-reference.
- Common Workflows — Handling a Late Payment collections hub — Hub matrix when operations planning surfaces unpaid lines needing collections Steps 1–6 (
workflows-operations-check-in-out-planning-view.png,finance-overview-income-chart-debt-aging.png) - Check-in & Check-out Tab — Departure-week / move-in arrears during turnover planning
- Handling a Late Payment — Steps 1–4 — Collections on real arrears before next arrival
- Managing a Check-in — Move-in shortfall before key handover
- Managing a Check-out — Departure-week settlement before refund
- Finance debt receivables triage — Portfolio Top debtors when planning view debt is unclear
- Common Workflows — Same-day turnover coordination — Outgoing In Debt blocks incoming check-in
- Common Workflows — Check-out collections before refund — Departure-week rent arrears contrast
- FAQ — Handling a Late Payment collections hub — Symptom table for triage surface → collections step pairing
Check-out vs cancellation
Turnover planning on Check-in & Check-out pairs with completed departure → Managing a Check-out vs early policy void → Cancelling a Booking — not Step 7 when guest never completed occupancy. Hub parity: Common Workflows — Check-out vs cancellation. Full pairing matrix: Operations section cross-reference · Module cross-reference.
- Common Workflows — Check-out vs cancellation — Hub matrix when turnover week needs lifecycle exit routing (
workflows-operations-check-in-out-planning-view.png,bookings-list-canceled-tab.png) - Check-in & Check-out Tab — Departure rows before Ended vs Canceled routing
- Managing a Check-out — Completed stay turnover mesh
- Cancelling a Booking — Policy void before next arrival
- Common Workflows — Same-day turnover coordination — Outgoing stay exit type affects incoming check-in
- Common Workflows — Check-out collections before refund — Departure-week arrears on Ended path
- Common Workflows — Cancellation collections before void — Pre-cancel void on Canceled path
- FAQ — Check-out vs cancellation — Symptom table for lifecycle exit routing
Deposit missing on Finance Deposits
Turnover planning on Check-in & Check-out pairs with deposit refund triage — clear Finance → Deposits toolbar date range when departure rows show booking Deposit data but portfolio lifecycle cards are empty. Hub parity: Common Workflows — Deposit missing on Finance Deposits. Full pairing matrix: Operations section cross-reference · Module cross-reference.
- Common Workflows — Deposit missing on Finance Deposits — Hub matrix (
workflows-operations-check-in-out-planning-view.png,finance-deposits-date-range-clear-flow.mp4) - Check-in & Check-out Tab — Departure rows before Finance → Deposits triage
- Managing a Check-out — Deposit missing on Finance Deposits — Step 5 refund triage after clearing range
- Finance — Deposit lifecycle status cards — Partial paid card scoped to date window
- Common Workflows — Same-day turnover coordination — Deposit release timing on shared-unit departures
- FAQ — Deposit missing on Finance Deposits — Symptom table for toolbar date range triage
Notification row-click navigation
Turnover-week /notifications row-click usually lands on Bookings first — open Check-in & Check-out Tab or Tickets Tab for property-scoped alerts that carry propertyId after you verify booking context. Hub parity: Common Workflows — Notification row-click navigation. Full pairing matrix: Operations section cross-reference · Module cross-reference.
- Common Workflows — Notification row-click navigation — Hub matrix (
notifications-row-navigate-to-booking-detail.png,notifications-row-navigation-flow.mp4) - Notifications module — Notification row-click navigation — Canonical
/notificationsrow-click pairing - Dashboard — Notification row-click navigation — Bell General vs full
/notificationsrow-click - Bookings — Notification row-click navigation — Booking sidebar when alert carries
bookingId - Tenants — Notification row-click navigation — Tenant profile when alert carries
tenantId - Listings — Notification row-click navigation — Property or unit sidebar when alert carries
listingIdorpropertyId - Inbox — Notification row-click navigation — Bell Inbox
linkdeep-link vs General row-click - Utilities — Notification row-click navigation — Overage payment overdue alerts after bill cycle
- Sales — Notification row-click navigation — Channel-import alerts before Multicalendar review
- Analytics — Notification row-click navigation — Month-range KPI charts after row-click opens booking context
- AI Chat — Notification row-click navigation — Verify assistant-cited alerts by row-click before operational follow-up
- Audit — Notification row-click navigation — Discounts / Manual Blocks month-end review after row-click
- Legacy
/propertiesURLs — Notification row-click navigation — Legacy bookmarks that land in Listings during alert triage - Booking engine details — Notification row-click navigation — Engine-sourced alerts before Full integration payload edits
- Check-in & Check-out Tab — Arrival/departure queues after row-click opens booking context
- Tickets Tab — Maintenance ticket backlog after ticket-related alert row-click
- Notification triage — Step 4 — Row-click before Step 5
- Payment alert to receivables triage — Ongoing/Ended payment overdue row-click
- Confirmation alert triage — Upcoming Booking created / Payment received row-click
- Managing a Check-in — Notification row-click navigation — Move-in alerts on Step 3
- Managing a Check-out — Notification row-click navigation — Departure-week alerts on Step 6
- Lockout catch-up after password recovery — Turnover backlog after sign-in restored
- FAQ — Notification row-click navigation — Target field order (
link,bookingId,tenantId,listingId,propertyId)
Payment alert to receivables triage
Clear Ongoing/Ended payment overdue alerts with Handling a Late Payment — Step 1 before key handover on Check-in & Check-out Tab — unpaid move-ins and departure-week charges block turnover prep. Hub parity: Common Workflows — Payment alert to receivables triage. Full pairing matrix: Operations section cross-reference · Module cross-reference.
- Common Workflows — Payment alert to receivables triage — Hub matrix (
notifications-row-navigate-to-booking-detail.png,notifications-row-navigation-flow.mp4,finance-overview-debt-aging-walkthrough-flow.mp4) - Notifications module — Payment alert to receivables triage — Payments category row-click entry
- Dashboard — Payment alert to receivables triage — Total Debt KPI after alert row-click
- Bookings — Payment alert to receivables triage — Payment Plan / Transactions on opened booking
- Finance — Payment alert to receivables triage — Overview → Debt Aging after single-booking triage
- Tenants — Payment alert to receivables triage — With Debt cross-check on tenant profile
- Listings — Payment alert to receivables triage — Property Payments Active portal charges on listing bookings
- Inbox — Payment alert to receivables triage — payment overdue on General before WhatsApp chase
- Utilities — Payment alert to receivables triage — Utility overage lines behind overdue alerts
- Sales — Payment alert to receivables triage — Channel-import schedules behind overdue alerts
- Analytics — Payment alert to receivables triage — Revenue trend may lag until receivables clear
- AI Chat — Payment alert to receivables triage — Validate assistant debt answers after receivables triage
- Audit — Payment alert to receivables triage — Discounts review when receivables lag behind goodwill lines
- Legacy
/propertiesURLs — Payment alert to receivables triage — Collections on bookings tied to redirected properties - Booking engine details — Payment alert to receivables triage — Engine-sourced schedules behind overdue alerts
- Check-in & Check-out Tab — Arrival-week planning when payment overdue alerts cite unpaid move-in lines
- Notification row-click navigation — Row-click on
/notificationsbefore key handover - Pending manual receipt approval — Amber Pending before collections sign-off on turnover week
- Confirmation alert triage — Contrast Upcoming vs Ongoing/Ended alerts
- Handling a Late Payment — Step 1 — Canonical receivables triage before key handover
- Managing a Check-in — Payment alert to receivables triage — Move-in alerts on Step 3
- Managing a Check-out — Payment alert to receivables triage — Departure-week alerts on Step 6
- FAQ — Payment alert to receivables triage — Alert-type contrast table
- FAQ — Payment alert to receivables triage hub — Unpaid move-in lines before key handover symptom table
Finance debt receivables triage
Unpaid move-in lines on Check-in & Check-out may block key handover while portfolio Total Debt still looks high — triage Debt Aging after clearing Pending receipts. Hub parity: Common Workflows — Finance debt receivables triage. Full pairing matrix: Operations section cross-reference · Module cross-reference.
- Common Workflows — Finance debt receivables triage — Hub matrix (
finance-overview-income-chart-debt-aging.png,finance-overview-debt-aging-walkthrough-flow.mp4) - Payment alert to receivables triage — Single-booking alert triage before portfolio surfaces
- Finance — Finance debt receivables triage — Debt Aging Top debtors canonical surface
- Pending manual receipt approval — Clear amber Pending before Top debtors sign-off
- Dashboard — Finance debt receivables triage — Total Debt headline vs Finance drill-down
- Bookings — Finance debt receivables triage — Payment Plan on opened booking
- Handling a Late Payment — Finance debt receivables triage — Debt Aging on Step 1 before outreach
- Portfolio KPI review — Finance debt receivables triage — Month-end Top debtors on Step 7
- FAQ — Finance debt receivables triage hub — Symptom table for four-surface triage
- Check-in & Check-out tab — Move-in payment shortfall before handover
- Tickets tab — Collections-related maintenance during arrears triage
Finance Income status drill-down
Unpaid move-in lines may appear in the wrong month In debt segment — verify Payment Plan before Debt Aging sign-off. Hub parity: Common Workflows — Finance Income status drill-down. Full pairing matrix: Operations section cross-reference · Module cross-reference.
- Common Workflows — Finance Income status drill-down — Hub matrix (
finance-overview-income-status-in-debt-modal.png,finance-overview-income-drill-down-flow.mp4) - Finance debt receivables triage — Debt Aging Top debtors when payment-line modal is not enough
- Finance — Income status drill-down — Stacked Income chart canonical surface
- FAQ — Finance Income status drill-down hub — Symptom table for segment vs Debt Aging
- FAQ — Finance Income status drill-down — Paid / Scheduled / In debt segment-click habit
- Portfolio KPI review — Finance Income status drill-down — Month-end Income reconciliation on Step 7
- Operations — Finance debt receivables triage — Move-in shortfall before Top debtors
- Managing a Check-in — Finance Income status drill-down — Move-in charge segment on Step 3
Cash flow forecast drill-down
Move-in collections may land in the wrong week — toggle Day on Cash flow forecast before handover sign-off. Hub parity: Common Workflows — Cash flow forecast drill-down. Full pairing matrix: Operations section cross-reference · Module cross-reference.
- Common Workflows — Cash flow forecast drill-down — Hub matrix (
finance-overview-cash-flow-all-payments-modal.png,finance-overview-cash-flow-day-view.png,finance-overview-cash-flow-drill-down-flow.mp4) - Finance Income status drill-down — Paid / Scheduled / In debt segments — not collections history
- Finance — Income chart and cash flow forecast — Canonical Cash flow forecast chart surface
- FAQ — Cash flow forecast drill-down hub — Symptom table for collections vs Income / Dashboard
- FAQ — Cash flow forecast drill-down — Month / Day bar-click habit
- Portfolio KPI review — Cash flow forecast drill-down — Month-end collections reconciliation on Step 7
- Check-in & Check-out tab — Move-in payment timing before Cash flow forecast read
- Managing a Check-in — Cash flow forecast drill-down — Move-in collections on Step 3
Confirmation alert triage
Upcoming Booking created / Payment received rows on /notifications row-click into Bookings — finish Processing a New Booking — Step 5b before you schedule turnover tickets on Check-in & Check-out Tab. Hub parity: Common Workflows — Confirmation alert triage. Full pairing matrix: Operations section cross-reference · Module cross-reference.
- Common Workflows — Confirmation alert triage — Hub matrix (
notifications-row-navigation-flow.mp4) - Notifications module — Confirmation alert triage — Canonical inbox pairing
- Bookings — Confirmation alert triage — Transactions / Contract Info on Upcoming imports
- Dashboard — Confirmation alert triage — Post-login Upcoming alert backlog on bell
- Tenants — Confirmation alert triage — Tenant Info / Category on confirmation-week clusters
- Listings — Confirmation alert triage — Channel import bookings on go-live properties
- Inbox — Confirmation alert triage — WhatsApp thread after Payment received row-click
- Utilities — Confirmation alert triage — First bill cycle after go-live alerts
- Sales — Confirmation alert triage — Channel-import Upcoming alerts before Channels linking
- Analytics — Confirmation alert triage — Upcoming alerts during month-end KPI review
- AI Chat — Confirmation alert triage — Assistant-cited confirmation backlog before bulk mark-read
- Audit — Confirmation alert triage — Month-end Discounts review after confirmation receipts approved
- Legacy
/propertiesURLs — Confirmation alert triage — First alerts after legacy redirects land in Listings - Booking engine details — Confirmation alert triage — White-label Upcoming alerts before payload sync
- Check-in & Check-out Tab — Upcoming arrivals after confirmation receipts are approved
- Notification row-click navigation — Row-click on
/notificationsbefore mark-read - Payment alert to receivables triage — Contrast Upcoming vs Ongoing/Ended payment overdue
- Pending manual receipt approval — Payment received alert until Approve payments
- Processing a New Booking — Step 5b / Step 6 — Canonical confirmation gates
- Managing a Check-in — Step 1 — Arrival-week planning after confirmation triage
- Notification triage — Confirmation alert triage — Steps 4 / 5 path
- FAQ — Confirmation alert triage — Alert-type table and bulk mark-read guard
- FAQ — Confirmation alert triage hub — Turnover prep after confirmation receipts approved symptom table
New inventory to first booking handoff
Check-in & Check-out Tab Timeline overlap on Onboarding — Step 7 should show the first Upcoming reservation only after Processing a New Booking — Step 6 portal gates. Hub parity: Common Workflows — New inventory to first booking handoff. Full pairing matrix: Operations section cross-reference · Module cross-reference.
- Check-in & Check-out tab — Timeline overlap on Step 7 verify
- Listings — New inventory to first booking handoff — Portfolio verify upstream
- Bookings — New inventory to first booking handoff — First Upcoming status tabs
- Onboarding a New Property — Step 7 — Upstream Multicalendar / Timeline verify
- Processing a New Booking — Step 6 — Portal gates before arrival planning
- Common Workflows — New inventory to first booking handoff — Hub matrix (
workflows-onboarding-property-wizard.mp4,bookings-add-booking-modal.png) - Property setup to first arrival handoff — Downstream Next 7 days arrival week
- FAQ — New inventory to first booking handoff — Symptom table for property wizard → first reservation
Property setup to first arrival handoff
Check-in & Check-out Tab Next 7 days / Check-ins pill is the canonical first-arrival surface after Onboarding a New Property — Steps 1–7 — open only when property wizard, Access Lockers, and first Upcoming reservation are ready. Hub parity: Common Workflows — Property setup to first arrival handoff. Full pairing matrix: Operations section cross-reference · Module cross-reference.
- Check-in & Check-out tab — Next 7 days / Check-ins pill on first move-in week
- Listings — Property setup to first arrival handoff — Access Lockers before key handover
- Bookings — Property setup to first arrival handoff — First Upcoming reservation status tabs
- Onboarding a New Property — Step 7 — Upstream Multicalendar / Timeline verify
- Managing a Check-in — Step 1 — Canonical arrival-week workflow entry
- Common Workflows — Property setup to first arrival handoff — Hub matrix (
listings-property-edit-access-lockers-tab.png,workflows-operations-check-in-out-planning-view.png,workflows-onboarding-property-wizard.mp4) - Confirmation to check-in handoff — Upstream Upcoming portal gates after first booking
- FAQ — Property setup to first arrival handoff — Symptom table for go-live → first arrival week
Confirmation to check-in handoff
Check-in & Check-out Tab Next 7 days / Check-ins pill is the canonical arrival-week surface — open only after Processing a New Booking — Step 6 portal gates on Upcoming reservations. Hub parity: Common Workflows — Confirmation to check-in handoff. Full pairing matrix: Operations section cross-reference · Module cross-reference.
- Check-in & Check-out tab — Next 7 days / Check-ins pill after confirmation closes
- Confirmation alert triage — Turnover prep after confirmation receipts approved
- Bookings — Confirmation to check-in handoff — Contract Info portal gates on Upcoming imports
- Managing a Check-in — Step 1 — Downstream arrival-week entry
- Common Workflows — Confirmation to check-in handoff — Hub matrix (
bookings-detail-contract-method-of-payments.png,workflows-operations-check-in-out-planning-view.png,booking-lifecycle-status-tabs-flow.mp4) - Processing a New Booking — Step 6 — Upstream portal sanity before handoff
- Pending manual receipt approval — Step 5b confirmation receipts before handoff
- FAQ — Confirmation to check-in handoff — Symptom table for Upcoming → arrival week
Check-in to check-out handoff
Check-in & Check-out Tab Check-outs pill + Next 7 days is the canonical departure-week surface — open after Managing a Check-in — Step 4 keys handed over on Ongoing stays. Hub parity: Common Workflows — Check-in to check-out handoff. Full pairing matrix: operations-section-cross-reference · Module cross-reference.
- Check-in & Check-out tab — Check-outs pill + Next 7 days
- Bookings — Check-in to check-out handoff — Timeline departure bars on Ongoing rows
- Managing a Check-in — Step 4 — Upstream prerequisite on mid-stay
- Managing a Check-out — Step 1 — Downstream departure-week entry
- Common Workflows — Check-in to check-out handoff — Hub matrix (
operations-check-in-out-check-outs-next-7-days.png,bookings-timeline-view.png) - Common Workflows — Same-day turnover coordination — Outgoing turnover before incoming keys
- Confirmation to check-in handoff — Upcoming → arrival week contrast (upstream lifecycle)
- FAQ — Check-in to check-out handoff — Symptom table for Ongoing → departure week
Check-out final utilities handoff
Turnover-week final utility overages pair with Check-in & Check-out Tab departure planning after Entering Monthly Utility Bills — Steps 2–4 — hub: Managing a Check-out — Step 6. Hub parity: Common Workflows — Check-out final utilities handoff. Distinct from Utility overage collections (mid-stay mesh). Full pairing matrix: operations-section-cross-reference · Module cross-reference.
- Check-in & Check-out tab — Departure-week utility settlement during turnover
- Utilities — Check-out final utilities handoff — Missing / Allocations posting upstream
- Bookings — Check-out final utilities handoff — Payment Plan overage lines after bill posting
- Entering Monthly Utility Bills — Step 4 — Upstream overage posting verification
- Managing a Check-out — Step 6 — Settlement before deposit release
- Common Workflows — Same-day turnover coordination — Final overages on outgoing stay before incoming keys
- Common Workflows — Check-out final utilities handoff — Hub matrix (
utilities-allocations-review-flow.mp4,operations-check-in-out-check-outs-next-7-days.png) - FAQ — Check-out final utilities handoff — Symptom table for final utility overage blocking refund
WhatsApp per-booking messaging
Maintenance ticket threads pair with Bookings → Communication when tenants message about check-in prep or ticket status — cross-booking Inbox lacks ticket sidebar context. Hub parity: Glossary — WhatsApp per-booking messaging hub · Common Workflows — WhatsApp per-booking messaging. Full pairing matrix: Operations section cross-reference · Module cross-reference.
- Common Workflows — WhatsApp per-booking messaging — Hub matrix (
bookings-detail-communication-tab-whatsapp-thread.png,inbox-module-overview.png,inbox-module-triage-flow.mp4) - Glossary — WhatsApp per-booking messaging hub — Surface table + per-guide/module mesh reciprocal hub
- Dashboard — WhatsApp per-booking messaging — Bell Inbox sub-tab vs General on post-login scan
- Notifications — WhatsApp per-booking messaging — Canonical
/notificationsmessage alert rows - Bookings — WhatsApp per-booking messaging — Communication tab composer with Payment Plan context
- Inbox — WhatsApp per-booking messaging — Cross-booking triage and bell Inbox sub-tab
- Tenants — WhatsApp per-booking messaging — Tenant profile after Inbox name click
- Finance — WhatsApp per-booking messaging — Collections outreach with Transactions visible
- Listings — WhatsApp per-booking messaging — Go-live property tenant threads after channel import
- Utilities — WhatsApp per-booking messaging — Utility overage bill questions on Communication
- Sales — WhatsApp per-booking messaging — Channel-import message backlog during Multicalendar review
- Analytics — WhatsApp per-booking messaging — Month-end message backlog during KPI review
- AI Chat — WhatsApp per-booking messaging — Assistant-cited threads before operational follow-up
- Audit — WhatsApp per-booking messaging — Month-end communication review after Discounts audit
- Legacy
/propertiesURLs — WhatsApp per-booking messaging — Legacy bookmarks during message triage - Booking engine details — WhatsApp per-booking messaging — Engine-sourced tenant threads before payload sync
- Ticket details sidebar — Linked maintenance context on booking Tickets tab
- Notification row-click navigation — Ticket ping row-click before Communication reply
- Common Workflows — Notification row-click navigation —
New WhatsApp message from …on/notificationsvs bell Inbox - Notification triage — WhatsApp per-booking messaging — Message pings on bell Inbox /
/notifications - Handling a Late Payment — WhatsApp per-booking messaging — Collections outreach on Step 3
- Managing a Check-in — WhatsApp per-booking messaging — Arrival-week threads before Step 4
- Managing a Check-out — WhatsApp per-booking messaging — Departure settlement on Step 6
- Processing a New Booking — WhatsApp per-booking messaging — Confirmation follow-up on Step 6
- Cancelling a Booking — WhatsApp per-booking messaging — Void outreach before Step 4
- Entering Monthly Utility Bills — WhatsApp per-booking messaging — Overage bill questions on Step 4
- Portfolio KPI review — WhatsApp per-booking messaging — Month-end message backlog on Step 7
- Manual block hygiene — WhatsApp per-booking messaging — Blocked-date questions on Step 3
- Onboarding a New Property — WhatsApp per-booking messaging — First tenant threads on Step 7 go-live
- Using in-app support — WhatsApp per-booking messaging — Self-serve Inbox / Communication before filing
- Resetting a Management User Password — WhatsApp per-booking messaging — Lockout-delayed bell Inbox after Step 3
- FAQ — WhatsApp per-booking messaging hub — Maintenance ticket threads on Communication tab symptom table
Bot reasoning (audit)
Chatbot-created maintenance tickets on Communication. Hub parity: Glossary — Bot reasoning (audit) hub · Common Workflows — Bot reasoning (audit). Full pairing matrix: Operations section cross-reference · Module cross-reference.
- Common Workflows — Bot reasoning (audit) — Hub matrix (
bookings-detail-communication-tab-bot-reasoning-expanded.png) - Glossary — Bot reasoning (audit) hub — Surface table + per-guide/module mesh reciprocal hub
- Bookings — Bot reasoning (audit) — Canonical Communication Reasoning control
- ChatBot settings — Read-only audit vs editable persona / IF/THEN
ChatBot settings
Account Settings → ChatBot pairs with Communication thread review — chatbot-created maintenance tickets on communication. Hub parity: Glossary — ChatBot settings hub · Common Workflows — ChatBot settings. Full pairing matrix: Operations section cross-reference · Module cross-reference.
- Common Workflows — ChatBot settings — Hub matrix (
settings-chatbot-tab-overview.png,settings-chatbot-status-bot-connected.png,settings-chatbot-save-rule-flow.mp4) - Glossary — ChatBot settings hub — Surface table + per-guide/module mesh reciprocal hub
- ChatBot settings — Persona, IF/THEN rules, Status Bot pairing
- Glossary — Bot reasoning (audit) hub — Thread audit after rule changes
Rent reduction after invoicing
Turnover-week goodwill repricing on departure bookings may hit the invoiced floor — use Bookings → Contract Info → Change monthly rent before Check-in & Check-out sign-off. Pair Bulk Hostkit invoicing when external relief surfaces Not issued credit note rows. Hub parity: Common Workflows — Rent reduction after invoicing. Full pairing matrix: Operations section cross-reference · Module cross-reference.
- Common Workflows — Rent reduction after invoicing — Hub matrix (
bookings-detail-change-monthly-rent-modal.png,bookings-rent-reduction-invoiced-floor-flow.mp4) - Bookings — Changing contract dates and rent — Contract Info repricing entry point
- Bookings — Contract Values tab — Per-line Edit amount under the same floor
- Finance — Invoiced floor and rent edits — Why edits start on the booking, not Finance → Transactions
- Check-in & Check-out tab — Departure bookings needing repricing before refund
- Processing a New Booking — Rent reduction after invoicing — Confirmation month already invoiced on Step 3
- Handling a Late Payment — Rent reduction after invoicing — Collections goodwill after Step 4
- Portfolio KPI review — Rent reduction after invoicing — Month-end repricing sign-off on Step 7
- Cancelling a Booking — Rent reduction after invoicing — Settlement repricing during Step 2b
- Managing a Check-in — Rent reduction after invoicing — Pre-move-in goodwill
- Managing a Check-out — Rent reduction after invoicing — Departure-week goodwill adjustments
- Notification triage — Rent reduction after invoicing — Row-click to invoiced booking on Step 4
- Entering Monthly Utility Bills — Rent reduction after invoicing — Month-end bill cycle on Step 5
- Manual block hygiene — Rent reduction after invoicing — Hold cleanup on Step 5
- Using in-app support — Rent reduction after invoicing — Self-serve before filing tickets
- Resetting a Management User Password — Rent reduction after invoicing — Lockout-delayed repricing after Step 3
- FAQ — Rent reduction after invoicing hub — Turnover-week repricing blocked by invoiced floor symptom table
Same-day turnover coordination
Check-in & Check-out week lists are the primary entry for hub Common Workflows — Same-day turnover coordination — switch Check-outs and Check-ins on one unit before you open Tickets for turnover prep. Full pairing matrix: Operations section cross-reference · Module cross-reference.
- Common Workflows — Same-day turnover coordination — Hub matrix (
operations-check-in-out-check-outs-next-7-days.png,operations-add-ticket-modal.png) - Check-in & Check-out Tab — Next 7 days / Custom with unit Search
- Tickets Tab — Turnover cleaning with tight due date
- FAQ — Same-day turnovers — Four-step operator habit
- Glossary — Same-day turnover — Shared-unit vocabulary
- Managing a Check-in — Same-day turnover coordination — Check-ins / Timeline overlap on Step 1 before Step 4 handover
- Managing a Check-out — Same-day turnover coordination — Turnover ticket due date on Step 2 before incoming arrival
- Processing a New Booking — Same-day turnover coordination — Timeline overlap on shared units during Step 1
- Onboarding a New Property — Same-day turnover coordination — Multicalendar / Timeline turnover planning on Step 7
Occupancy KPI to block hygiene handoff
Check-in & Check-out planning rows that show blocked units without an active reservation pair with hub Common Workflows — Occupancy KPI to block hygiene handoff before turnover tickets — stale holds suppress Multicalendar availability. Hub parity: Common Workflows — Occupancy KPI to block hygiene handoff. Full pairing matrix: Operations section cross-reference · Module cross-reference.
- Common Workflows — Occupancy KPI to block hygiene handoff — Hub matrix (
operations-check-in-out-planning-view.png,audit-manual-blocks-filter-scroll.mp4) - Check-in & Check-out tab — Arrival/departure week planning vs blocked units
- Bookings — Timeline view — Overlap bars from stale holds
- Manual block hygiene — Step 4 — Per-unit hold cleanup after Audit row-click
- Same-day turnover coordination — Turnover overlap distinct from hold hygiene
- FAQ — Occupancy KPI to block hygiene handoff hub — Symptom table for blocked planning rows
- Managing a Check-in — Occupancy KPI to block hygiene handoff — Timeline overlap from stale holds on Step 1
- Managing a Check-out — Occupancy KPI to block hygiene handoff — Calendar bars persist after Step 7
- Cancelling a Booking — Occupancy KPI to block hygiene handoff — Availability not restored on Step 5
- Entering Monthly Utility Bills — Occupancy KPI to block hygiene handoff — Dashboard vs Analytics vacancy mismatch on Step 5
- Notification triage — Occupancy KPI to block hygiene handoff — Vacant Units vs Analytics on Step 1
- Resetting a Management User Password — Occupancy KPI to block hygiene handoff — Lockout-delayed KPI review after Step 3
- Using in-app support — Occupancy KPI to block hygiene handoff — Calendar edit blocked after block hygiene
- Handling a Late Payment — Occupancy KPI to block hygiene handoff — Vacant Units vs Multicalendar holds on Step 1
Partly collected security deposit
Deposit shortfalls pair with Finance — Deposits status summary cards and Bookings — Deposit tab. Hub parity: Common Workflows — Partly collected security deposit. Full pairing matrix: Operations section cross-reference · Module cross-reference.
- Common Workflows — Partly collected security deposit — Hub matrix when Paid on the deposit is above zero but below Amount
- Finance — Deposit lifecycle status cards — Partial paid card for portfolio triage (#2091)
- Finance — Deposit status filter — Other filters → Deposit status → Partial paid on Bookings and Finance (#2090)
- Tickets toolbar search — Paste the full sequential ticket ID (for example
S259,T27) in toolbar Search (#2074) - FAQ — Find a ticket by its ID — Paste the full sequential ticket ID (for example
S259,T27) in Operations → Tickets toolbar Search (#2074) - FAQ — Skip automatic check-in/out tickets for one booking — Turn off Use unit contract rents and other contract details on Add booking to reveal CI/CO ticket checkboxes (#1140)
- FAQ — Manual payments after Delete Booking — Delete Booking hides manual/provider_platform rows on Finance → Transactions; vIBAN and credit card stay visible (#1897)
- FAQ — Communication or Tickets load failure — Tab-scoped Refresh (Communication) or Retry (Tickets); other booking sidebar tabs stay usable
- Glossary — Directory list load failures — First-fetch directory failures show Retry / Try again; distinct from filter-empty states and booking-sidebar tab errors
- Glossary — Vacant Unit Preference — Include manual blocks counts operator holds as free on Dashboard / Sales vacancy surfaces (#1427)
- Bookings — Deposit tab — Partially paid badge and remaining helper on a single reservation
- FAQ — Partly collected security deposit — Distinct from Partial Paid rent on Payment Plan
- Finance — Deposit lifecycle status cards — Deposit lifecycle status row (#2091)
- Glossary — Deposit lifecycle status —
depositStatuspill vocabulary (Partial Paid vs rent Partial Paid) - Finance — Deposit lifecycle status cards — Deposit lifecycle status row on Finance → Deposits; click Partial paid for collection shortfalls (#2091)
- Manual block hygiene — Partly collected security deposit — Partial paid card when debt KPIs stay high after holds cleared (Step 5)
- Resetting a Management User Password — Partly collected security deposit — Lockout-delayed deposit triage after Step 3
- Using in-app support — Partly collected security deposit — File Finance module tickets when partial filter or badge behaviour is wrong
- Entering Monthly Utility Bills — Directory list load failures — Utilities tab Retry on bill entry (Step 2)
- Handling a Late Payment — Directory list load failures — Receivables directory Retry on collections triage (Step 1)
- Managing a Check-in — Directory list load failures — Check-in & Check-out Retry on arrival-week planning (Step 1)
- Notification triage — Directory list load failures — /notifications Try again before alert row-click (Step 2)
- Resetting a Management User Password — Directory list load failures — Directory Retry after lockout catch-up (Step 3)
- Using in-app support — Directory list load failures — Support inbox Retry before filing tickets
Month-end invoicing (fixed date)
Turnover-week Tickets may overlap month-end Pending receivables — finish confirmation meshes before bulk Issue allocation with fixed Invoice date on Finance → Transactions. Hub parity: Common Workflows — Month-end invoicing (fixed date). Full pairing matrix: Operations section cross-reference · Module cross-reference.
- Common Workflows — Month-end invoicing (fixed date) — Hub matrix (
settings-invoicing-invoice-date-toggle.png,finance-transactions-fixed-invoice-date-banner.png,finance-transactions-bulk-toolbar-fixed-invoice-date-banner.png) - Invoicing — Default invoice date — Account-wide toggle + Save
- Common Workflows — Bulk Hostkit invoicing — Issue allocation after fixed date is saved
- Tickets tab — Turnover workload before month-end export
- Finance — Month-end invoicing with a fixed date — Bulk Issue allocation after fixed date is saved
- Processing a New Booking — Month-end invoicing (fixed date) — First-month bulk export after confirmation (Step 6b)
- Handling a Late Payment — Month-end invoicing (fixed date) — Collections batch during Step 6b
- Portfolio KPI review — Month-end invoicing (fixed date) — Step 7 sign-off mesh
- Notification triage — Month-end invoicing (fixed date) — Alert cleanup before bulk Issue allocation (Step 5)
- Entering Monthly Utility Bills — Month-end invoicing (fixed date) — Finish Missing data + overage Pending (Steps 4b–5)
- Manual block hygiene — Month-end invoicing (fixed date) — Clear stale holds before Issue allocation (Step 5)
- Using in-app support — Month-end invoicing (fixed date) — Self-serve before filing wrong-date tickets
- Resetting a Management User Password — Month-end invoicing (fixed date) — Lockout-delayed month-end export after Step 3
- FAQ — Month-end invoicing (fixed date) hub — Turnover-week tickets overlapping month-end bulk export with fixed Invoice date symptom table
Bulk Hostkit invoicing
Turnover-week receivables on linked bookings may need Pending clearance before month-end bulk Issue allocation — pair Check-in & Check-out Tab with Finance → Transactions. Hub parity: Common Workflows — Bulk Hostkit invoicing. Full pairing matrix: Operations section cross-reference · Module cross-reference.
- Common Workflows — Bulk Hostkit invoicing — Hub matrix (
finance-transactions-bulk-selection-bar.png,settings-invoicing-hostkit-series.png) - Common Workflows — Month-end invoicing (fixed date) — Fixed Invoice date before bulk Issue allocation
- Settings > Invoicing — Hostkit invoice series — Required FR code before Issue allocation
- Finance — Invoice automation — Bulk Issue allocation / Invoice selected toolbar
- Finance — Issuing credit notes (integrated invoicing) — Issue credit notes (N) after invoiced Reject / Revert
- Check-in & Check-out Tab — Turnover-week receivables mesh
- Finance — Bulk Hostkit invoicing — Transactions toolbar reference
- Processing a New Booking — Bulk Hostkit invoicing — First-month Issue allocation after confirmation (Step 6b)
- Handling a Late Payment — Bulk Hostkit invoicing — Collections month-end mesh (Step 6b)
- Portfolio KPI review — Bulk Hostkit invoicing — Step 7 month-end sign-off
- Managing a Check-in — Bulk Hostkit invoicing — Move-in Pending mesh (Step 6b)
- Managing a Check-out — Bulk Hostkit invoicing — Departure-week mesh (Step 6b)
- Onboarding a New Property — Bulk Hostkit invoicing — First month-end on new inventory
- Cancelling a Booking — Bulk Hostkit invoicing — Settlement bulk export (Step 6b)
- Notification triage — Bulk Hostkit invoicing — Alert cleanup before bulk export (Step 5)
- Entering Monthly Utility Bills — Bulk Hostkit invoicing — Finish Missing data + overage Pending (Steps 4b–5)
- Manual block hygiene — Bulk Hostkit invoicing — Clear stale holds before Issue allocation (Step 5)
- Using in-app support — Bulk Hostkit invoicing — Self-serve Hostkit pacing before filing tickets
- Resetting a Management User Password — Bulk Hostkit invoicing — Lockout-delayed month-end export after Step 3
- FAQ — Bulk Hostkit invoicing slow — Hostkit HTTP 429 pacing and refresh-before-reissue habit
- FAQ — Bulk Hostkit invoicing hub — Turnover-week tickets overlapping month-end bulk Issue allocation Hostkit pacing symptom table
Directory list load failures
Tickets and Cash Flows first-fetch failures show tab-level Failed to load … + Retry — other tabs (Overview, Check-in & Check-out, Schedule) stay usable. Pair Directory load failures with Managing a Check-in — Step 1 when arrival-week planning needs the Check-in & Check-out tab. Hub parity: Common Workflows — Directory list load failures. Full pairing matrix: Operations section cross-reference · Module cross-reference.
- Common Workflows — Directory list load failures — Hub matrix (
notifications-module-load-failure.png) - Directory load failures — Tickets / Cash Flows tab-level Retry
- Check-in & Check-out tab — Arrival-week directory on Managing a Check-in — Step 1
- Managing a Check-out — Directory list load failures — Departure-week Bookings / Operations list Retry
- Manual block hygiene — Directory list load failures — Audit → Manual Blocks Retry before hold scan
- FAQ — Directory list load failures — Whole-module vs empty filter state
- FAQ — Directory list load failures hub — Tickets / Cash Flows tab Retry vs empty filter state symptom table
- Glossary — Directory list load failures hub — Surface table + per-guide/module mesh reciprocal hub
Portfolio segmentation by tenant category
Segment filters pair with Settings > Tenant categories and Portfolio KPI review — Step 6. Hub parity: Common Workflows — Portfolio segmentation by tenant category. Full pairing matrix: Operations section cross-reference · Module cross-reference.
- Common Workflows — Portfolio segmentation by tenant category — Hub matrix when turnover tickets cluster on one tenant segment
- Check-in & Check-out Tab — Scope unpaid move-ins with Bookings — Other filters tenant category when portal rules differ by segment
- Bookings — Other filters — Tenant category on reservation list Other filters
- Tenants — Tenant category filter — Profile-count cross-check before segment-wide portal changes
- Settings > Tenant categories — Portal modules and move-in rules by segment during check-in/out prep
- Portfolio KPI review — Step 6 — Optional month-end segment pass on maintenance workload
Key glossary terms
Glossary rows pair with Glossary cluster cross-reference. Full pairing matrix: Operations section cross-reference · Module cross-reference.
-
Deposit dispute — Freeze deposit refunds when damage tickets precede contested retention
-
Glossary — End-of-Booking cost split — Charge Time → End of Booking splits daily overage across every occupied unit; still-staying roommates stay in the denominator (#2111)
-
Glossary — Change history — Operator-initiated edits on Listings setup and Bookings Changelog; create-time defaults excluded (#2093)
-
FAQ — Booking Changelog scope — Operator-initiated edits only; create-time defaults excluded (#2093)
-
Glossary — Archived booking ledger visibility — Delete Booking hides manual/provider_platform rows on Finance → Transactions; vIBAN and credit card stay visible (#1897)
-
Bookings — Provider platform payment — Non-rejected provider platform in-payment blocks Delete Booking until Reject or assign (#2076)
-
FAQ — Delete Booking on integration reservation — Clear pending provider platform in-payment with Reject or assign before soft-archive (#2076)
-
Listings — Property edit sidebar pills — Setup / Full integration / Photos pills on property and unit edit sidebars; replaced the old Go to details shortcut (#2082)
-
Glossary — Finance tenant category cache refresh — Recategorizing a tenant on Tenants → Tenant Info force-refreshes Finance caches so Contract Values, Overview, and Deposits filters match within seconds (#2088)
-
FAQ — Finance tenant category filter parity — Finance Other filters drawer lists segments on cached bookings only; mirror Bookings / Tenants when a segment is missing
-
FAQ — Assign tenant category for direct booking — Add booking has no category field; assign on Tenants → Tenant Info or + Create New → Tenant before contract mail
-
Glossary — SIMAR water contract ID — SIMAR (Loures e Odivelas) water bills use Cód. Local in Connections — not Nº de Contador; leading zeros stripped (#2110)
-
FAQ — SIMAR water bill property match — Cód. Local in Connections — not Nº de Contador; strip leading zeros (#2110)
-
Glossary — Per-booking maintenance ticket opt-out — Add booking checkboxes skip automatic CI/CO tickets for one reservation only; property rule unchanged (#1140)
-
Glossary — Same-day turnover — Check-in & Check-out week lists and turnover ticket due dates on shared units
-
FAQ — Archive a property — Edit property sidebar Archive / Unarchive on Listings; building-level — not Delete Booking or Cancel booking
-
FAQ — Same-day turnovers — Four-step habit when check-out and check-in share one calendar day on a unit
-
FAQ — Cancel Booking vs Delete Booking — Cancel for real stays with settlement; Delete soft-archives mistaken/test rows (#1897 / #2076)
-
Glossary — Archived property — Archive retires a building to Listings → Archived without deleting bookings; distinct from Delete Booking (reservation soft-archive) — Listings — Archived properties
-
FAQ — Portfolio retirement decisions — Archive property (building) vs Cancel booking vs Delete Booking (reservation soft-archive) — three-way decision table
-
Deposit lifecycle status —
depositStatuspill vocabulary from Fully Paid through Refunded -
Finance — Deposit status filter — Other filters → Deposit status multi-select on Bookings and Finance (#2090)
-
Tickets toolbar search — Paste the full sequential ticket ID (for example
S259,T27) in toolbar Search (#2074) -
Operations — Property-level ticket search — Property-name matches share the top relevance tier with unit hits; building-scoped rows float first under an active Property filter (#2089)
-
Credit note (payment reject/revert) — Settlement receipts cleared during check-out (Step 6 in check-out workflow)
-
Invoiced floor (rent) — Cannot lower invoiced rent on Contract Values during damage deductions or goodwill adjustments tied to tickets
-
FAQ — Bulk Hostkit invoicing slow — Vivin paces Hostkit API calls and retries HTTP 429 during bulk Issue allocation / Invoice selected; refresh Transactions before re-issuing
-
Same-day turnover — Coordinate overlapping arrivals and departures on shared units
-
Tenant category — Segment portal and payment rules when turnover tickets involve mixed tenant profiles
-
Booking detail sidebar tab load failures — Tickets tab Retry when the booking sidebar list fails to load
-
Short-term iCal pseudo check-in/out — Channel-only calendar rows on this tab
-
FAQ — AI token usage — Poll GET /ai-usage / GET /ai-usage/summary with management JWT;
landlord_chat+utility_bill_extraction; no management UI screen yet -
FAQ — Automatic check-in email — Trigger matrix, 15-day cutoff, paper upload vs portal signing, Nuki-only toggle, Send / Resend on Contract Info
-
FAQ — WhatsApp and email per booking — Bookings → Communication tab when tenant chatbot is enabled; Inbox for portfolio-wide triage
-
FAQ — Deposit missing on Finance Deposits — Default ~3 months date range; clear or widen before triaging older move-outs or dispute row actions
-
FAQ — Pending manual in-payment on /notifications — Alert persists until Approve payments clears Finance or booking Transactions
-
FAQ — Uncovered Debt KPI — Finance Total Debt minus deposit offsets; pair with Debt Aging and In debt drill-down
-
FAQ — Dashboard Total Debt subtitle — Post-login Total Debt card headline vs >15 days subtitle; ongoing bookings only
-
FAQ — Analytics (KPI workspace) — Portfolio KPIs vs Sales/Listings/Dashboard; load-failure Try again
-
FAQ — Lower rent below invoiced — Change monthly rent clamps and Contract Values → Edit amount blocks net below exported invoice totals; use credit notes in accounting when you truly need a reduction
-
FAQ — Reject or revert an incoming payment — Reject pending rows or Revert confirmed ones; Finance → Transactions uses Reject selected bulk-only; modals warn about credit notes when Finance already invoiced
-
FAQ — Finance Income status drill-down — Overview Income chart (Paid / Scheduled / In debt); click a segment for month-scoped payment-line modal; Debt Aging for booking-level receivables
-
FAQ — Permission denied toast — Red You do not have permission to perform this action. toast when RBAC blocks a save; fix in Users → Role Permissions
-
FAQ — Phone shows Operations only — Mobile phone user agent locks operators with Operations access to
/operations; iPads and narrow desktop browsers keep the full module list -
FAQ — Notification row-click navigation — On
/notifications, row click marks unread then openslink,bookingId,tenantId,listingId, orpropertyId(first match); Dashboard bell General rows stay in-panel unlesslinkis set -
FAQ — Bookings that owe money — Top debtors and overdue buckets on Finance → Overview; Total Debt KPI is not a table
-
FAQ — Fixed rent on variable unit — Variable listing + equal rent every contract month → booking stores fixed headline Monthly rent; payment plan unchanged
API & companion guides
API bullets pair with API Reference hub. Full pairing matrix: Operations section cross-reference · Module cross-reference.
- API Reference — Creating Bookings — Partner imports that spawn check-in/out prep tickets after background validation succeeds
- API Reference — Booking Lifecycle & Validations — Integration queue states before imported stays appear on Check-in & Check-out
Module documentation hubs
Module hub bullets pair with Modules — Module cross-reference. Full pairing matrix: Operations section cross-reference · Module cross-reference.
- Operations module — Hub for maintenance tickets, cash flows, check-in/out coordination, Draft ticket queues, and linked cash flows (this page)
- Bookings module — Full reservation lifecycle with sidebar Tickets and Communication tabs (hub)
- Finance module — Portfolio ledgers with payment approval and deposit settlement (hub)
- Listings module — Property wizard, Maintenances tab, and unit management (hub)
- Dashboard module — Post-login Today, Total debt, Vacant Units, and forecast KPI snapshot (hub)
- Analytics module — Month-range portfolio KPI charts with Maintenance tab (hub)
- Utilities module — Bills Included ceiling model, Connections, and tenant overage charges (hub)
- Sales module — Portfolio availability, monthly rent editing, and channel manager connections (hub)
- Inbox module — Portfolio-wide WhatsApp workspace (hub)
- Notifications module — Full
/notificationshistory with row-click navigation (hub) - AI Chat module — Vivin-internal AI Assistant for portfolio Q&A (hub)
- Audit module — Portfolio-wide Manual Blocks and Discounts contract-value review (hub)
- Properties workspace — Legacy
/propertiesURL redirects into Listings (hub) - Booking engine details — Rich marketplace payload editor via the Full integration pill (hub)
- Tenants module — Tenant directory, profile sidebars, and With Debt segmentation (hub)
- Account Settings — Workspace-wide financial policies, templates, integrations, and operational defaults (hub)
- API Reference hub — Partner HTTP contracts and partial vs full feeds (hub)