Utilities
9. Utilities
The Utilities module tracks and manages monthly property expenses for electricity, water, gas, and internet. Its primary purpose is twofold: giving you a clear view of your utility costs across your entire portfolio, and automatically calculating the tenant overage (the portion of a utility bill that exceeds the included amount and is charged back to the tenant).
9.1. How Utility Billing Works
Vivin uses a ceiling model for tenant utility billing. When you create a property, you define a Bills Included amount for each utility — the maximum cost that is absorbed into the rent. If the actual monthly bill exceeds that ceiling, the tenant is automatically charged the difference.
- Bills Included (electricity) on a property: €50/month
- Actual electricity bill for March: €73
- Tenant overage charge: €23 (added to their payment schedule)
- If the bill had been €42, the tenant pays nothing extra — you absorb the full €42
For this system to work, two things must be set up:
- Utility account IDs linked to each property (configured in the property wizard Step 2, managed in the Connections tab)
- Bills Included amounts configured on the property (Step 3 of the property wizard)
9.2. Overview Tab
The Overview tab is the central dashboard for utility expenses across your entire portfolio. It loads with the current month selected, and you can navigate to any past month using the month selector.
The overview shows a list of all utility bills for the selected period. For each entry you can see the property, utility type, billing amount, and whether the bill has been paid or is still outstanding.
Below the list, the tab includes two key charts:
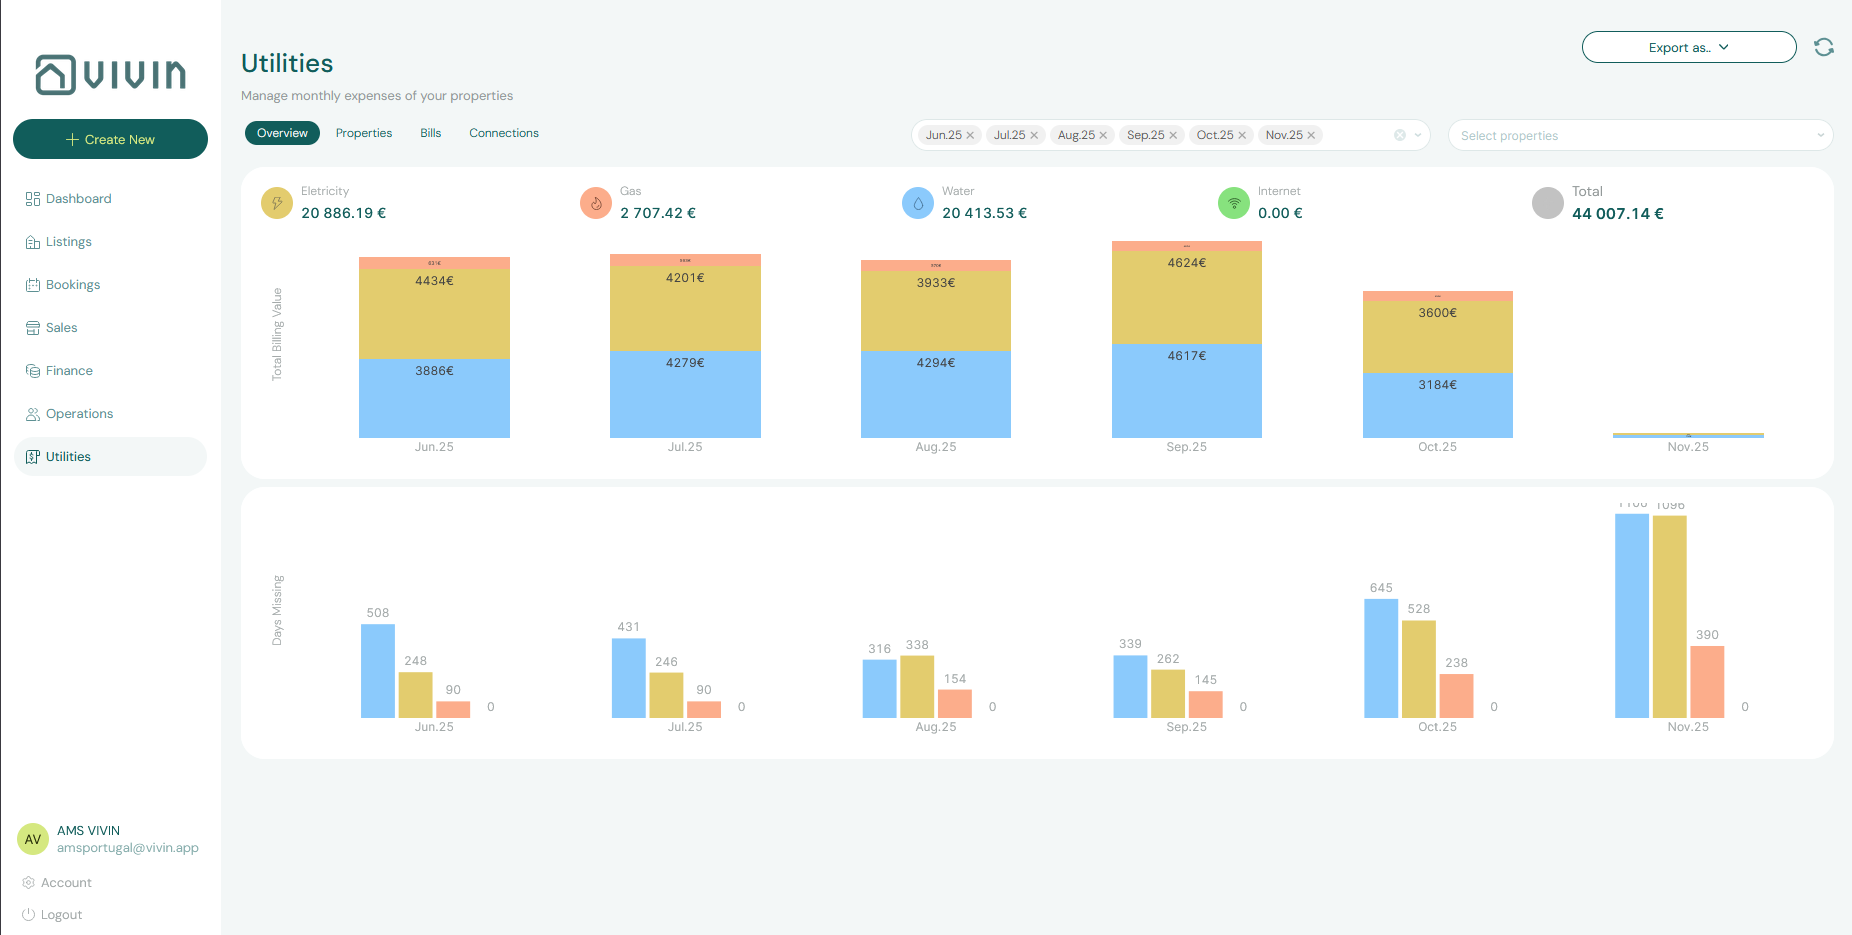
Total Expense Value Over Time A stacked bar chart showing utility costs month by month. Each bar is segmented by utility type (electricity, gas, water, internet), each in a distinct color. This lets you:
- Identify seasonal cost spikes (e.g., higher gas bills in winter)
- Spot sudden increases that may indicate a leak or equipment fault
- Track whether your overall utility spend is trending up or down
Days Missing Data by Utility Type A stacked bar chart showing how many days of bill data are missing for each utility type in each month. Missing data gaps mean the system cannot calculate accurate tenant overages for those periods. Use this chart to identify which properties need bills entered for past months.
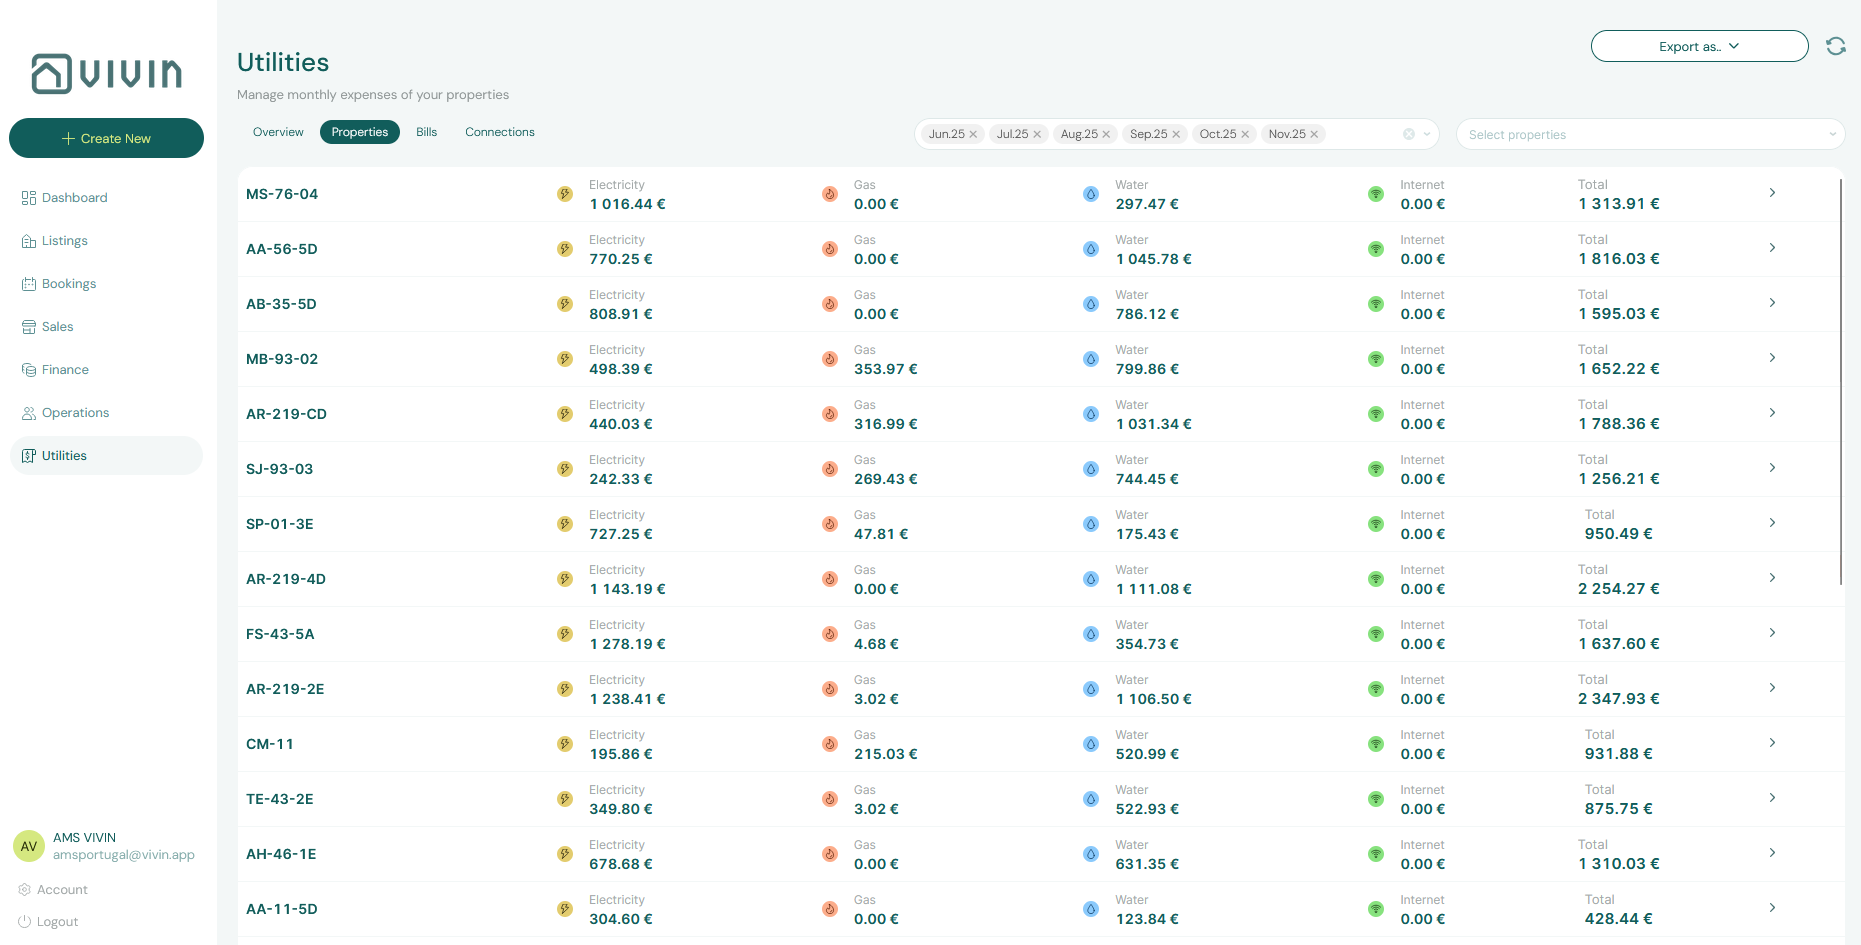
9.3. Properties Tab
The Properties tab breaks down utility expenses on a property-by-property basis, making it easy to understand the cost profile of each building separately.
Select a specific property from the dropdown at the top to view:
- A monthly breakdown of all utility costs for that property
- Which utility account IDs are connected to it
- A history of bills entered for each utility type
Use this tab when reviewing a property's operational costs or preparing an owner statement — it gives you a single-property view of all utility expenses over any time period.
9.4. Bills Tab
The Bills tab is the detailed ledger of every utility bill entered into the system. This is where day-to-day bill management happens.
Each bill entry shows:
| Column | Description |
|---|---|
| Property | Which property this bill belongs to |
| Utility Type | Electricity, Gas, Water, or Internet |
| Billing Period | The month or date range this bill covers |
| Amount | The total billed amount |
| Status | Paid, Unpaid, or Overdue |
Filtering Bills
Use the filter controls above the list to narrow down by:
- Property — view bills for a single building
- Utility type — focus on one service (e.g., only electricity)
- Status — isolate unpaid or overdue bills that need action
Adding a New Bill
To enter a utility bill manually, click + Add Bill and fill in:
- Property — which property this bill is for
- Utility type — the service provider type
- Billing period — the month or date range the bill covers
- Amount — the billed amount (what you owe to the utility company)
- Due date — when the bill must be paid
Once saved, the system compares the bill amount against the Bills Included ceiling for that property and utility type. If the bill exceeds the ceiling, the system creates an overage charge in the relevant tenants' payment schedules automatically.
Bills must be entered for the correct billing period. An electricity bill covering March must have March as its period — if you enter it in April with April as the period, the overage calculation will be assigned to the wrong month and wrong tenants.
9.5. Connections Tab
The Connections tab manages the link between properties and their utility accounts. This is the configuration layer that tells Vivin which utility account belongs to which property.
Each row in the Connections tab represents a property-utility pairing and shows:
- Property name
- Utility type
- Account ID — the identifier for that utility account (e.g., a meter number, contract reference, or customer number provided by the utility company)
Where Account IDs Come From
Account IDs are first set during Step 2 of the property creation wizard (Section 4.2, Step 2). However, if you need to update an account ID — for example, if the utility provider changes the reference number or you switch providers — you do so here in the Connections tab without editing the property itself.
Adding or Updating a Connection
Click + Add Connection or click an existing connection to edit it. Specify:
- Property
- Utility type
- Account ID
Once saved, any future bill imports or manual bill entries using this account ID will be automatically associated with the correct property.
If a property has no connection configured for a given utility type, the system cannot associate bills for that utility with the property. Ensure all active utility services have a corresponding connection entry.
9.6. How Tenant Overage Charges Are Created
When a bill is entered and exceeds the Bills Included ceiling, Vivin automatically generates an overage charge for the affected tenants. Here is the full flow:
- Bill entered for Property A, Electricity, March, €80
- Ceiling checked — Property A has Bills Included of €50 for electricity
- Overage calculated — €80 − €50 = €30 overage
- Tenants identified — all active bookings in Property A during March are identified
- Charge created — a new charge of €30 is added to each eligible tenant's payment schedule
- Tenant notified — if email automation is configured, the tenant receives a notification of the new charge
If multiple units exist within a property and each has a different Bills Included ceiling (configured at the unit level), the overage is calculated independently for each unit.
9.7. Key Business Rules for Utilities
-
Bills Included is a per-property ceiling. Set it during property creation (Step 3) or edit it afterward in the property's payment settings. It represents the maximum utility cost absorbed into the rent — anything above this becomes a tenant charge.
-
Missing bill data = missing overage charges. If you forget to enter a utility bill for a month, no overage will be calculated for that period. Use the "Days Missing Data" chart in the Overview tab to identify and fill gaps.
-
Billing periods must be accurate. A bill must be assigned to the period it covers, not the period it was received. Entering a January bill in February is fine — just ensure the billing period is set to January.
-
Account IDs must be unique per utility per property. Each utility connection requires a unique account ID. If two properties share the same electricity meter (unusual but possible), they will share the same connection entry.
-
Overages are calculated at the property level by default. If your property has multiple units, the overage is split across all active bookings. Configure Bills Included at the unit level if different units should have different ceilings.