Managing Listings (Properties & Units)
Finish Getting Started — Recommended Setup Sequence steps 1–12 on Account Settings (map: Recommended setup order) before step 13 — create and configure properties and units here. Guided settings steps 4–12: Onboarding a New Property. After steps 14–15 go live, run Onboarding a New Property — Step 7. Legacy /properties bookmarks redirect here — see Legacy /properties URLs. Lockout catch-up: Getting Started. Workflow pairing: Modules — Setup sequence after go-live.
Skim Understanding the Listings Structure, then use Portfolio toolbar before Creating a New Property or Creating a New Unit. Link channels on Channels Tab; review Archived properties separately. Guide subsection map: Listings guide subsection index (portfolio, unit, and channel sections + Related subsections). Non-linear operator habits (Lockout catch-up, Pending manual receipt approval, Reject/revert mistaken receipts, Notification row-click navigation, Payment alert to receivables triage, Confirmation alert triage, Finance debt receivables triage, Finance Income status drill-down, Cash flow forecast drill-down, Partly collected security deposit, Portfolio segmentation by tenant category) have matching Related subsections below. Full pairing matrix: Listings section cross-reference · Modules — Module cross-reference.
The Listings module is your property portfolio inventory. This is where you view, create, edit, and manage all properties and their individual units from a single workspace. Understanding how to work with this module is essential, as properties and units form the foundation for all bookings, financial tracking, and operations. With real-time occupancy tracking, multi-property support, and role-based team access, you have complete control over your entire portfolio.
/properties links?Legacy URLs under /properties redirect into Listings. See Legacy /properties URLs for the exact redirect table.
Open the Listings module at platform.vivin.app/listings. See Deep Links for all management frontend routes, including property and unit sidebar URLs.
Link units on Sales → Channels before channel import; pair Bookings for reservations and Utilities → Connections for Bills Included ceilings. New direct bookings inherit the property’s default tenant category — cross-check segment counts on Tenants — Tenant category filter before you change portal modules account-wide. When Property Payments Active is enabled, unpaid portal charges can surface payment overdue rows — continue with Handling a Late Payment — Step 1. Poll AI usage API (utility_bill_extraction) when Utilities → Bills AI upload volume spikes after new properties go live — there is no in-app ledger screen yet. Section-to-doc pairing: Listings section cross-reference. Hub tab matrix: Modules — Module cross-reference.
If /listings/property/:propertyId/... points to a property that does not exist or is outside your account, the app shows Property not found. and returns you to /listings. See Deep Links — Broken entity deep links.
Understanding the Listings Structure
Portfolio hierarchy pairs with Onboarding a New Property and the legacy Properties workspace redirect. Full pairing matrix: Listings section cross-reference.
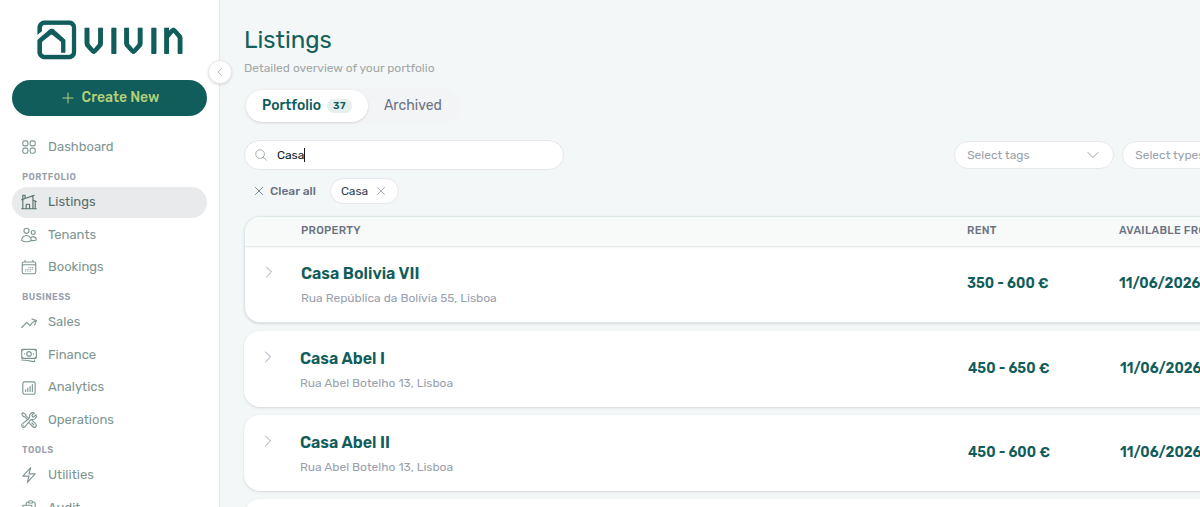
Vivin organizes your portfolio in a hierarchical structure: Properties contain Units. A property represents a physical building or location (for example, "Central Apartment Building" or "Riverside Complex"), while units represent the individual rentable spaces within that property (for example, "Unit 101" or "Studio A").
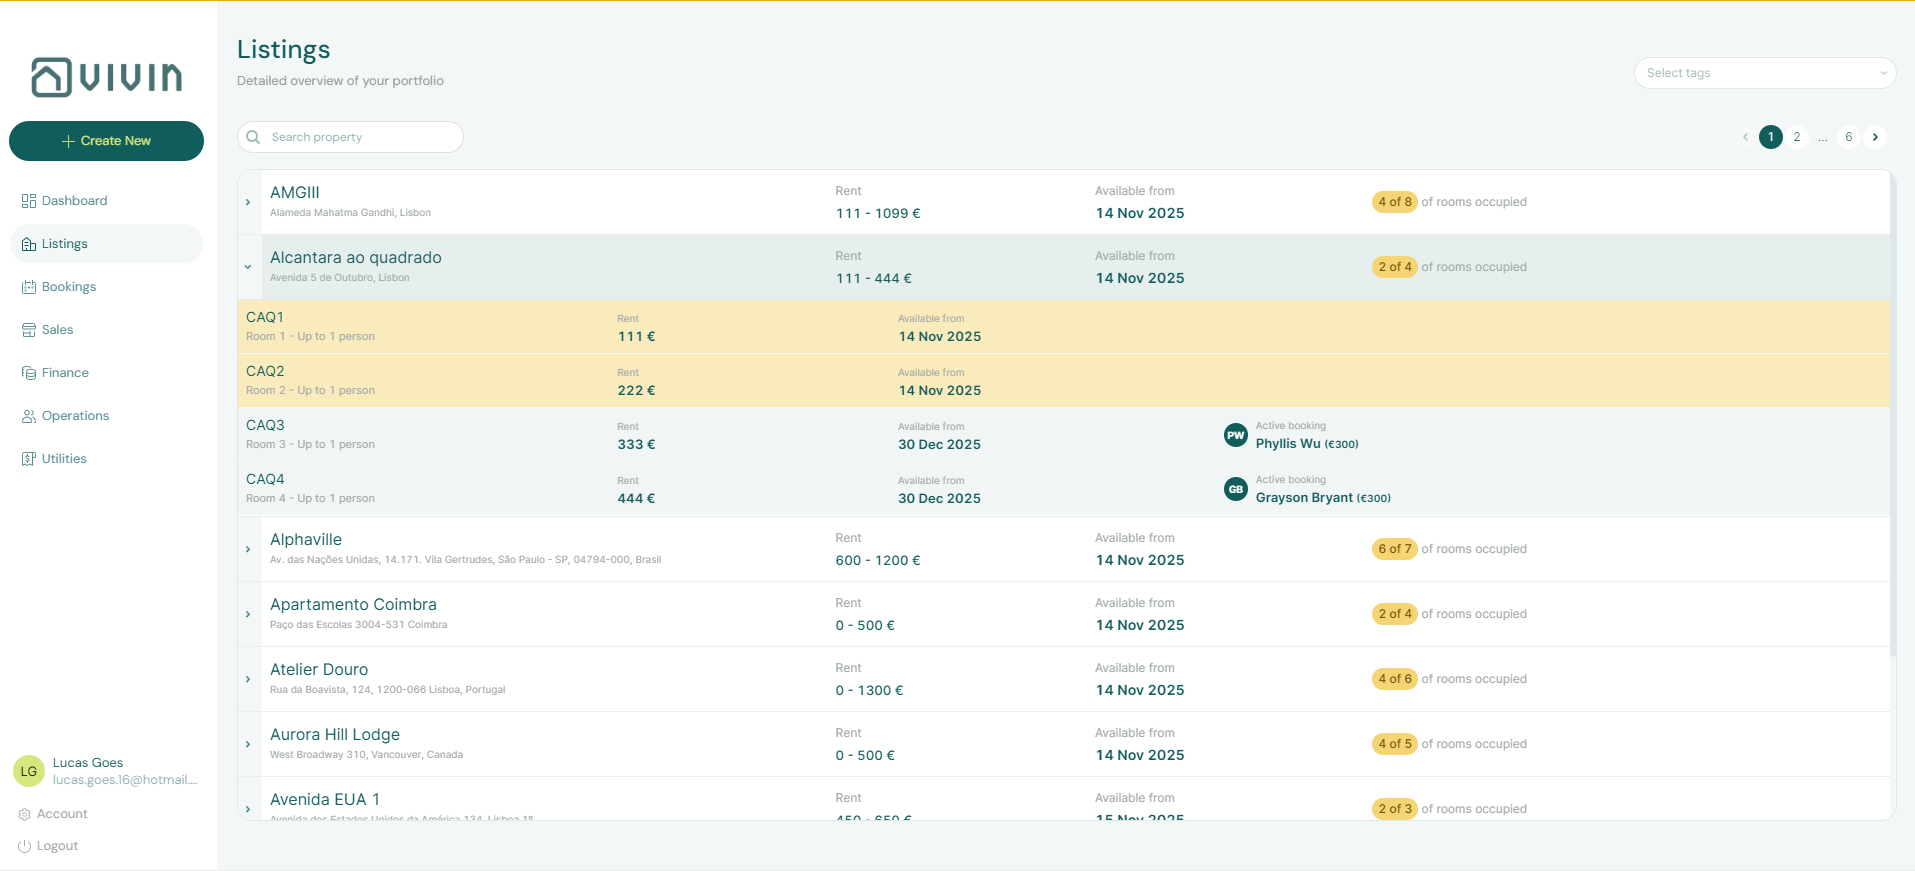
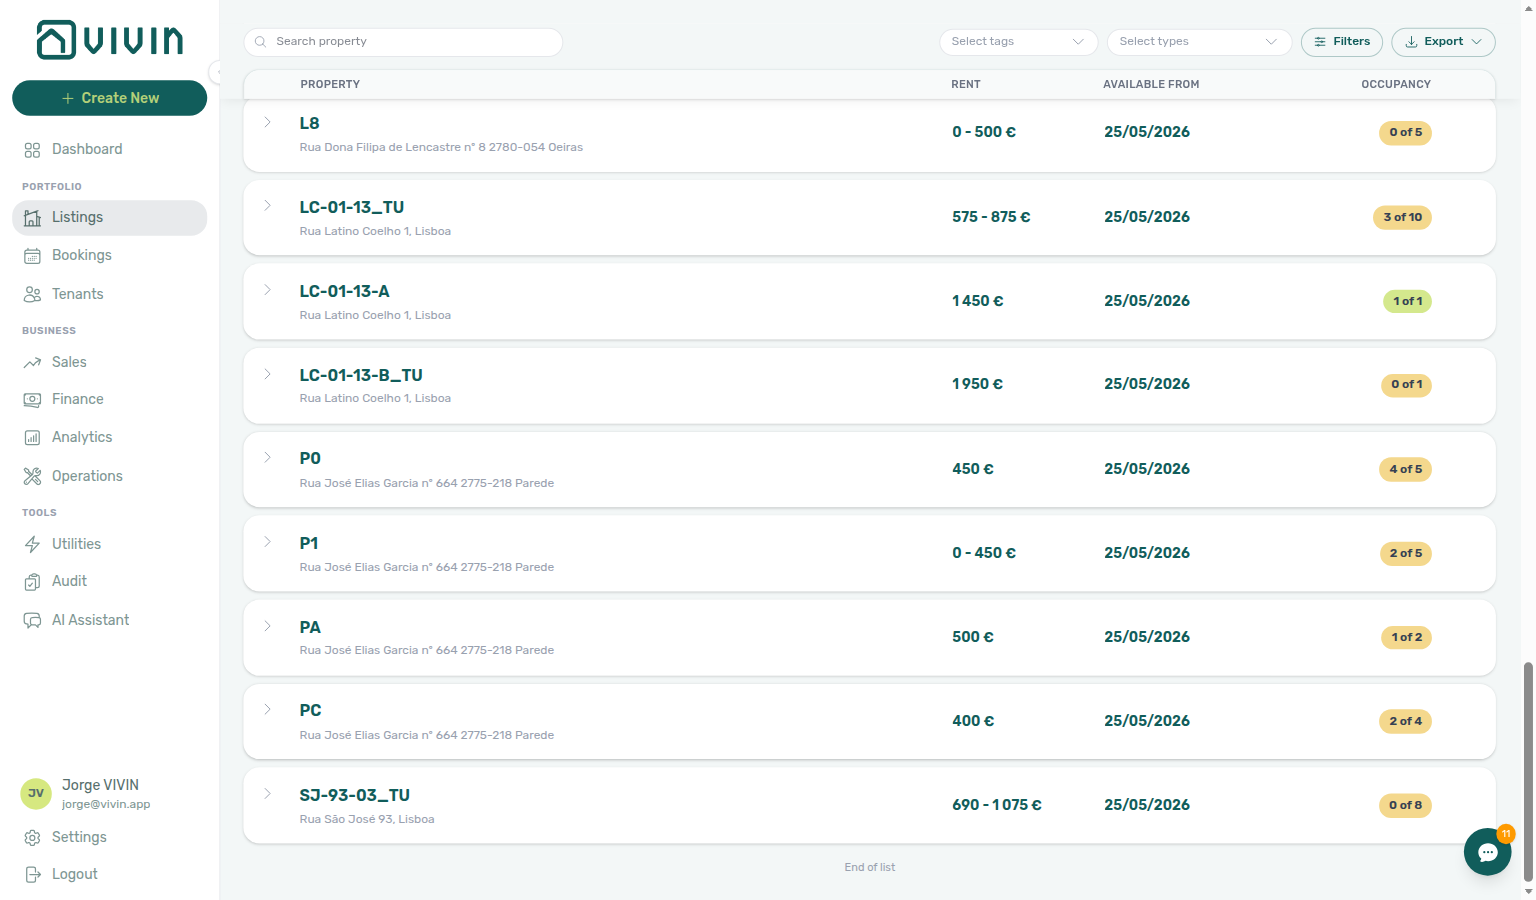
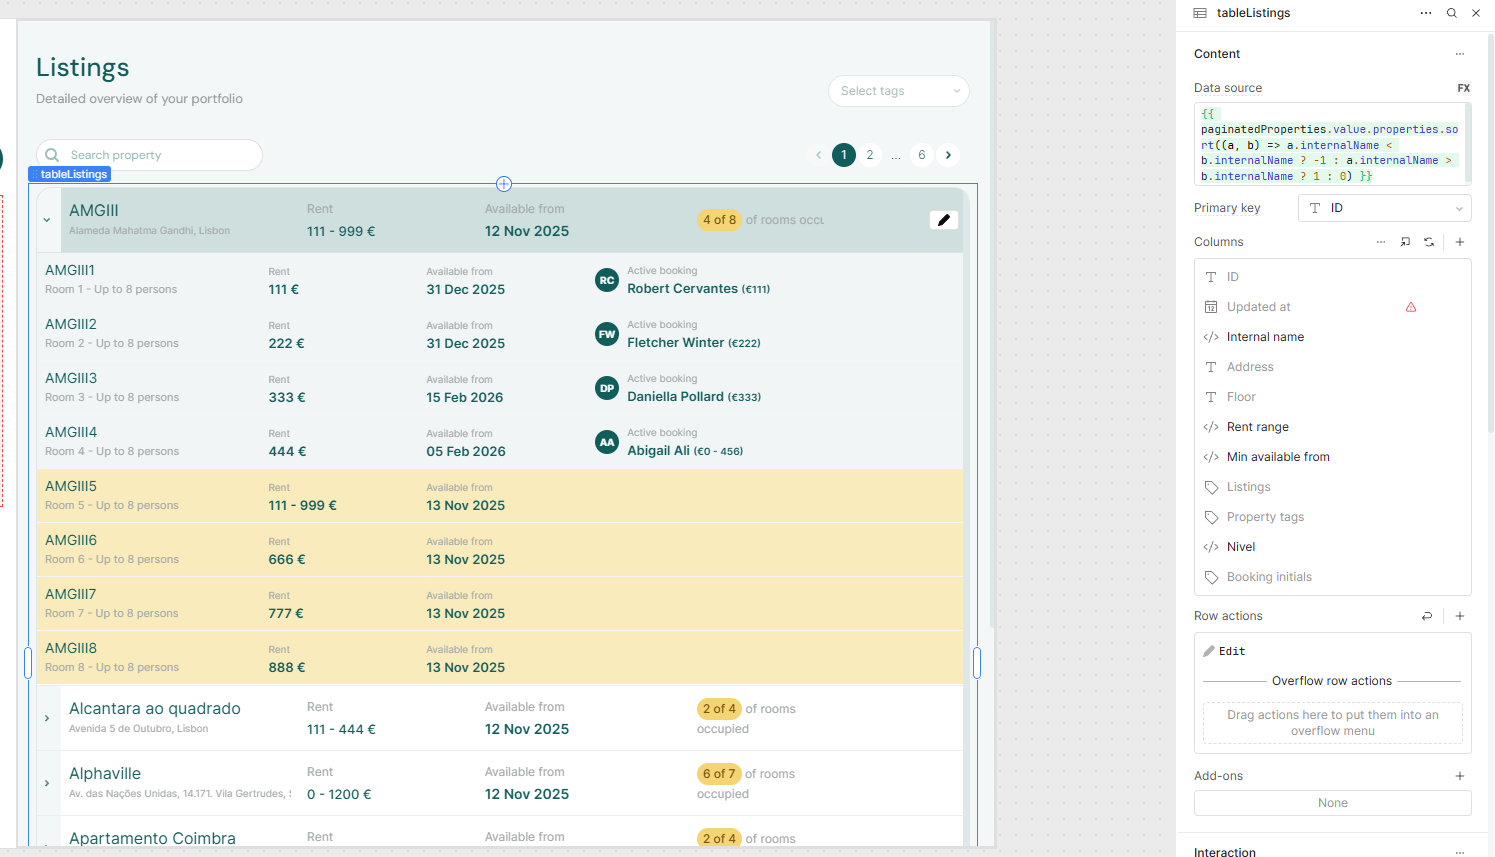
When you open the Listings module, you will see a table displaying all your properties. Each row represents one property and shows key information including:
- Cover photo — When the property has at least one Full integration photo, the row shows a small thumbnail of the main (cover) image; hover ~2 seconds for a larger preview. Rows without photos keep a muted placeholder so the table stays aligned.
- Property Name
- Full Address
- Rent Range (minimum and maximum rent across all units)
- Available from (earliest date a unit in that property becomes bookable)
- Occupancy — badge showing
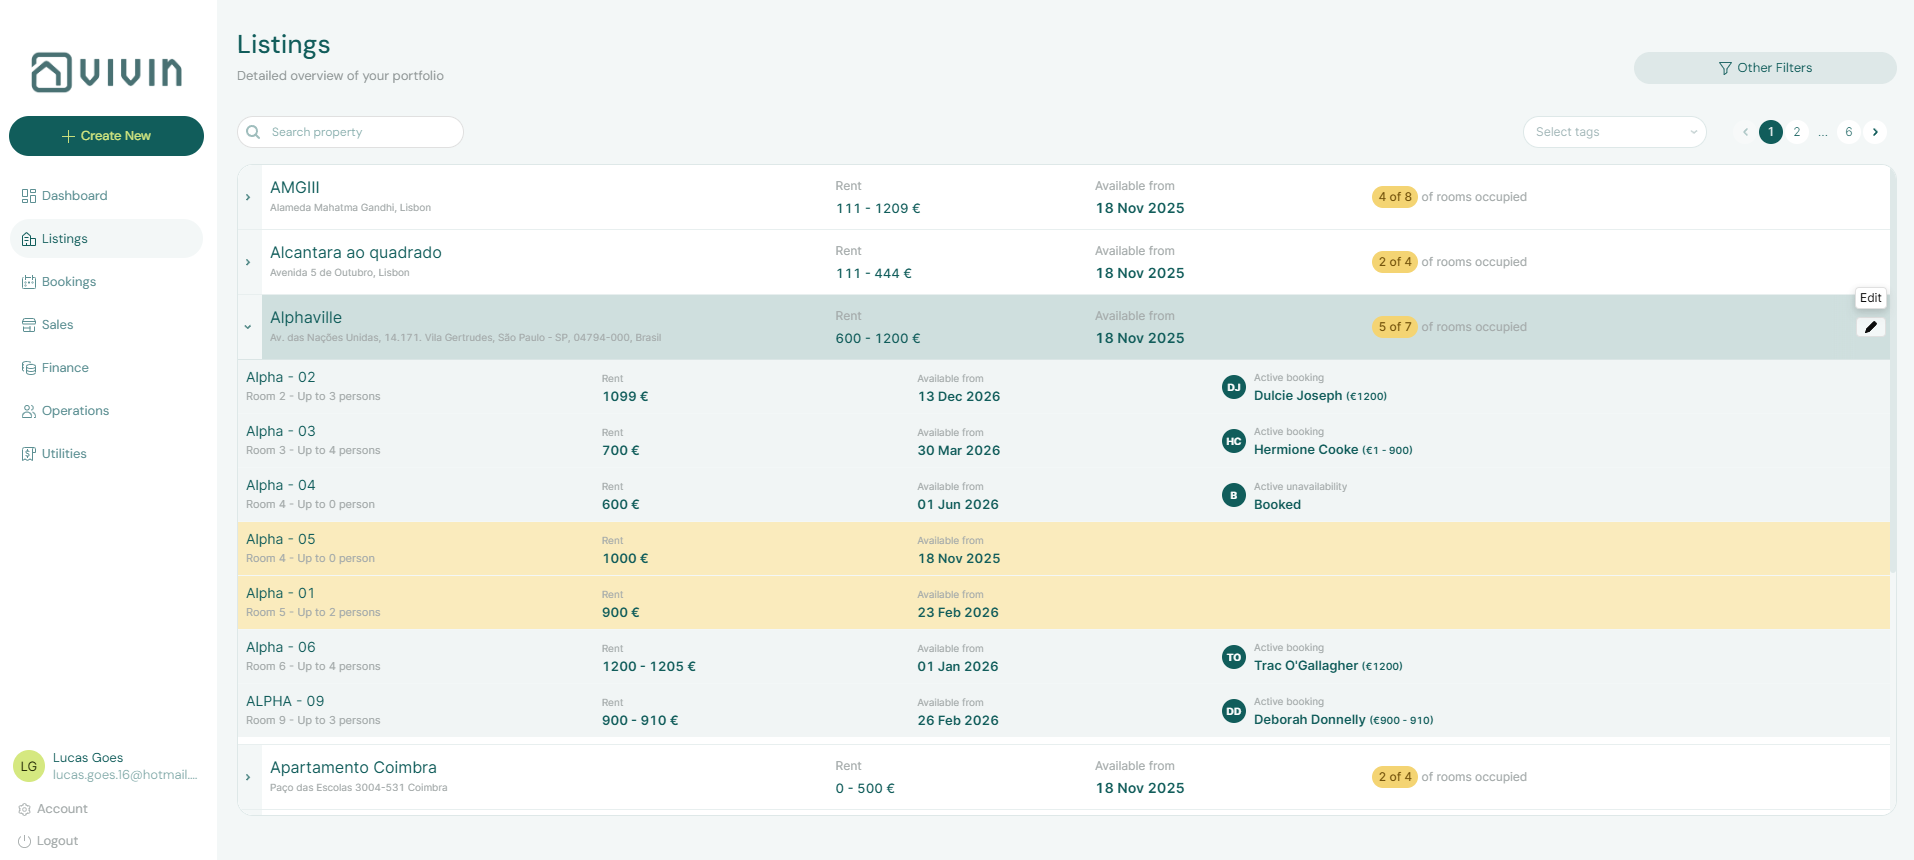
X of Yunits occupied today (active Vivin booking or manual/short-term block covering today) - Expand Arrow (click to reveal units)
- Edit Icon (pencil icon to edit the property)
To view the units within a property, click the arrow icon on the left side of the property row. The row will expand to show all units belonging to that property. Each unit displays its internal name, type, rent, Available from, and — when occupied today — either an Active booking chip (tenant + rent; opens the booking sidebar) or an Active unavailability chip (manual block or short-term hold reason).
Reading occupancy in the portfolio table
Property-level badge (X of Y)
| Badge colour | Meaning |
|---|---|
Green (occupied === total) | Every unit in the property is occupied or blocked today |
Yellow (occupied < total) | At least one unit is free today — use this to spot partial vacancy at a glance |
Grey (total === 0) | Property has no units yet |
Occupied counts include both active Vivin bookings and unavailabilities (manual blocks, short-term iCal holds, and similar) that cover today’s calendar date — the same rule used in Sales Overview “free room” logic.
Expanded unit rows
| Row background | Occupancy column |
|---|---|
Mint (#f1f5f5) | Unit is occupied today — Active booking (click tenant chip → booking sidebar) or Active unavailability (reason text; edit the block from the unit Calendar) |
Yellow (#faebbd) | Unit is vacant today — no active booking and no block covering today |
![]()
Partial-occupancy badge and expanded unit-row captures refreshed 2026-06-12 12:12 UTC (VIVIN_DOCS_BASE_URL=http://localhost:5173 VIVIN_DOCS_RECORD_API=$VITE_API_BASE_URL npx tsx tools/capture-listings-portfolio-occupancy-screenshots.ts).
Deep links hidden by filters
If you open /listings/property/:propertyId/edit or search for a property but toolbar filters or search hide that row, the portfolio shows No properties found with a Clear filters control. Click it to reset search, tags, type, and capacity filters so the deep-linked property appears. See also Deep Links — Listings.
Unit order within an expanded property
When a property row is expanded, units are sorted by internal name using natural numeric order (for example Room 2 before Room 10, or AA-11-5D-R2 before AA-11-5D-R10). The sort key is the unit internal name only — not the display room number label shown in the row.
Portfolio table loading (infinite scroll)
On Portfolio and Archived, the property table is server-paged and loads in chunks as you scroll — there is no separate Load more button.
Each batch is served by GET /properties/portfolio with the same search, tag, type, capacity, and archived flags you set in the toolbar. Distinct portfolio filter catalog values (tags, types, capacities) load once per session from GET /properties/portfolio/filter-options so scrolling pages does not re-download the full account.
- First load — The app requests an initial batch of property rows (enough to fill a typical desktop viewport).
- Scroll for more — When you scroll near the bottom of the main content area, the next batch loads automatically. While the request runs, you see skeleton rows at the bottom of the table.
- End of list — After every property in the current filter set is loaded, a subtle End of list line appears below the table.
- Search and filter refetch — Changing search, tags, type, capacity, or switching between Portfolio and Archived starts a new server request from the first batch. Portfolio search debounces for about one second after you stop typing before the server query runs — until then, or while the refetch is in flight, the table shows skeleton placeholders instead of a misleading No properties found empty state. The active search chip and toolbar filters stay visible so you know which criteria are in flight. Each search or filter change also scrolls the portfolio table back to the top so the first batch of matching rows is always in view (you are not left mid-scroll on an old slice from the previous criteria).
Large portfolios stay responsive because only part of the list is in memory at once; expand a property row only after its parent row is visible in the loaded slice.
Load failures — When the first portfolio or archived request fails, the active tab shows a red inline alert card — Failed to load listings. Please try again. — with optional server detail and Retry (Portfolio and Archived share the same pattern). Toolbar tabs stay visible so you can switch to Tags & types or retry after connectivity improves. This is distinct from search or filter criteria that genuinely match zero properties. See Glossary — Directory list load failures.
While a search or filter refetch is loading and no rows match yet, skeleton cards fill the main table area:
After the debounce finishes and the server returns matches, the active search chip stays under the toolbar (with Clear all and any tag/type chips) while property cards show the filtered portfolio:
Portfolio search chip capture refreshed 2026-06-12 00:05 UTC (npx tsx tools/capture-listings-portfolio-search-results-screenshot.ts). Listings does not re-rank by unit name — see Glossary — Directory search ranking.
While the next scroll page is loading, placeholder skeleton rows appear at the bottom of the table (same card shape as property rows):
When every row for the current filters is loaded, the End of list line appears under the table:
Clicking on an active unit row opens a Booking Sidebar on the right side of the screen, showing the current tenant's booking details, payment status, and key dates — all without leaving the Listings module:
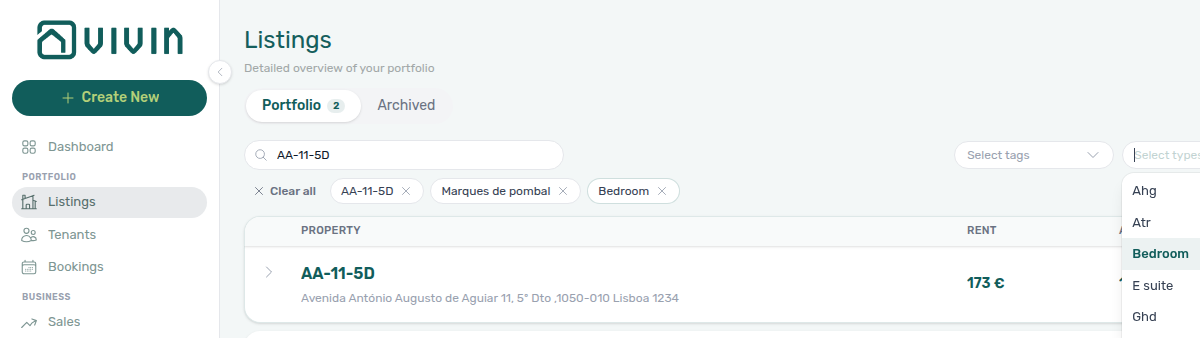
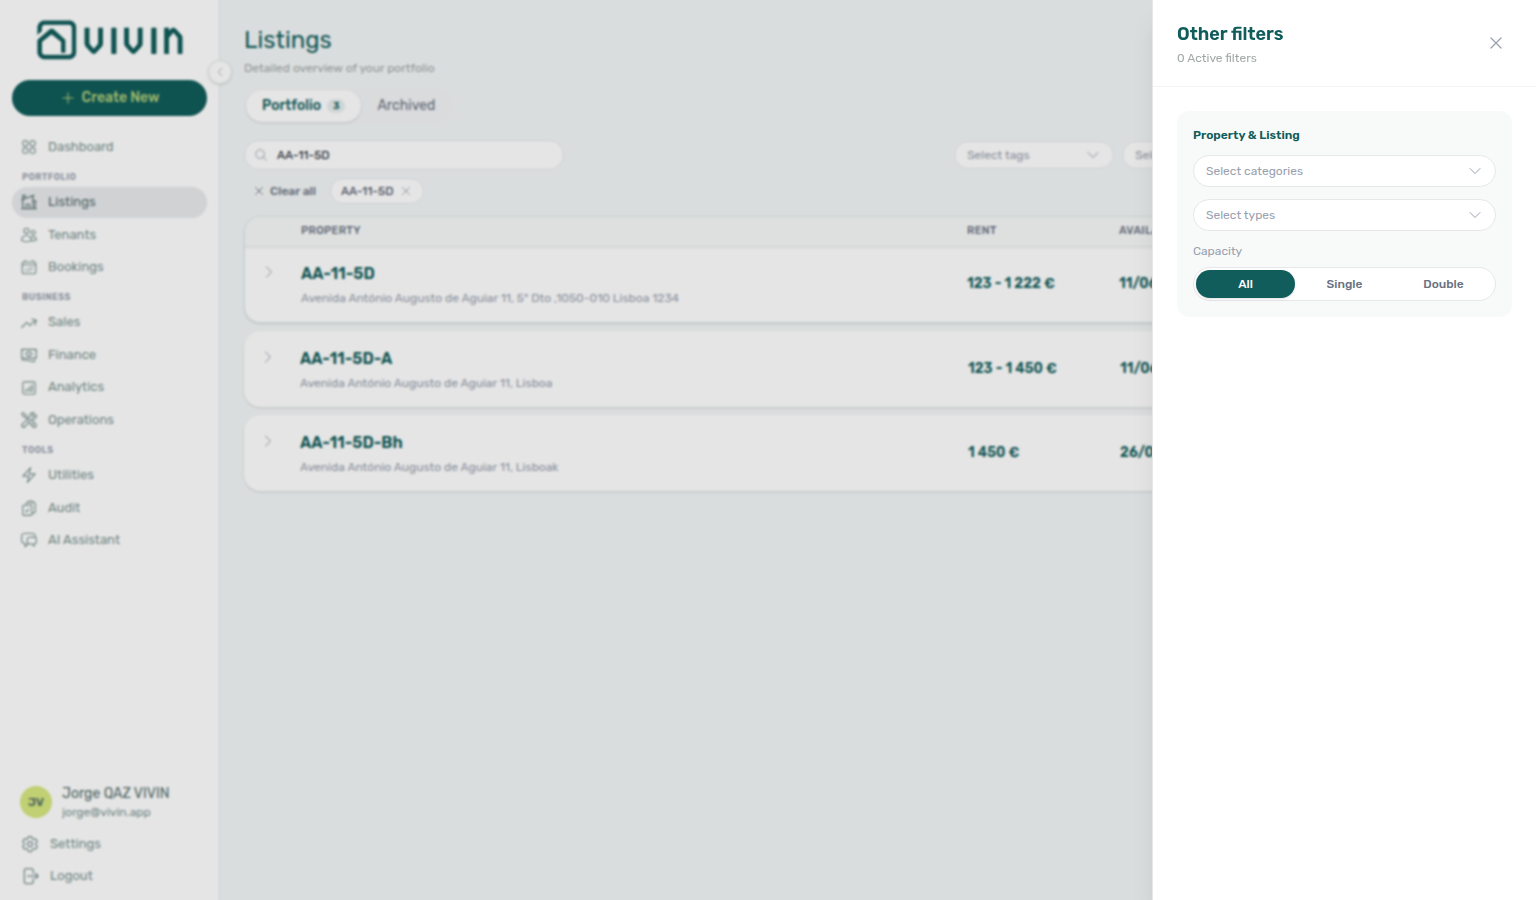
Portfolio toolbar: search, filters, and export
The Portfolio and Archived tabs share one toolbar above the property table:
| Control | Purpose |
|---|---|
| Search | Free-text filter on property internal name and address, plus unit internal name and room number label. Results debounce (~1 s) and refetch from the server — see Portfolio table loading. |
| Tags / Types (desktop) | Inline multi-select chips for listing categories (tags) and type labels. Selected values also appear as removable chips under the toolbar with Clear all. |
| Filters | Opens the Other filters drawer — same tag/type pickers plus Capacity (All, Single, Double). The drawer header shows how many filters are active. |
| Export | Server-side download of the current tab + search + tag/type/capacity scope (not only rows loaded in the viewport). |

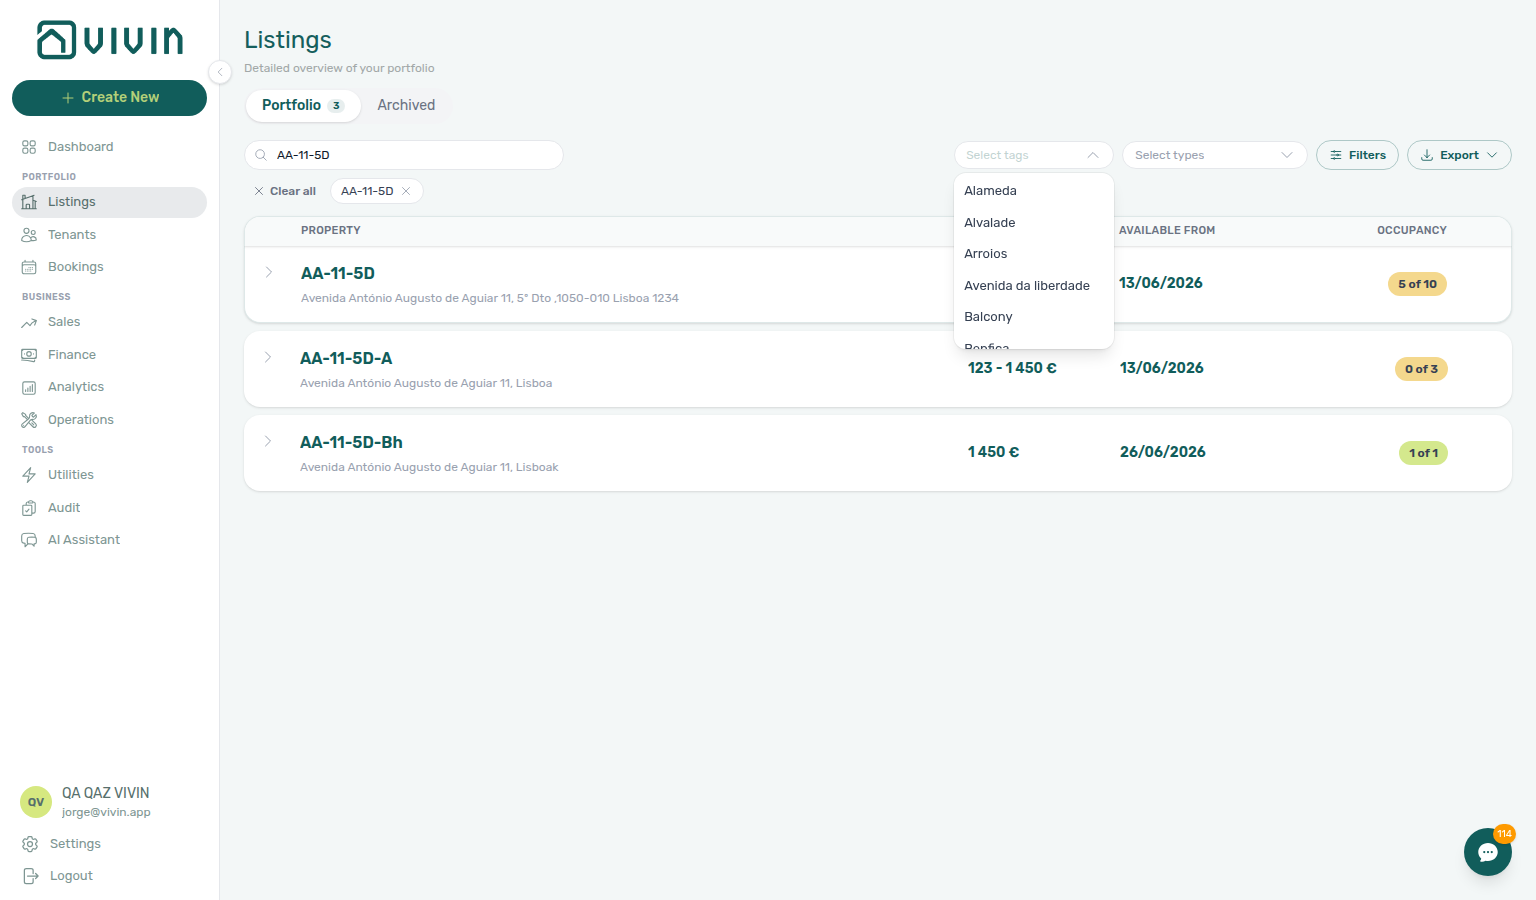
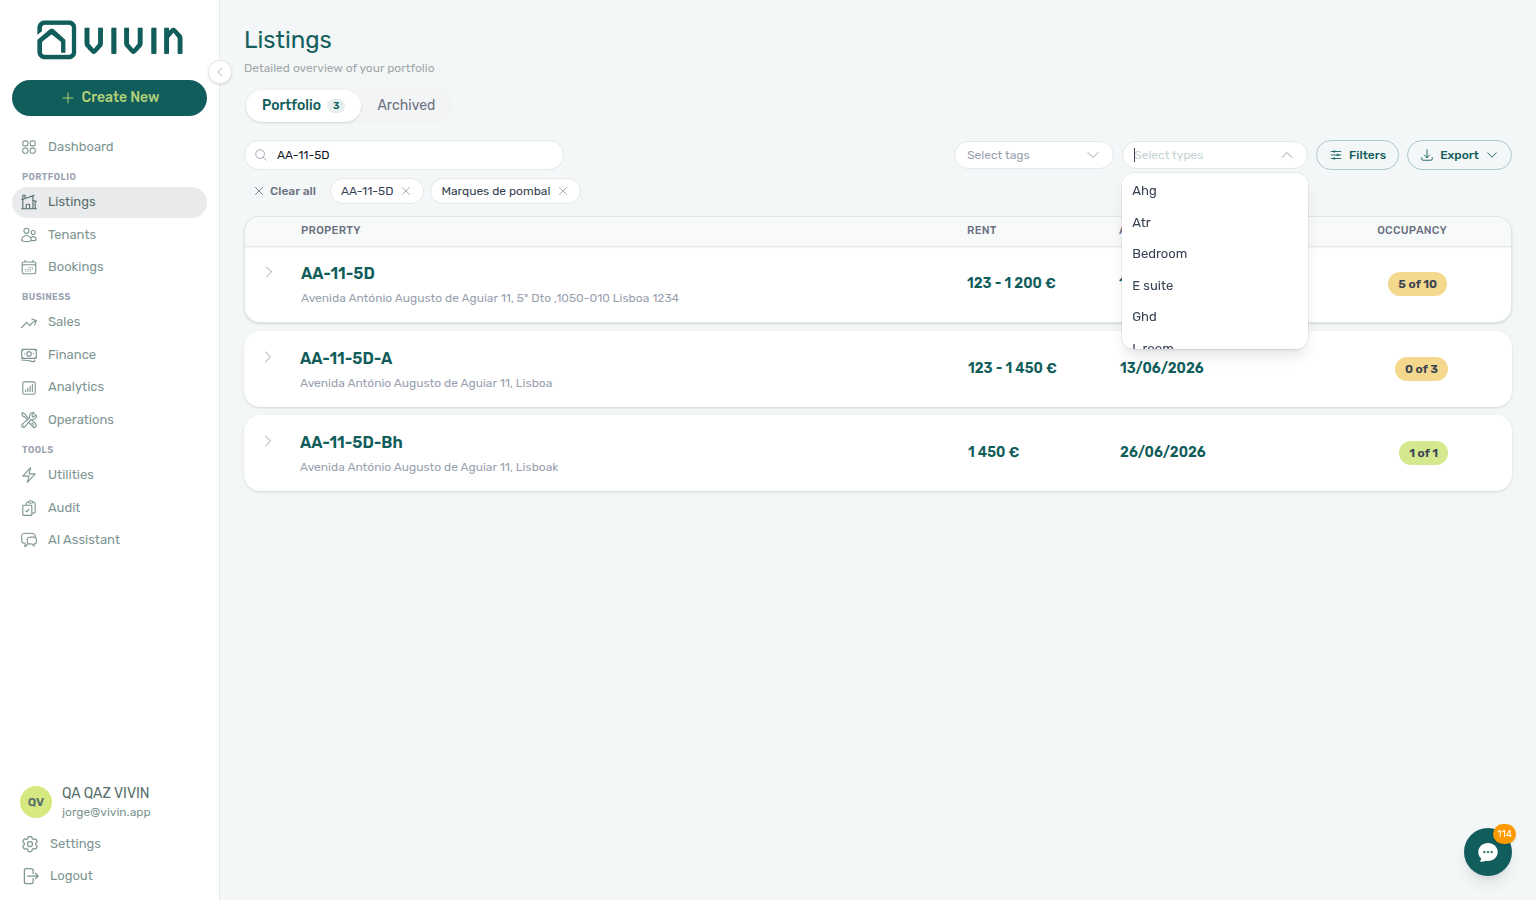
After you pick tags and types, removable chips appear under the toolbar (with Clear all) while the table refetches:
Portfolio tag/type toolbar captures refreshed 2026-06-13 13:45 UTC (VIVIN_DOCS_BASE_URL=http://localhost:5173 VIVIN_DOCS_RECORD_API=$VITE_API_BASE_URL VIVIN_DOCS_PROPERTY_SEARCH=AA-11-5D npx tsx tools/capture-listings-portfolio-tags-types-toolbar-screenshot.ts).
With no search term, properties sort A–Z by internal name. When Search is active, the server narrows to properties (or units within a property) that match the term; the table still orders properties A–Z by internal name — unlike Bookings and Operations Tickets, which rank unit-name hits above tenant-name or address-only matches (#1768).

Export formats
- CSV — one file with a listings sheet (one row per unit in scope).
- Excel — two CSV downloads (properties then listings) that Excel imports natively; property rows group units under each building.
While a download runs, the Export menu shows a spinner (Exporting…). Large portfolios stay responsive because the API streams the file instead of loading every row into the browser.
If the export fails, Vivin shows a toast (Failed to export. or the server message when available) — the menu closes and no file is saved. Retry after checking filters or connectivity. See Glossary — Export and download failures.
For channel rows with a VIVIN iCal column and platform connection status across the whole portfolio, use Sales > Channels — both surfaces read the same integration toggles. Use Listings → Export when you need a property/unit inventory CSV for audits, onboarding spreadsheets, or offline review.
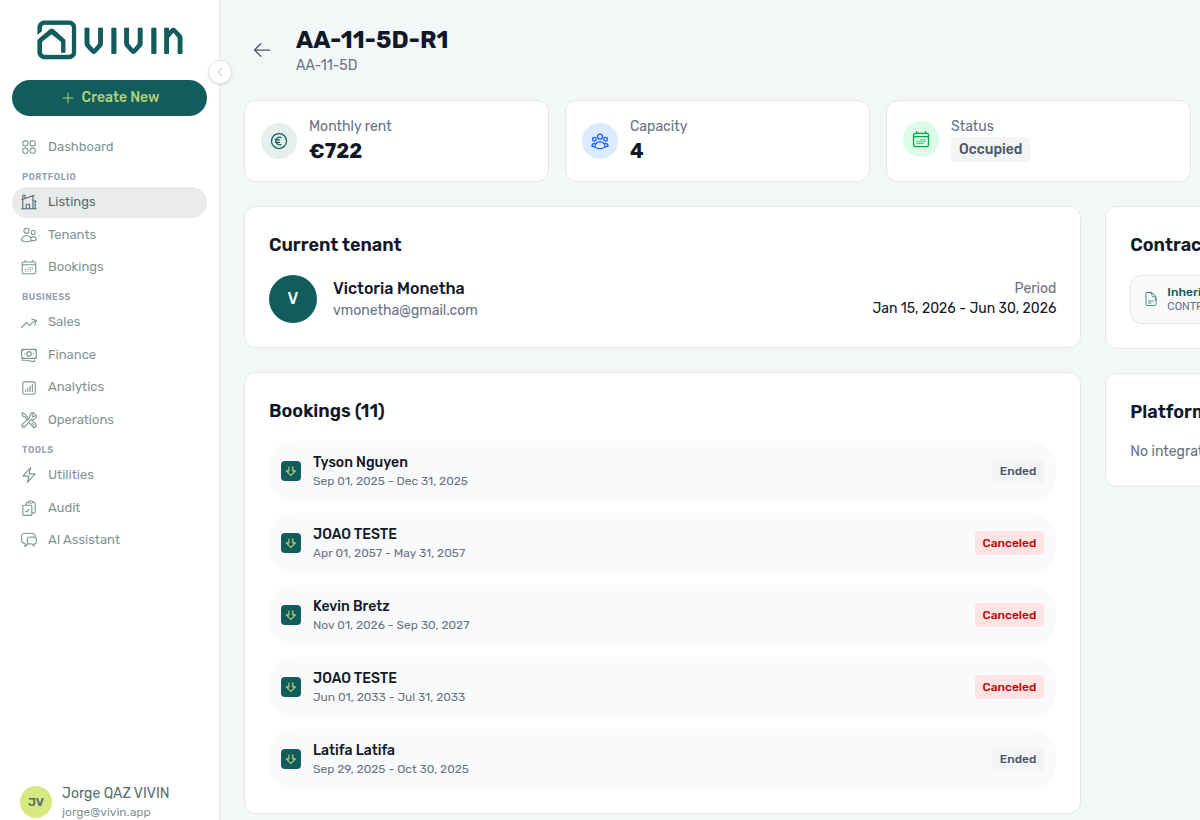
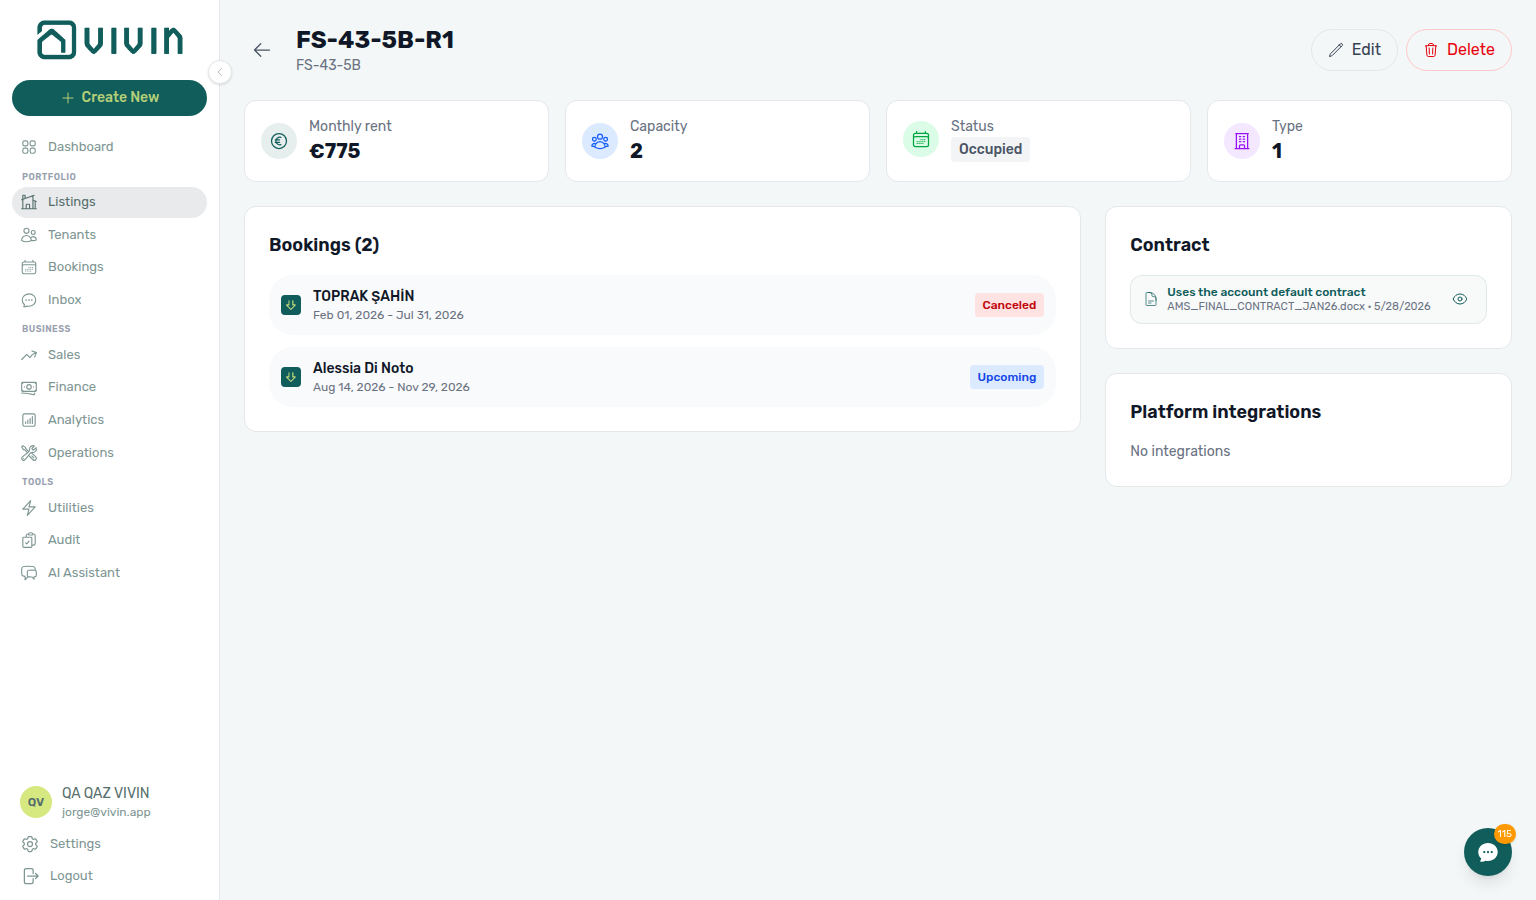
Full-page unit detail (/listings/:listingId)
Some bookmarks and integrations open a full-page unit detail at /listings/:listingId (replace :listingId with the unit UUID). This is a read-focused summary — not the multi-tab unit edit sidebar opened from an expanded property row or /listings/unit/:listingId.
| Area | What you see |
|---|---|
| Header | Unit internal name, parent property label, back arrow (browser history), and Edit / Delete actions. |
| Stat cards | Monthly rent, capacity, availability badge (Available vs Occupied), and type (room, studio, etc.). |
| Current tenant | When a current booking exists — tenant name, email, and stay dates. |
| Bookings | Up to five reservations with platform icon, dates, status badge, and links to /bookings/list/:id. |
| Contract | Effective contract template summary for the unit (inherits property defaults unless the unit has its own contract). |
| Platform integrations | Connected marketplace platforms for this row, or an empty state when none are linked. |
Use the unit edit sidebar (Deep Links — Listings) when you need Calendar, Channels, Rent, Access, or other setup tabs. Use the full-page detail when you want a compact overview or you received a direct /listings/<uuid> link.
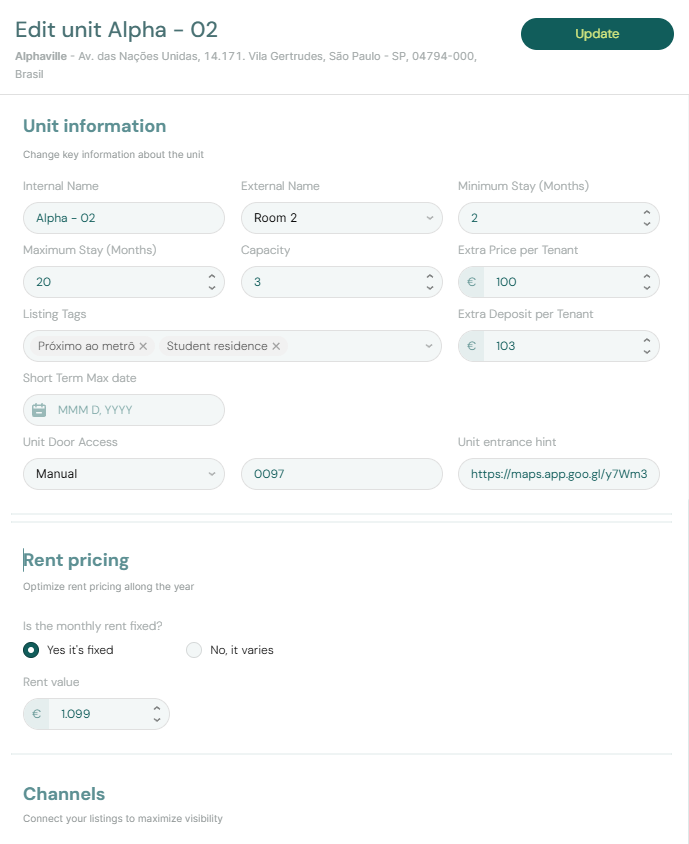
Creating a New Property
The four-step wizard pairs with Settings > Owners and Create New menu — Property — wire utilities in Step 6 before first Utilities bill. Full pairing matrix: Listings section cross-reference.
Creating a new property is one of the most important workflows in Vivin. The system guides you through a four-step wizard that captures all essential information and business rules.
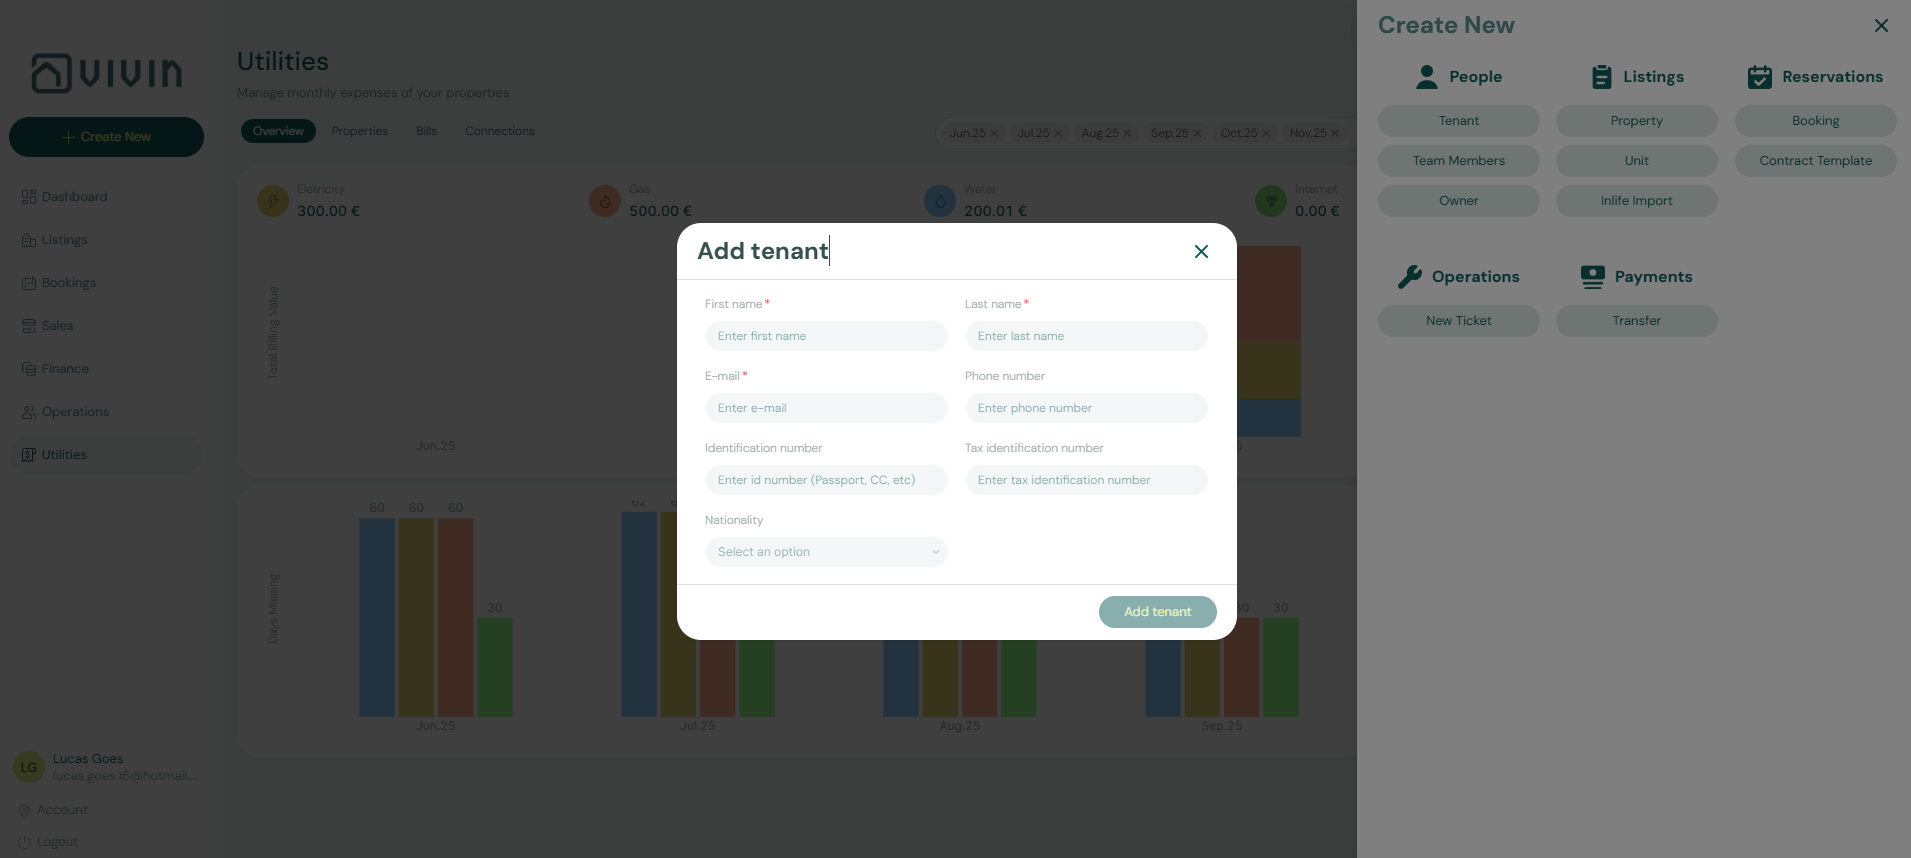
To begin, click the + Create New button in the left sidebar and select Property from the Listings group.
Step 1: Property Details
The first step captures basic identification information for the property.
- Property Name (required): The public or internal name you will use to identify this property (for example, "Central Apartment Building").
- Address (required): The complete street address.
- Floor (optional): Which floor the property is located on (useful for multi-story buildings).
- Owner (optional, recommended): Associate the property with a property owner who has been previously registered in the system.
The Owner dropdown will only display owners who have already been added through Settings > Owners. If the owner you need is not in the list, you must navigate to that section and create the owner record first.
Click Continue to proceed to the next step.
Step 2: Utility Bills ID
In this step, you enter the account identifiers for utility services associated with the property:
- Electricity Bill ID
- Gas Bill ID
- Water Bill ID
- Internet Bill ID
These identifiers are used by the Utilities module to automatically import and process bills for these accounts. By linking utility accounts to properties during setup, you enable automated expense tracking and tenant billing for utility overages.
For SIMAR (Loures e Odivelas) water, enter Cód. Local / Código de Local from the supplier statement — not Nº de Contador — and strip leading zeros (for example 0181474 → 181474). See Glossary — SIMAR water contract ID and FAQ — SIMAR water bill property match.
Click Continue to proceed.
Step 3: Extra Payments
This step defines additional fees and deposits that will be charged beyond the base rent. The configuration here establishes default values that can be applied to bookings for this property.
Security Deposit: Choose between two types:
- Fixed: A set monetary amount (for example, €500)
- Variable: Calculated based on the rent amount (Half Rent, 1 Rent, or 2 Rent)
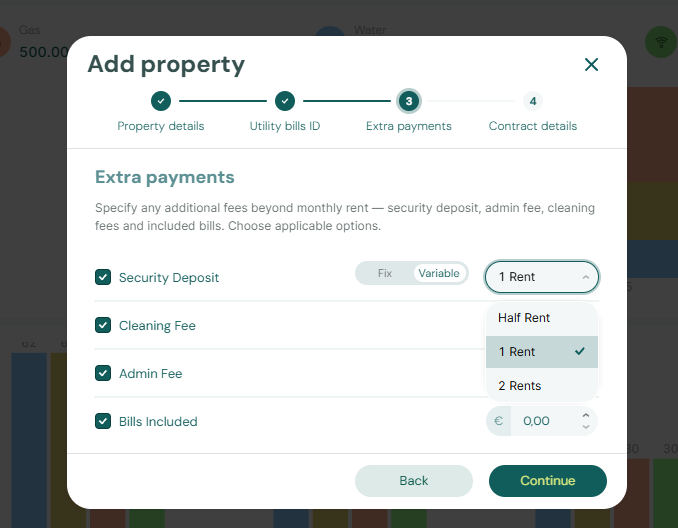
Cleaning Fee: A fixed amount charged for cleaning services. Note that you can later configure when this fee is charged (see Payments Tab).
Admin Fee: When Admin fee is enabled under Account Settings > Fees, enter a default amount here. The wizard stores a fixed value; after the property is created you can switch to Per stay duration tiers in Contract Information (see Admin fee — fixed or by stay duration below).
Bills Included: This field represents the ceiling (maximum amount) of utilities that is included in the tenant's rent.
If you set the Bills Included amount to €50 for electricity, and the actual monthly electricity bill is €70, the system will automatically charge the tenant the €20 overage. If the bill is only €40, the tenant pays nothing extra.

Click Continue to proceed to the final step.
Step 4: Contract Details
This is the most critical step, as it defines how and when rent will be charged. The settings here directly impact your cash flow and tenant payment schedules.
Rental Payment Frequency: Determines how rent is calculated and billed.
- Monthly: Charges the full month's rent regardless of the check-in or check-out date.
- Fortnightly: Divides the month into two periods (days 1-15 and days 16-end of month).
- Daily: Calculates rent proportionally based on the number of days occupied.
Contract Type: Used for reporting and legal classification purposes (e.g., Rental, Services).
Confirmation Payments: Defines what the tenant must pay at the moment they book the unit to confirm their reservation (e.g., Deposit, First Rent, Last Rent, Deposit and First Rent).
Check-in Payments: Defines what the tenant must pay on the day they physically move into the property.
The system enforces a strict rule to prevent double-charging. If you select Deposit in Confirmation Payments, you cannot select Deposit again in Check-in Payments. The same rule applies to First Rent and Last Rent.

Finalizing the Property
You can use the Back button at any time to review and modify previous steps. Once all four steps are complete and you are satisfied with the configuration, click Submit to create the property in the system.
Creating a New Unit
Units are the individual rentable spaces within a property. To create a unit, click + Create New and select Unit from the Listings group. The system will guide you through a two-step wizard.

A unit cannot exist without being associated with a property. You must create the property first before adding units to it.
Step 1: Unit Details
The first step captures the basic identification information for the unit.
- Unit Name (required): The identifier for this unit (e.g., "Sala 01", "Room 2", "Studio A")
- Property (required): Select the parent property from the dropdown
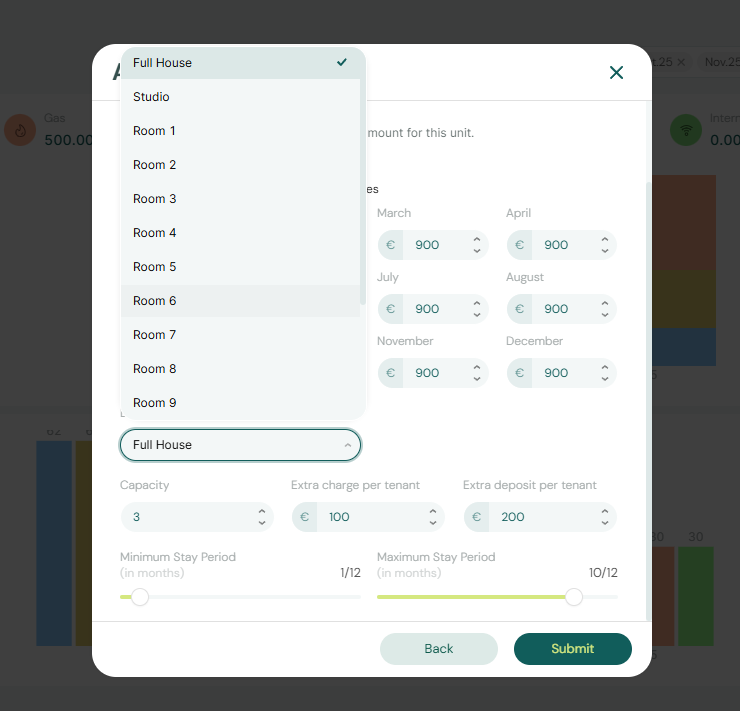
- Property Type (required): Select the unit type from the dropdown. Available options include:
- Full House
- Studio
- Room 1, Room 2, Room 3, etc. (numbered rooms)
- Bed (for shared accommodations)
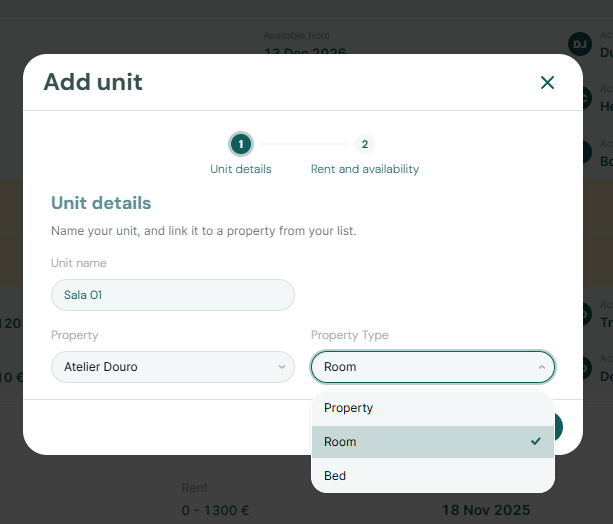
Click Continue to proceed to the next step.
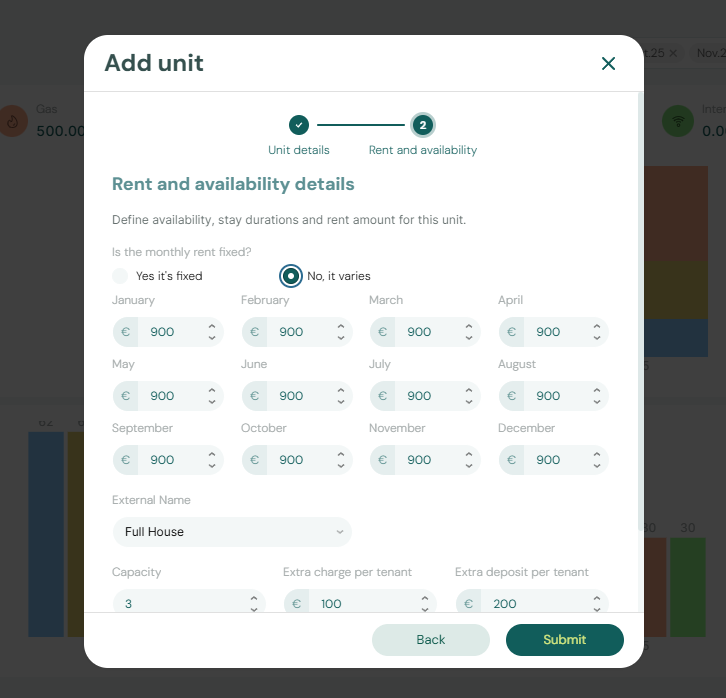
Step 2: Rent and Availability Details
The second step defines the financial and operational parameters for the unit.
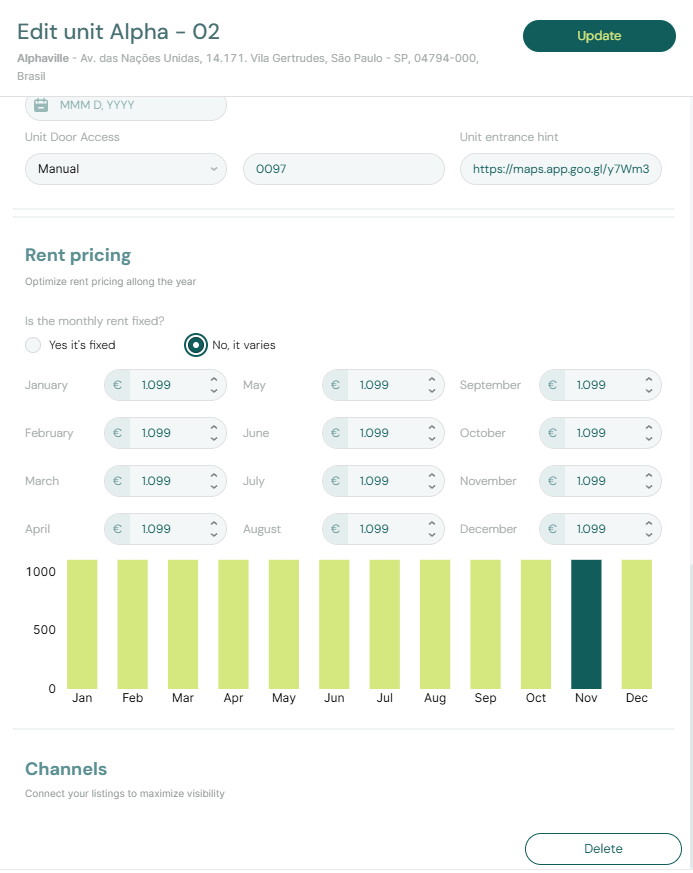
Is the monthly rent fixed?
-
Yes, it's fixed: The rent amount remains constant for all bookings
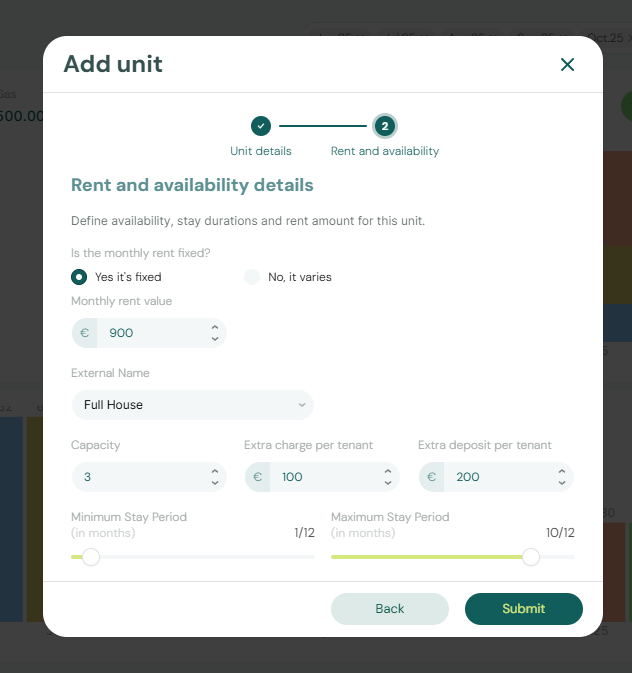
-
No, it varies: The rent can change based on season, demand, or other factors (you can configure variable pricing later in the unit's edit view)
Monthly Rent Value: Enter the base monthly rent amount (e.g., €500).
External Name: This is the name that will be displayed on external platforms like Airbnb or Booking.com (e.g., "Room 2").
Capacity: The maximum number of tenants allowed in this unit (e.g., 3).
Extra Charge per Tenant: If the number of tenants exceeds the base capacity, this amount will be added to the monthly rent for each additional tenant (e.g., €60).
Extra Deposit per Tenant: If the number of tenants exceeds the base capacity, this amount will be added to the security deposit for each additional tenant (e.g., €100).
Minimum Stay Period (in months): The shortest booking duration allowed for this unit. Use the slider to set a value between 0 and 12 months. For example, if you set this to 3, tenants cannot book for less than 3 months.
Maximum Stay Period (in months): The longest booking duration allowed for this unit. Use the slider to set a value between 0 and 12 months. For example, if you set this to 12, tenants cannot book for more than 12 months. Setting this to 12 typically means "no maximum limit."
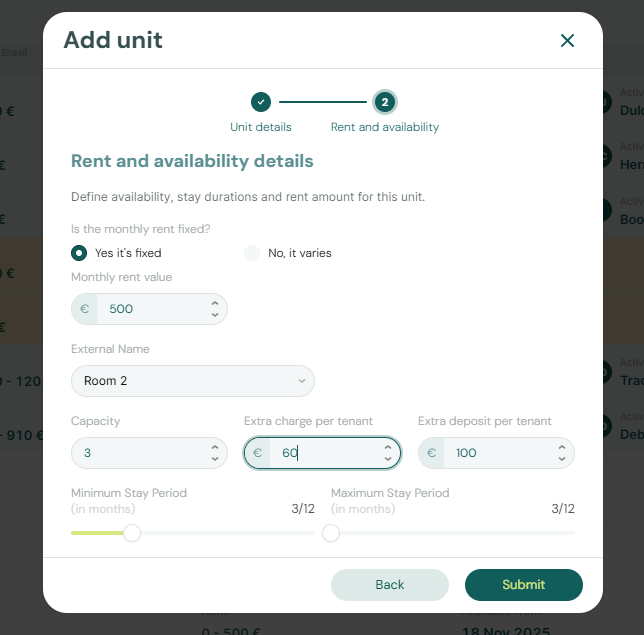
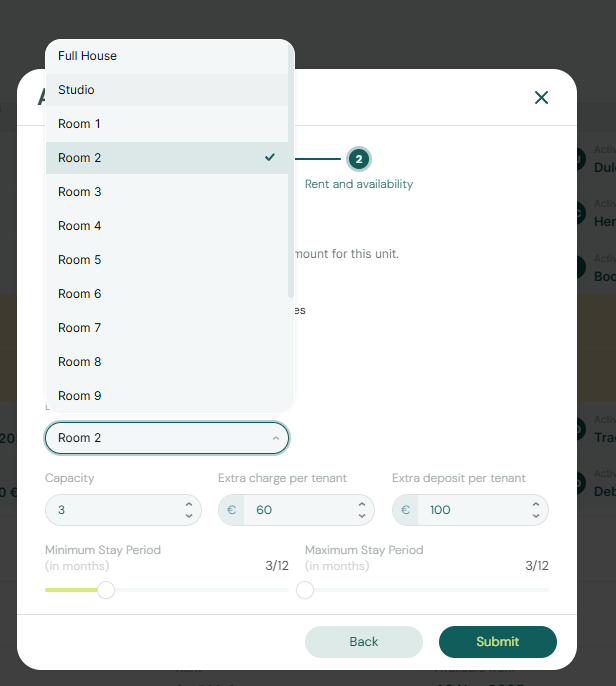
Finalizing the Unit
You can use the Back button to review and modify the previous step. Once both steps are complete, click Submit to create the unit in the system.
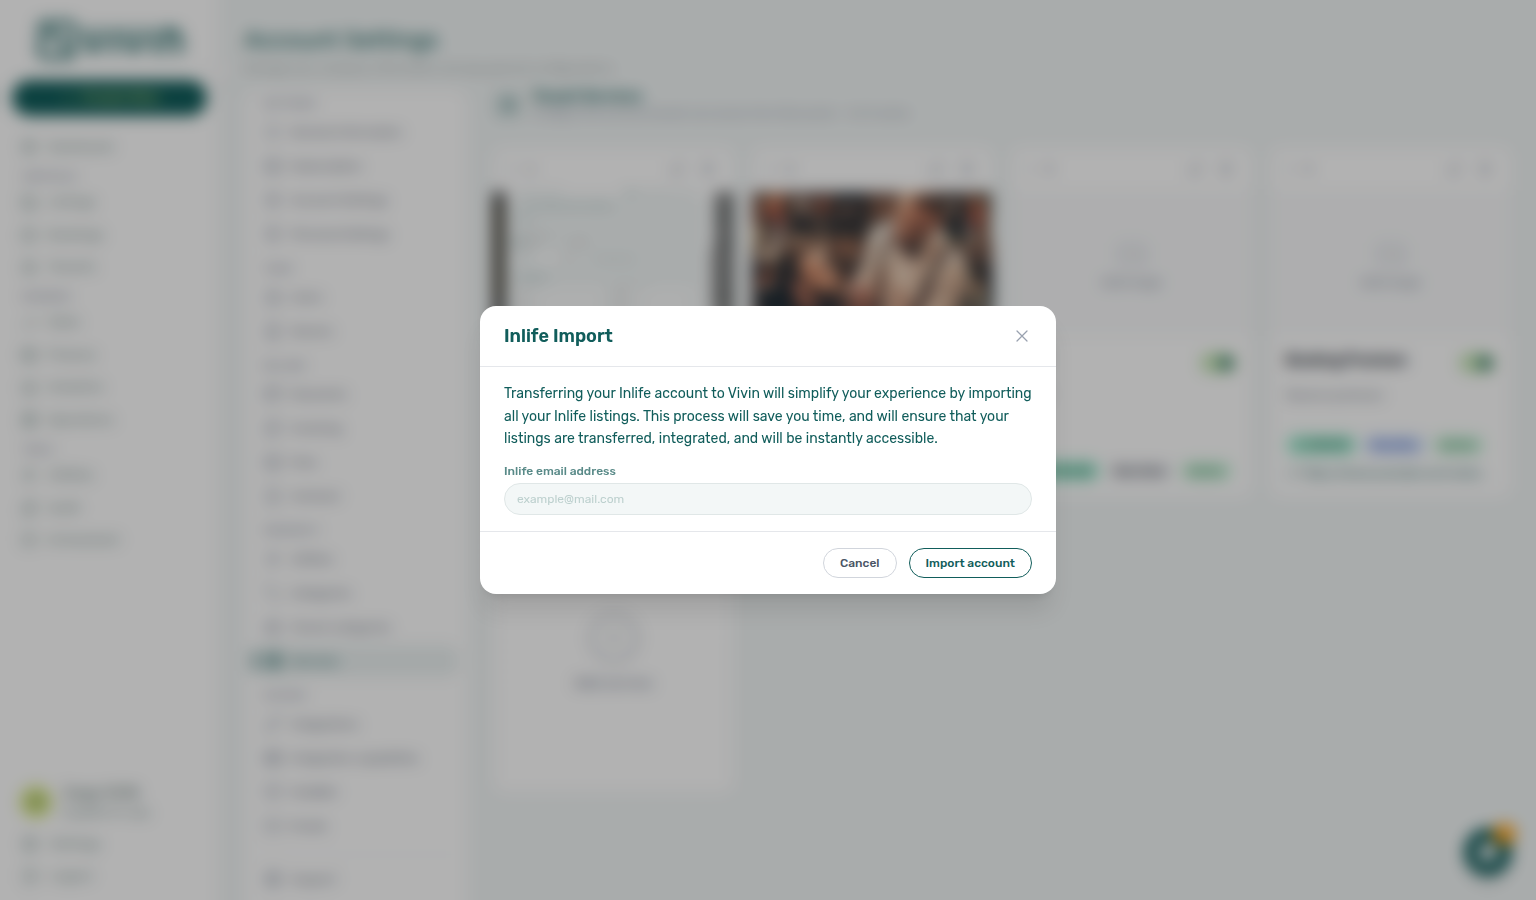
Importing from Inlife
When you are migrating inventory from Inlife, enable the Inlife platform under Account Settings → Integrations first. Import actions live in the + Create New slide-out under Listings — they queue a server-side pull from the landlord’s Inlife account instead of walking the property or unit wizards row by row.
| Action | Who sees it | What transfers | Typical next step |
|---|---|---|---|
| Inlife Import | Roles with create permission when Inlife is enabled | Properties, units, and core listing linkage | Review rows in Portfolio, then wire Channels and booking-engine fields as needed |
| Inlife Full Import | Vivin internal operators only (@vivin.app email) | Everything in Inlife Import plus booking-engine-style details and photos | Review Property & listing details (booking engine) tabs, then enable full listing feeds on Housing Anywhere, Spotahome, Uniplaces, or Inlife |
Standard import (all accounts)
- Click + Create New → Listings → Inlife Import.
- Enter the landlord Inlife email address for the account you want to pull from.
- Click Import account and wait for success — the modal closes when the API accepts the job.
- Open Listings after a few minutes and confirm properties and units appeared; map any remaining partner IDs on each unit’s Channels tab.
Full import (Vivin internal)
Inlife Full Import uses the same email dialog but also copies rich content (amenities, location, rules, photos) so listings are closer to publish-ready on partner full feeds. Large portfolios can run for several minutes — if the browser times out while photos upload, the job often continues on the server; avoid starting a duplicate import immediately.
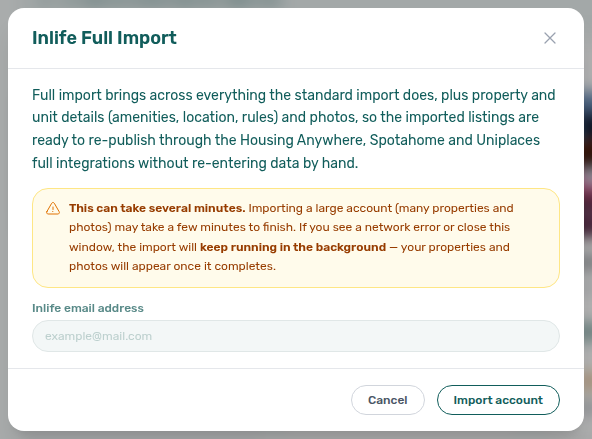
Inlife Full Import modal capture refreshed 2026-06-22 02:13 UTC (VIVIN_DOCS_BASE_URL=http://localhost:5173 VIVIN_DOCS_RECORD_API=$VITE_API_BASE_URL npx tsx tools/capture-create-new-inlife-full-import-screenshot.ts).
After either import path, open the Full integration pill on the property or unit sidebar to fill gaps before turning on outbound full integrations. Step-by-step UI for both dialogs is also documented under Create New Menu — Inlife Import and Inlife Full Import.
When you poll the outbound Inlife full listing feed (GET /inlife-integration/:landlordKey/listings/full), calendar date fields arrive as epoch milliseconds (numbers), not ISO date strings — required for Inlife’s Elasticsearch long mapping.
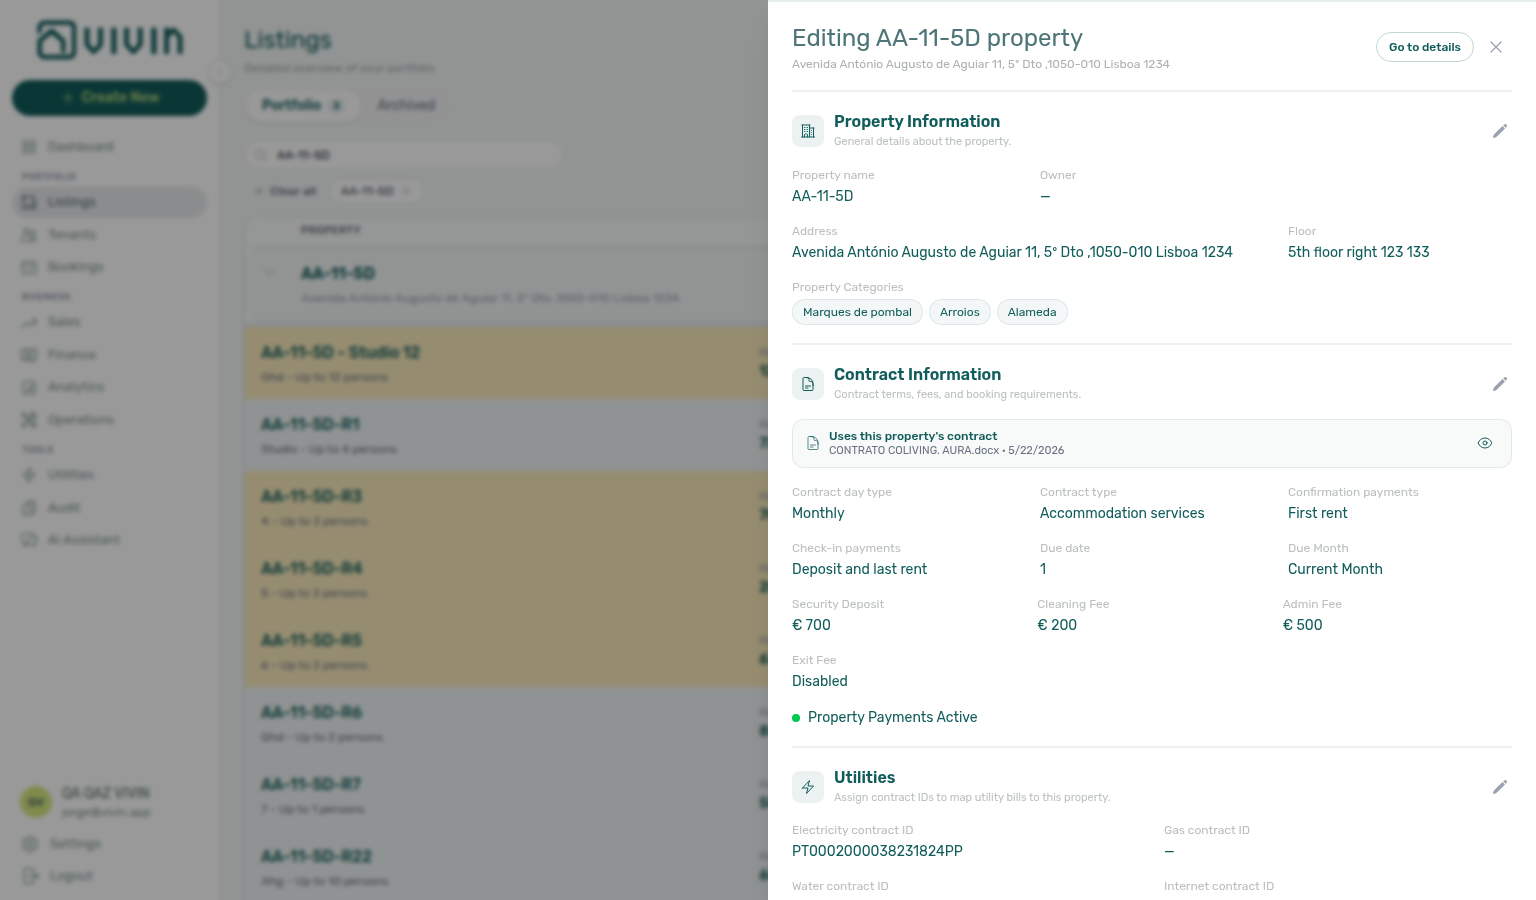
Editing Properties
To edit an existing property, navigate to the Listings module and click the pencil icon next to the property you wish to modify. The property edit sidebar opens with a pill navigation row (#2082 — merged setup, marketplace payload, and gallery layers; the legacy Go to details header shortcut was removed):
| Pill | What it contains |
|---|---|
| Setup | Operational fields in this guide — general info, tags, contract, payments, access, WiFi, change history, and archive controls |
| Full integration | Marketing copy, location, amenities, partner platforms, and Full integration readiness checks for outbound feeds and the booking engine — see Property & listing details (booking engine) |
| Photos | Property-level gallery for the booking engine; drag to reorder — the first photo is the cover (also used as the portfolio thumbnail) |
An amber dot on Full integration means required partner fields are still missing; open that pill and complete the readiness checklist before enabling full feeds.
![]()
Bookmark or hand off a link that opens Full integration directly: append ?propertyDetails=1 to the property edit URL — Deep Links — booking engine query params.
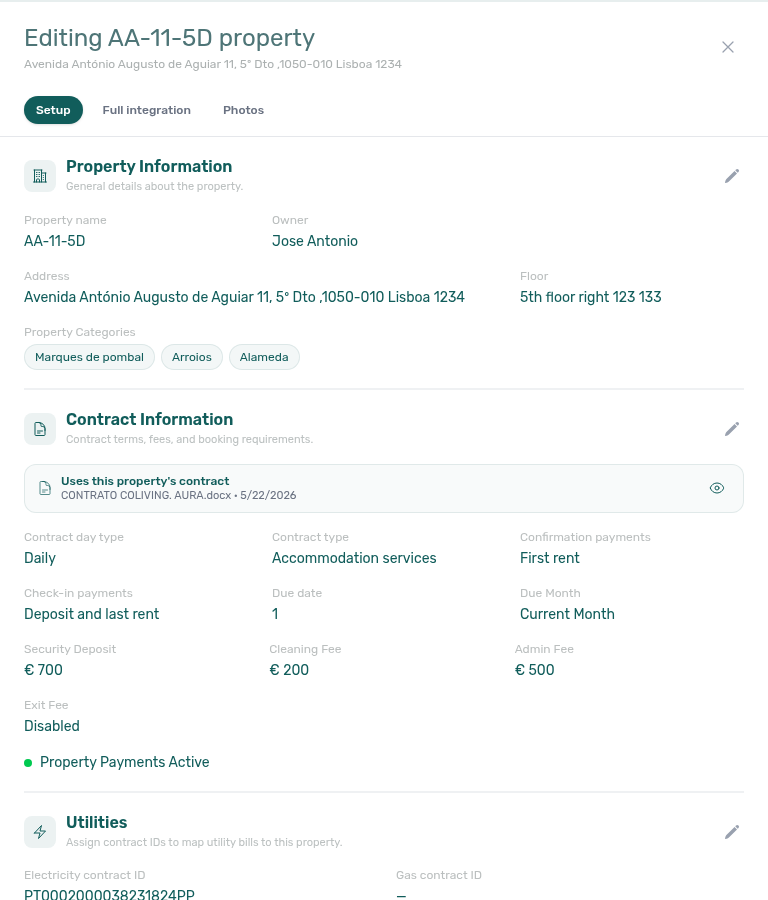
General Information Tab
On the Setup pill, the General Information section lets you update basic identification:
- Property Name
- Address — Google Places autocomplete when maps are configured; pick a suggestion to fill structured street, postal, city, and country fields. Below the field, the Exact Location map lets you drag the pin when the building entrance is offset from the geocoded point. If maps are unavailable, the control falls back to a plain text address.
- Floor
- Owner
Any changes made here will apply to future bookings but will not retroactively affect existing reservations.


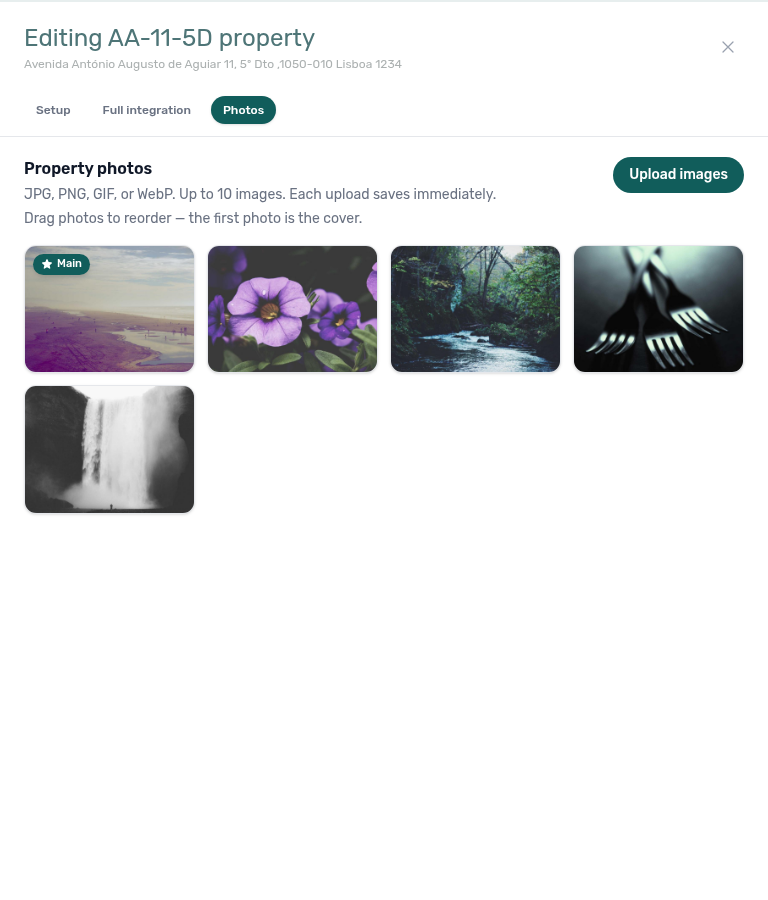
Photos pill
On the Photos pill, upload JPG/PNG/GIF/WebP images (up to 10). Each upload saves immediately. Drag thumbnails to reorder — the first photo is labelled Main and drives the portfolio cover thumbnail on the property row.
Tags Tab
Tags are labels that help you organize and categorize your properties. When you add tags to a property, they automatically propagate to all units within that property.
To add a tag, click + Add Tag and select from your existing tags or create a new one. To manage your tag library, see Categories. Finance Select categories loads tag options from live listings via GET /listings/tags — see that note for how the API differs from this settings catalog.
Tags assigned here (and on units under Tags Tab) feed the Tags multi-select on the Portfolio toolbar, Select tags on Sales → Multicalendar / Pricing, and Select categories under Property & Listing in Finance → Other filters. Listing Types from the same settings page drive the Types toolbar control here and Select listing types on Sales.
Use Case Example: You might create tags like "Pet Friendly," "Furnished," "City Center," or "Student Housing" to make filtering and reporting easier.
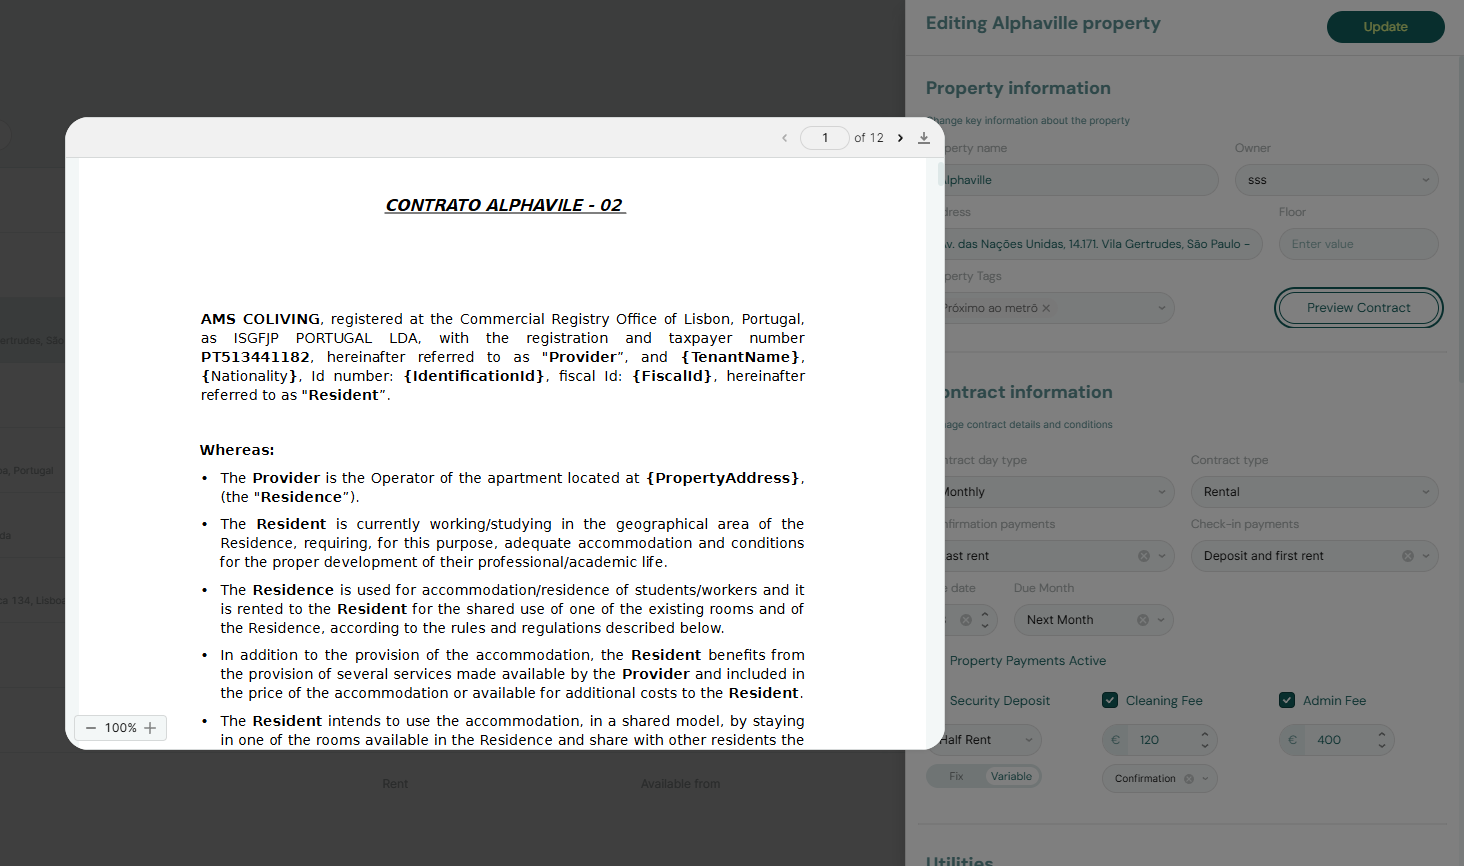
Contract Tab
The property Contract tab shows which .docx template resolves for new bookings on this building and lets you preview it without leaving Listings.
At the top, the effective contract card mirrors the backend fallback chain (unit → property → account) used when Vivin generates tenant PDFs:
| Resolved source (English UI) | Meaning |
|---|---|
| Uses this property's contract | A property-scoped template uploaded under Settings > Contract templates applies to units here unless a unit has its own file. |
| Uses the account default contract | No property override — bookings inherit the account template (subtitle shows the filename and upload date when known). |
| No contract template resolved | No .docx is available at any level — upload under Settings before expecting generated contracts. |
The card shows the filename, optional upload date, and an eye control that opens an in-app PDF preview modal (sample variables filled). Upload or replace templates from Settings > Contract templates — this tab is read-focused for resolution and preview.
![]()
Click the eye control to open the in-app PDF preview modal (sample variables filled):
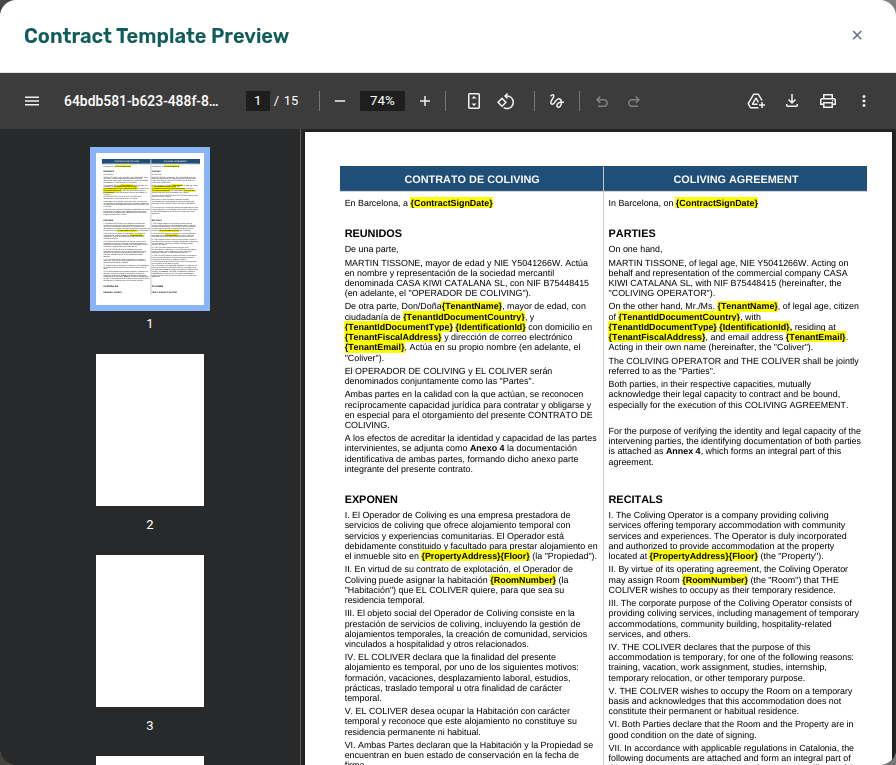
Effective-contract card captures refreshed 2026-06-19 04:00 UTC (VIVIN_DOCS_BASE_URL=http://localhost:5173 VIVIN_DOCS_RECORD_API=$VITE_API_BASE_URL VIVIN_DOCS_PROPERTY_ID=0af9c920-0b64-49ad-ac38-e2d28536ed4d npx tsx tools/capture-listings-effective-contract-card-screenshot.ts).
Scroll below the card for Contract Information (payment terms, confirmation/check-in requirements, fee defaults, and related fields). This guide groups those payment fields under Payments Tab because they define booking payment behaviour.
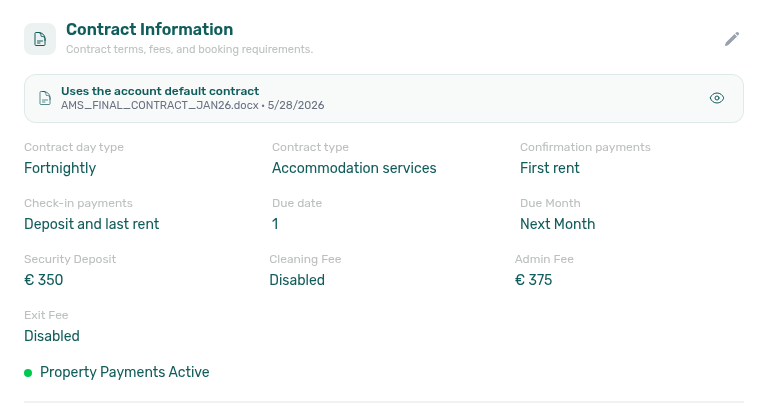
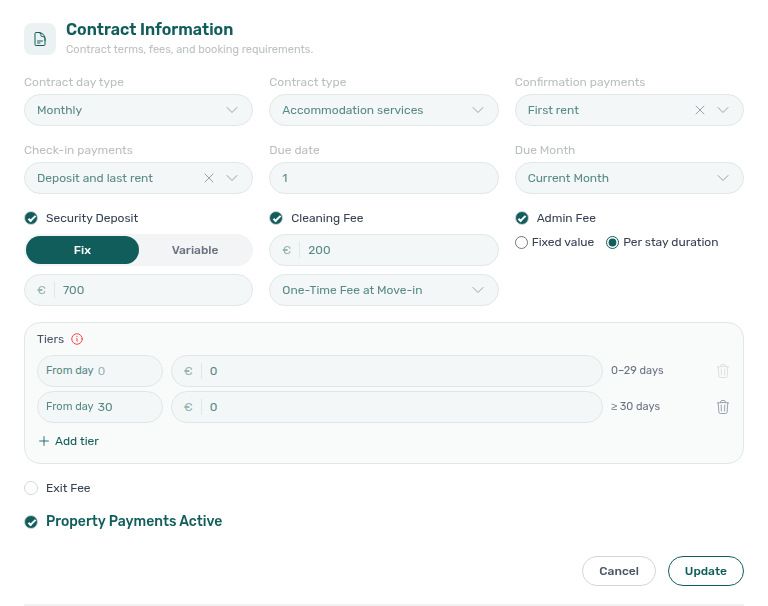
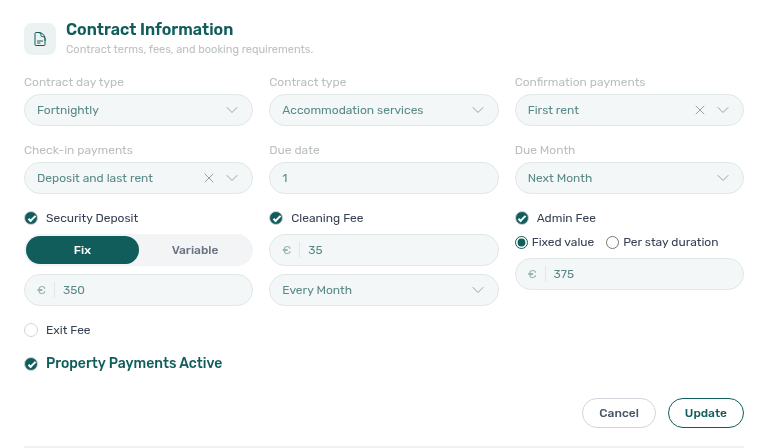
Payments Tab
This is one of the most important tabs, as it controls payment behavior for all bookings in this property.
In the property sidebar, these fields live in the Contract Information section (scroll below the contract preview). This guide groups them under Payments Tab because they define confirmation/check-in requirements, due dates, cleaning fee timing, and tenant portal payments.
Confirmation Payments & Check-in Payments: You can modify or completely remove the default payment requirements. For example, you can uncheck "Confirmation Payments" entirely if you want tenants to pay everything at check-in.
Due Date: You can set a specific due date for this property (e.g., "Rent is due on the 5th of every month"). If you click Clear, the system will use the default due date defined in Payments.
Cleaning fee frequency: The Cleaning fee column in Contract Information appears only when Cleaning fee is on under Account Settings > Fees (account-wide fee visibility). On the property, check Cleaning fee to reveal the € amount and Frequency dropdown; when the checkbox is off, frequency is not editable for that property.
When the cleaning fee is enabled for the property, use Frequency next to the amount to choose when that fee appears on the payment plan:
| UI label | Payment plan behaviour |
|---|---|
| Every Month (default) | One cleaning fee line per contract month (first/last months prorated like rent when applicable). |
| One-Time Fee at Booking Confirmation | A single cleaning fee line due at confirmation (uses booking creation date when it precedes move-in, otherwise move-in). |
| One-Time Fee at Move-in | A single cleaning fee line due in the move-in month. |
Selecting Every Month again clears a one-time mode (the product stores this as the default recurring setting).
When you create a property, the cleaning fee frequency defaults to Every Month and cannot be changed during creation. Edit the property after creation in Contract Information to switch to a one-time mode.
When payment schedules are regenerated for a booking, Vivin reconciles cleaning fee rows to match the active mode — extra monthly lines are removed when you switch to one-time, and missing months are added when you switch back to Every Month. Rows that are already invoiced block destructive reconciliation; resolve those in Finance (and issue credit notes in your accounting system when needed) before changing mode on affected bookings — the same invoiced floor boundary applies to rent edits on those bookings.
Admin fee — fixed or by stay duration
The Admin fee row in Contract Information appears only when Admin fee is on under Account Settings > Fees. Check Admin fee on the property, then choose how the amount is determined for new payment plans on this property:
| Mode (UI label) | Behaviour |
|---|---|
| Fixed value | One € amount applies to every booking on this property (same field as the property wizard). |
| Per stay duration | A tier table maps total stay length in days to an admin fee. The first tier always starts at 0 days; each additional tier must use a From day strictly greater than the previous tier. Stays at or above the last tier’s From day use that tier’s value until you add another row. |
Use Add tier to add rows; remove any tier except the first with the trash control. The (i) tooltip beside Tiers summarizes the open-ended last tier. Save on the property sidebar is blocked while tier validation errors are shown (for example duplicate or non-increasing From day values).

Per stay duration admin-fee tier table refreshed 2026-06-12 10:14 UTC (VIVIN_DOCS_BASE_URL=http://localhost:5173 VIVIN_DOCS_RECORD_API=$VITE_API_BASE_URL VIVIN_DOCS_PROPERTY_SEARCH=AA-11-5D npx tsx tools/capture-docs-enrichment-media.ts).

Admin fee tier captures re-verified 2026-06-16 13:09 UTC — Per stay duration tier table via capture-docs-enrichment-media.ts (property AA-11-5D); fixed vs tiered mode and tier table close-up via capture-listings-admin-fee-tiers-screenshots.ts (2026-06-11).
Property Payments Active: This is a critical toggle. When enabled, tenants can make payments through the Tenant Portal. When disabled, all payment functionality is blocked for tenants in this property.
If you disable "Property Payments Active," tenants will not be able to pay rent, deposits, or any other charges through the platform. Use this setting carefully, typically only when you are handling payments through an external system.
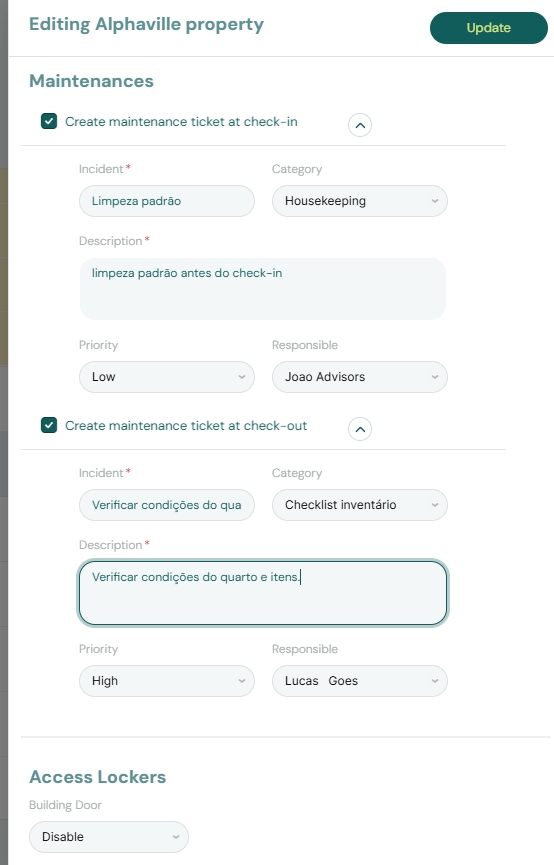
Maintenances Tab
This tab allows you to automate ticket creation for check-ins and check-outs.
You can configure the system to automatically create a maintenance ticket whenever a booking in this property has a check-in or check-out. For each event type, you can define:
- Responsible Team Member: Who should be assigned to the ticket
- Priority: Low, Medium, High, or Critical
- Category: The type of task (e.g., "Cleaning - Check-in," "Inspection - Check-out")
- Description: A default message that will appear in the ticket
Use Case Example: You might configure an automatic "Cleaning" ticket to be created 1 day before every check-in, assigned to your cleaning team, with High priority.
On individual reservations, operators can opt out per booking when creating a manual stay: on Add booking, after you turn off Use unit contract rents and other contract details, Create check-in ticket and Create check-out ticket checkboxes appear when the property has that auto-create enabled (#1140). Each defaults on (same as the property). Unchecking skips automatic ticket creation for that booking only; the property rule stays unchanged for future reservations. When you keep Use unit contract rents and other contract details checked, Vivin follows today's property defaults with no per-booking override row. See FAQ — Skip automatic check-in/out tickets for one booking.
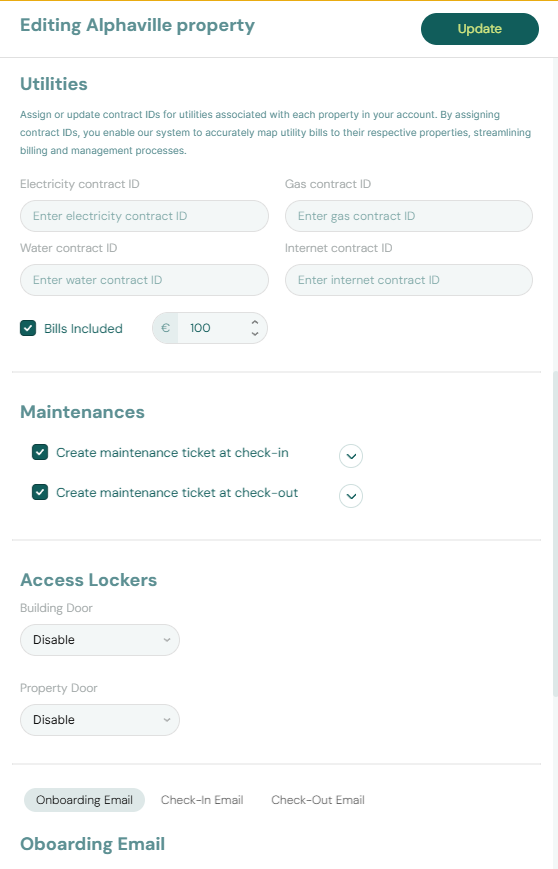
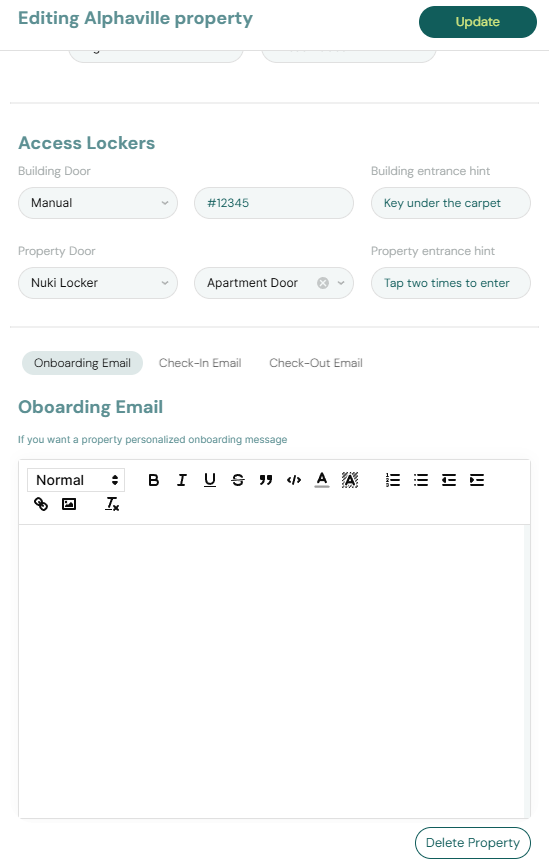
Access Lockers Tab
This tab manages access codes and smart lock integrations for the property.
You can define access codes for two levels:
- Building Access: The code to enter the building itself
- Property Access: The code to enter the specific property or apartment
For each level, you can choose between:
- Manual Code: A static code that you enter manually (e.g., "1234#")
- Nuki Integration: If you have connected Nuki smart locks in Integrations, you can link a Nuki device here. The system will automatically generate and send temporary access codes to tenants.
Entrance Hint: You can also add a text hint to help tenants find the entrance (e.g., "Use the side door on the left").
The access codes and hints you configure here will be automatically included in the check-in email sent to tenants and will also be visible in the Tenant Portal.
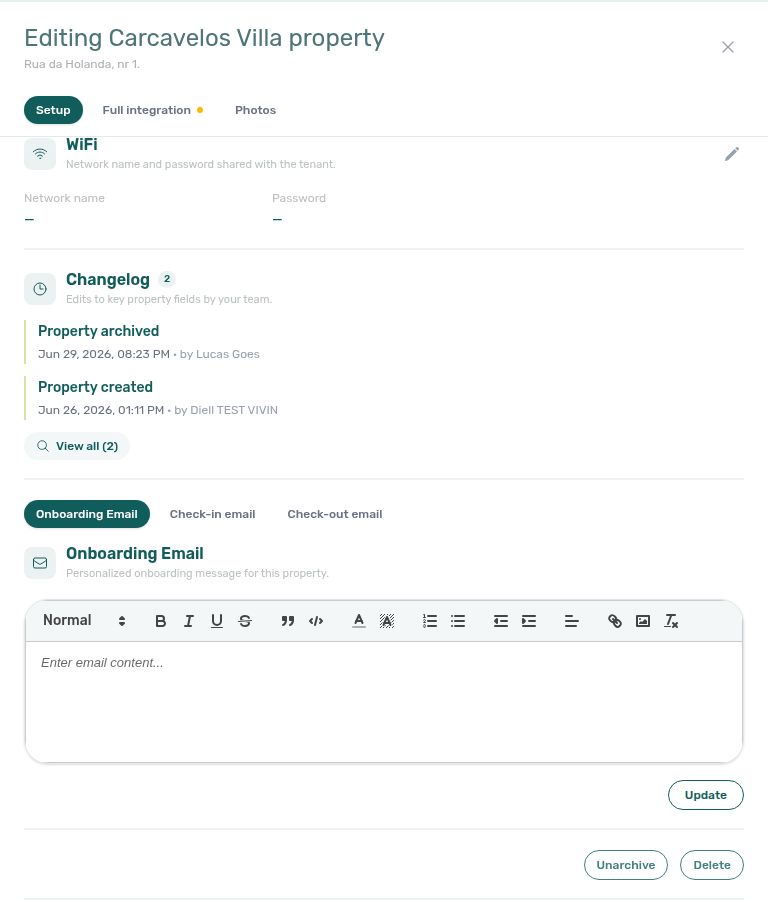
WiFi
Near Access Lockers in the property edit sidebar, the WiFi section stores the network name (SSID) and password for this building. Operators with edit access can update both fields inline; in read mode the password is masked with show/hide and copy controls so you can share credentials with tenants without retyping. Leave either field empty only when WiFi is not provided for that property.
Use this when check-in emails, the Tenant Portal, or on-site support should reference the same WiFi details as your property record. Values are scoped to the property — configure unit-specific access separately under unit Access Lockers when locks differ per room.

WiFi section capture refreshed 2026-06-06 (tools/capture-docs-enrichment-batch.ts).
Email Customization Tab
This tab allows you to personalize the automated emails sent to tenants for this specific property.
You can customize three types of emails:
- Onboarding Email: Sent after the booking is confirmed
- Check-in Email: Sent before the tenant's arrival
- Check-out Email: Sent before the tenant's departure
For each email type, you can add a custom message that will be appended to the default template. This is useful for property-specific instructions (e.g., "Please note that parking is available in the garage on the right side of the building").
To manage the default email templates, see Emails.
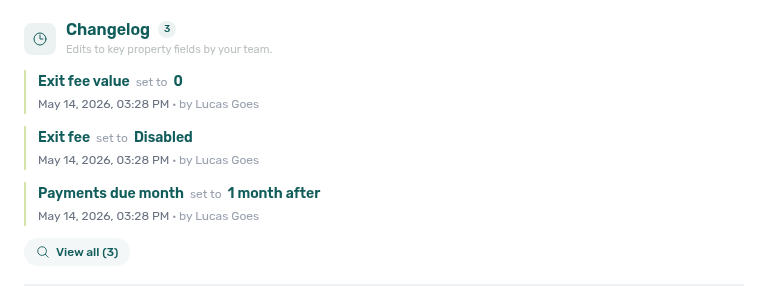
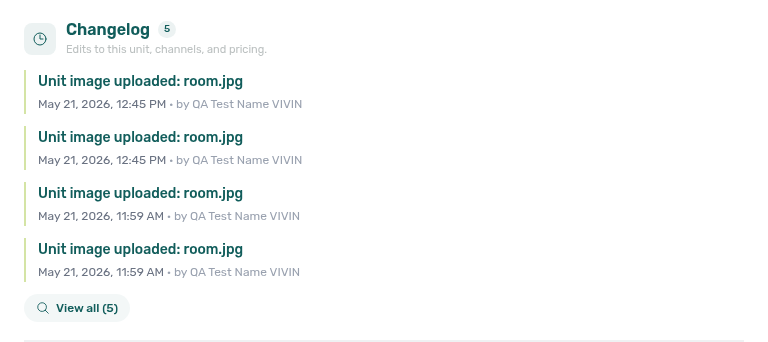
Change history
Near the bottom of the property edit sidebar, Change history records recent edits to key property fields by your team. On the property path, scroll the right-hand panel past operational sections such as Access Lockers and WiFi — the block sits above the Onboarding / Check-in / Check-out email customization tabs (clock icon in the section header).
| UI element | Meaning |
|---|---|
| Title | Change history |
| Subtitle (property) | Edits to key property fields by your team. |
| Subtitle (unit) | Edits to this unit, channels, and pricing. |
| Each row | Plain-language description of what changed (for example contract timing, rent settings, access configuration, or admin fee tiers — tier updates may show a compact before/after breakdown in the line) |
| Timestamp | When the save occurred (locale-formatted date and time) |
| by … | Operator display name when Vivin can resolve the editor’s email to a user on the account |
Use it when you need accountability for contract, payment, or access changes without leaving Listings. The section is always visible: when nothing has been logged yet, it shows No changes recorded yet.
Change history appears on the normal Listings property and unit setup sidebars. Edits made in the Vivin-internal Property Details / Listing Details layer (Booking engine details) are not listed here — use that editor’s Save workflow and partner exports for marketplace payload changes.
Per-booking milestone dates and field changes live under Bookings → booking detail → Contract Info → Check-in & Check-out → Changelog, not in this sidebar block. Both surfaces list operator-initiated edits only (#2093) — see FAQ — Booking Changelog scope (three-way table: booking Changelog vs Listings Change history vs Tools → Audit). See Bookings — Timeline (booking change log) (bookings-detail-contract-info-timeline.png) and Glossary — Change history.
The unit edit sidebar includes the same Change history block for listing-scoped field changes. Scroll the unit panel below Contract and channel sections until you see the same clock-icon header.
Property and unit Change history captures re-verified 2026-07-08 00:15 UTC (VIVIN_DOCS_BASE_URL=http://localhost:5173 VIVIN_DOCS_RECORD_API=$VITE_API_BASE_URL npx tsx tools/capture-change-history-screenshots.ts).
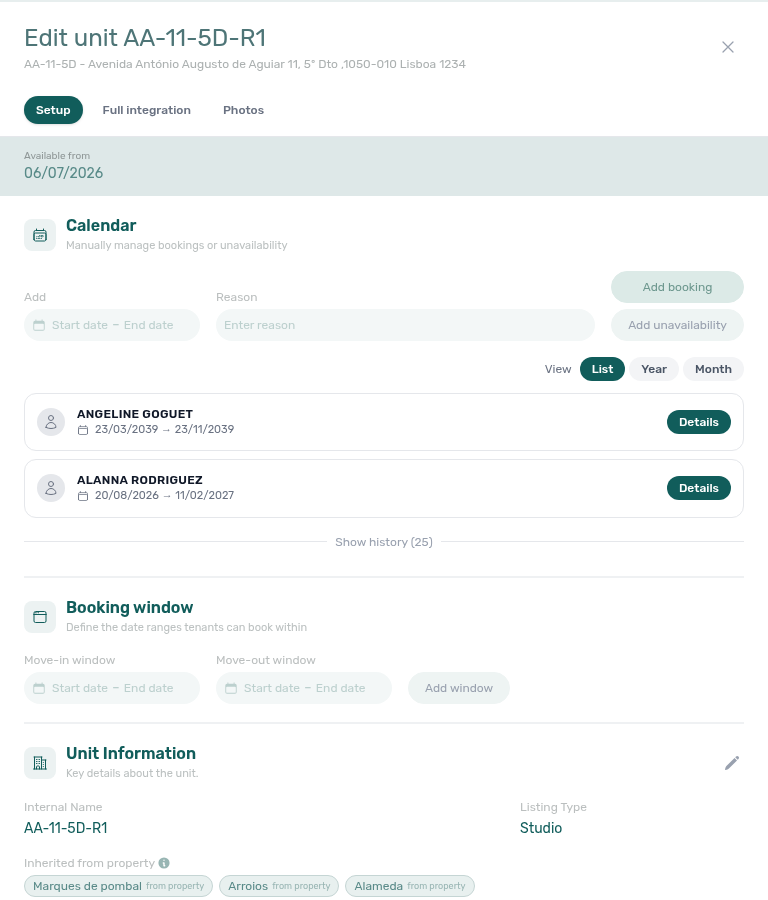
Editing Units
To edit an existing unit, expand the property in the Listings module and click the pencil icon next to the unit you wish to modify.
![]()
The unit edit sidebar uses the same three pills as properties:
| Pill | What it contains |
|---|---|
| Setup | Unit general info, tags, access lockers, rent, contract, channels, calendar, and change history (sections below) |
| Full integration | Unit marketing copy, room fixtures, partner platforms, and per-platform Integration listings toggles — see Property & listing details (booking engine) |
| Photos | Unit gallery; drag to reorder — first image is the cover |
Append ?listingDetails=1 to a unit edit URL to land on Full integration — Deep Links — booking engine query params.
General Information Tab
Update the unit's basic details:
- Unit Number — the identifier for this unit
- Unit Type — the type of rental space (Room, Studio, Full House, Bed, etc.)
- Monthly Rent — can be set as Fixed or Variable
- Availability Date — the earliest date this unit can be booked from
The Availability Date field controls when the unit first appears as bookable. Set this to the date the unit will be ready to receive tenants:
You can also set the Extra Charge per Tenant and Extra Deposit per Tenant values directly from the general tab — these define the additional amounts added when a booking exceeds the unit's base capacity:
Tags Tab
Add or remove tags for this specific unit. Unit tags are independent of property tags, allowing you to create more granular categorization (e.g., "Corner Unit," "Balcony," "Renovated 2024").
Access Lockers Tab
Similar to the property-level access codes, you can define a unit-specific access code here. This is useful when each unit has its own lock or smart lock device.
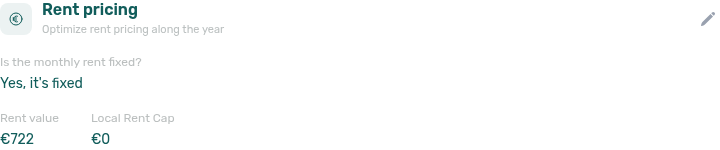
Rent Value Tab
This tab allows you to configure whether the rent is fixed or variable.
- Fixed Rent: The rent amount remains constant for all bookings.
- Variable Rent: The rent can change based on season, demand, or other factors. You can define different rent amounts for different date ranges.
At booking level, Vivin may still store fixed monthly rent when this unit is variable but every contract month in the reservation span shares the same configured € amount — the listing stays variable for future stays. See Bookings — Fixed rent on a variable unit and FAQ — Fixed rent on variable unit.
Local rent cap
When Dual pricing / local rent cap is enabled on the account, the unit sidebar shows Local Rent Cap beside the rent amount (fixed or variable grid). This is the legal rent portion Vivin uses when splitting each monthly Rent line on new bookings; the remainder is scheduled as Others using the category configured in Account Settings.
| Rule | Detail |
|---|---|
| Visibility | Appears when dual pricing is enabled on the account, or when the unit already has a cap saved. |
| Create unit | + Create New → Unit requires Local Rent Cap ≥ €0.01 when dual pricing is on. |
| Valid range | Must be greater than zero and less than the unit’s monthly rent (or the rent for that month when variable). |
| Existing bookings | Changing the cap on the unit does not alter bookings already created; caps are copied at booking create. |
Set the cap in the unit Rent section of the edit sidebar (same area as Monthly Rent / variable month grid). Operators with dual-pricing bookings can adjust the frozen cap on the booking — see Bookings — Dual pricing.
Contract section
The unit edit sidebar includes a Contract block (above Change history and Channels) with the same effective contract card used on properties and on the full-page unit detail.
Resolution order for a unit:
| Resolved source (English UI) | Meaning |
|---|---|
| Uses this unit's own contract | A unit-scoped .docx uploaded in Settings overrides property and account defaults for this row only. |
| Inherited from <property name> | The parent property’s template applies (shown when the unit has no own file but the property does). |
| Uses the account default contract | Neither unit nor property has an override — the account default from Settings applies. |
| No contract template resolved | Upload a template before contract generation can succeed for new bookings on this unit. |
Use the eye control to preview the resolved template as PDF. Manage uploads from Settings > Contract templates.
When the unit has no own .docx but the parent property does, the card shows Inherited from <property name> with the property template filename and upload date:
![]()
Unit inherited-contract card captured 2026-06-19 05:00 UTC (VIVIN_DOCS_BASE_URL=http://localhost:5173 VIVIN_DOCS_RECORD_API=$VITE_API_BASE_URL VIVIN_DOCS_PROPERTY_ID=0af9c920-0b64-49ad-ac38-e2d28536ed4d VIVIN_DOCS_LISTING_ID=e4473824-a3aa-4297-af3b-357cdb213112 npx tsx tools/capture-listings-unit-effective-contract-inherited-screenshot.ts).
The account-default capture above uses the full-page unit detail Contract card (same resolution component as the unit sidebar). For a property-scoped tight crop and PDF preview modal, see Property Contract tab — effective contract card.
Channels Tab
Use the unit Channels tab to wire this unit to external marketplace listings after the platform is enabled on Account Settings > Integrations. Credentials, Pricing Markup, and account-wide Short-term iCal Max Date stay on Integrations; here you add per-unit external listing IDs, import URLs, and connection status.
For a portfolio-wide channel matrix (search, platform filters, Export with a VIVIN iCal column per row), use Sales > Channels. For a property/unit inventory CSV of the current Listings filters, use Portfolio toolbar — Export. Both surfaces read the same integration toggles; open the unit Channels tab when you are already editing one row.
Typical linking workflow
- Turn on the marketplace under Account Settings > Integrations and save credentials or integration email.
- Open the unit in Listings and select the Channels tab in the unit sidebar.
- For each enabled platform, enter the external listing ID (and iCal or API fields the card shows) so imports and calendar sync map to this row.
- Open the platform link from the tab when you need to confirm the live listing on Airbnb, Booking.com, or a mid-term channel.
- When onboarding many units, audit gaps from Sales > Channels or Listings → Export, then return to this tab for one-off fixes.
This tab shows, per connected channel:
- Platform name (e.g., Airbnb, Booking.com, Idealista)
- Link to the listing on that platform
- Sync / connection status for that unit
Channex is provisioned differently from mid-term marketplaces: Vivin maps each unit to Channex property / room type / rate plan UUIDs via internal admin (channexMapping), not through self-serve external listing ID fields on this tab. When mapping exists, a Channex row can appear here like other platforms; enable the platform card under Settings > Integrations and contact Vivin support if ARI sync or booking imports are missing. Channex does not have a column on Sales > Channels.
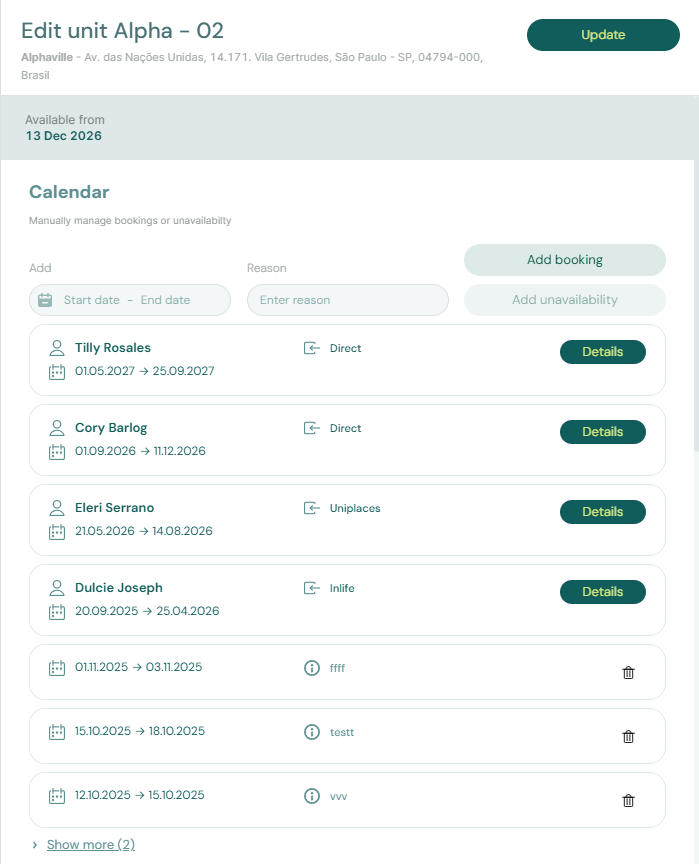
Viewing Unit Availability and Unavailability
Calendar pairs with Sales — Multicalendar and Audit — Manual Blocks — edit holds here, triage portfolio-wide in Audit. Full pairing matrix: Listings section cross-reference.
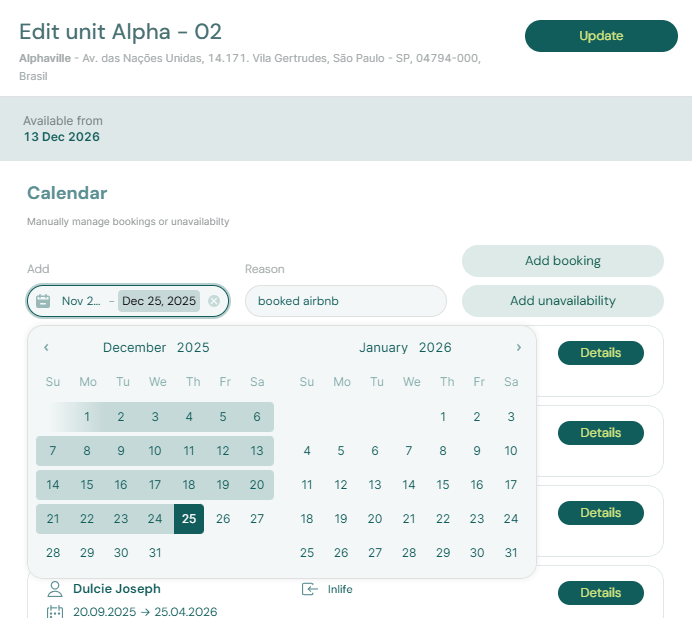
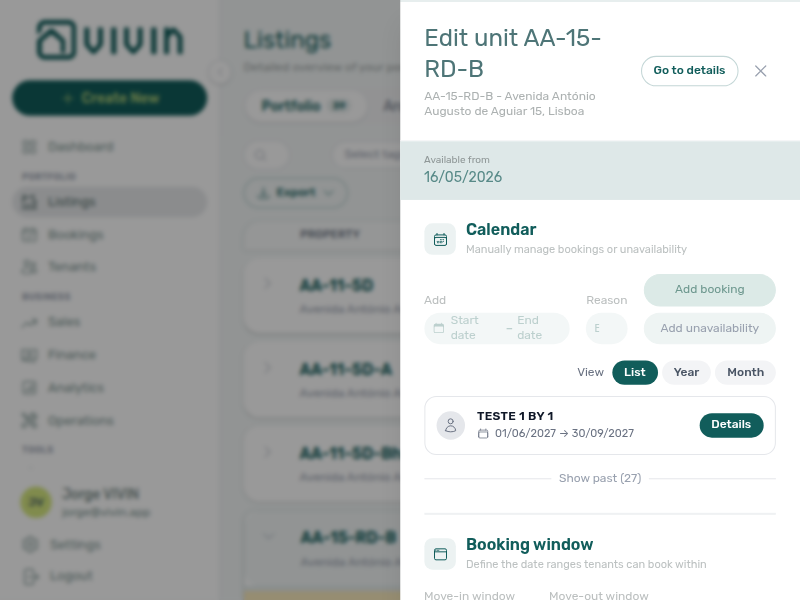
When you open a unit in the Listings module, the Calendar section at the top of the unit sidebar is where you read and manage availability: booked nights, channel blocks, and manual holds. (Older internal wording sometimes called this an “Availability” view; in the English UI the heading is Calendar, with the subtitle about manually managing bookings or unavailability.)
This view shows:
- Available Dates: Dates when the unit is ready to be booked
- Unavailable Dates: Dates when the unit is blocked
Unavailability can come from three sources:
- Bookings: Dates when a tenant is occupying the unit
- Airbnb (or other platforms): Dates blocked by external platform calendars
- Manual Unavailability: Dates you have manually blocked
Adding Manual Unavailability
To manually block dates (for example, during renovations or personal use), follow these steps:
Step 1: Open the unit's detail view by clicking on it in the Listings module.
Step 2: In the unit sidebar, scroll to the Calendar section (combined calendar and list for bookings and unavailability).
Step 3: Choose a start and end date (the date-range control above the calendar), optionally enter a reason, then click Add unavailability — the English UI uses that exact label on the primary action next to Add booking. The block is saved as soon as the request succeeds; the form clears and the calendar refreshes.
The unit will now be blocked for those dates and will not appear as available in the Sales module or external platforms.
In the Calendar section, the calendar shows booked, channel-blocked, and manually blocked ranges together; new manual blocks appear in the unavailability list under the calendar once added.
Reading the calendar
- Hover a coloured span on the calendar to see the date range, whether the block is tied to a booking, an external channel / iCal sync, or a manual block, and any reason or guest-style label the product shows for that slice.
- Short-term iCal blocks (for example Airbnb or Booking.com calendar imports) may show the platform logo on the block or list row when Vivin knows the
integrationPlatform. Raw feed reasons such asCLOSED - Not availableon Booking.com are normalized to Booking.com in the UI instead of the opaque calendar string. - Blocks imported from platforms that only expose an iCal feed (no deep API link) may appear with a platform or generic label rather than a tenant name — that is expected for calendar-only integrations.
Removing manual unavailability
- Only manual unavailability rows you created from Add unavailability can be removed from this tab (use the delete/remove control on that row).
- Booking and channel blocks are managed from their source (for example cancel or amend the booking, or adjust the external calendar); you cannot delete those rows as if they were manual blocks.
Reviewing manual blocks across the portfolio (Audit)
When you need a cross-property view of manual holds (for example before high season or after staff changes), open Tools → Audit (/audit) — the Manual Blocks tab lists manual unavailability with filters, sortable column headers (server-side sort on Unit, dates, Nights, Reason, creator, and Created), a Blocked nights per month chart, and infinite-scroll pagination so you can spot forgotten or overlapping blocks without stepping through every unit sidebar. Access uses the same Listings module permission as this workspace. See Audit module, Modules — Audit, Deep Links — Audit, and Glossary — Manual unavailability.
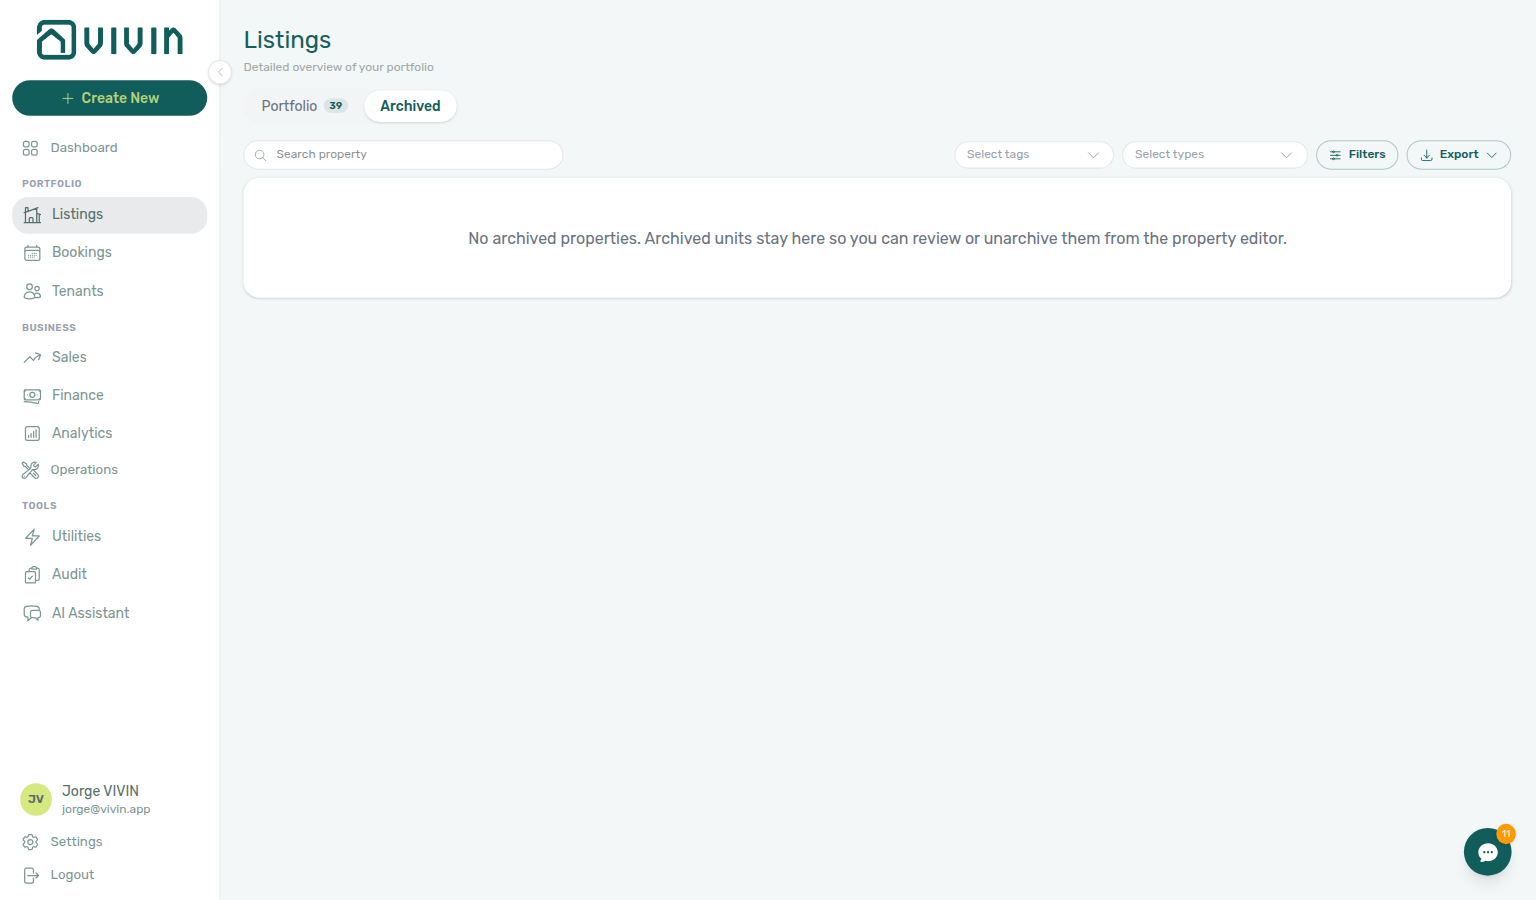
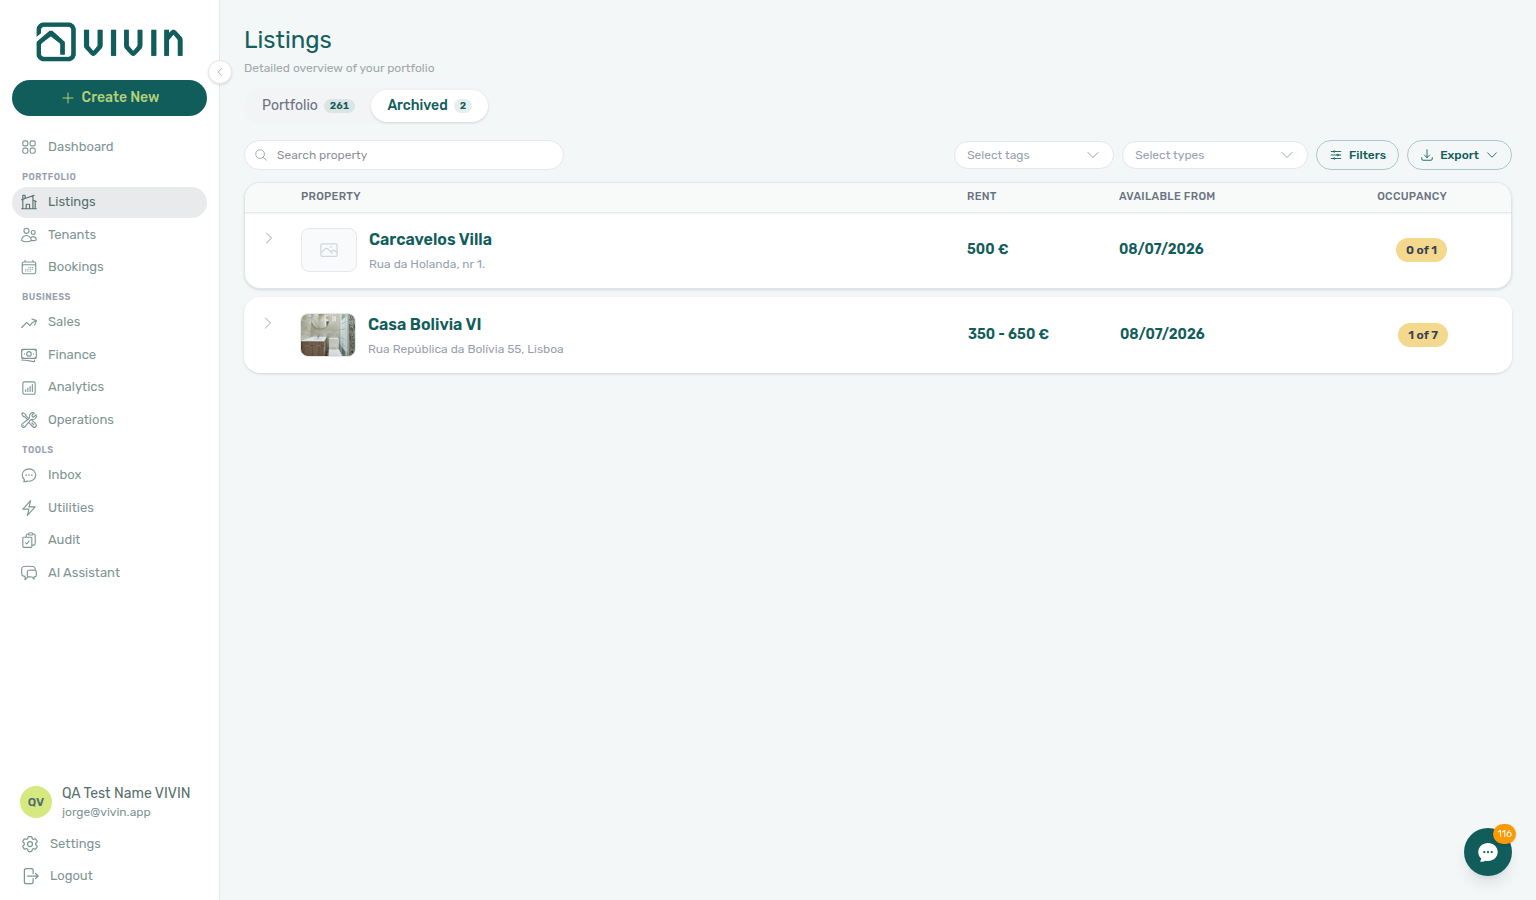
Archived properties
Archived properties drop from active Sales grids but Bookings historical rows remain — verify channel feeds before archiving. Full pairing matrix: Listings section cross-reference.
Use the Archived pill at the top of Listings (next to Portfolio) or open platform.vivin.app/listings/archived directly. Legacy bookmarks under /properties/archived redirect to the same route (see Legacy /properties URLs). Archived property is building-level inventory retirement — distinct from Delete Booking (reservation soft-archive) and Cancel booking; step-by-step: FAQ — Archive a property. Hub matrix: Common Workflows — Portfolio retirement decisions. Scope table: FAQ — Portfolio retirement decisions, Glossary — Archived property, and FAQ — Cancel Booking vs Delete Booking.
| Tab / route | Purpose |
|---|---|
| Portfolio | Active properties and units in day-to-day operations (/listings). |
| Archived | Properties you have archived — hidden from portfolio pickers and default Listings views, but still available for history, contracts, and unarchive. The tab badge shows how many archived properties you have. |
The Archived table uses the same search, tag, type, and filter controls as Portfolio, and the same infinite-scroll loading behaviour (scroll near the bottom to load more archived properties). When nothing is archived yet, you see an empty state that explains archived units remain reviewable from the property editor.
When your account has archived buildings, the Archived pill shows a badge count and the list fills with property cards (same card layout as Portfolio).
Archive and unarchive
- Archive — Open a property in the Edit property sidebar (Portfolio tab), scroll to the danger zone at the bottom of the sidebar, and choose Archive. The app confirms before archiving; properties with active bookings may show an extra warning.
- Unarchive — From the Archived tab, open the property sidebar and choose Unarchive in the same area. The property returns to Portfolio and to property pickers across the app.
Archived tab captures refreshed 2026-07-08 01:10 UTC (VIVIN_DOCS_BASE_URL=http://localhost:5173 VIVIN_DOCS_RECORD_API=$VITE_API_BASE_URL npx tsx tools/capture-listings-archived-screenshots.ts — docs account now has archived properties; prior runs only had the empty state).
Archiving does not delete bookings or financial history; it removes the property from active portfolio workflows until you unarchive it.
Key Business Rules for Listings
-
Properties must exist before units: You cannot create a unit without first creating a property.
-
Owners must exist before properties: You cannot assign an owner to a property unless that owner has been registered in Settings > Owners.
-
Tags propagate from property to units: When you add a tag to a property, all units within that property automatically inherit that tag.
-
Cleaning fee frequency cannot be set during creation: When creating a property, the cleaning fee defaults to Every Month. Edit the property after creation to switch to One-Time Fee at Booking Confirmation or One-Time Fee at Move-in.
-
Property Payments Active controls tenant portal payments: If this setting is disabled, tenants will not be able to make any payments through the platform for bookings in this property.
-
Changes do not affect existing bookings: If you change the rent, payment terms, or other settings for a property or unit, those changes will only apply to new bookings created after the change. Existing bookings will continue using the values that were in effect when they were created.
-
Access codes in check-in email and portal: Codes configured in the Access Lockers tab are included in the check-in email when that lifecycle message sends. The portal Home Entry codes card is separate — it requires Allow to see entry codes on Preferences → Tenant Portal, a sent check-in email, and an active stay window. See Tenant Portal — Entry codes (#2166).
-
Manual unavailability blocks connected channels: For units linked to external platforms, manual blocks you save here keep those dates unavailable in Vivin and on connected calendars — treat them like operational holds, not just a local note. See also the Sales module for how availability stays in sync across channels.
Listings guide subsection index
This index pairs Listings portfolio, unit, and channel sections with Related subsections — use it when inventory disagrees with Sales availability, Bookings assignments, or Utilities Bills Included ceilings. Full pairing matrix: Listings section cross-reference.
Listings section cross-reference
Use this table when one Listings section or control naturally leads into another module, workflow, or concept — each row links to the docs you should read before or after acting in that section.
Related
Related below links this module to settings, concepts, workflows, and escalation paths. Pair Documentation map & escalation with Modules hub — Documentation map & escalation; pair Upstream & downstream workflows with Common Workflows — Workflow cross-reference. Topic-to-section pairing in sections above: Listings guide subsection index · Listings section cross-reference. Full hub matrix: Module cross-reference · Modules hub subsection index.
Documentation map & escalation
Documentation-map bullets pair with Introduction — Section cross-reference and FAQ — Section cross-reference. Hub parity: Modules hub — Documentation map & escalation. Full pairing matrix: Listings section cross-reference · Module cross-reference.
- Modules hub — Hub pairing matrix across operator workspaces
- Modules overview — Audit — Cross-portfolio review of manual availability blocks (
/audit) - Deep Links — Listings paths and
propertyDetails=1/listingDetails=1query flags - Glossary — Term definitions used across listings and channel workflows
Upstream & downstream workflows
Workflow bullets pair with Common Workflows — Workflow cross-reference. Full pairing matrix: Listings section cross-reference · Module cross-reference.
- Onboarding a New Property (section cross-reference; Deeper workflow reads; hub) — Step-by-step workflow for adding properties
- Processing a New Booking (section cross-reference; Deeper workflow reads; hub) — First reservation after the property wizard completes
- Manual block hygiene (workflow) (section cross-reference; Deeper workflow reads; hub) — Audit pass when Vacant Units or Sales heatmaps look suppressed by stale holds
- Notification triage (workflow) (section cross-reference; Deeper workflow reads; hub) — Clear listing- or booking-linked alerts after portfolio edits
- Entering Monthly Utility Bills (section cross-reference; Deeper workflow reads; hub) — Utility connections and Bills Included ceilings configured per property
- Managing a Check-out & Deposit Refund (section cross-reference; Deeper workflow reads; hub) — Unit availability after Ended bookings release inventory for the next tenant
- Handling a Late Payment — Step 1 (section cross-reference; Deeper workflow reads; hub) — Collections when Property Payments Active bookings still owe on portal-enabled properties; upstream path from Notifications — Payment overdue alerts
Deeper workflow reads
Workflow reads pair with Common Workflows hub subsection index and Workflow cross-reference. Each workflow sub-guide reciprocates with [Deeper workflow reads](../modules/listings/index.md#deeper-workflow-reads) anchors on Module documentation hubs bullets — hub parity: Modules hub — Deeper workflow reads. Full pairing matrix: Listings section cross-reference · Module cross-reference.
- Onboarding a New Property — Property wizard, unit setup, Channels tab, and Step 7 — Verify in Listings (section cross-reference; Deeper API reads; hub)
- Manual block hygiene — Unit Calendar hold edits after Audit → Manual Blocks scan (section cross-reference; Deeper API reads; hub)
- Processing a New Booking — Property and unit context when verifying channel imports (section cross-reference; Deeper API reads; hub)
- Entering Monthly Utility Bills — Bills Included ceilings and Utilities → Connections per property (section cross-reference; Deeper API reads; hub)
- Managing a Check-out & Deposit Refund — Unit availability after Ended bookings release inventory (section cross-reference; Deeper API reads; hub)
- Handling a Late Payment — Step 1 — Collections on Property Payments Active properties (section cross-reference; Deeper API reads; hub)
Settings that shape Listings
Settings bullets pair with Account Settings — Tab cross-reference. Full pairing matrix: Listings section cross-reference · Module cross-reference.
- Settings > Tenant categories — Default segment for tenants created from listing-linked bookings
- Settings > Categories — Configure property and unit tags
- Settings > Integrations — Connect units to external platforms
- Settings > Preferences — In-app notifications — Account-wide listing or integration alerts before you open Notifications
- Settings > Emails — Email Customization tab, Access Lockers, and Communication Rules audience filters
Deeper concept reads
Concept reads pair with Concepts hub subsection index and Concept cross-reference. Full pairing matrix: Listings section cross-reference · Module cross-reference.
- Integrations & Distribution — Per-unit Channels tab links inventory to external marketplace listings after account credentials are saved (section cross-reference; hub)
- Services Marketplace — Property-scoped add-ons when Properties multi-select limits portal catalogue cards per building (section cross-reference; hub)
- Payment Allocation — Two-layer receipts, invoiced-floor rent edits, and credit note reject/revert warnings (section cross-reference; hub)
- Booking Lifecycle — Computed Upcoming → Ongoing → Ended / Canceled status model, list filters, and Timeline (section cross-reference; hub)
- Tenant MCP — External AI clients that read listing context for booking-scoped automation (section cross-reference; hub)
- Landlord MCP — Account-scoped inventory and calendar tools after channel mapping on this module (section cross-reference; hub)
Operator modules (pairing surfaces)
Module hub bullets pair with Modules — Module cross-reference. Full pairing matrix: Listings section cross-reference · Module cross-reference.
- Properties workspace — Legacy
/propertiesbookmarks that redirect into this module - Bookings Module — Create reservations for your units; bills included ceiling copied from property defaults
- Sales Module — Manage availability and pricing; manual blocks propagate to connected channels
- Sales — Multicalendar — Per-unit Gantt after manual blocks or booking holds change
- Utilities Module — Track utility expenses per property
- Audit — Discounts tab — Portfolio-wide discounted contract values after repricing on unit Contract Values
- Audit module — Cross-portfolio manual blocks when calendar edits do not match Sales heatmaps
- Analytics (KPI workspace) — Portfolio occupancy and revenue trends after large portfolio edits
- Notifications — Payment overdue alerts — Operator Payments category rows when property-level payment settings leave charges unpaid
- Property & listing details (booking engine) — Full integration pill, tab reference, legacy URL redirects
Navigation & bookmarks
Bookmark routes pair with Management Frontend Deep Links and Create New menu. Full pairing matrix: Listings section cross-reference · Module cross-reference.
- Create New menu — Property and Unit — Wizard entry without a dedicated deep link
Lockout catch-up after password recovery
Operational backlog after sign-in recovery pairs with Resetting a Management User Password — Step 3. Hub parity: Common Workflows — Lockout catch-up after password recovery. Full pairing matrix: Listings section cross-reference · Module cross-reference.
- Common Workflows — Lockout catch-up after password recovery — Hub matrix when sign-in was restored mid-setup before step 13 inventory is complete
- Getting Started — Lockout catch-up after password recovery — Canonical operational backlog mesh
- Onboarding a New Property — Step 7 — Verify properties and units after lockout-delayed setup
- Notification triage — Clear listing or integration alerts before channel linking
- Pending manual receipt approval — Channel bookings may show stale debt until Finance clears Pending receipts
Pending manual receipt approval
Receipt approval pairs with Finance — Pending manual payments and Bookings — Transactions tab. Hub parity: Common Workflows — Pending manual receipt approval. Full pairing matrix: Listings section cross-reference · Module cross-reference.
-
Common Workflows — Pending manual receipt approval — Hub matrix when unit sidebar debt indicators lag until Approve payments confirms recorded transfers
-
Finance — Pending manual payments — Amber Pending chip on Finance → Transactions
-
Bookings — Transactions tab — Per-row Approve payment on reservations tied to a unit
-
Channels Tab — Channel import bookings whose confirmation receipts may need approval
-
FAQ — Manual receipt still pending — Why vacancy or debt KPIs may disagree until approval
-
FAQ — Pending manual receipt approval hub — Symptom table for Approve payments / amber Pending
Reject/revert mistaken receipts
Receipt cleanup pairs with Finance — Row actions on in-payment rows and Bookings — Row actions on in-payment rows. Hub parity: Common Workflows — Reject/revert mistaken receipts. Full pairing matrix: Listings section cross-reference · Module cross-reference.
-
Common Workflows — Reject/revert mistaken receipts — Hub matrix when duplicate receipts on listing bookings need Reject / Revert after Approve
-
Finance — Row actions on in-payment rows — Portfolio reject/revert on Finance → Transactions
-
Bookings — Row actions on in-payment rows — Per-booking cleanup from unit sidebar drill-down
-
Payment Allocation — Correcting mistaken receipts — Two-layer model and credit note follow-up
-
Rent Value tab — Reconcile rent edits after mistaken receipt cleanup on invoiced months
-
FAQ — Reject/revert mistaken receipts hub — Symptom table for Reject / Revert / Issue credit notes
Check-out ledger cleanup before refund
Duplicate-transfer cleanup pairs with Reject/revert mistaken receipts and Managing a Check-out. Hub parity: Common Workflows — Check-out ledger cleanup before refund. Full pairing matrix: Listings section cross-reference · Module cross-reference.
-
Common Workflows — Check-out ledger cleanup before refund — Hub matrix when unit sidebar debt indicators show phantom balance from duplicate departure transfers
-
Reject/revert mistaken receipts — Reject / Revert duplicate before Ready To Refund
-
Managing a Check-out — Step 6 — Canonical departure-week duplicate cleanup before refund
-
Common Workflows — Check-out collections before refund — Real arrears contrast (tenant did not pay)
-
Bookings — Deposit tab — Ready To Refund on listing bookings after Revert
-
Managing a Check-out — Departure-week settlement on unit bookings
-
FAQ — Check-out ledger cleanup before refund hub — Symptom table for phantom In Debt / Ready To Refund blocked when tenant paid once
Utility overage collections
Unit sidebar debt from utility overage lines pairs with Utilities bill posting and Finance collections. Hub parity: Common Workflows — Utility overage collections. Full pairing matrix: Listings section cross-reference · Module cross-reference.
-
Common Workflows — Utility overage collections — Hub matrix when unit sidebar shows utility overage In Debt after bill posting
-
Utilities — Allocations tab — Property-scoped overage math before lines post
-
Entering Monthly Utility Bills — Step 4 — Upstream posting before collections
-
Finance — Contract Values tab — Portfolio In Debt filter
-
Handling a Late Payment — Step 1 — Collections after overage posts
-
FAQ — Utility overage collections hub — Symptom table for unpaid utility overage on Payment Plan after bill posting
Cancellation collections before void
Pre-cancel arrears pair with Cancelling a Booking before Step 5 frees unit nights. Hub parity: Common Workflows — Cancellation collections before void. Full pairing matrix: Listings section cross-reference · Module cross-reference.
-
Common Workflows — Cancellation collections before void — Hub matrix when unit sidebar debt indicators show pre-cancel rent arrears before policy void
-
Cancelling a Booking — Step 2 — Settle before Step 4 and Step 5
-
Handling a Late Payment — Steps 1–4 — Collections on unit bookings
-
Bookings — Payment Plan tab — Unpaid schedule on listing bookings
-
Common Workflows — Check-out collections before refund — Departure-week contrast
-
FAQ — Cancellation collections before void hub — Symptom table for In Debt blocking Cancel booking until Payment Plan settles
Check-out collections before refund
Unit sidebar departure-week arrears pair with Managing a Check-out and Handling a Late Payment. Hub parity: Common Workflows — Check-out collections before refund. Full pairing matrix: Listings section cross-reference · Module cross-reference.
-
Common Workflows — Check-out collections before refund — Hub matrix when unit sidebar debt indicators show departure-week rent arrears
-
Managing a Check-out — Step 6 — Settlement before unit turns over
-
Handling a Late Payment — Steps 1–4 — Collections on unit bookings
-
Bookings — Payment Plan tab — Unpaid schedule on listing bookings
-
Bookings — Timeline — Departure-week In Debt on unit rows
-
Common Workflows — Check-out ledger cleanup before refund — Duplicate transfer contrast
-
Common Workflows — Cancellation collections before void — Pre-cancel void contrast
-
FAQ — Check-out collections before refund hub — Symptom table for rent/fee In Debt blocking Ready To Refund before deposit release
Handling a Late Payment collections
Unit sidebar debt indicators pair with booking Payment Plan before Handling a Late Payment outreach — portfolio Top debtors ranks bookings, not units alone. Hub parity: Common Workflows — Handling a Late Payment collections hub. Full pairing matrix: Listings section cross-reference · Module cross-reference.
- Common Workflows — Handling a Late Payment collections hub — Hub matrix when unit-level debt cues need collections Steps 1–6 (
bookings-detail-payment-plan-tab-schedule.png,finance-overview-income-chart-debt-aging.png) - Bookings — Payment Plan tab — Per-reservation schedule behind unit debt
- Finance debt receivables triage — Portfolio Top debtors after unit sidebar triage
- Handling a Late Payment — Steps 1–4 — Collections on unit-linked arrears
- Manual block hygiene — Phantom availability vs real arrears contrast
- FAQ — Handling a Late Payment collections hub — Symptom table for triage surface → collections step pairing
Check-out vs cancellation
Unit Calendar availability after early termination depends on lifecycle exit — policy void → Cancelling a Booking Canceled vs completed stay → Managing a Check-out Ended. Hub parity: Common Workflows — Check-out vs cancellation. Full pairing matrix: Listings section cross-reference · Module cross-reference.
- Common Workflows — Check-out vs cancellation — Hub matrix: unit calendar after lifecycle exit (
listings-unit-calendar-month.png,bookings-list-canceled-tab.png) - Unit sidebar Calendar — Bars persist until correct exit workflow runs
- Manual block hygiene — Stale holds after Canceled or Ended
- Managing a Check-out — Step 7 — Completed stay unit release
- Cancelling a Booking — Step 5 — Policy void unit release
- Bookings — Check-out vs cancellation — Reservation status on unit sidebar
- FAQ — Check-out vs cancellation — Symptom table for lifecycle exit routing
Deposit missing on Finance Deposits
First check-out deposit triage after property go-live should clear Finance → Deposits toolbar date range when the departing stay falls outside the default ~3 months window. Hub parity: Common Workflows — Deposit missing on Finance Deposits. Full pairing matrix: Listings section cross-reference · Module cross-reference.
- Common Workflows — Deposit missing on Finance Deposits — Hub matrix (
listings-property-detail-overview.png,finance-deposits-date-range-clear-flow.mp4) - Onboarding a New Property — Deposit missing on Finance Deposits — First check-out deposit triage after Step 7 go-live
- Bookings — Deposit tab — Per-unit first reservation deposit
- Finance — Deposits tab — Portfolio refund queue
- Managing a Check-out — Deposit missing on Finance Deposits — Step 5 refund triage after clearing range
- FAQ — Deposit missing on Finance Deposits — Symptom table for toolbar date range triage
Notification row-click navigation
/notifications row-click with listingId opens the unit edit sidebar (or Full-page unit detail when the route is /listings/:listingId); propertyId opens the property edit sidebar — clear Deep links hidden by filters when the portfolio row is hidden. Hub parity: Common Workflows — Notification row-click navigation. Full pairing matrix: Listings section cross-reference · Module cross-reference.
- Common Workflows — Notification row-click navigation — Hub matrix (
notifications-module-row-click-target.png,notifications-row-navigation-flow.mp4) - Notifications module — Notification row-click navigation — Canonical
/notificationsrow-click pairing - Dashboard — Notification row-click navigation — Bell General vs full
/notificationsrow-click - Bookings — Notification row-click navigation — Booking sidebar when alert carries
bookingId(most payment alerts) - Tenants — Notification row-click navigation — Tenant profile when alert carries
tenantId - Operations — Notification row-click navigation — Turnover-week alerts that row-click into Bookings first
- Inbox — Notification row-click navigation — Bell Inbox
linkdeep-link vs General row-click - Utilities — Notification row-click navigation — Overage payment overdue alerts after bill cycle
- Sales — Notification row-click navigation — Channel-import alerts before Multicalendar review
- Analytics — Notification row-click navigation — Month-range KPI charts after row-click opens booking context
- AI Chat — Notification row-click navigation — Verify assistant-cited alerts by row-click before operational follow-up
- Audit — Notification row-click navigation — Discounts / Manual Blocks month-end review after row-click
- Legacy
/propertiesURLs — Notification row-click navigation — Legacy bookmarks that land in Listings during alert triage - Booking engine details — Notification row-click navigation — Engine-sourced alerts before Full integration payload edits
- Editing Properties — Property sidebar after
propertyIdrow-click - Full-page unit detail — Bookmarkable
/listings/:listingIdwhen alert carrieslistingId - Deep links hidden by filters — Clear filters when row-click target is hidden
- Notification triage — Step 4 — Row-click before Step 5
- Payment alert to receivables triage — Ongoing/Ended payment overdue row-click (usually Bookings)
- Confirmation alert triage — Upcoming Booking created / Payment received row-click
- Onboarding a New Property — Notification row-click navigation — First alerts on Step 7 go-live verify
- FAQ — Notification row-click navigation — Target field order (
link,bookingId,tenantId,listingId,propertyId)
Payment alert to receivables triage
When Property Payments Active is enabled on a property, unpaid portal charges surface payment overdue rows — row-click into Bookings and finish Handling a Late Payment — Step 1 before you change listing defaults account-wide. Hub parity: Common Workflows — Payment alert to receivables triage. Full pairing matrix: Listings section cross-reference · Module cross-reference.
- Common Workflows — Payment alert to receivables triage — Hub matrix (
notifications-row-navigate-to-booking-detail.png,notifications-row-navigation-flow.mp4,finance-overview-debt-aging-walkthrough-flow.mp4) - Notifications module — Payment alert to receivables triage — Payments category row-click entry
- Dashboard — Payment alert to receivables triage — Total Debt KPI after alert row-click
- Bookings — Payment alert to receivables triage — Payment Plan / Transactions on opened booking
- Finance — Payment alert to receivables triage — Overview → Debt Aging after single-booking triage
- Tenants — Payment alert to receivables triage — With Debt cross-check on tenant profile
- Operations — Payment alert to receivables triage — Unpaid move-in lines before key handover
- Inbox — Payment alert to receivables triage — payment overdue on General before WhatsApp chase
- Utilities — Payment alert to receivables triage — Utility overage lines behind overdue alerts
- Sales — Payment alert to receivables triage — Channel-import schedules behind overdue alerts
- Analytics — Payment alert to receivables triage — Revenue trend may lag until receivables clear
- AI Chat — Payment alert to receivables triage — Validate assistant debt answers after receivables triage
- Audit — Payment alert to receivables triage — Discounts review when receivables lag behind goodwill lines
- Legacy
/propertiesURLs — Payment alert to receivables triage — Collections on bookings tied to redirected properties - Booking engine details — Payment alert to receivables triage — Engine-sourced schedules behind overdue alerts
- Editing Properties — Property Payments Active toggle and portal charge defaults
- Channels Tab — Channel import bookings whose confirmation receipts may need approval
- Notification row-click navigation — Row-click on
/notificationsbefore portfolio edits - Pending manual receipt approval — Amber Pending before debt KPI sign-off
- Confirmation alert triage — Contrast Upcoming vs Ongoing/Ended alerts
- Handling a Late Payment — Step 1 — Canonical receivables triage on portal-enabled properties
- FAQ — Payment alert to receivables triage — Alert-type contrast table
- FAQ — Payment alert to receivables triage hub — Property Payments Active portal charges symptom table
Finance debt receivables triage
Unit sidebar debt indicators and Property Payments Active portal charges on listing bookings may disagree with portfolio Top debtors until ledger cleanup finishes. Hub parity: Common Workflows — Finance debt receivables triage. Full pairing matrix: Listings section cross-reference · Module cross-reference.
- Common Workflows — Finance debt receivables triage — Hub matrix (
finance-overview-income-chart-debt-aging.png,finance-overview-debt-aging-walkthrough-flow.mp4) - Payment alert to receivables triage — Single-booking alert triage before portfolio surfaces
- Finance — Finance debt receivables triage — Debt Aging Top debtors canonical surface
- Pending manual receipt approval — Clear amber Pending before Top debtors sign-off
- Dashboard — Finance debt receivables triage — Total Debt headline vs Finance drill-down
- Bookings — Finance debt receivables triage — Payment Plan on opened booking
- Handling a Late Payment — Finance debt receivables triage — Debt Aging on Step 1 before outreach
- Portfolio KPI review — Finance debt receivables triage — Month-end Top debtors on Step 7
- FAQ — Finance debt receivables triage hub — Symptom table for four-surface triage
- Portfolio toolbar: search, filters, and export — Property-level collections context
- Full-page unit detail — Per-listing debt indicators vs Debt Aging rank
Finance Income status drill-down
Unit sidebar debt indicators show one booking — use Income → In debt for month-scoped payment lines or Debt Aging for portfolio rank. Hub parity: Common Workflows — Finance Income status drill-down. Full pairing matrix: Listings section cross-reference · Module cross-reference.
- Common Workflows — Finance Income status drill-down — Hub matrix (
finance-overview-income-status-in-debt-modal.png,finance-overview-income-drill-down-flow.mp4) - Finance debt receivables triage — Debt Aging Top debtors when payment-line modal is not enough
- Finance — Income status drill-down — Stacked Income chart canonical surface
- FAQ — Finance Income status drill-down hub — Symptom table for segment vs Debt Aging
- FAQ — Finance Income status drill-down — Paid / Scheduled / In debt segment-click habit
- Portfolio KPI review — Finance Income status drill-down — Month-end Income reconciliation on Step 7
- Viewing unit availability and unavailability — Occupancy vs receivables on opened unit
- Finance debt receivables triage — Unit debt vs Top debtors rank
Cash flow forecast drill-down
Go-live property collections may skew Cash flow forecast month bars — reconcile on Finance → Overview after channel import. Hub parity: Common Workflows — Cash flow forecast drill-down. Full pairing matrix: Listings section cross-reference · Module cross-reference.
- Common Workflows — Cash flow forecast drill-down — Hub matrix (
finance-overview-cash-flow-all-payments-modal.png,finance-overview-cash-flow-day-view.png,finance-overview-cash-flow-drill-down-flow.mp4) - Finance Income status drill-down — Paid / Scheduled / In debt segments — not collections history
- Finance — Income chart and cash flow forecast — Canonical Cash flow forecast chart surface
- FAQ — Cash flow forecast drill-down hub — Symptom table for collections vs Income / Dashboard
- FAQ — Cash flow forecast drill-down — Month / Day bar-click habit
- Portfolio KPI review — Cash flow forecast drill-down — Month-end collections reconciliation on Step 7
- Onboarding a New Property — Cash flow forecast drill-down — First collections read on Step 7
- Full-page unit detail — Per-listing context vs portfolio All payments modal
Confirmation alert triage
Upcoming Booking created / Payment received alerts on channel-linked units row-click into Bookings — finish Processing a New Booking — Step 5b and verify inventory on Onboarding a New Property — Step 7 before bulk-clear on /notifications. Hub parity: Common Workflows — Confirmation alert triage. Full pairing matrix: Listings section cross-reference · Module cross-reference.
- Common Workflows — Confirmation alert triage — Hub matrix (
notifications-row-navigation-flow.mp4) - Notifications module — Confirmation alert triage — Canonical inbox pairing
- Bookings — Confirmation alert triage — Transactions / Contract Info on Upcoming imports
- Dashboard — Confirmation alert triage — Post-login Upcoming alert backlog on bell
- Tenants — Confirmation alert triage — Tenant Info / Category on confirmation-week clusters
- Operations — Confirmation alert triage — Turnover prep after confirmation receipts approved
- Inbox — Confirmation alert triage — WhatsApp thread after Payment received row-click
- Utilities — Confirmation alert triage — First bill cycle after go-live alerts
- Sales — Confirmation alert triage — Channel-import Upcoming alerts before Channels linking
- Analytics — Confirmation alert triage — Upcoming alerts during month-end KPI review
- AI Chat — Confirmation alert triage — Assistant-cited confirmation backlog before bulk mark-read
- Audit — Confirmation alert triage — Month-end Discounts review after confirmation receipts approved
- Legacy
/propertiesURLs — Confirmation alert triage — First alerts after legacy redirects land in Listings - Booking engine details — Confirmation alert triage — White-label Upcoming alerts before payload sync
- Channels Tab — First channel import bookings on newly linked units
- Onboarding a New Property — Step 7 — Verify properties and units after go-live alerts
- Notification row-click navigation — Row-click on
/notificationsbefore mark-read - Payment alert to receivables triage — Contrast Upcoming vs Ongoing/Ended payment overdue
- Pending manual receipt approval — Payment received alert until Approve payments
- Processing a New Booking — Step 5b / Step 6 — Canonical confirmation gates
- Onboarding a New Property — Confirmation alert triage — First confirmation alerts on go-live (Step 7)
- Notification triage — Confirmation alert triage — Steps 4 / 5 path
- FAQ — Confirmation alert triage — Alert-type table and bulk mark-read guard
- FAQ — Confirmation alert triage hub — Channel import bookings on go-live properties symptom table
New inventory to first booking handoff
Go-live properties need Onboarding a New Property — Steps 1–7 complete — especially portfolio verify on Step 7 — before Processing a New Booking — Step 1 duplicate check or Add booking. Hub parity: Common Workflows — New inventory to first booking handoff. Full pairing matrix: Listings section cross-reference · Module cross-reference.
- Maintenances tab — Auto check-in rules before first reservation
- Onboarding a New Property — Step 7 — Upstream go-live verify on portfolio table
- Bookings — New inventory to first booking handoff — First Upcoming status tabs
- Sales — New inventory to first booking handoff — Multicalendar before channel import
- Processing a New Booking — Step 1 — Duplicate import check
- Common Workflows — New inventory to first booking handoff — Hub matrix (
listings-module-overview.png,workflows-onboarding-property-wizard.mp4) - Property setup to first arrival handoff — Downstream arrival week
- FAQ — New inventory to first booking handoff — Symptom table for property wizard → first reservation
Property setup to first arrival handoff
Go-live properties need Onboarding a New Property — Steps 1–7 complete — especially Access Lockers tab and portfolio verify on Step 7 — before Managing a Check-in — Step 1. Hub parity: Common Workflows — Property setup to first arrival handoff. Full pairing matrix: Listings section cross-reference · Module cross-reference.
- Access Lockers tab — Nuki / access codes before Managing a Check-in — Step 4
- Maintenances tab — Auto check-in ticket rules before first arrival
- Onboarding a New Property — Step 7 — Upstream go-live verify on portfolio table
- Operations — Property setup to first arrival handoff — Check-in & Check-out Next 7 days after setup
- Bookings — Property setup to first arrival handoff — First Upcoming on new inventory
- Common Workflows — Property setup to first arrival handoff — Hub matrix (
listings-property-edit-access-lockers-tab.png,workflows-onboarding-property-wizard.mp4) - Managing a Check-in — Step 1 — Downstream arrival-week entry (~7 days out)
- FAQ — Property setup to first arrival handoff — Symptom table for go-live → first arrival week
Confirmation to check-in handoff
Go-live properties need Processing a New Booking — Step 6 portal gates on first Upcoming reservation before Managing a Check-in — Step 1. Hub parity: Common Workflows — Confirmation to check-in handoff. Full pairing matrix: Listings section cross-reference · Module cross-reference.
- Access Lockers tab — Access codes before Managing a Check-in — Step 4
- Confirmation alert triage — Channel import bookings on go-live properties
- Bookings — Confirmation to check-in handoff — Contract Info portal gates on Upcoming imports
- Onboarding a New Property — Step 7 — Upstream go-live verify before first arrival
- Common Workflows — Confirmation to check-in handoff — Hub matrix (
bookings-detail-contract-method-of-payments.png,workflows-operations-check-in-out-planning-view.png,booking-lifecycle-status-tabs-flow.mp4) - Processing a New Booking — Step 6 — Upstream portal sanity before handoff
- Managing a Check-in — Step 1 — Downstream arrival-week entry (~7 days out)
- Pending manual receipt approval — Step 5b confirmation receipts before handoff
- FAQ — Confirmation to check-in handoff — Symptom table for Upcoming → arrival week
Check-in to check-out handoff
Unit Calendar and sidebar departure bars on Ongoing stays signal when to switch from move-in prep to Managing a Check-out — Step 1. Hub parity: Common Workflows — Check-in to check-out handoff. Full pairing matrix: listings-section-cross-reference · Module cross-reference.
- Viewing unit availability and unavailability — Departure bar visibility on unit row
- Bookings — Timeline view — Ongoing → departure week on listing calendar
- Operations — Check-in to check-out handoff — Check-outs pill per unit cluster
- Managing a Check-in — Step 4 — Upstream keys handed over
- Managing a Check-out — Step 1 — Downstream departure-week entry
- Common Workflows — Same-day turnover coordination — Shared-unit one-day overlap
- Common Workflows — Check-in to check-out handoff — Hub matrix (
operations-check-in-out-check-outs-next-7-days.png,bookings-timeline-view.png) - FAQ — Check-in to check-out handoff — Symptom table for Ongoing → departure week
Check-out final utilities handoff
Unit-level Bills Included ceilings (see Bookings — Bills included ceiling) affect final-cycle utility overage math during departure week — pair Utilities Allocations with booking Payment Plan before refund. Hub parity: Common Workflows — Check-out final utilities handoff. Distinct from Utility overage collections (mid-stay mesh). Full pairing matrix: Listings section cross-reference · Module cross-reference.
- Utilities — Connections — Bills Included ceiling context for final-cycle overage lines
- Utilities — Check-out final utilities handoff — Property-scoped Allocations / Bills posting
- Bookings — Check-out final utilities handoff — Unit booking Payment Plan overage lines
- Entering Monthly Utility Bills — Step 4 — Upstream overage posting verification
- Managing a Check-out — Step 6 — Settlement before deposit release
- Common Workflows — Check-out final utilities handoff — Hub matrix (
utilities-allocations-row-breakdown-expanded.png,utilities-bills-tab-missing-toggle.png) - FAQ — Check-out final utilities handoff — Symptom table for final utility overage blocking refund
Same-day turnover coordination
Unit Calendar and Bookings — Timeline view show back-to-back departure and arrival bars on turnover day — pair with hub Common Workflows — Same-day turnover coordination before you treat overlap as a duplicate import. Full pairing matrix: listings-section-cross-reference · Module cross-reference.
- Common Workflows — Same-day turnover coordination — Hub matrix (
bookings-timeline-view.png,bookings-timeline-day-week-month-and-sidebar.mp4) - Viewing unit availability and unavailability — Departure + arrival bars on one unit row
- Bookings — Same-day turnover coordination — Timeline Week scale overlap
- Sales — Same-day turnover coordination — Multicalendar sales-scoped overlap
- Operations — Same-day turnover coordination — Turnover ticket on Check-in & Check-out
- Managing a Check-out — Same-day turnover coordination — Turnover ticket due date on Step 2
- Onboarding a New Property — Same-day turnover coordination — Multicalendar / Timeline on Step 7
- FAQ — Same-day turnovers — Four-step operator habit
- Glossary — Same-day turnover — Distinct from channel double-book
WhatsApp per-booking messaging
Go-live property tenant WhatsApp threads pair with Bookings → Communication after channel import bookings land — Listings calendar alone cannot reply. Hub parity: Glossary — WhatsApp per-booking messaging hub · Common Workflows — WhatsApp per-booking messaging. Full pairing matrix: Listings section cross-reference · Module cross-reference.
- Common Workflows — WhatsApp per-booking messaging — Hub matrix (
bookings-detail-communication-tab-whatsapp-thread.png,inbox-module-overview.png,inbox-module-triage-flow.mp4) - Glossary — WhatsApp per-booking messaging hub — Surface table + per-guide/module mesh reciprocal hub
- Dashboard — WhatsApp per-booking messaging — Bell Inbox sub-tab vs General on post-login scan
- Notifications — WhatsApp per-booking messaging — Canonical
/notificationsmessage alert rows - Bookings — WhatsApp per-booking messaging — Communication tab composer with Payment Plan context
- Inbox — WhatsApp per-booking messaging — Cross-booking triage and bell Inbox sub-tab
- Tenants — WhatsApp per-booking messaging — Tenant profile after Inbox name click
- Finance — WhatsApp per-booking messaging — Collections outreach with Transactions visible
- Operations — WhatsApp per-booking messaging — Maintenance ticket threads on Communication
- Utilities — WhatsApp per-booking messaging — Utility overage bill questions on Communication
- Sales — WhatsApp per-booking messaging — Channel-import message backlog during Multicalendar review
- Analytics — WhatsApp per-booking messaging — Month-end message backlog during KPI review
- AI Chat — WhatsApp per-booking messaging — Assistant-cited threads before operational follow-up
- Audit — WhatsApp per-booking messaging — Month-end communication review after Discounts audit
- Legacy
/propertiesURLs — WhatsApp per-booking messaging — Legacy bookmarks during message triage - Booking engine details — WhatsApp per-booking messaging — Engine-sourced tenant threads before payload sync
- Channels Tab — Channel import bookings that generate first tenant messages
- Notification row-click navigation — Property or unit sidebar when alert carries
listingId - Common Workflows — Notification row-click navigation —
New WhatsApp message from …on/notificationsvs bell Inbox - Notification triage — WhatsApp per-booking messaging — Message pings on bell Inbox /
/notifications - Handling a Late Payment — WhatsApp per-booking messaging — Collections outreach on Step 3
- Managing a Check-in — WhatsApp per-booking messaging — Arrival-week threads before Step 4
- Managing a Check-out — WhatsApp per-booking messaging — Departure settlement on Step 6
- Processing a New Booking — WhatsApp per-booking messaging — Confirmation follow-up on Step 6
- Cancelling a Booking — WhatsApp per-booking messaging — Void outreach before Step 4
- Entering Monthly Utility Bills — WhatsApp per-booking messaging — Overage bill questions on Step 4
- Portfolio KPI review — WhatsApp per-booking messaging — Month-end message backlog on Step 7
- Manual block hygiene — WhatsApp per-booking messaging — Blocked-date questions on Step 3
- Onboarding a New Property — WhatsApp per-booking messaging — First tenant threads on Step 7 go-live
- Using in-app support — WhatsApp per-booking messaging — Self-serve Inbox / Communication before filing
- Resetting a Management User Password — WhatsApp per-booking messaging — Lockout-delayed bell Inbox after Step 3
- FAQ — WhatsApp per-booking messaging hub — Go-live property tenant WhatsApp after channel import symptom table
Bot reasoning (audit)
Go-live property bot threads after channel import. Hub parity: Glossary — Bot reasoning (audit) hub · Common Workflows — Bot reasoning (audit). Full pairing matrix: Listings section cross-reference · Module cross-reference.
- Common Workflows — Bot reasoning (audit) — Hub matrix (
bookings-detail-communication-tab-bot-reasoning-expanded.png) - Glossary — Bot reasoning (audit) hub — Surface table + per-guide/module mesh reciprocal hub
- Bookings — Bot reasoning (audit) — Canonical Communication Reasoning control
- ChatBot settings — Read-only audit vs editable persona / IF/THEN
ChatBot settings
Account Settings → ChatBot pairs with Communication thread review — go-live property bot threads after channel import. Hub parity: Glossary — ChatBot settings hub · Common Workflows — ChatBot settings. Full pairing matrix: Listings section cross-reference · Module cross-reference.
- Common Workflows — ChatBot settings — Hub matrix (
settings-chatbot-tab-overview.png,settings-chatbot-status-bot-connected.png,settings-chatbot-save-rule-flow.mp4) - Glossary — ChatBot settings hub — Surface table + per-guide/module mesh reciprocal hub
- ChatBot settings — Persona, IF/THEN rules, Status Bot pairing
- Glossary — Bot reasoning (audit) hub — Thread audit after rule changes
Rent reduction after invoicing
Variable-unit bookings may show fixed headline rent after equal-month inference — reopen Change monthly rent on live bookings when month-end repricing hits the invoiced floor after first export. Pair Bulk Hostkit invoicing for Issue credit notes (N). Hub parity: Common Workflows — Rent reduction after invoicing. Full pairing matrix: Listings section cross-reference · Module cross-reference.
- Common Workflows — Rent reduction after invoicing — Hub matrix (
bookings-detail-change-monthly-rent-modal.png,bookings-rent-reduction-invoiced-floor-flow.mp4) - Bookings — Changing contract dates and rent — Contract Info repricing entry point
- Bookings — Contract Values tab — Per-line Edit amount under the same floor
- Finance — Invoiced floor and rent edits — Why edits start on the booking, not Finance → Transactions
- Editing units — Listing rent vs booking Contract Info repricing
- Processing a New Booking — Rent reduction after invoicing — Confirmation month already invoiced on Step 3
- Handling a Late Payment — Rent reduction after invoicing — Collections goodwill after Step 4
- Portfolio KPI review — Rent reduction after invoicing — Month-end repricing sign-off on Step 7
- Cancelling a Booking — Rent reduction after invoicing — Settlement repricing during Step 2b
- Managing a Check-in — Rent reduction after invoicing — Pre-move-in goodwill
- Managing a Check-out — Rent reduction after invoicing — Departure-week goodwill adjustments
- Notification triage — Rent reduction after invoicing — Row-click to invoiced booking on Step 4
- Entering Monthly Utility Bills — Rent reduction after invoicing — Month-end bill cycle on Step 5
- Manual block hygiene — Rent reduction after invoicing — Hold cleanup on Step 5
- Using in-app support — Rent reduction after invoicing — Self-serve before filing tickets
- Resetting a Management User Password — Rent reduction after invoicing — Lockout-delayed repricing after Step 3
- FAQ — Rent reduction after invoicing hub — Variable unit bookings hitting invoiced floor on repricing symptom table
Month-end invoicing (fixed date)
First month-end on new inventory after Onboarding a New Property pairs with fixed Invoice date before bulk Issue allocation on Finance → Transactions. Hub parity: Common Workflows — Month-end invoicing (fixed date). Full pairing matrix: Listings section cross-reference · Module cross-reference.
- Common Workflows — Month-end invoicing (fixed date) — Hub matrix (
settings-invoicing-invoice-date-toggle.png,finance-transactions-fixed-invoice-date-banner.png,finance-transactions-bulk-toolbar-fixed-invoice-date-banner.png) - Invoicing — Default invoice date — Account-wide toggle + Save
- Common Workflows — Bulk Hostkit invoicing — Issue allocation after fixed date is saved
- Portfolio table loading (infinite scroll) — Go-live inventory before first month-end batch
- Finance — Month-end invoicing with a fixed date — Amber toolbar banner on bulk export
- Processing a New Booking — Month-end invoicing (fixed date) — First-month bulk export after confirmation (Step 6b)
- Handling a Late Payment — Month-end invoicing (fixed date) — Collections batch during Step 6b
- Portfolio KPI review — Month-end invoicing (fixed date) — Step 7 sign-off mesh
- Notification triage — Month-end invoicing (fixed date) — Alert cleanup before bulk Issue allocation (Step 5)
- Entering Monthly Utility Bills — Month-end invoicing (fixed date) — Finish Missing data + overage Pending (Steps 4b–5)
- Manual block hygiene — Month-end invoicing (fixed date) — Clear stale holds before Issue allocation (Step 5)
- Using in-app support — Month-end invoicing (fixed date) — Self-serve before filing wrong-date tickets
- Resetting a Management User Password — Month-end invoicing (fixed date) — Lockout-delayed month-end export after Step 3
- FAQ — Month-end invoicing (fixed date) hub — New-inventory first month-end fixed Invoice date before bulk export symptom table
Bulk Hostkit invoicing
First month-end on new inventory may surface many Not issued rows — batch Issue allocation on Finance → Transactions with Hostkit pacing after go-live verification. Hub parity: Common Workflows — Bulk Hostkit invoicing. Full pairing matrix: Listings section cross-reference · Module cross-reference.
- Common Workflows — Bulk Hostkit invoicing — Hub matrix (
finance-transactions-bulk-selection-bar.png,settings-invoicing-hostkit-series.png) - Common Workflows — Month-end invoicing (fixed date) — Fixed Invoice date before bulk Issue allocation
- Settings > Invoicing — Hostkit invoice series — Required FR code before Issue allocation
- Finance — Invoice automation — Bulk Issue allocation / Invoice selected toolbar
- Finance — Issuing credit notes (integrated invoicing) — Issue credit notes (N) after invoiced Reject / Revert
- Portfolio table loading (infinite scroll) — New inventory before first bulk export
- Finance — Bulk Hostkit invoicing — Transactions toolbar reference
- Processing a New Booking — Bulk Hostkit invoicing — First-month Issue allocation after confirmation (Step 6b)
- Handling a Late Payment — Bulk Hostkit invoicing — Collections month-end mesh (Step 6b)
- Portfolio KPI review — Bulk Hostkit invoicing — Step 7 month-end sign-off
- Managing a Check-in — Bulk Hostkit invoicing — Move-in Pending mesh (Step 6b)
- Managing a Check-out — Bulk Hostkit invoicing — Departure-week mesh (Step 6b)
- Onboarding a New Property — Bulk Hostkit invoicing — First month-end on new inventory
- Cancelling a Booking — Bulk Hostkit invoicing — Settlement bulk export (Step 6b)
- Notification triage — Bulk Hostkit invoicing — Alert cleanup before bulk export (Step 5)
- Entering Monthly Utility Bills — Bulk Hostkit invoicing — Finish Missing data + overage Pending (Steps 4b–5)
- Manual block hygiene — Bulk Hostkit invoicing — Clear stale holds before Issue allocation (Step 5)
- Using in-app support — Bulk Hostkit invoicing — Self-serve Hostkit pacing before filing tickets
- Resetting a Management User Password — Bulk Hostkit invoicing — Lockout-delayed month-end export after Step 3
- FAQ — Bulk Hostkit invoicing slow — Hostkit HTTP 429 pacing and refresh-before-reissue habit
- FAQ — Bulk Hostkit invoicing hub — New-inventory first month-end bulk Issue allocation Hostkit pacing symptom table
Directory list load failures
Portfolio and Archived first-fetch failures show Failed to load listings. Please try again. + Retry — distinct from toolbar filters or search that genuinely match zero properties. Pair Portfolio table loading (infinite scroll) with Onboarding a New Property — Step 7 go-live verify. Hub parity: Common Workflows — Directory list load failures. Full pairing matrix: Listings section cross-reference · Module cross-reference.
- Common Workflows — Directory list load failures — Hub matrix (
notifications-module-load-failure.png) - Portfolio table loading (infinite scroll) — First-fetch Retry on Portfolio / Archived
- Onboarding a New Property — Directory list load failures — Go-live verify on Step 7
- Manual block hygiene — Directory list load failures — Audit → Manual Blocks Retry before hold scan (Step 1)
- Deep links hidden by filters — Clear filters when deep link rows are hidden — not a load failure
- FAQ — Directory list load failures — Whole-module vs No properties found
- FAQ — Directory list load failures hub — Portfolio / Archived Retry vs filter-empty state symptom table
- Glossary — Directory list load failures hub — Surface table + per-guide/module mesh reciprocal hub
Occupancy KPI to block hygiene handoff
Unit Calendar mystery blocks without a rate change pair with hub Common Workflows — Occupancy KPI to block hygiene handoff before Sales → Pricing edits — row-click from Tools → Audit opens this sidebar. Hub parity: Common Workflows — Occupancy KPI to block hygiene handoff. Full pairing matrix: Listings section cross-reference · Module cross-reference.
- Common Workflows — Occupancy KPI to block hygiene handoff — Hub matrix (
listings-unit-calendar-month.png,audit-manual-blocks-filter-scroll.mp4) - Viewing unit availability and unavailability — Per-unit Calendar hold edit
- Audit — Occupancy KPI to block hygiene handoff — Portfolio Manual Blocks entry
- Sales — Occupancy KPI to block hygiene handoff — Multicalendar reconciliation
- Manual block hygiene — Step 4 — Canonical per-unit hold cleanup
- FAQ — Occupancy KPI to block hygiene handoff hub — Symptom table for calendar blocks vs arrears
- Managing a Check-in — Occupancy KPI to block hygiene handoff — Timeline overlap from stale holds on Step 1
- Managing a Check-out — Occupancy KPI to block hygiene handoff — Calendar bars persist after Step 7
- Cancelling a Booking — Occupancy KPI to block hygiene handoff — Availability not restored on Step 5
- Entering Monthly Utility Bills — Occupancy KPI to block hygiene handoff — Dashboard vs Analytics vacancy mismatch on Step 5
- Notification triage — Occupancy KPI to block hygiene handoff — Vacant Units vs Analytics on Step 1
- Resetting a Management User Password — Occupancy KPI to block hygiene handoff — Lockout-delayed KPI review after Step 3
- Using in-app support — Occupancy KPI to block hygiene handoff — Calendar edit blocked after block hygiene
- Handling a Late Payment — Occupancy KPI to block hygiene handoff — Vacant Units vs Multicalendar holds on Step 1
Partly collected security deposit
Deposit shortfalls pair with Finance — Deposits status summary cards and Bookings — Deposit tab. Hub parity: Common Workflows — Partly collected security deposit. Full pairing matrix: Listings section cross-reference · Module cross-reference.
- Common Workflows — Partly collected security deposit — Hub matrix when Paid on the deposit is above zero but below Amount
- Finance — Deposit lifecycle status cards — Partial paid card for portfolio triage (#2091)
- Finance — Deposit status filter — Other filters → Deposit status → Partial paid on Bookings and Finance (#2090)
- Operations — Tickets toolbar search — Paste the full sequential ticket ID (for example
S259,T27) in toolbar Search (#2074) - FAQ — Find a ticket by its ID — Paste the full sequential ticket ID (for example
S259,T27) in Operations → Tickets toolbar Search (#2074) - FAQ — Skip automatic check-in/out tickets for one booking — Turn off Use unit contract rents and other contract details on Add booking to reveal CI/CO ticket checkboxes (#1140)
- FAQ — Same-day turnovers — Check-out + check-in on one unit same day: Operations → Check-in & Check-out, Timeline / Multicalendar, turnover tickets
- FAQ — Manual payments after Delete Booking — Delete Booking hides manual/provider_platform rows on Finance → Transactions; vIBAN and credit card stay visible (#1897)
- FAQ — Communication or Tickets load failure — Tab-scoped Refresh (Communication) or Retry (Tickets); other booking sidebar tabs stay usable
- Glossary — Directory list load failures — First-fetch directory failures show Retry / Try again; distinct from filter-empty states and booking-sidebar tab errors
- Glossary — Vacant Unit Preference — Include manual blocks counts operator holds as free on Dashboard / Sales vacancy surfaces (#1427)
- Bookings — Deposit tab — Partially paid badge and remaining helper on a single reservation
- FAQ — Partly collected security deposit — Distinct from Partial Paid rent on Payment Plan
- Finance — Deposit lifecycle status cards — Deposit lifecycle status row (#2091)
- Glossary — Deposit lifecycle status —
depositStatuspill vocabulary (Partial Paid vs rent Partial Paid) - Finance — Deposit lifecycle status cards — Deposit lifecycle status row on Finance → Deposits; click Partial paid for collection shortfalls (#2091)
- Manual block hygiene — Partly collected security deposit — Partial paid card when debt KPIs stay high after holds cleared (Step 5)
- Resetting a Management User Password — Partly collected security deposit — Lockout-delayed deposit triage after Step 3
- Using in-app support — Partly collected security deposit — File Finance module tickets when partial filter or badge behaviour is wrong
- Manual block hygiene — Portfolio retirement decisions — Portfolio sunsetting after hold cleanup (Step 5)
- Cancelling a Booking — Portfolio retirement decisions — Cancel booking for real voids — not Delete Booking (Step 4)
- Managing a Check-out — Portfolio retirement decisions — Last departure before building Archive (Step 7)
- Onboarding a New Property — Portfolio retirement decisions — Unarchive mistaken go-live Archive (Step 7)
- Processing a New Booking — Portfolio retirement decisions — Delete Booking on duplicate imports — not building Archive (Step 1)
- Entering Monthly Utility Bills — Portfolio retirement decisions — Finish utility month-end before building Archive (Step 5)
- Handling a Late Payment — Portfolio retirement decisions — Cancel booking for policy voids — not Delete Booking (Step 6)
- Managing a Check-in — Portfolio retirement decisions — Upcoming arrivals block mistaken building Archive (Step 1)
- Notification triage — Portfolio retirement decisions — Alert row-click before retirement scope choice (Step 4)
- Resetting a Management User Password — Portfolio retirement decisions — Lockout-delayed retirement catch-up after Step 3
- Using in-app support — Portfolio retirement decisions — Archive / Unarchive or Delete Booking guard defects
Portfolio retirement decisions
Building Archive on Portfolio moves inventory to Archived properties — distinct from Delete Booking on one reservation. Hub parity: Common Workflows — Portfolio retirement decisions. Full pairing matrix: Listings section cross-reference · Module cross-reference.
- Common Workflows — Portfolio retirement decisions — Hub matrix (
listings-archived-populated-table.png,listings-archived-unarchive-sidebar.png) - Glossary — Portfolio retirement decisions hub — Surface table + per-guide/module mesh reciprocal hub
- Archived properties — Archived tab and Unarchive danger zone
- FAQ — Archive a property — Step-by-step Archive / Unarchive
- Manual block hygiene — Portfolio retirement decisions — Clear holds before building Archive
- Glossary — Archived property — Building-level retirement vocabulary
- Portfolio KPI review — Portfolio retirement decisions — Step 7 sunsetting review
Archive property (building-level)
Building Archive on Portfolio retires inventory to Archived properties without deleting bookings or Finance → Transactions rows — distinct from per-reservation Cancel / Delete. Hub parity: Common Workflows — Archive property (building-level). Full pairing matrix: Listings section cross-reference · Module cross-reference.
- Common Workflows — Archive property (building-level) — Hub matrix (
listings-archived-populated-table.png,listings-archived-unarchive-sidebar.png) - Glossary — Archive property (building-level) hub — Surface table + per-guide/module mesh reciprocal hub
- Archived properties — Archive / Unarchive on property edit sidebar
- Portfolio retirement decisions — Three-way Archive vs Cancel vs Delete scope table
- Manual block hygiene — Archive property (building-level) — Clear holds before building Archive
- Managing a Check-out — Archive property (building-level) — Last departure before sunsetting
- Onboarding a New Property — Archive property (building-level) — Unarchive if archived by mistake during go-live
Portfolio segmentation by tenant category
Segment filters pair with Settings > Tenant categories and Portfolio KPI review — Step 6. Hub parity: Common Workflows — Portfolio segmentation by tenant category. Full pairing matrix: Listings section cross-reference · Module cross-reference.
- Common Workflows — Portfolio segmentation by tenant category — Hub matrix when portal or channel rules differ by tenant segment on the same property
- Settings > Tenant categories — Define segments, portal gates, and integration defaults
- Bookings — Other filters — Tenant category on reservations tied to a unit
- Finance — Tenant category filter — Ledger segmentation when unit debt clusters on one cohort
- Tenants — Tenant category filter — Profile-count cross-check before segment-wide listing changes
- Portfolio KPI review — Step 6 — Optional month-end segment pass on weak occupancy by unit type
Key glossary terms
Glossary rows pair with Glossary cluster cross-reference. Full pairing matrix: Listings section cross-reference · Module cross-reference.
-
Glossary — End-of-Booking cost split — Charge Time → End of Booking splits daily overage across every occupied unit; still-staying roommates stay in the denominator (#2111)
-
Operations — Property-level ticket search — Property-name matches share the top relevance tier with unit hits; building-scoped rows float first under an active Property filter (#2089)
-
Glossary — Change history — Operator-initiated edits on Listings setup and Bookings Changelog; create-time defaults excluded (#2093)
-
FAQ — Booking Changelog scope — Operator-initiated edits only; create-time defaults excluded (#2093)
-
Glossary — Archived booking ledger visibility — Delete Booking hides manual/provider_platform rows on Finance → Transactions; vIBAN and credit card stay visible (#1897)
-
Bookings — Provider platform payment — Non-rejected provider platform in-payment blocks Delete Booking until Reject or assign (#2076)
-
FAQ — Delete Booking on integration reservation — Clear pending provider platform in-payment with Reject or assign before soft-archive (#2076)
-
Listings — Property edit sidebar pills — Setup / Full integration / Photos pills on property and unit edit sidebars; replaced the old Go to details shortcut (#2082)
-
Glossary — Finance tenant category cache refresh — Recategorizing a tenant on Tenants → Tenant Info force-refreshes Finance caches so Contract Values, Overview, and Deposits filters match within seconds (#2088)
-
FAQ — Finance tenant category filter parity — Finance Other filters drawer lists segments on cached bookings only; mirror Bookings / Tenants when a segment is missing
-
FAQ — Assign tenant category for direct booking — Add booking has no category field; assign on Tenants → Tenant Info or + Create New → Tenant before contract mail
-
Glossary — SIMAR water contract ID — SIMAR (Loures e Odivelas) water bills use Cód. Local in Connections — not Nº de Contador; leading zeros stripped (#2110)
-
FAQ — SIMAR water bill property match — Cód. Local in Connections — not Nº de Contador; strip leading zeros (#2110)
-
Glossary — Per-booking maintenance ticket opt-out — Add booking checkboxes skip automatic CI/CO tickets for one reservation only; property rule unchanged (#1140)
-
FAQ — Cancel Booking vs Delete Booking — Cancel for real stays with settlement; Delete soft-archives mistaken/test rows (#1897 / #2076)
-
Glossary — Archived property — Archive retires a building to Listings → Archived without deleting bookings; distinct from Delete Booking (reservation soft-archive) — Listings — Archived properties
-
FAQ — Archive a property — Edit property sidebar Archive / Unarchive on Listings; building-level — not Delete Booking or Cancel booking
-
FAQ — Portfolio retirement decisions — Archive property (building) vs Cancel booking vs Delete Booking (reservation soft-archive) — three-way decision table
-
Invoiced floor (rent) — Rent edits on existing bookings blocked below exported months after Finance invoices
-
FAQ — Bulk Hostkit invoicing slow — Vivin paces Hostkit API calls and retries HTTP 429 during bulk Issue allocation / Invoice selected; refresh Transactions before re-issuing
-
Tenant category — Default segment on new direct bookings and portal module visibility per property
-
Credit note (payment reject/revert) — Accounting follow-up when rejecting mistaken receipts tied to listing bookings
-
FAQ — AI token usage — Poll GET /ai-usage / GET /ai-usage/summary with management JWT;
landlord_chat+utility_bill_extraction; no management UI screen yet -
FAQ — Tenant contract signing blocked — No PDF yet, mandatory Your Details gates, category locks, or Lease purpose; portal signing vs paper upload on Contract Info
-
FAQ — Automatic check-in email — Trigger matrix, 15-day cutoff, paper upload vs portal signing, Nuki-only toggle, Send / Resend on Contract Info
-
FAQ — WhatsApp and email per booking — Bookings → Communication tab when tenant chatbot is enabled; Inbox for portfolio-wide triage
-
FAQ — Deposit missing on Finance Deposits — Default ~3 months date range; clear or widen before triaging older move-outs or dispute row actions
-
FAQ — Pending manual in-payment on /notifications — Alert persists until Approve payments clears Finance or booking Transactions
-
FAQ — Uncovered Debt KPI — Finance Total Debt minus deposit offsets; pair with Debt Aging and In debt drill-down
-
FAQ — Dashboard Total Debt subtitle — Post-login Total Debt card headline vs >15 days subtitle; ongoing bookings only
-
FAQ — Analytics (KPI workspace) — Portfolio KPIs vs Sales/Listings/Dashboard; load-failure Try again
-
FAQ — Lower rent below invoiced — Change monthly rent clamps and Contract Values → Edit amount blocks net below exported invoice totals; use credit notes in accounting when you truly need a reduction
-
FAQ — Reject or revert an incoming payment — Reject pending rows or Revert confirmed ones; Finance → Transactions uses Reject selected bulk-only; modals warn about credit notes when Finance already invoiced
-
FAQ — Finance Income status drill-down — Overview Income chart (Paid / Scheduled / In debt); click a segment for month-scoped payment-line modal; Debt Aging for booking-level receivables
-
FAQ — Permission denied toast — Red You do not have permission to perform this action. toast when RBAC blocks a save; fix in Users → Role Permissions
-
FAQ — Phone shows Operations only — Mobile phone user agent locks operators with Operations access to
/operations; iPads and narrow desktop browsers keep the full module list -
FAQ — Notification row-click navigation — On
/notifications, row click marks unread then openslink,bookingId,tenantId,listingId, orpropertyId(first match); Dashboard bell General rows stay in-panel unlesslinkis set -
FAQ — Bookings that owe money — Top debtors and overdue buckets on Finance → Overview; Total Debt KPI is not a table
-
FAQ — Fixed rent on variable unit — Variable listing + equal rent every contract month → booking stores fixed headline Monthly rent; payment plan unchanged
API & companion guides
API bullets pair with API Reference hub. Full pairing matrix: Listings section cross-reference · Module cross-reference.
- API Reference — Creating Bookings — Partner
POST …/bookingsafterexternalIdmaps to a unit here - API Reference — Listings & Availability — Partial
GET /listingspulls whoseunavailabilitiesshould match manual blocks saved here - API Reference — Full listing feeds — Rich catalogue exports partners poll after units are linked on Channels
- API Reference — Property & unit mapping —
externalIdkeys operators save per unit before partner traffic - API Reference — iCal feeds — Calendar retrofeed URLs copied from Sales → Channel Manager
- AI usage API — Internal
utility_bill_extractioncost after Utilities → Bills AI upload on properties configured here (section cross-reference; hub)
Module documentation hubs
Module hub bullets pair with Modules — Module cross-reference. Full pairing matrix: Listings section cross-reference · Module cross-reference.
- Listings module — Property wizard, Channels tab, Archived inventory, and unit management (this page)
- Utilities module — Bills Included ceiling model, Connections, AI bill upload, and tenant overage charges on payment plans (hub)
- Operations module — Maintenance tickets, cash flows, check-in/out coordination, Draft ticket queues, and linked cash flows (hub)
- Dashboard module — Post-login Today, Total debt, Vacant Units, and forecast KPI snapshot with bell notification triage (hub)
- Analytics module — Month-range portfolio KPI charts (Overview, Revenue, Occupancy, ADR, RevPAR, Maintenance) with rankings and heatmaps (hub)
- Properties workspace — Legacy
/propertiesURL redirects into Listings (hub) - Booking engine details — Rich marketplace payload editor via the Full integration pill (hub)
- Finance module — Portfolio ledgers (Overview, Income, Contract Values, Transactions, Payouts, Deposits) with payment approval and deposit settlement (hub)
- Tenants module — Tenant directory, profile sidebars, With Debt segmentation, and table expand for linked bookings (hub)
- Sales module — Portfolio availability, monthly rent editing, and channel manager connections (hub)
- Inbox module — Portfolio-wide WhatsApp workspace with Dashboard bell Inbox sub-tab deep links (hub)
- Notifications module — Full
/notificationshistory with search, filters, and row-click navigation (hub) - AI Chat module — Vivin-internal AI Assistant using Landlord MCP tools for portfolio Q&A (hub)
- Audit module — Portfolio-wide Manual Blocks and Discounts contract-value review (hub)
- Account Settings — Workspace-wide financial policies, templates, integrations, and operational defaults (hub)
- API Reference hub — Partner HTTP contracts, Swagger onboarding, and partial vs full feeds (hub)