Payments, Invoicing & Utilities
This page documents Payments and Invoicing under Billing, plus Utilities and Fees cards that now live on Global Settings (legacy /settings/utilities and /settings/fees bookmarks redirect there).
The rules configured across these tabs govern how payments are calculated, when they are due, how late payments are penalized, which utility overages can be billed, and how VAT is applied to invoices. Configuration cards here affect new bookings — existing payment schedules are not retroactively rewritten by deadline, penalty, dual-pricing, or fee toggles. Rent adjustment is the deliberate exception: it raises rent instalments on selected current bookings from a chosen month onward.
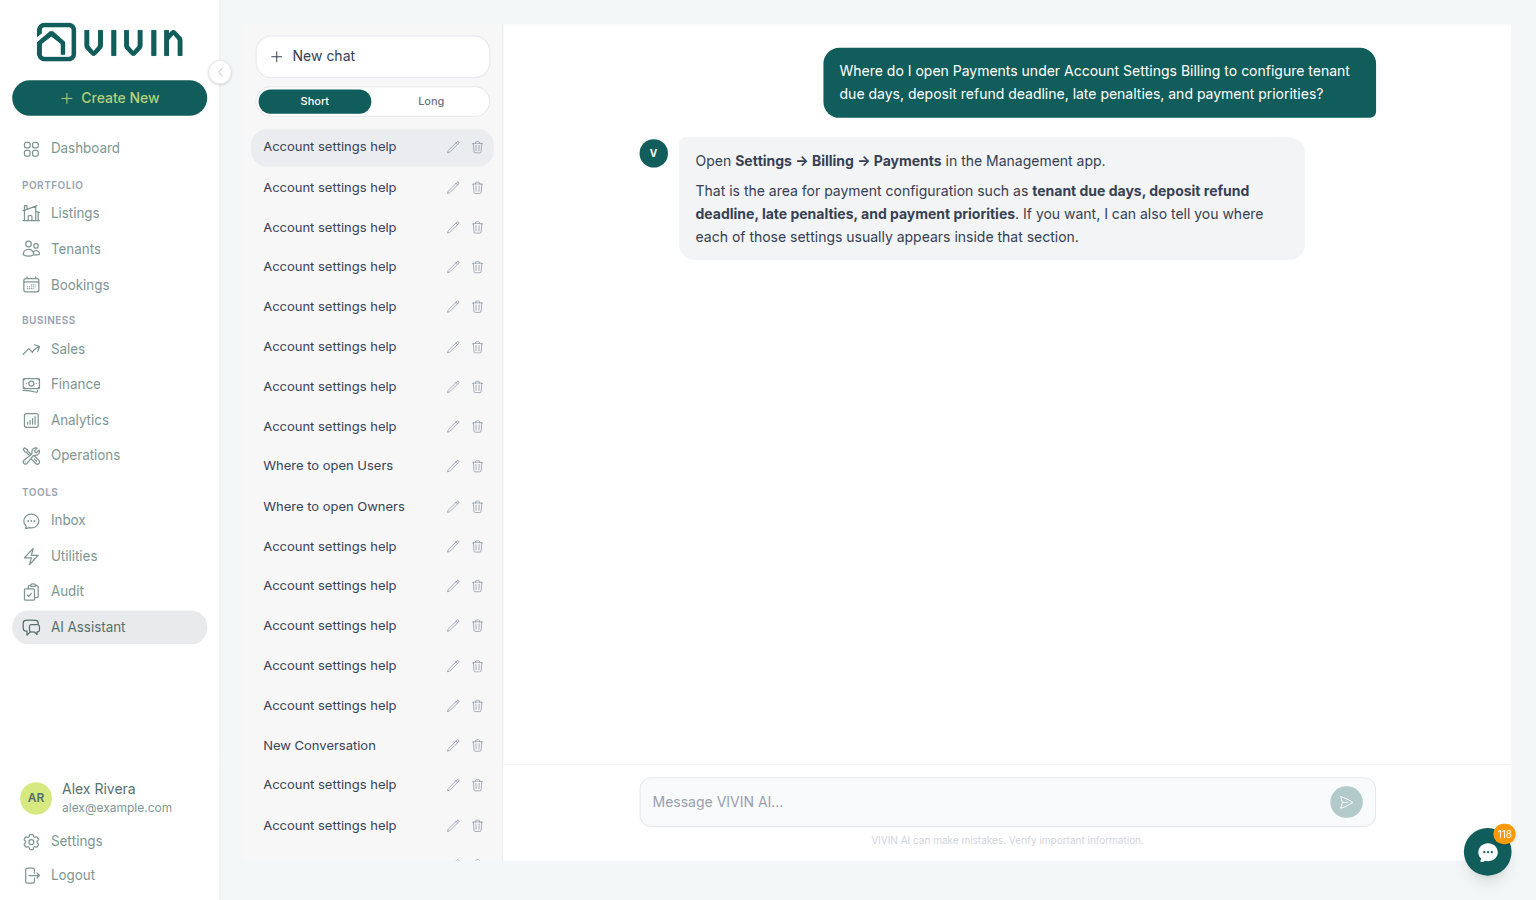
Ask AI Chat “Where do I open Payments under Account Settings Billing to configure tenant due days, deposit refund deadline, late penalties, and payment priorities?” — then open the Payments tab (ai-chat-product-context-payments-reply.png, ai-chat-product-context-payments-flow.mp4). The assistant typically says Settings → Billing → Payments (or Settings → Billing and names the payment configuration area). Canonical route: /settings/payments. Same grounding external MCP clients get from get-vivin-context-finance (or get-vivin-context-platform). Distinct from portfolio ledgers on Finance and from fee visibility on Fees.
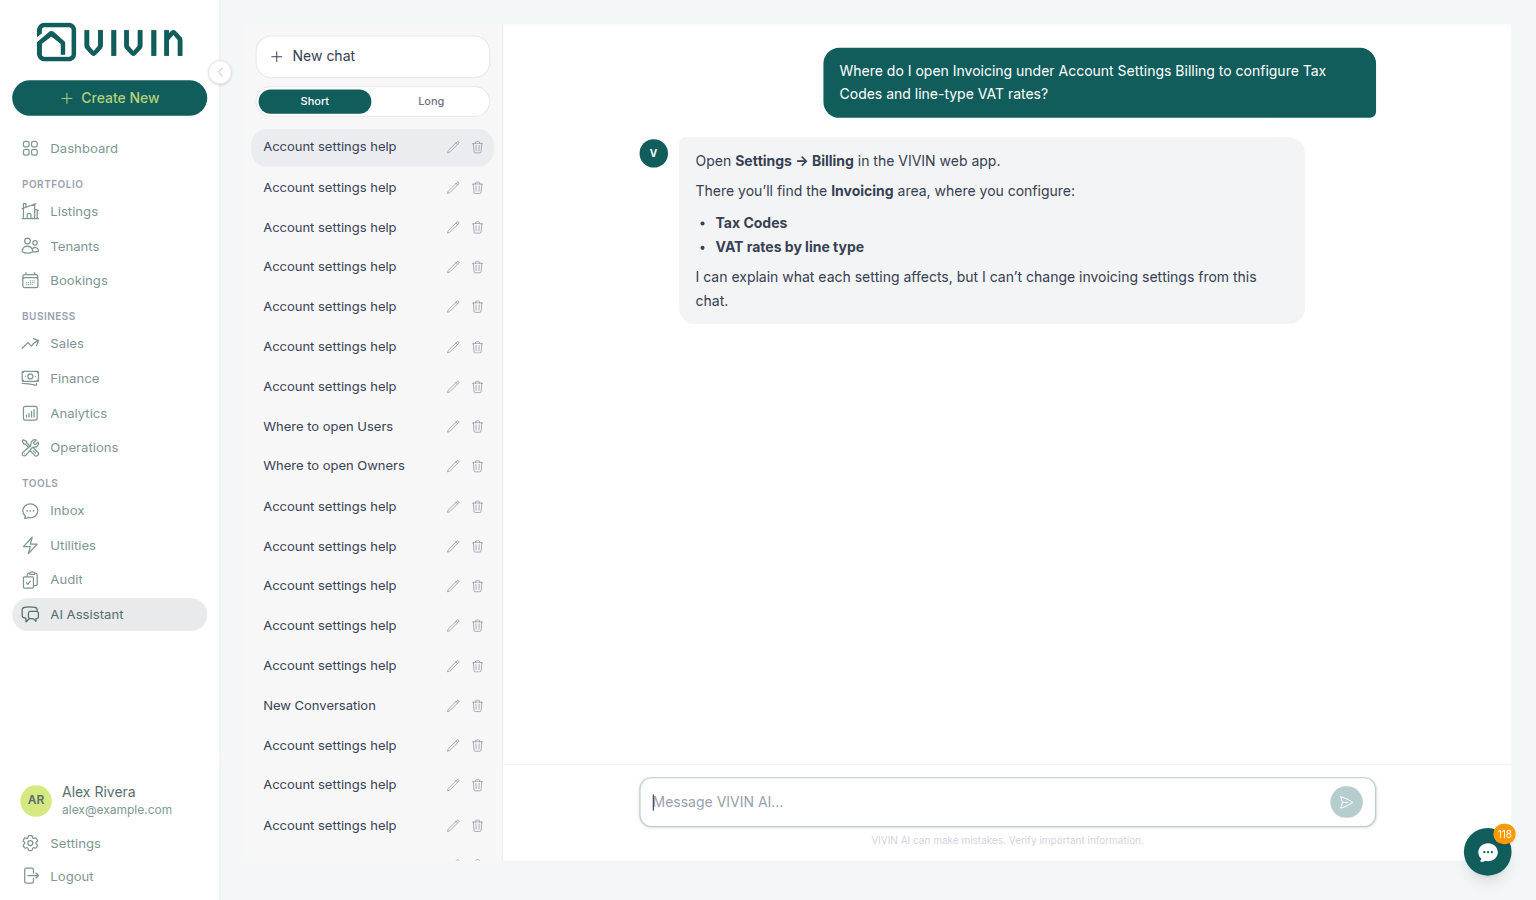
Ask AI Chat “Where do I open Invoicing under Account Settings Billing to configure Tax Codes and line-type VAT rates?” — then open the Invoicing tab (ai-chat-product-context-invoicing-tax-codes-reply.png, ai-chat-product-context-invoicing-tax-codes-flow.mp4). The assistant typically says Settings → Billing (then the Invoicing area for Tax Codes and VAT by line type). Canonical route: /settings/invoicing. English tab label is Invoicing. Same grounding external MCP clients get from get-vivin-context-finance (or get-vivin-context-platform). Distinct from issuer numbering on VIVIN Invoicing and from issued documents on Finance → Transactions.
Complete Getting Started — Recommended Setup Sequence steps 5–7 on this page — Payments, Invoicing, and Utilities — after step 4 Owners and before step 8 Contract; full tab map: Recommended setup order. Finish steps 13–15 in Listings, Bookings, and Tenants, then Onboarding a New Property — Step 7. Guided steps 4–12: Onboarding a New Property. Lockout catch-up: Getting Started. Workflow pairing after go-live: Account Settings — Setup sequence after go-live.
Configure Payment Deadlines, When to show payment as due, and Invoicing (VAT rates, Hostkit series & InvoiceXpress remarks) first, then Utilities overage types and Fees (booking fee toggles and invoice labels). Receipt order: Payments Priorities. Recurring extras: Recurring Services. Portfolio-wide rent raises: Rent adjustment — Step 2 Select properties / Select categories stay open and View booking details stays on the preview. Habit-specific shortcuts live under Related below.
Open each tab directly (subject to permissions):
- Payments — platform.vivin.app/settings/payments
- Invoicing — platform.vivin.app/settings/invoicing
- Utilities (utility types for tenant overage billing) — legacy platform.vivin.app/settings/utilities redirects to Global Settings
- Fees — legacy platform.vivin.app/settings/fees redirects to Global Settings
See Deep Links for the full Account Settings route list.
Before go-live, connect Integrations (VIVIN Invoicing, Hostkit, Invoice-xpress, NetSuite, or virtual IBAN) and configure Emails payment-reminder Communication Rules alongside Payments deadlines and Invoicing VAT rates. Categories extra-charge labels feed Fees invoice line names. Month-end utility PDF volume pairs with AI usage API (utility_bill_extraction on GET /ai-usage/summary) during Entering Monthly Utility Bills — Step 5. Hub: Recommended setup order.
Screenshots
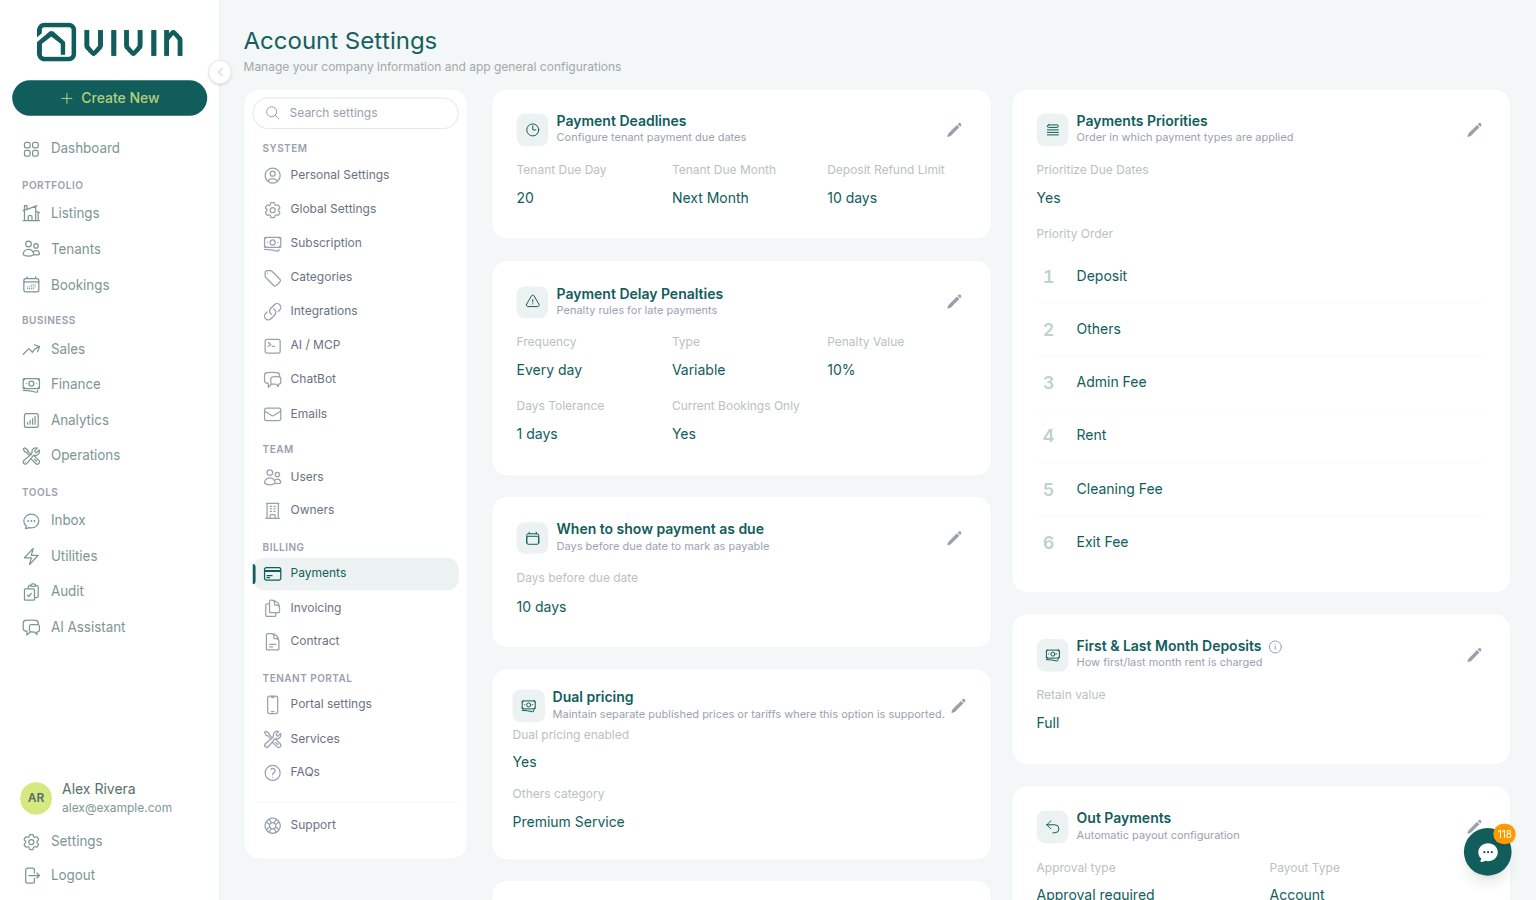
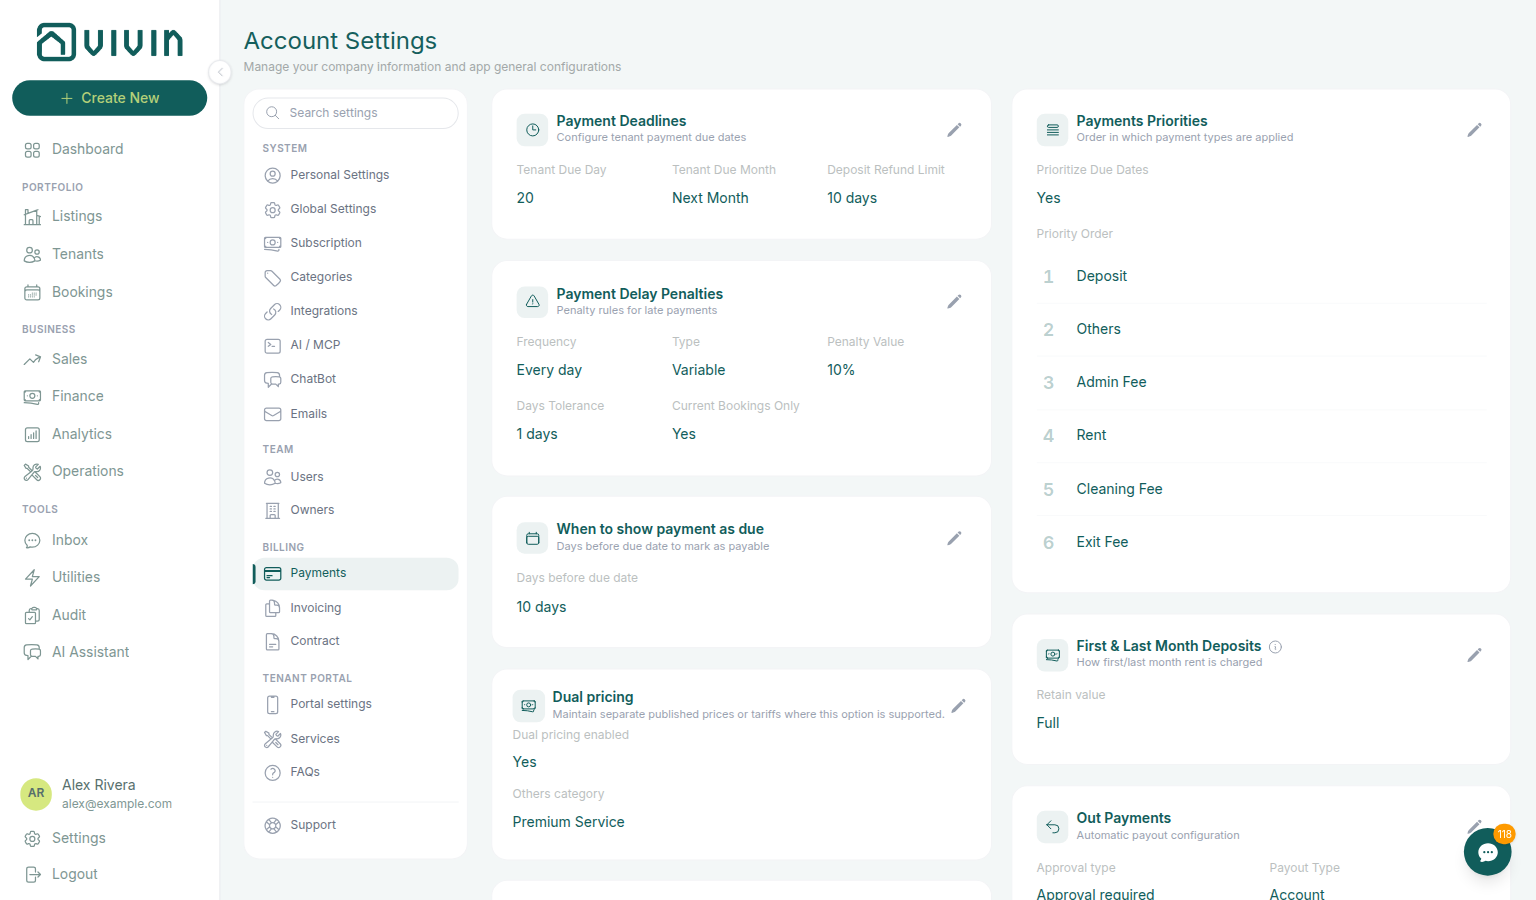
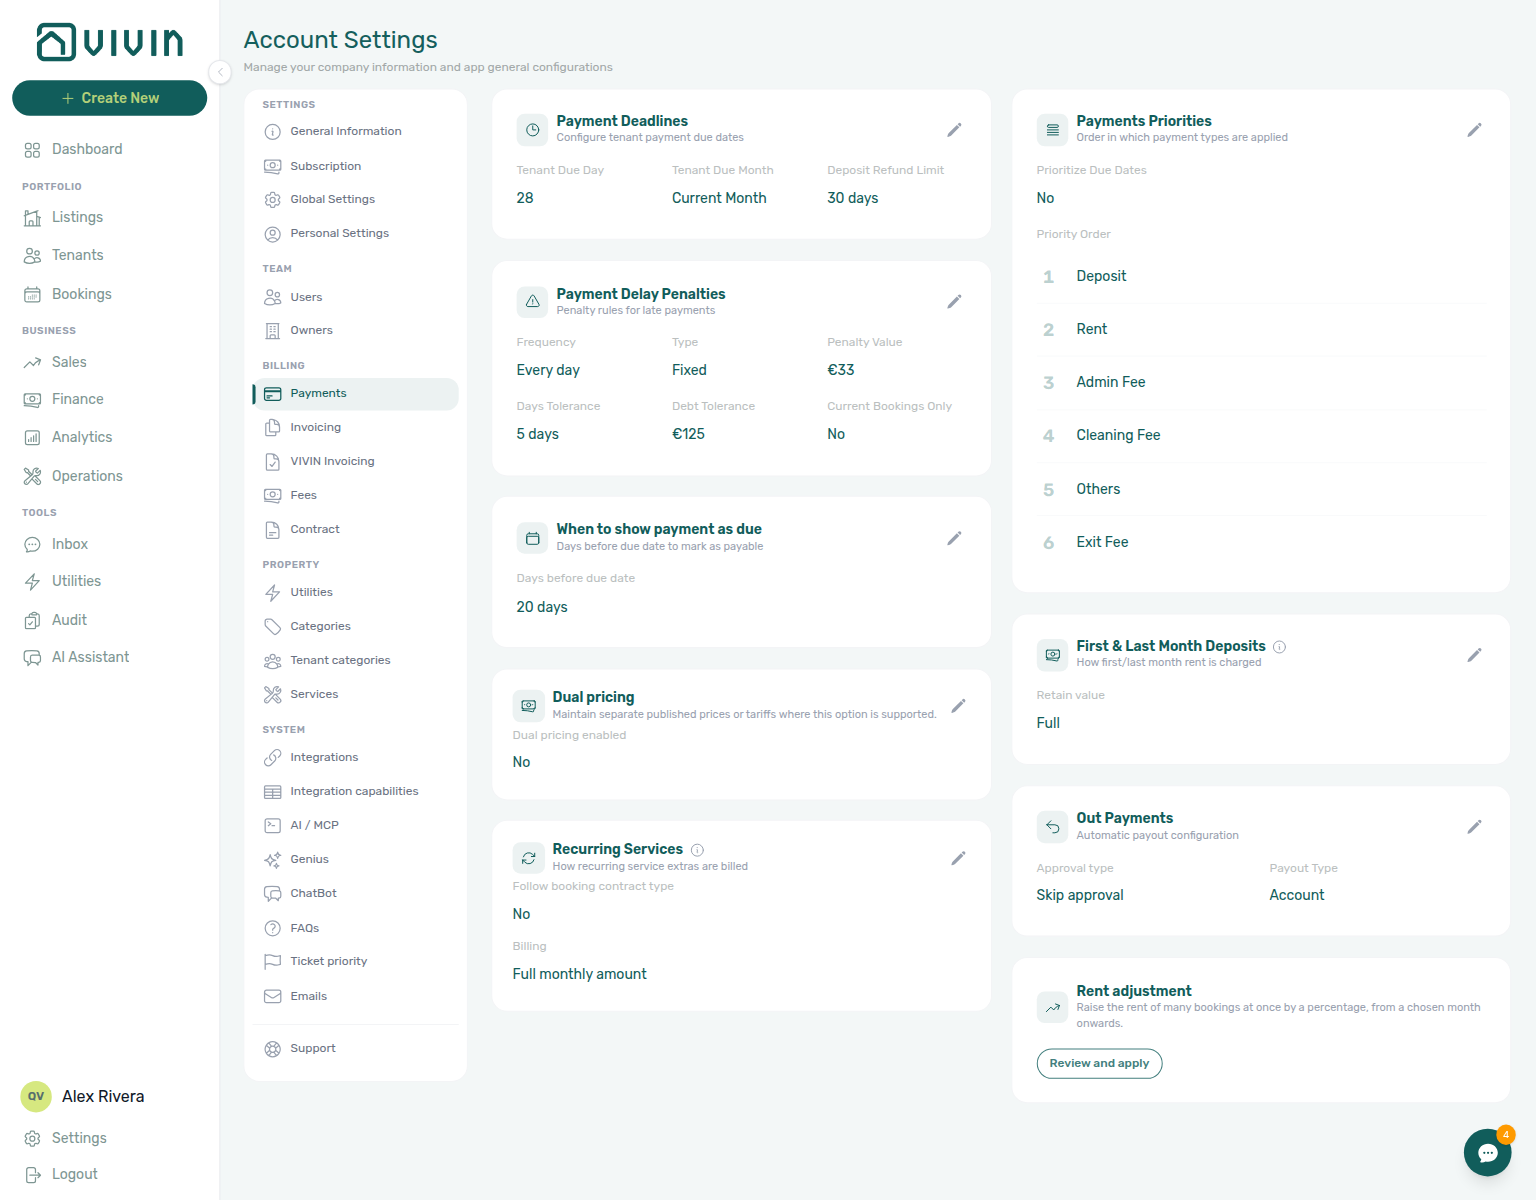
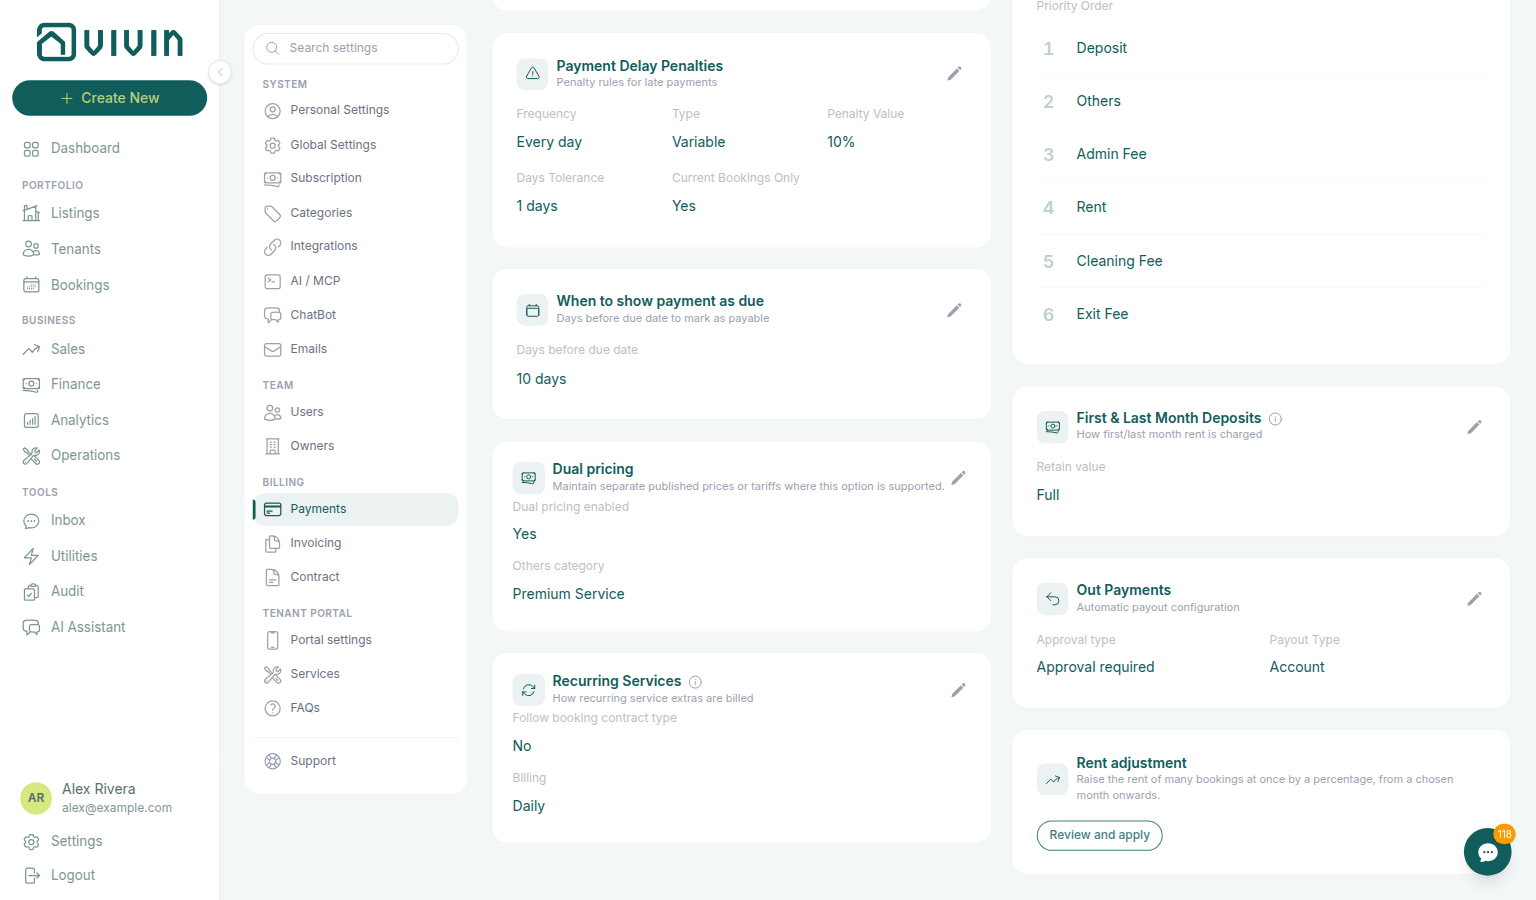
Payments (/settings/payments) — default deadlines, penalty rules, When to show payment as due, dual pricing, Recurring Services, first/last month deposit behaviour, the draggable Payments priorities list, and Rent adjustment (bulk percentage raise):
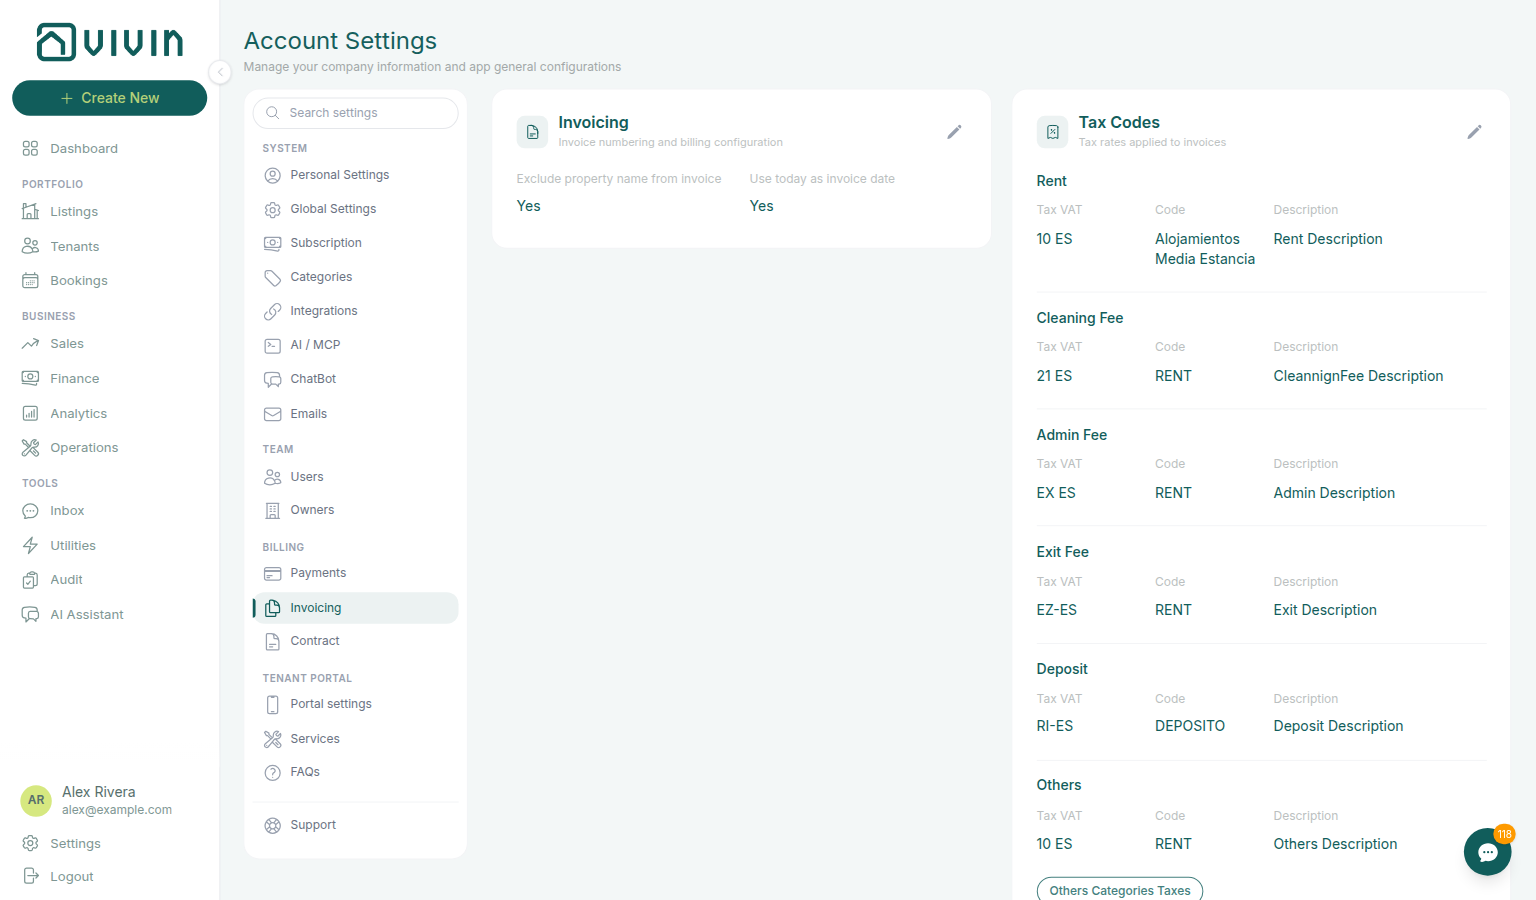
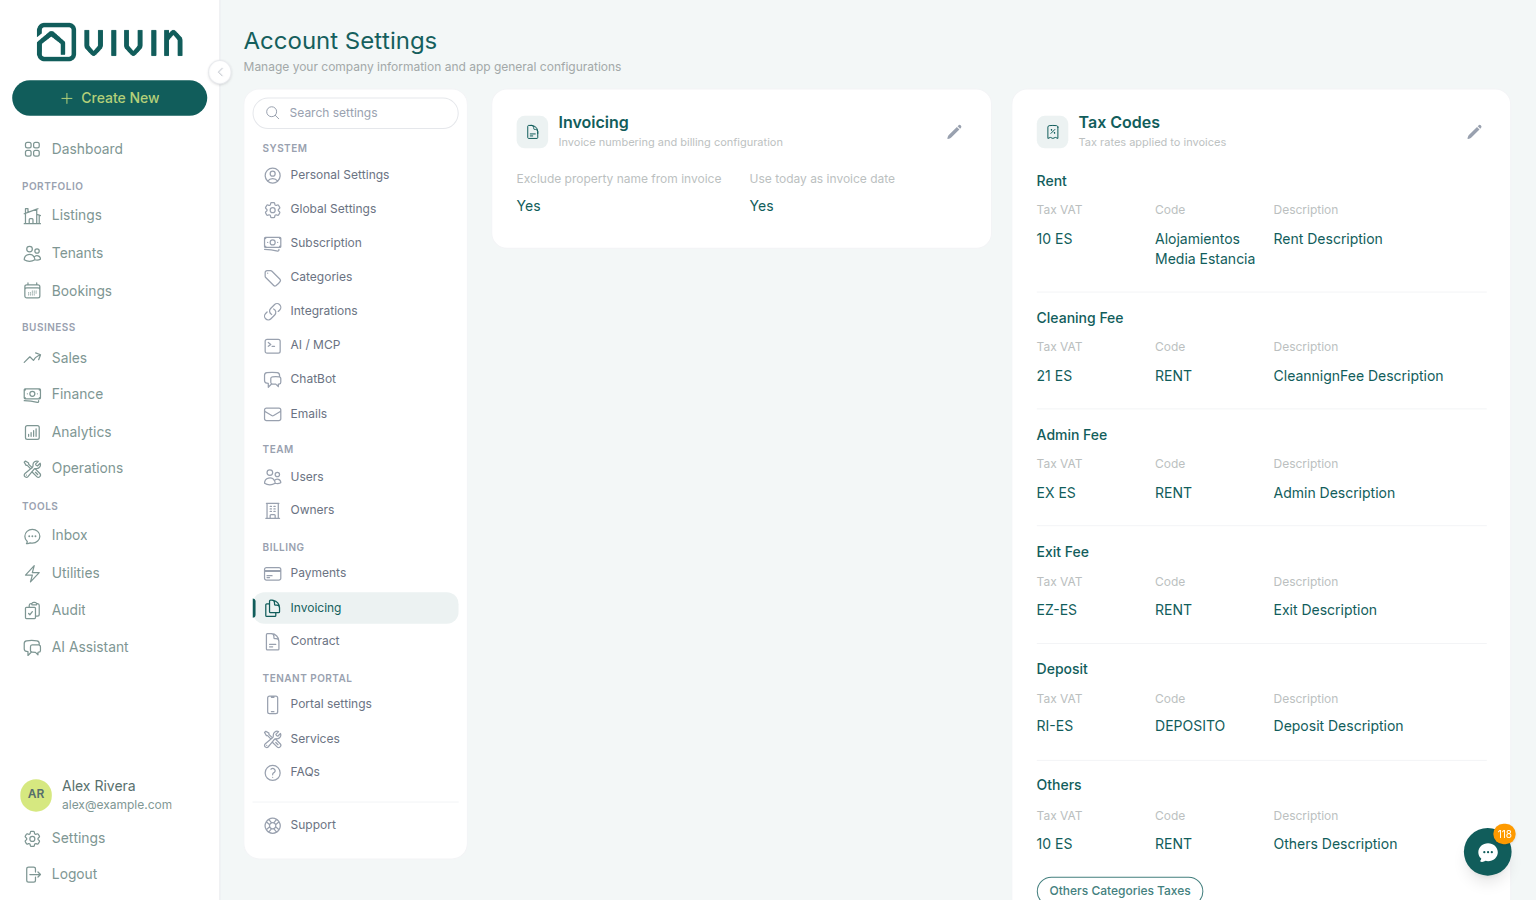
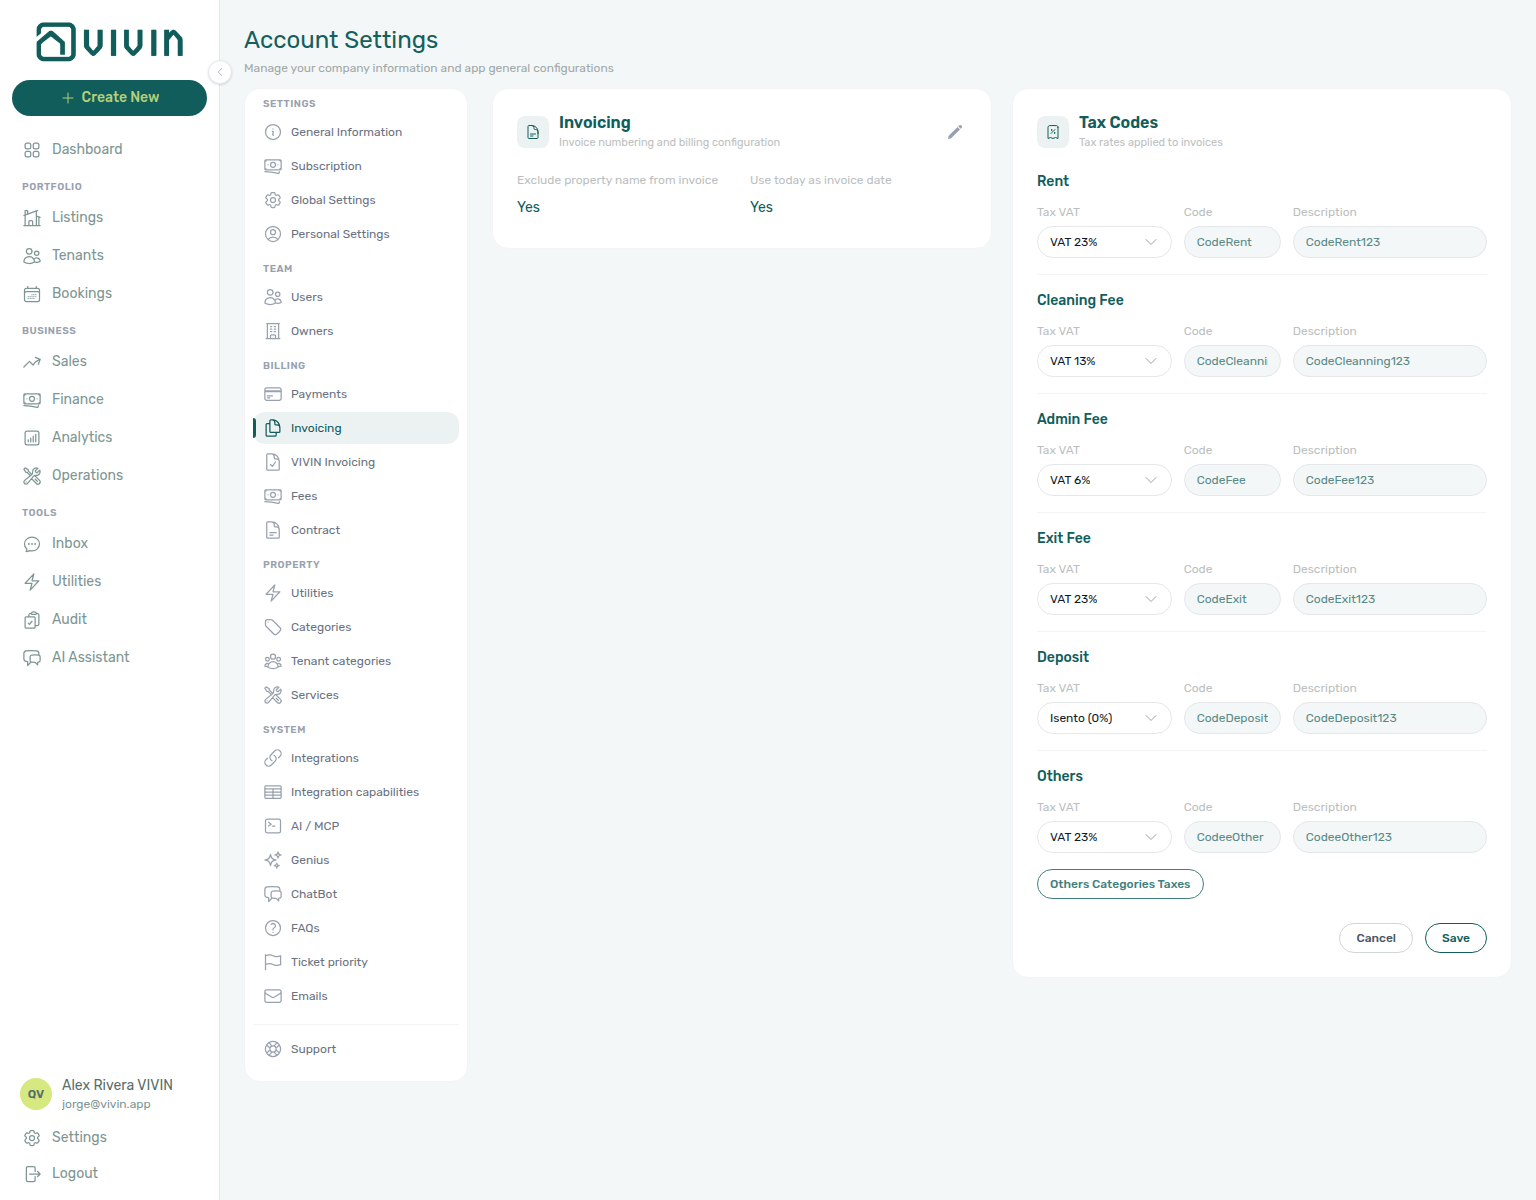
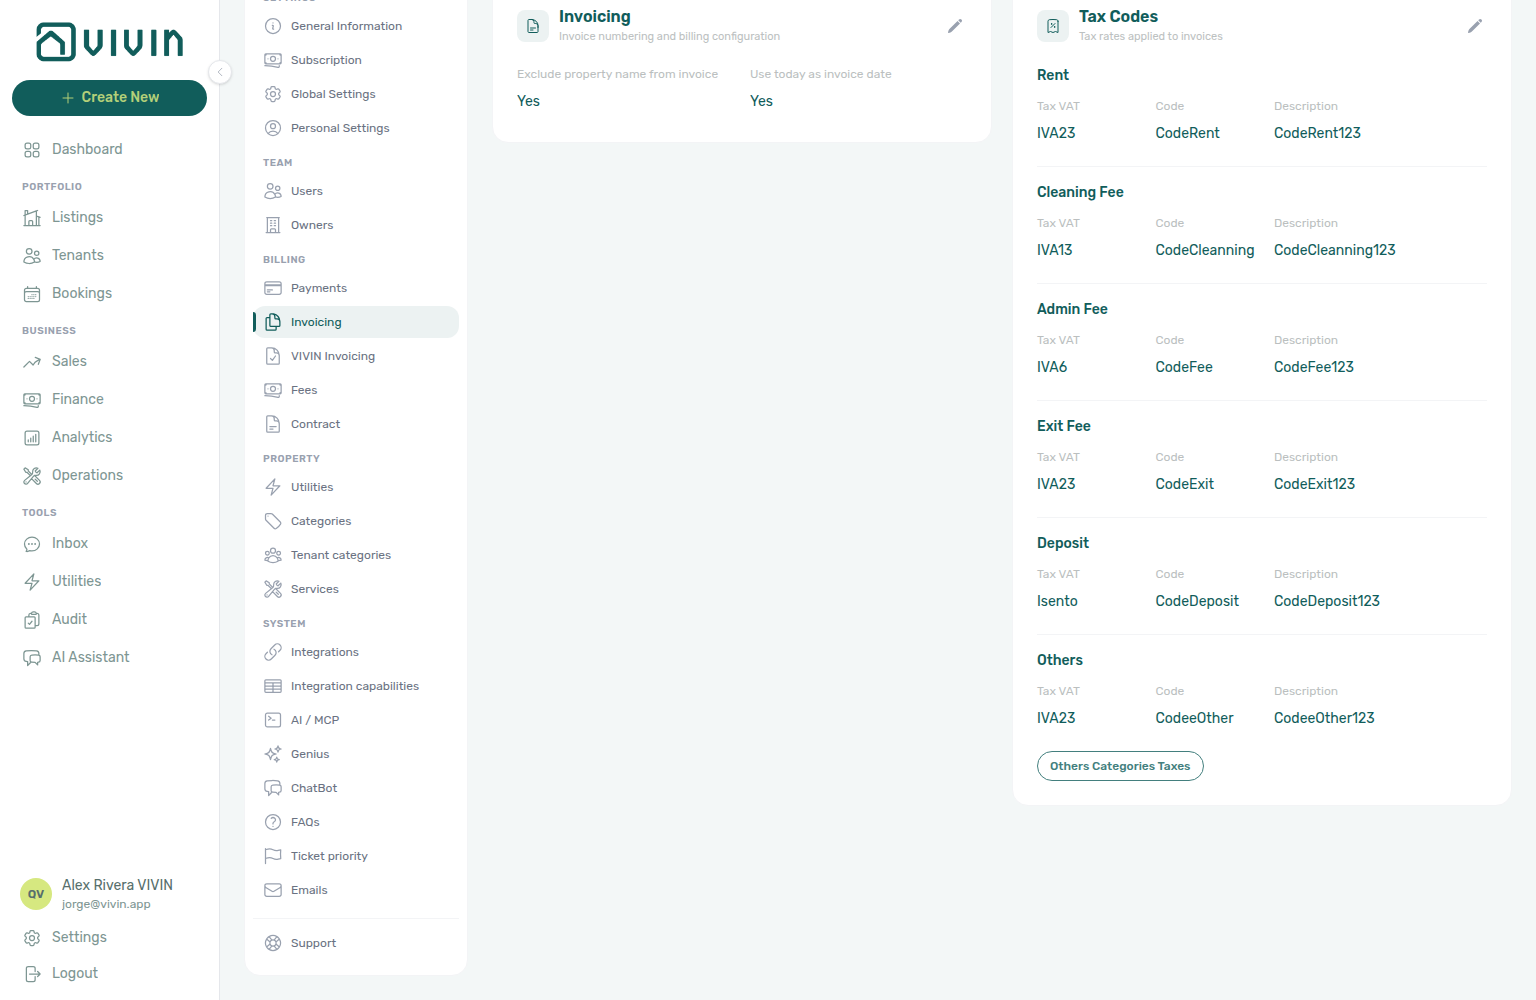
Invoicing (/settings/invoicing) — Tax Codes (provider catalogue Tax VAT per line type, plus product codes and descriptions), Others Categories Taxes for per–Others Items VAT, invoice date defaults, and provider-specific fields:
When VIVIN Invoicing is your active provider, keep Tax VAT names on this tab aligned with the Tax rates catalogue on Integrations → Configure — lines resolve rates by name.
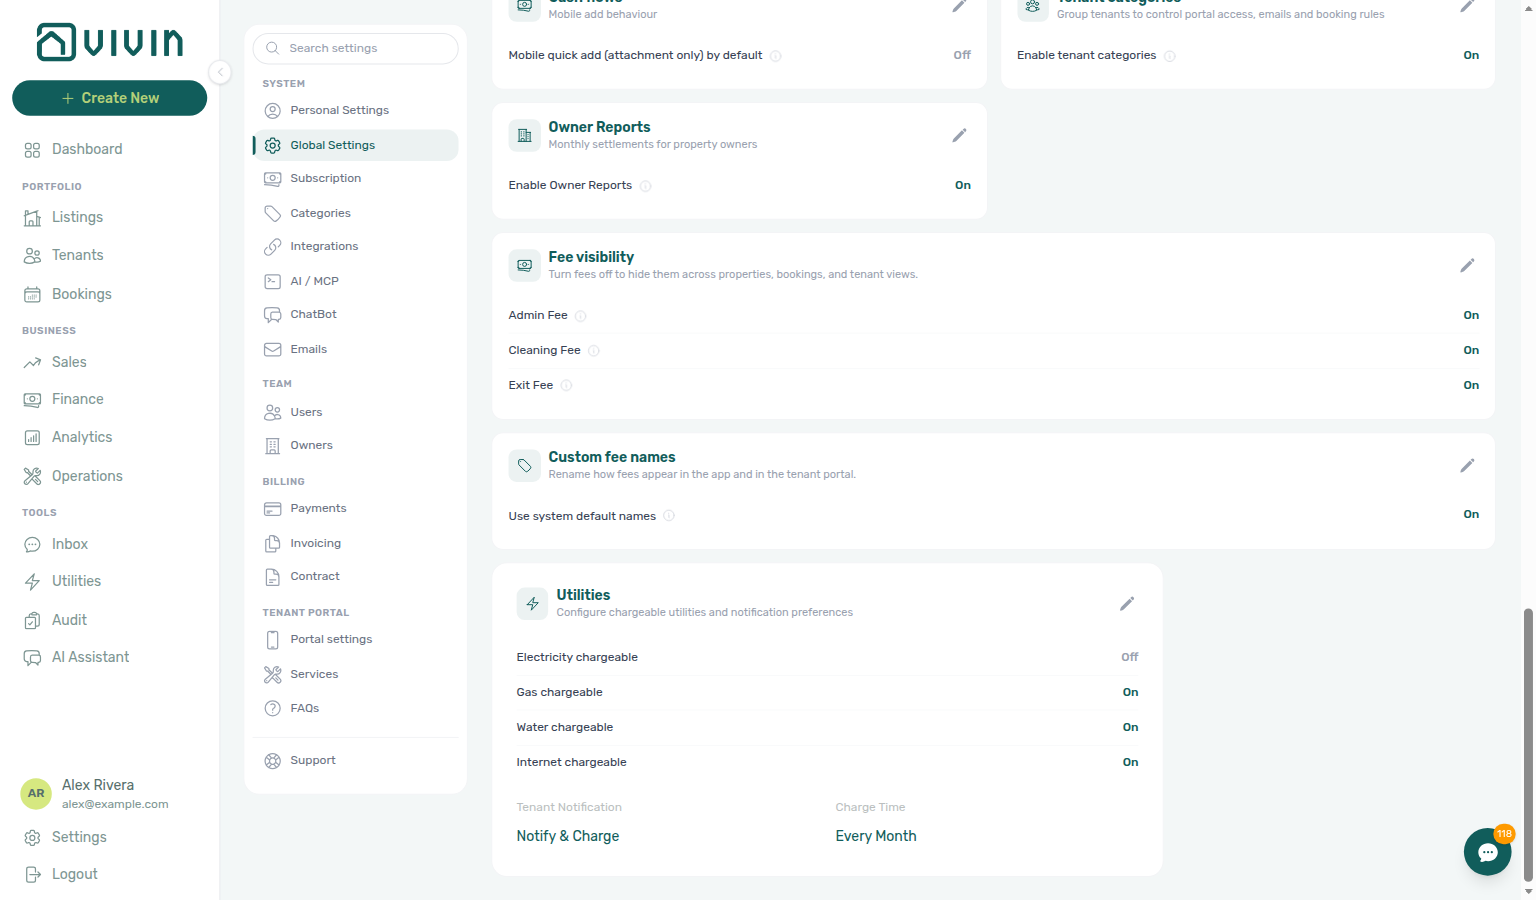
Utilities (Global Settings card; /settings/utilities redirects) — chargeable utility types plus Tenant Notification and Charge Time for tenant overages (works together with the Utilities module Allocations tab and property Bills Included ceilings):
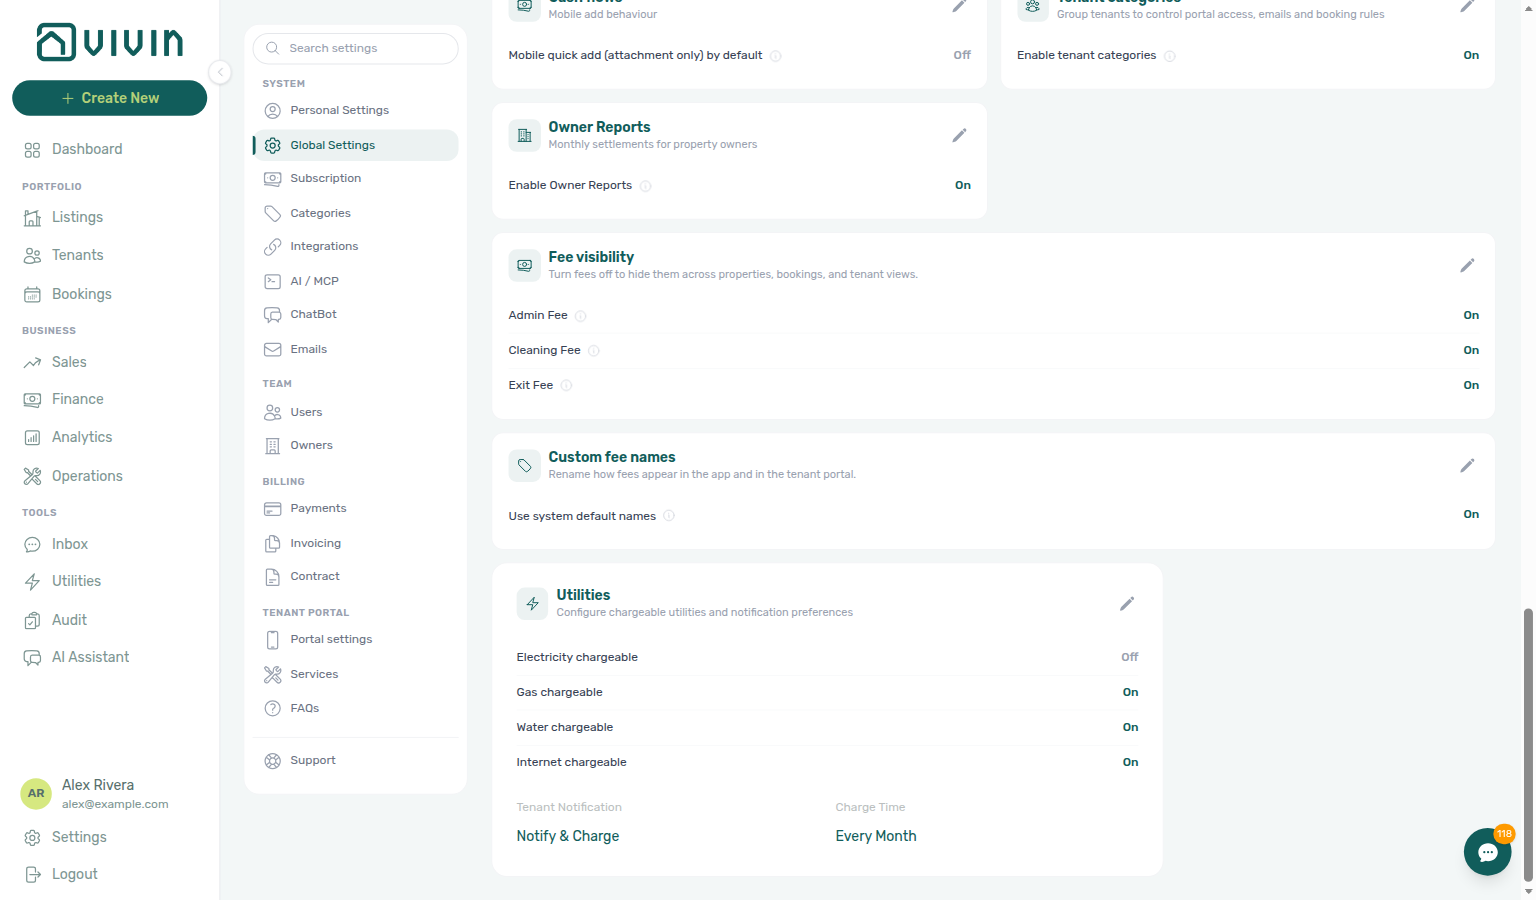
Fees (Global Settings cards; /settings/fees redirects) — fee availability toggles (admin, cleaning, exit) and custom invoice line labels:
Payment Deadlines
Tenant Due Day / Tenant Due Month here pair with Emails payment-reminder Communication Rules — Deposit Refund Limit drives Refund Due Date on Finance — Deposits.
| Field | Description |
|---|---|
| Tenant Due Day | The calendar day of the month when tenant charges are due by default (for example 20). Properties can override this with their own Due date on Listings — Contract Information. Marketplace POST /bookings cannot send this day — Creating Bookings — Due date. |
| Tenant Due Month | Which month that due day falls in relative to the charge period: Previous Month, Current Month, or Next Month. Together with Tenant Due Day, this sets the account default due date for new schedules. Marketplace POST /bookings cannot send a different day — Creating Bookings — Due date. |
| Deposit Refund Limit | The account-wide number of days after a booking’s refund anchor by which the security deposit should be returned (English card label Deposit Refund Limit). Used for compliance tracking and as the default for each booking’s Deposit Refund Limit. Marketplace POST /bookings cannot send a different term — imported stays inherit this value until Contract Info overrides it — Creating Bookings — Deposit Refund Limit. |
The Deposit Refund Limit is a compliance aid — it helps your team track which deposits need to be processed. Check local regulations for the legally required timeframe in your jurisdiction (commonly 30 days in many European countries).
On Finance → Deposits, Vivin derives each row’s Refund Due Date from the booking’s effective limit (account Deposit Refund Limit, unless Contract Info → Deposit Refund Limit overrides it) plus the booking’s refund anchor. The Deposits toolbar date range defaults to about the last three months — a row appears when check-in, check-out, or Refund Due Date intersects that window. Clear or widen the range before triaging older move-outs, disputes, or export. See Glossary — Finance Deposits date range, Glossary — Deposit lifecycle status, Glossary — Deposit Refund Limit, and Managing a Check-out — Step 5.
Payment Delay Penalties
Penalty rules surface as suggestions during Handling a Late Payment — Step 1 — align with Bookings — Confirmation and check-in payments before peak season.
Configure automatic late payment fees applied when tenants miss a due date.
| Field | Description |
|---|---|
| Frequency | How often the penalty is applied once a payment is overdue (Once, Every day, or Every two days). |
| Type | Fixed — a flat euro amount added each period. Variable — a percentage of the overdue amount added each period. |
| Penalty Value | The euro amount (Fixed) or percentage (Variable) to charge each period. |
| Days Tolerance | Grace days after the due date before the penalty rule starts counting. |
| Debt Tolerance | Shown when Type is Fixed — minimum overdue euro amount before the fixed penalty applies. |
| Current Bookings Only | When Yes, suggestions apply only to current bookings; when No, the rule can also inform older stays you still manage. |
Penalties are not automatically applied to a tenant's account — they must be manually triggered or are shown as suggestions based on the configured rules. The configuration here defines the terms, not automatic deductions.
Penalty Calculation Examples
Fixed penalty — Once A tenant owes €400 rent, due on the 1st. They do not pay by the due date. With a fixed penalty of €25 applied Once, the total penalty is €25 regardless of how late the payment is.
Fixed penalty — Every day Same scenario, but the penalty frequency is Every day. If the tenant pays on the 8th (7 days late), the penalty is: 7 days x €25 = €175.
Variable penalty — Every two days A tenant owes €600 rent. The penalty is 2% (Variable) applied Every two days. If the tenant pays 6 days late (three periods):
- Period 1: €600 x 2% = €12
- Period 2: €600 x 2% = €12
- Period 3: €600 x 2% = €12
- Total penalty: €36
Variable (percentage) penalties are calculated on the original overdue amount, not compounded. A 2% periodic penalty on €600 is always €12 per period, not €12 the first period and €12.24 the next.
To apply a penalty to a tenant's account, follow the Handling a Late Payment workflow — you manually add the penalty as an extra charge on the booking.
To skip these rules for one reservation, tick Exclude this booking from penalty fees on Contract Info → Method of payments. Marketplace POST /bookings cannot send that flag — imported stays land with the box off — Creating Bookings — Exclude from penalty fees.
When to show payment as due
The When to show payment as due card on Payments controls how many days before the charge’s due date Vivin marks the line as payable for operators and tenants (English field Days before due date).
| Field | Description |
|---|---|
| Days before due date | How early a scheduled charge appears as payable. Example: 10 days on a due date of the 20th means the charge is treated as payable from the 10th. Marketplace POST /bookings cannot send this window — Vivin copies the account value onto the imported stay — Creating Bookings — Days before due. |
This does not change the due date itself — pair it with Payment Deadlines (Tenant Due Day / Tenant Due Month) and with Emails payment-reminder rules so reminders and payable status stay aligned. There is no property-level Days before due date. + Create New → Booking cannot pick it at create. After a stay exists, Contract Info — Days before due can override the copied value for that reservation only.
Recurring Services
The Recurring Services card sets how recurring service extras (tenant marketplace / services catalogue lines that repeat with the stay) are billed on partial months.
| Field | Description |
|---|---|
| Follow booking contract type | When Yes, partial months follow the booking’s rent billing type (daily contracts prorate by days, fortnightly by half months, monthly contracts charge full months). When No, choose a fixed Billing mode below. |
| Billing | Manual proration when not following the contract type: Full monthly amount, Fortnightly, or Daily. |
| Billing option (when not following contract type) | Behaviour |
|---|---|
| Full monthly amount | Charge the full monthly service price for every month of the stay, including partial first and last months. |
| Fortnightly | Partial months charge half the price when only one fortnight is covered. |
| Daily | Partial months are prorated by the actual days of the stay (check-in to check-out). |
Pair with Services catalogue rows and booking Payment Plan extras — this card does not create the service itself; it only sets how recurring extras prorate.
First & Last Month Deposits
Confirmation and check-in payment shapes on Listings — Contract Details interpret these rules when Processing a New Booking creates the first schedule lines.
These settings define what happens to the first and last month's rent when used as deposits.
| Field | Description |
|---|---|
| First Month Deposit Rule | Whether the first month's rent collected at confirmation/check-in is treated as a deposit (refundable) or as prepaid rent (non-refundable). |
| Last Month Deposit Rule | Same concept applied to the last month's rent. Options typically include Full (retain the entire amount) or Partial (define what fraction is retained). |
How These Interact with Confirmation Payments
The First and Last Month Deposit Rules work together with the Confirmation Payments and Check-in Payments configured on each property (see Contract Details):
- If a property's Confirmation Payment is set to "Deposit and First Rent", the First Month Deposit Rule determines whether that first rent charge is treated as prepaid rent (applied to the first month) or as a refundable deposit (returned at the end of the tenancy).
- If the Last Rent is included as a Confirmation or Check-in payment, the Last Month Deposit Rule determines whether that amount is applied to the final month's rent or held as a refundable deposit.
A property's Confirmation Payment is "Deposit and First Rent" and the First Month Deposit Rule is set to "Prepaid Rent":
- The tenant pays the first month's rent upfront at confirmation.
- This amount is applied directly to the first month's scheduled charge (marked as Paid).
- The first month's rent is not refundable — it is treated as rent, not a deposit.
If the rule were set to "Deposit" instead:
- The same amount is collected, but it is tracked as a refundable deposit.
- The first month's scheduled rent charge remains Pending and must be paid separately.
Out Payments
The Out Payments card on the Payments tab (/settings/payments) controls how Vivin creates and approves outgoing payout batches when tenant vIBAN transfers are finalized into owner or account transfers. These settings work together with Finance > Payouts — operators with Approve payments permission review or confirm rows there.
| Field | Options (English UI) | What it does |
|---|---|---|
| Approval type | Approval required / Skip approval | When Skip approval is saved, Vivin automatically approves each new payout batch the scheduler creates (status moves past To approve without a manual step). When Approval required, batches stay To approve until someone approves them in Finance. |
| Payout type | Account / Owners | Account — group finalized incoming payments into payouts to your company IBAN on General Information. Owners — create separate payout batches per property owner, using each owner’s IBAN from Owners. |
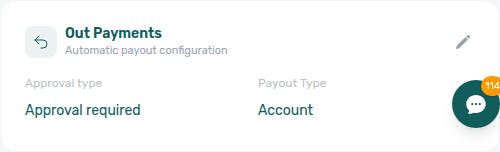
Use the card’s pencil control to change either field, then Save (or Cancel to discard). Values apply on the next payout generation cycle — they do not retroactively re-open completed batches.
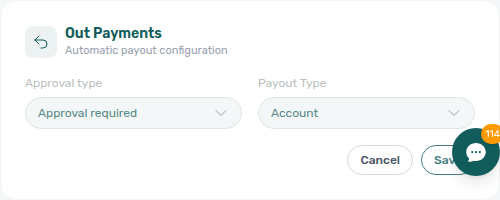
Owners mode requires complete IBAN (and identity) records on every owner you pay out. Account mode requires a valid company IBAN on General Information. Missing banking details surface as warnings on Finance > Payouts rows (Set recipient shortcuts).
Keep Approval required when a finance lead should review each batch against bank statements before funds leave. Use Skip approval only when your reconciliation process is automated and you accept scheduler-driven approval.
Utilities
Chargeable utility types, Tenant Notification, and Charge Time live on Account Settings → System → Global Settings (English tab label Global Settings). There is no separate Utilities sidebar tab under Billing — /settings/utilities redirects to Global Settings. Scroll to the Utilities card.
Ask AI Chat “Where do I open Utilities under Account Settings to configure chargeable utility types, Tenant Notification, and Charge Time for tenant overages — not Property Expenses, and not the Tools Utilities module?” — then open Global Settings and find the Utilities card (ai-chat-product-context-utilities-settings-reply.png, ai-chat-product-context-utilities-settings-flow.mp4). The assistant may still say Settings → Property → Utilities (and correctly warn that it is not Property Expenses and not the Tools Utilities module); follow Settings → System → Global Settings and scroll to the Utilities card instead — there is no separate Utilities sidebar tab under Billing. Same grounding external MCP clients get from get-vivin-context-finance (or get-vivin-context-platform). Distinct from the Tools → Utilities module (bills and allocations) and from Fees booking-fee toggles. Name Global Settings (or Utilities card) and disambiguate from Property Expenses / the Tools module so the reply stays on overage rules — a vague “Utilities settings” ask can invent a Property Expenses path.
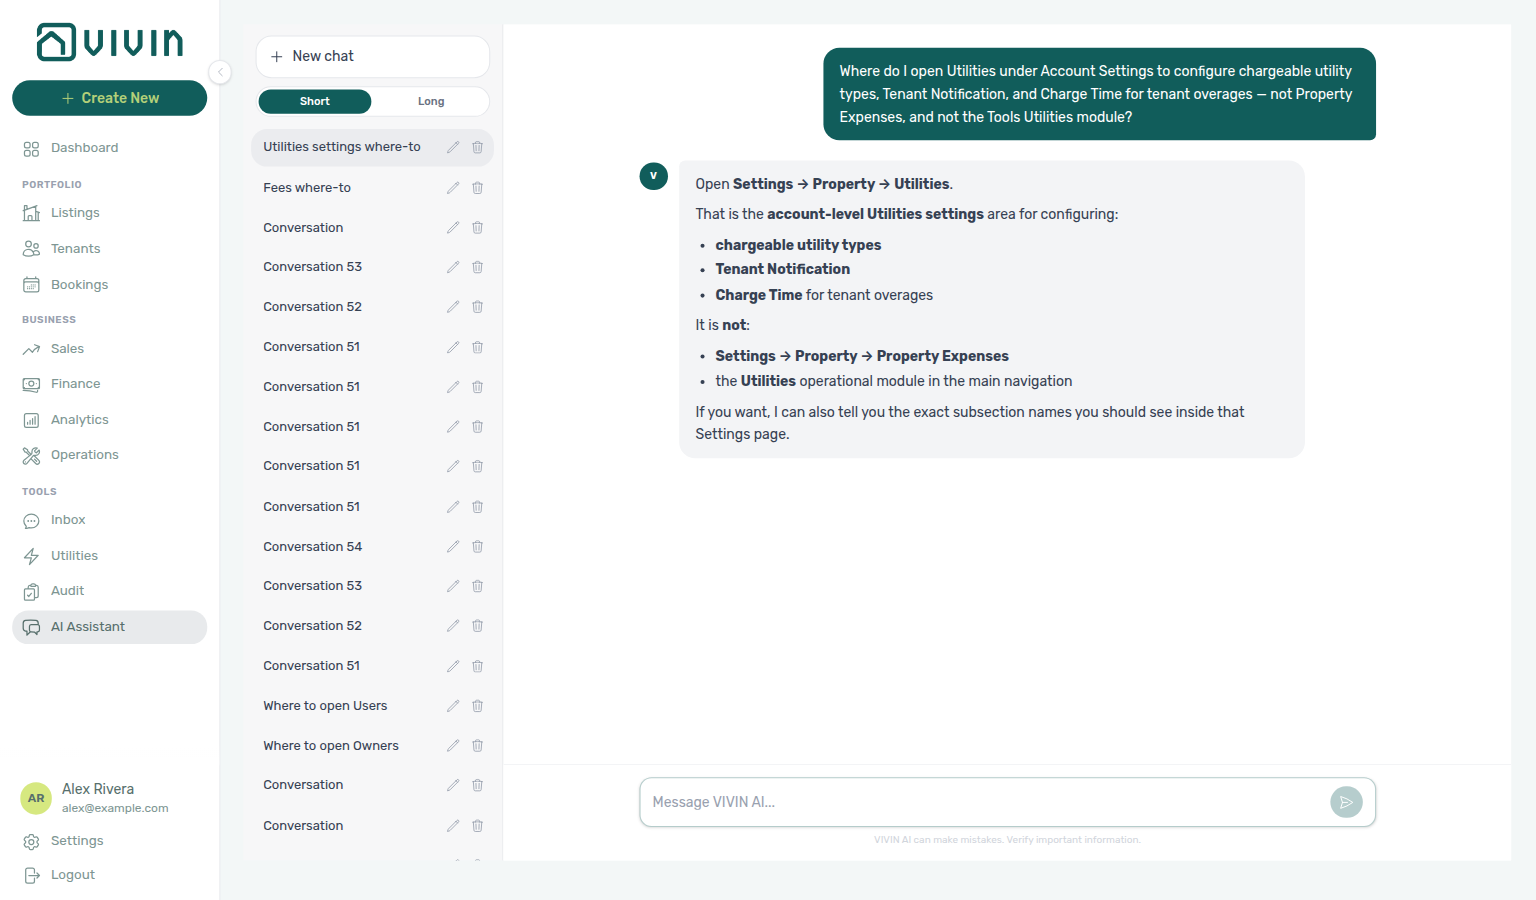
Chargeable-type toggles gate Utilities module overage math — pair Bills Included ceilings from Listings Step 3 with Entering Monthly Utility Bills before enabling Charge or Notify & Charge.
Configure which utility types participate in tenant overage math and how the product should notify or charge tenants when consumption exceeds the Bills Included ceiling on a property. These account-level rules work together with:
- Utilities module — bill entry, daily cost allocation, and the Allocations tab where pending overage rows are reviewed
- Property / unit ceilings — Bills Included limits set in Listings (see Utilities module — How tenant overage charges are created)
Open the card with the pencil control to edit; Save persists to the account, Cancel restores the last saved values.
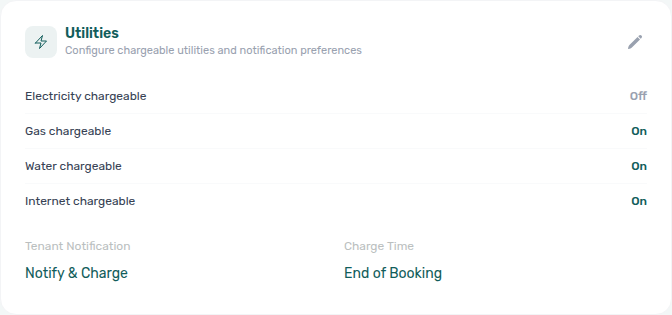
In read-only view, the card shows your saved Tenant Notification and Charge Time choices above the chargeable-type toggles:
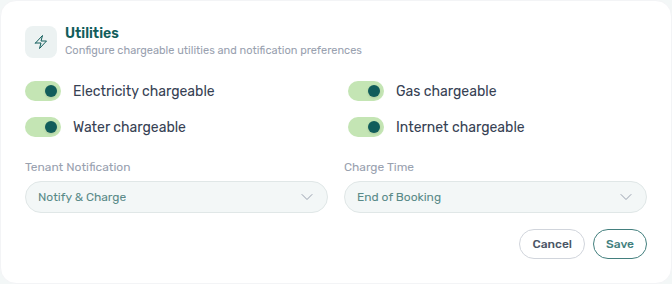
In edit mode, use the chargeable-type toggles plus the Tenant Notification and Charge Time dropdowns (options listed in the tables below), then Save:
Chargeable utility types
Each toggle marks whether that utility type may generate tenant overages when bills exceed the included ceiling:
| Toggle (English UI) | Utility type |
|---|---|
| Electricity chargeable | Electricity |
| Gas chargeable | Gas |
| Water chargeable | Water |
| Internet chargeable | Internet |
Turn a type On when you pass that utility through to tenants; leave it Off when the landlord absorbs that category entirely.
If a utility type is disabled here, the system will not calculate overages for that utility — even if a bill is entered and the property has a Bills Included ceiling configured. Enable all utility types that you intend to bill to tenants.
Tenant Notification
Controls whether the nightly overage job creates allocation rows and what happens when Vivin internal users approve a pending row on Utilities → Allocations:
| Option (English UI) | Behaviour |
|---|---|
| None | No extra-bill allocations are calculated for the account. |
| Charge | Allocations are created for operator review on Utilities → Allocations. When a pending row is approved, Vivin creates a booking payment on the tenant’s schedule for the allocated amount (due date follows your deposit-refund / return-due settings on the Payments tab) without sending the tenant utility overage notification. |
| Notify & Charge | Same allocation review flow and payment-schedule line on approve, and Vivin also notifies the tenant about the overage (email / portal path per your communication settings). |
Use Charge when approved overages should post to Bookings → Payment Plan without a tenant notification. Use Notify & Charge when tenants should receive the utility overage notification at the same time. Accounts that previously used the legacy Notify option (review-only, no automatic schedule line) were migrated to Notify & Charge.
Charge Time
Controls which stays are included when the system divides daily overage cost across occupied units:
| Option (English UI) | Behaviour |
|---|---|
| Every Month | Include active bookings throughout the billing month while they occupy the unit. |
| End of Booking | Defer allocation for a booking until its check-out date has passed (ended stays only). While a stay is still active, Vivin still counts that unit in the daily cost-split denominator so roommates who check out first are not charged for tenants who remain. Useful when you bill utility true-ups once per tenancy rather than month by month. |
Charge Time applies only when Tenant Notification is not None. Pair End of Booking with Notify & Charge when you want a single end-of-stay utility settlement on the payment plan. See Glossary — End-of-Booking cost split and Utilities — Smart Cost Distribution.
Pending rows still appear on Utilities → Allocations for Vivin internal approval when Tenant Notification is Charge or Notify & Charge — both options post a payment-schedule line on approve; only Notify & Charge also notifies the tenant. Customer property managers can review breakdowns; approve/reject actions are limited to Vivin internal users in the current product.
Payments Priorities
Drag order here drives Payment Allocation when partial receipts land on Finance — Transactions — reject/revert flows do not reorder this list.
When an incoming payment from a tenant is received and needs to be allocated across multiple outstanding charges, the system uses this priority list to determine the order.
The Payments priorities card on the Payments tab lists charge types top-to-bottom (highest priority first). In edit mode, drag rows to reorder; Prioritize due dates (when enabled) can override strict list order for overdue lines — see the in-product tooltip on that toggle.
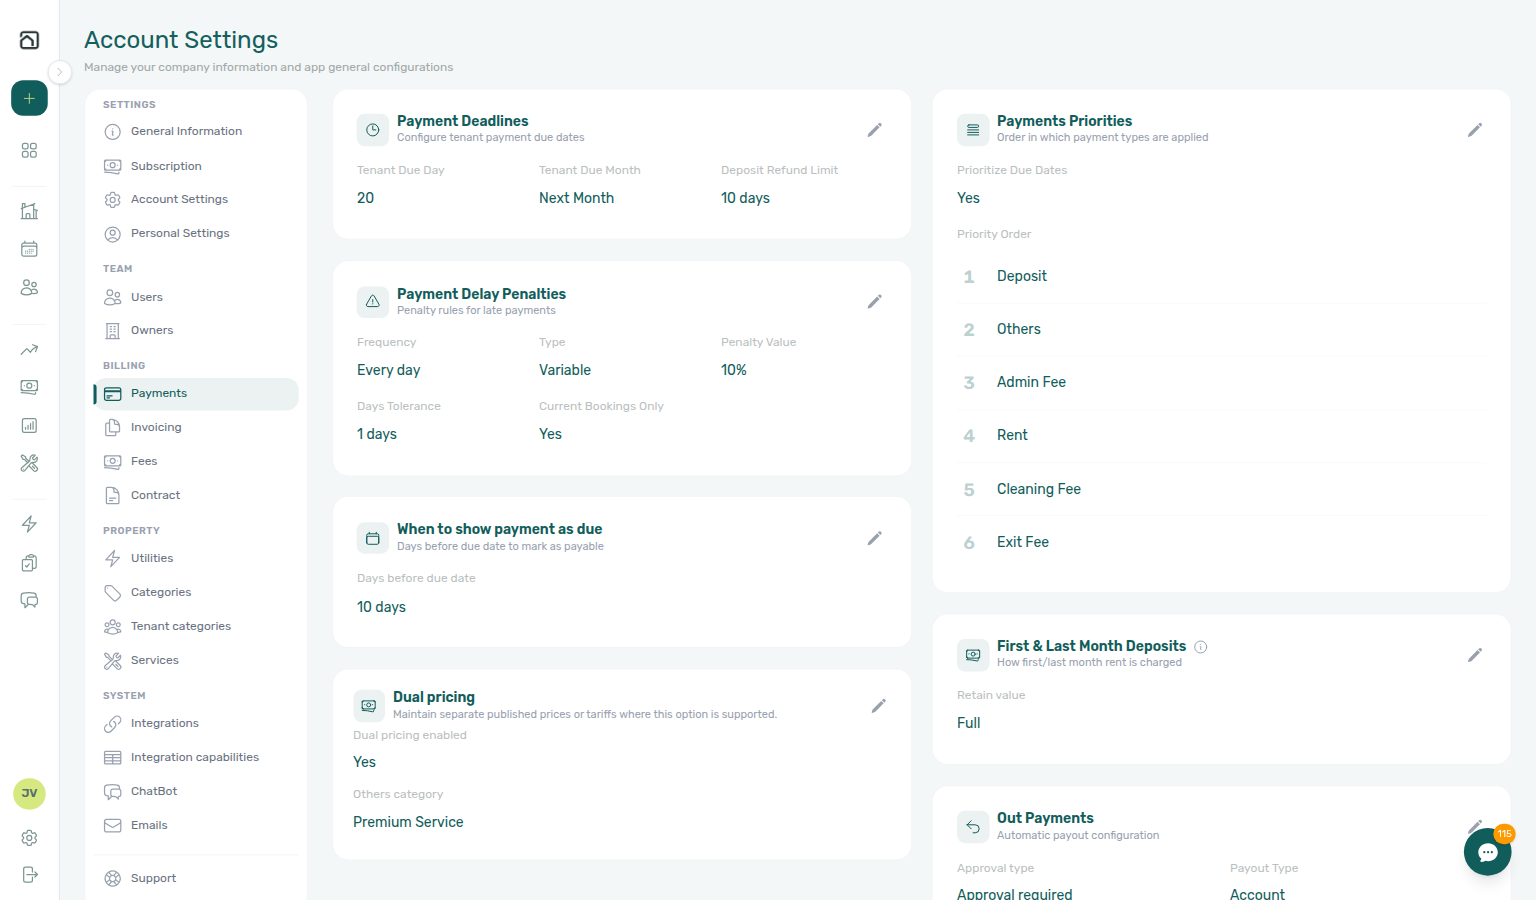
Use the drag-and-drop interface to rank payment types. For example, you might configure:
- Security Deposit (highest priority — always covered first)
- First Month Rent
- Admin Fee
- Monthly Rent
- Cleaning Fee
- Other Charges
When a payment arrives, the system applies it to the highest-priority outstanding charge first, then moves down the list.
This order matters when a partial payment is received. If a tenant pays €800 against a €1,000 total owed (€500 rent + €300 deposit + €200 admin fee), the system applies the €800 starting from the top of this priority list.
Using the priority order above, the €800 partial payment is allocated as:
- €300 → Security Deposit (fully paid — highest priority)
- €200 → Admin Fee (fully paid — assuming Admin Fee is higher priority than Monthly Rent)
- €300 → Monthly Rent (partially paid, €200 remaining)
The order you configure directly affects which charges are satisfied first and which remain outstanding.
Approve, reject, and revert on Finance → Transactions and booking Transactions change how money is matched to scheduled lines — they do not reorder this priority list. When you reject or revert a receipt that Finance already invoiced, confirmation modals warn that you may need credit notes in your accounting system. See Payment Allocation — Correcting mistaken receipts.
Out Payments (automatic payout configuration)
The Out Payments card on the Payments tab controls how Vivin creates and approves outgoing payouts to your bank (the same records you review on Finance > Payouts). Open the card’s pencil control to edit; Save persists account-wide defaults.
| Field (English UI) | Options | What it does |
|---|---|---|
| Approval type | Approval required (default) · Skip approval | When Vivin’s scheduled out-payment job creates a new payout batch, Approval required leaves it in To approve until an operator with payment-approval permission confirms it in Finance. Skip approval auto-approves the batch immediately after creation (still visible in Payouts; use when your process does not need a manual gate). |
| Payout Type | Account (default) · Owners | Account rolls finalized tenant vIBAN in-payments into account-level outgoing batches. Owners groups payouts per property owner (using each owner’s IBAN from Owners) so revenue distribution matches owner records. |
These settings affect how batches are generated and whether they need a manual approve step — not day-to-day Confirm received after money lands in your bank. Operators still reconcile Payouts against statements, use Export, and mark payouts Received when transfers clear. See Finance > Payouts tab.
With Payout Type set to Owners, each owner must have a valid IBAN before Vivin can create a payout for that owner. Missing banking details show an amber warning on the Payouts table with a Set recipient shortcut.
Rent adjustment
Ask AI Chat “Where do I open the Rent adjustment card under Account Settings Payments (the Billing group Payments tab at /settings/payments — English card label Rent adjustment with Review and apply — not Change monthly rent on a single booking Contract Info, and not Finance Transactions) to raise rent instalments on selected current bookings from a chosen month with Bulk Rent Increase?” — then open this Rent adjustment card (ai-chat-product-context-rent-adjustment-reply.png, ai-chat-product-context-rent-adjustment-flow.mp4). The assistant typically says Settings → Payments (then the Billing group Payments tab → Rent adjustment), or Settings → Billing → Payments → Rent adjustment. Canonical route: /settings/payments. Same grounding external MCP clients get from get-vivin-context-finance (or get-vivin-context-platform). Distinct from single-stay Change monthly rent on Contract Info and from ledgers on Finance → Transactions.
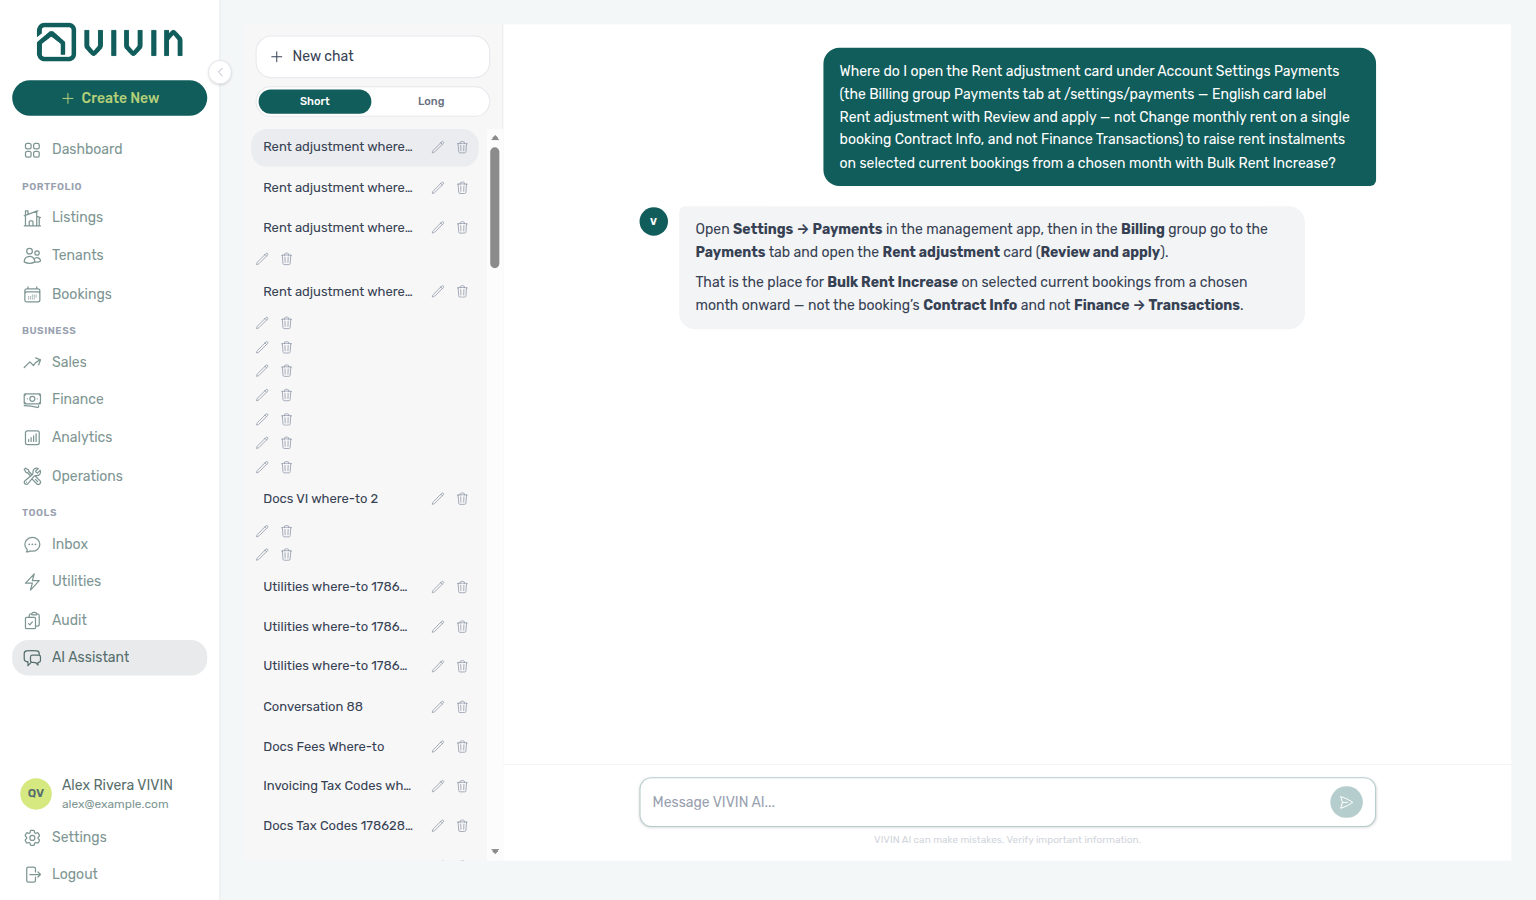
One booking at a time: Bookings → Contract Info → Change monthly rent. After Finance has already invoiced a month, lowering rent still follows the invoiced floor — this tool only raises instalments. Permission: Bulk Rent Increase (bookings.bulk_rent_increase) on Users and roles.
Use Rent adjustment on Account Settings → Payments when you need the same percentage raise across many current bookings from a chosen rental month onward — for example an annual indexation. The card sits at the bottom of the Payments grid (after the configuration cards it operates under). Without Bulk Rent Increase, the card is hidden.
| Control | Purpose |
|---|---|
| Review and apply | Opens the two-step Rent adjustment modal |
| Increase percentage | Raise amount (for example 3.5). Accepts 0.01–1000; comma or dot decimals |
| Effective month / year | First rental month whose Rent instalments are rewritten; later months on the same booking rise by the same percentage |
| Preview | Read-only table of eligible bookings with current vs new rent, instalment counts, and total increase |
| Select properties | Step 2 preview filter — tick one or more buildings; the menu stays open while you add another |
| Select categories | Step 2 preview filter for booking tags (hidden when the account has none) — the menu stays open while you add another |
| View booking details | Step 2 teal tenant name — opens the booking on top of the preview; the rest of the row still checks the stay |
| Apply | Writes the selected rows (chunked). Cannot be undone — confirm carefully |
| Export | CSV or Excel of the selected preview rows (tenant, unit, amounts, booking id) before or instead of applying |
Who can run it
The card and the preview/apply API both require bookings.bulk_rent_increase (Bulk Rent Increase under Bookings in the role matrix). Default Admin includes it; default Finance does not — grant it explicitly when finance operators should run portfolio raises. Owner-scoped managers only see bookings in their own portfolio.
Step 1 — Set the increase
- Open platform.vivin.app/settings/payments.
- Scroll to Rent adjustment → Review and apply.
- Enter the Increase percentage and choose the Effective month and Effective year.
- Click Preview.
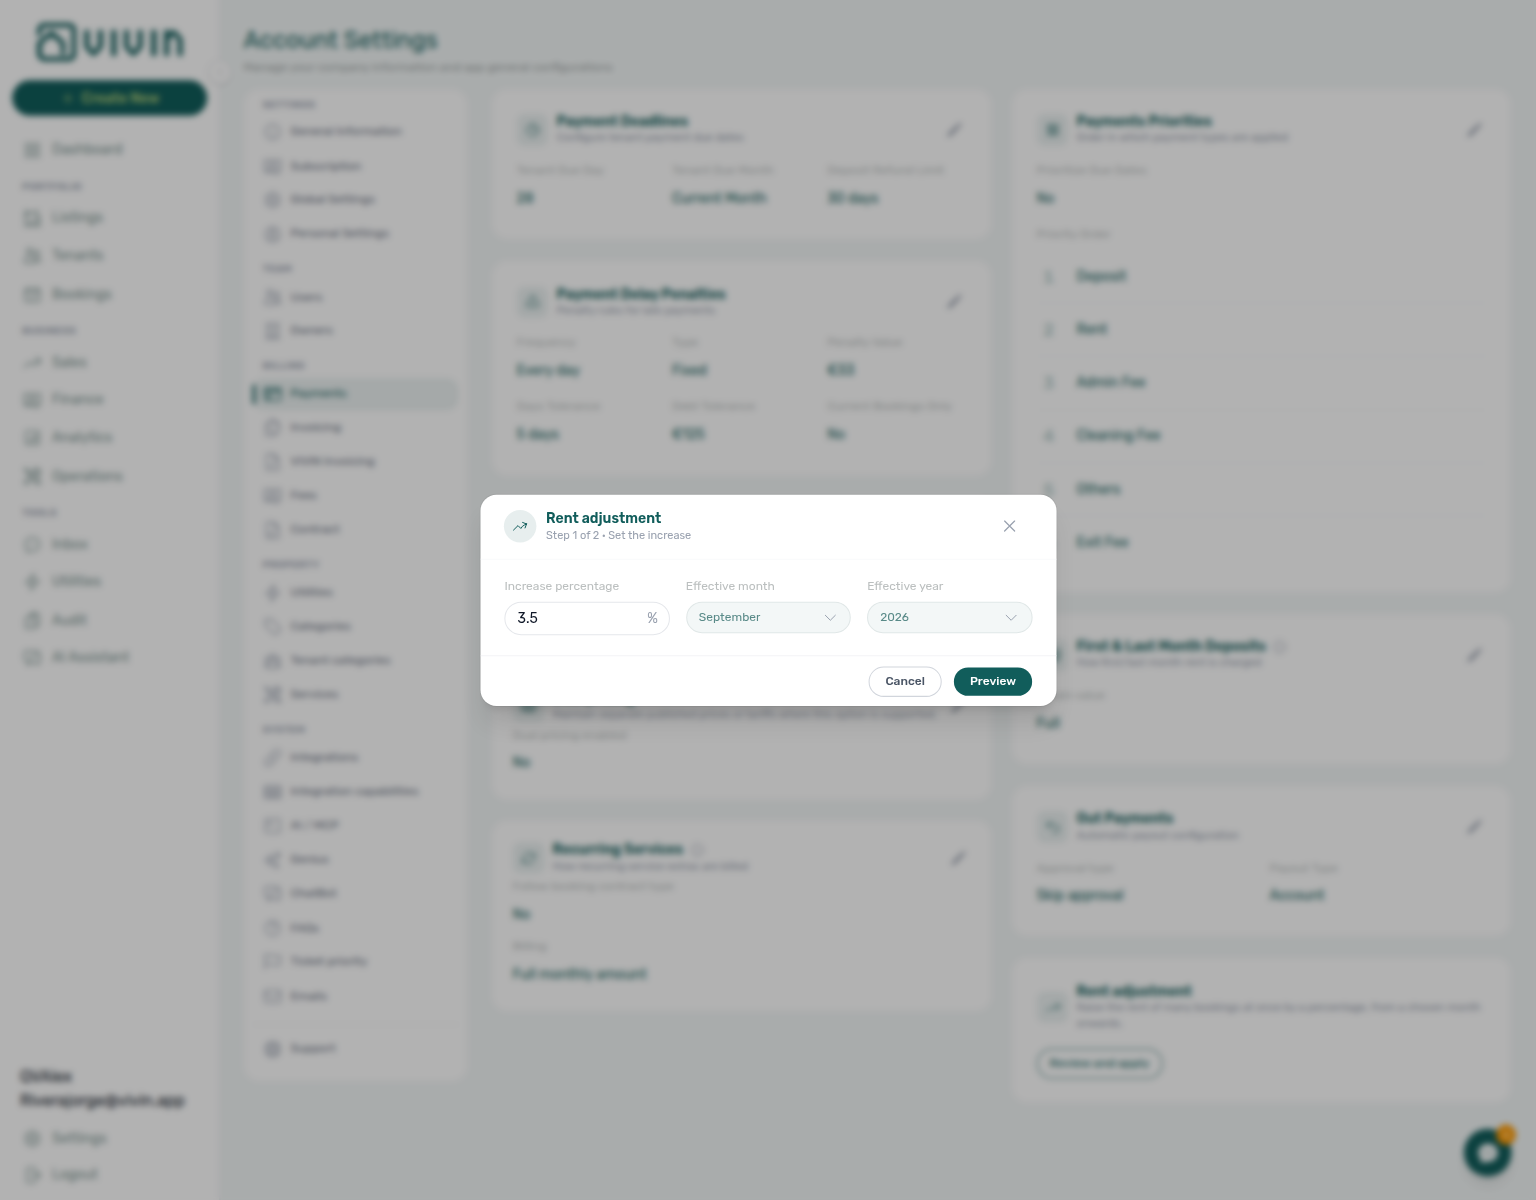
If the chosen month is already in the past, Vivin still rewrites matching unpaid Rent instalments. Amounts that were already paid become outstanding for the tenant for that uplift — review the preview totals before you apply.
Step 2 — Review what changes
The preview lists only bookings the raise can touch. Filters (search, contract date range, Select categories, Select properties) re-run the preview as you change them. Select properties and Select categories stay open while you add a second choice. The teal tenant name opens booking details on top of this preview — clicking the rest of the row still checks the stay. Use Show revised in last 12 months when you need to include bookings this tool already raised recently (those rows start deselected so you do not double-apply by accident).
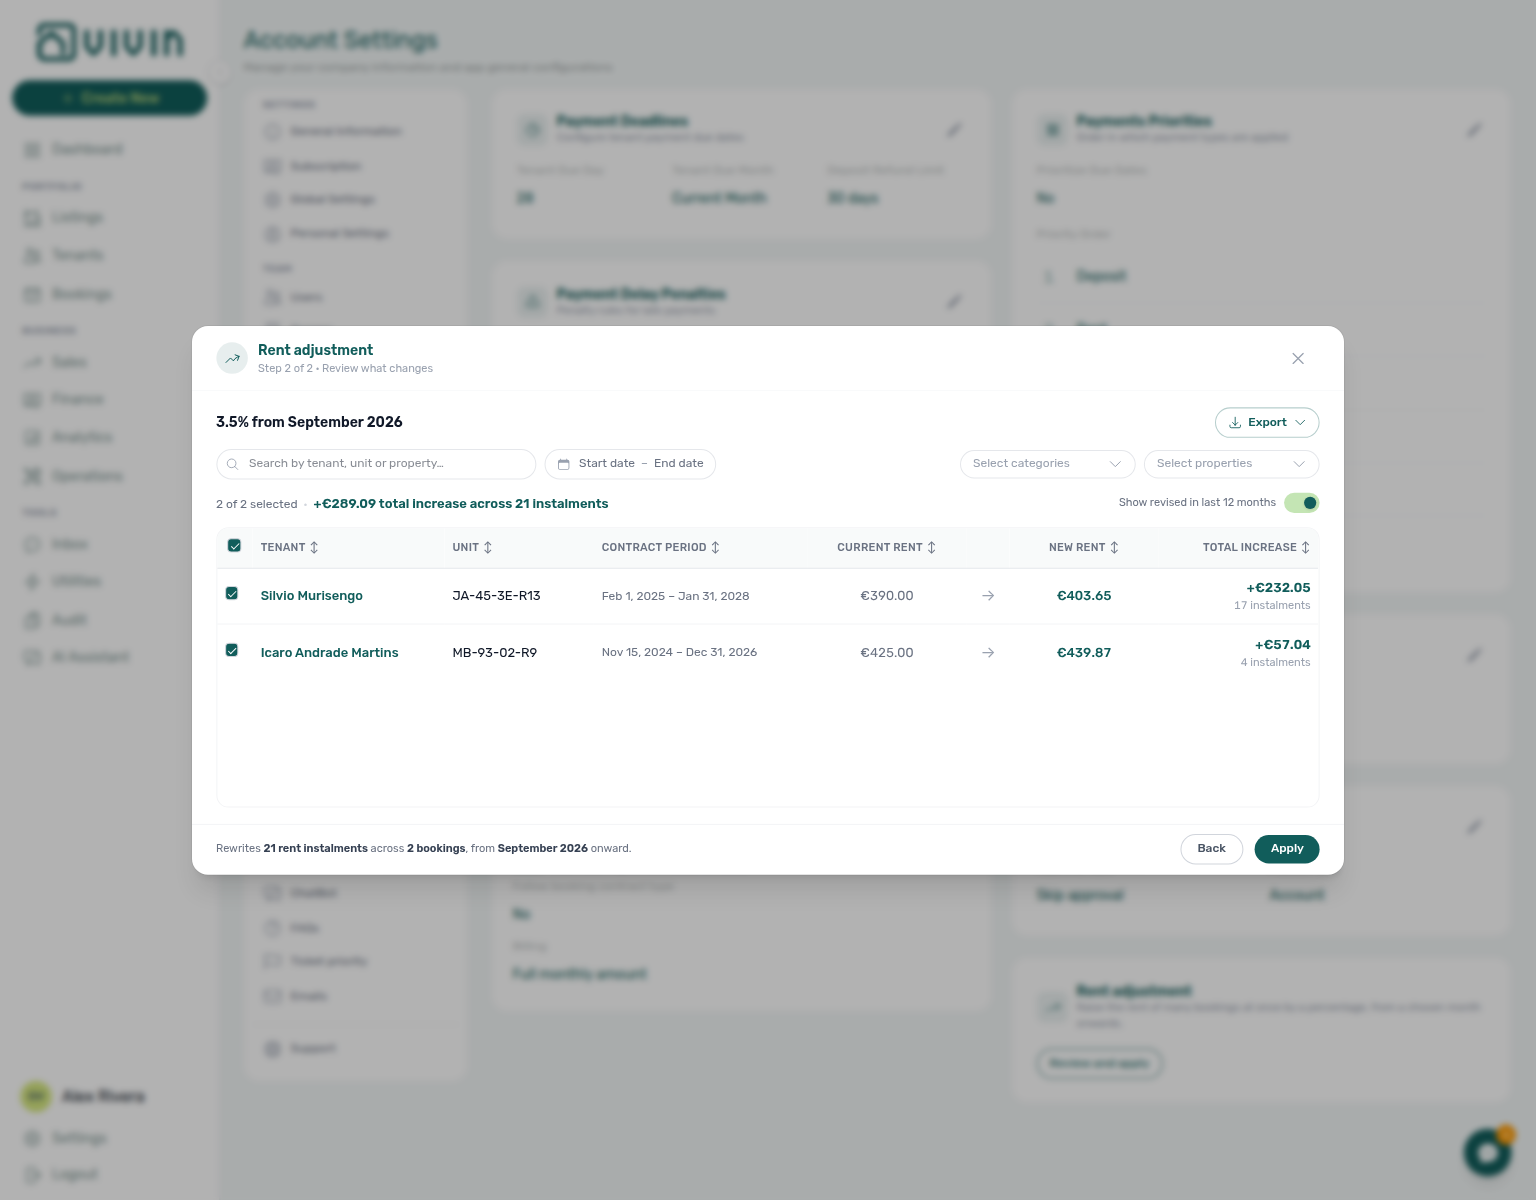
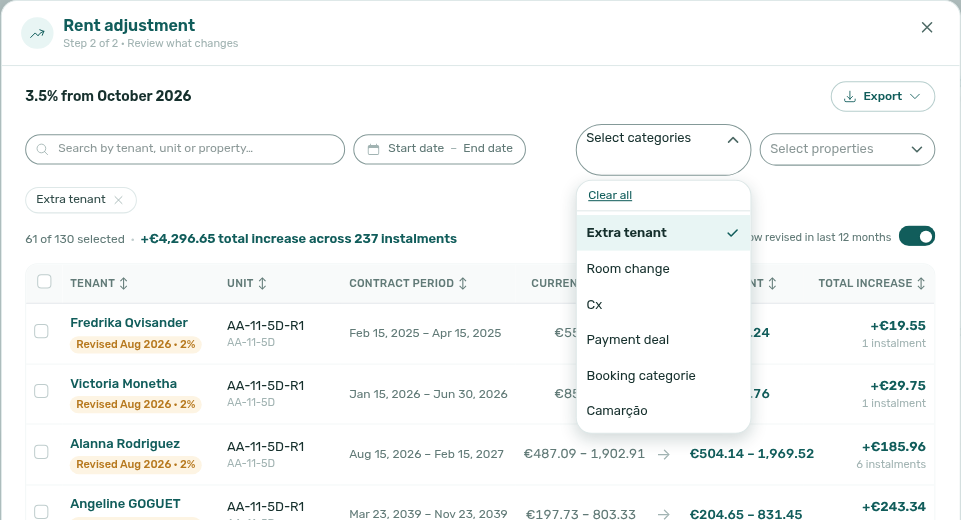
Select properties and Select categories stay open while you pick
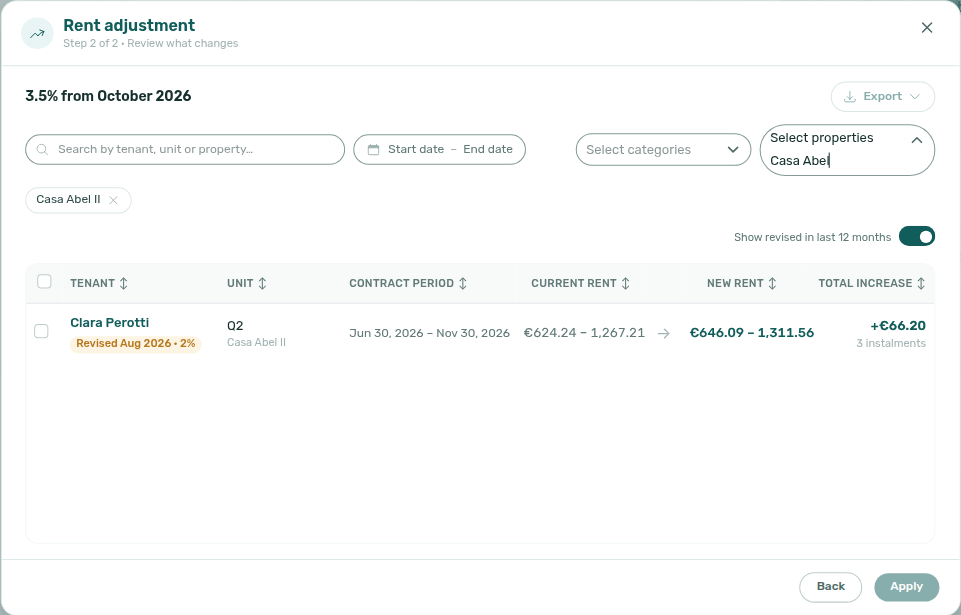
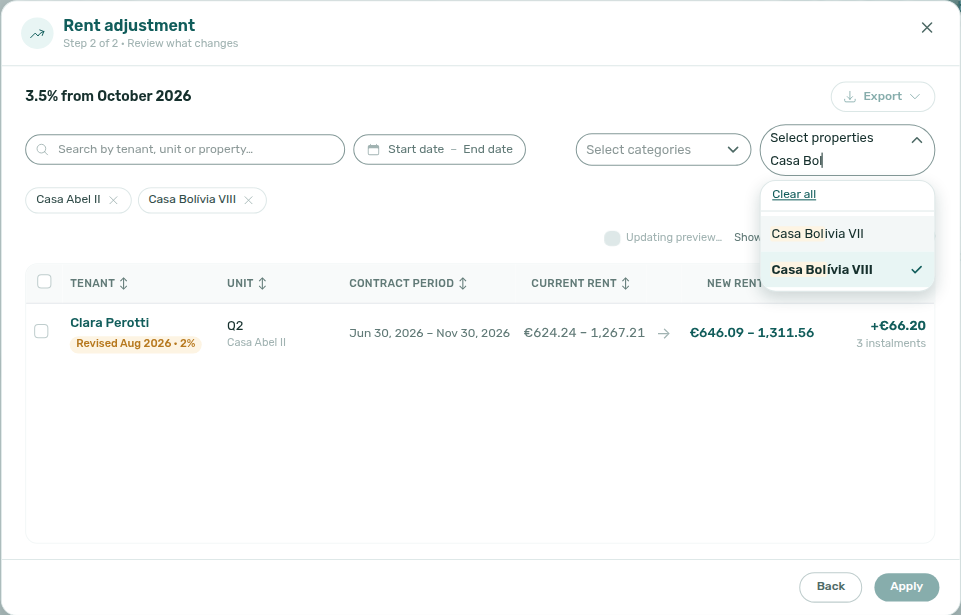
On Account Settings → Payments → Rent adjustment, open Review and apply, enter an Increase percentage and Effective month / year, then Preview. On Step 2, open Select properties and tick a building. The trigger still reads Select properties; the menu stays open so you can tick a second building. You do not need to open the picker again.
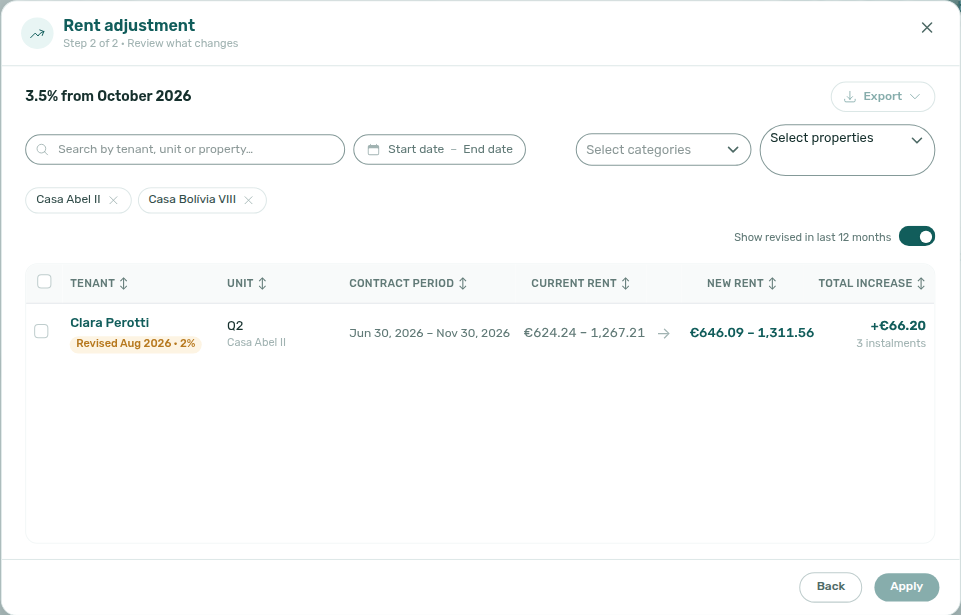
When the portfolio is long, type in the open list (for example Casa Abel, then tick Casa Abel II — not Casa Abel I). Tick Casa Abel II, then Casa Bolívia VIII. Both stay checked in the open list. Removable chips appear under the pickers. The table shows bookings in any of the buildings you ticked — not only stays that somehow sit in both. Leave Select properties empty to include every building. Dismiss the menu when the chips look right — click the percentage recap (for example 3.5% from September 2026), Search, or the modal title. Close with Back then Cancel, or the X — do not click Apply unless you intend to raise rent.
Select categories (English placeholder) sits beside Select properties when the account has booking tags. It uses the same stay-open habit: tick Extra tenant, then another tag from that catalog. The table shows bookings whose tags include any of the labels you ticked. There is no No booking category row here — untagged stays stay in the preview until a named tag filter excludes them. If you do not see Select categories, add tags under Settings → Categories → Bookings first. Combining a category chip with a property chip keeps rows that match both filters (any-of within each picker).
Search, Start date / End date, Effective month / Effective year, Export, and Show revised in last 12 months are different controls (search is a text box; the date range and month/year menus close after a pick; the toggle is not a list). Bookings → Select properties and Booking categories are toolbar filters on the reservation list — they do not open this modal. Finance → Other filters → Booking → Select categories is a different drawer control.
View booking details stays on the preview
On Account Settings → Payments → Rent adjustment, open Review and apply, enter an Increase percentage and Effective month / year, then Preview. On Step 2, the tenant name is a teal control (English View booking details). Click the name — not the rest of the row — to open that booking on top of the preview.
The row click still checks or unchecks the stay for the raise. The name click does not toggle the checkbox.
The booking sidebar stacks over the Rent adjustment modal. Search, Select properties / Select categories chips, checkboxes, and Show revised in last 12 months stay as you left them. Close the sidebar (not the Rent adjustment X) to return to the same preview and open the next name.
Names are clickable only when your role can open booking detail. Without that permission, the name is plain text.
This is not Finance → Overview drill-down lists (those open the sidebar from a full row click). It is not the Bookings directory (that replaces the list with the booking). Select properties / Select categories stay open is a different Step 2 habit.
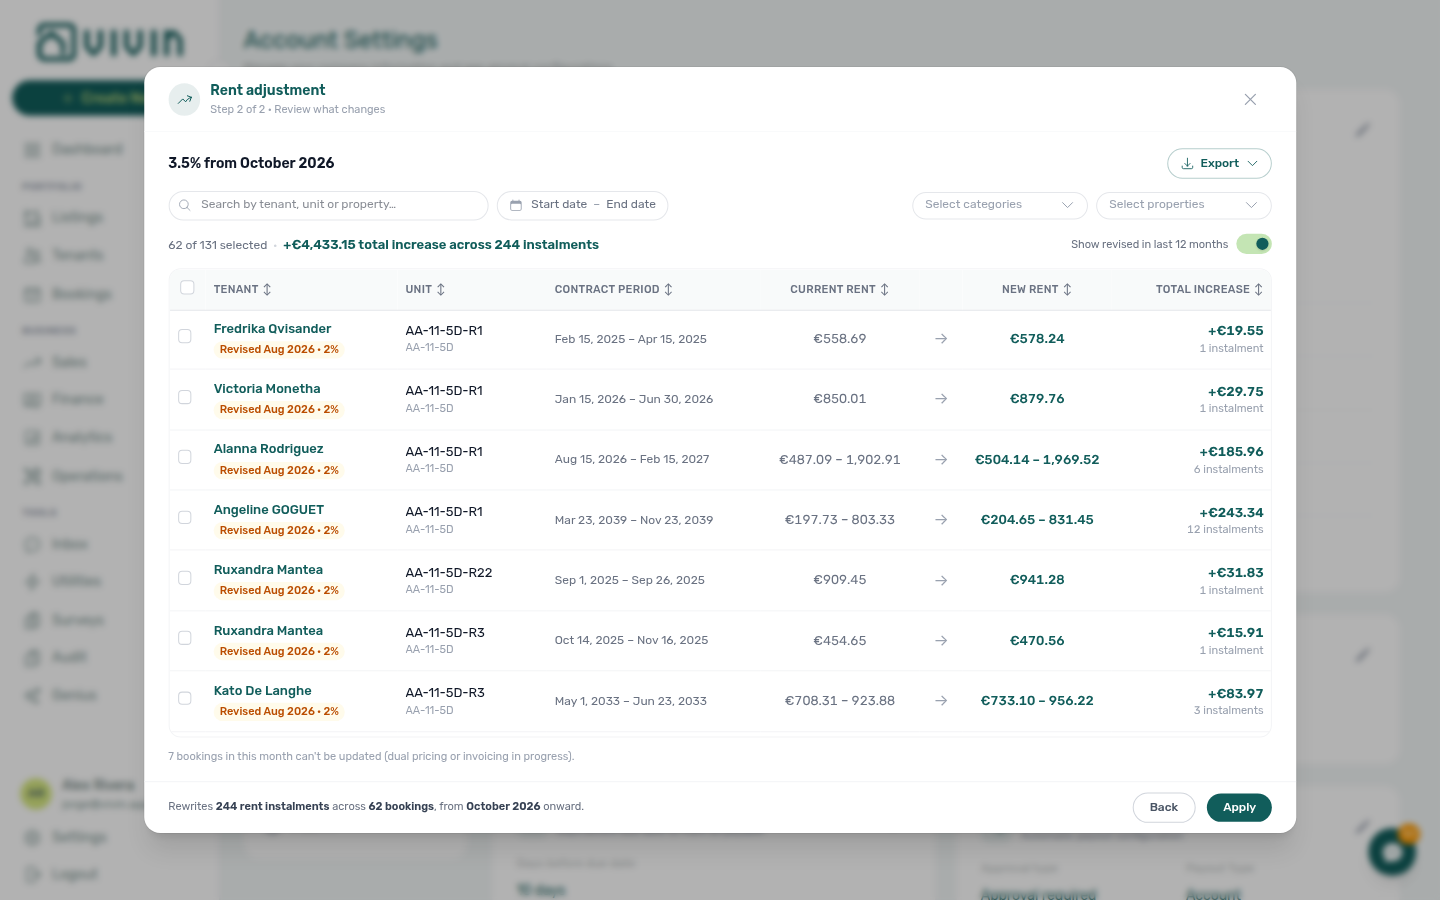
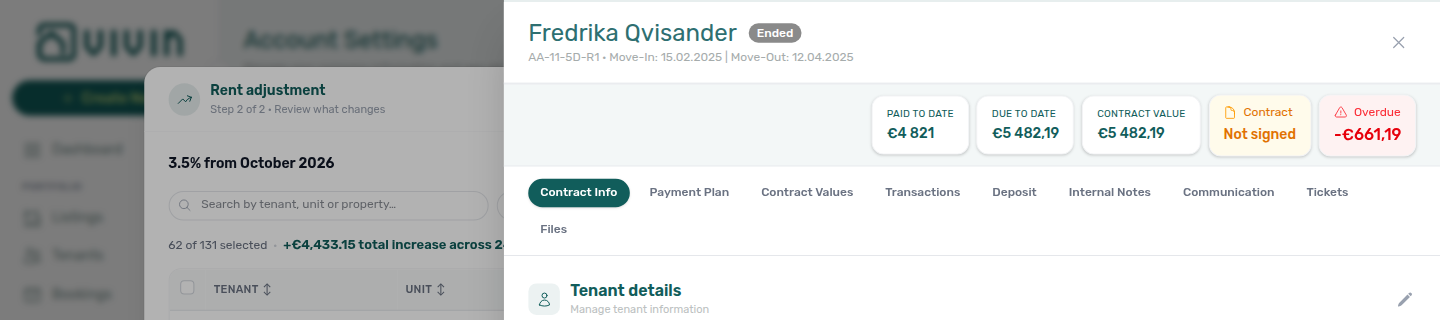
| Preview column | Meaning |
|---|---|
| Tenant / Unit / Contract period | Who and which stay is affected — the teal tenant name opens booking details on top of this preview |
| Current rent → New rent | Effective-month instalment before and after the percentage |
| Total increase | Sum of uplift across rewritten instalments from the effective month onward |
| Selection summary | How many bookings are checked and the combined uplift |
Footer copy summarises how many rent instalments and bookings will be rewritten. Back returns to Step 1; Apply opens a confirmation that names the count, percentage, effective month, and total uplift.
What Apply changes (and what it skips)
Apply scales Rent instalment amounts from the effective month forward on each selected booking. It does not change listing price grids or regenerate the whole payment plan from the unit formula — so months before the effective month stay at their previous amounts.
Bookings are omitted from the preview (or reported as skipped on apply) when they cannot be raised safely, including:
| Reason (UI) | Typical cause |
|---|---|
| Dual pricing | Stay uses Dual pricing / local rent cap — raise those stays one-by-one on the booking |
| Invoicing in progress | Rent lines are mid-export to your invoicing provider |
| Cancelled booking | Stay is cancelled |
| Empty preview | No rent instalment in the effective month, or every match is ineligible |
After Apply
The results screen reports raised, already applied (safe retry — no double increase), changed since preview (re-run Preview), skipped, and failed (nothing written on those bookings — retry is safe). Keep the window open until the progress bar finishes.
There is no automatic rollback. Export the preview first if you need a spreadsheet audit trail, then apply in a calm window. For a single stay, prefer Change monthly rent instead of a portfolio run.
Dual pricing / local rent cap
Local Rent Cap on Listings freezes useDualPricingRentSplit at booking creation — mid-stay edits follow Bookings — Discounts and Payment Allocation — Dual pricing.
Some portfolios must show a legal rent cap on contracts and invoices while the total monthly charge stays higher (for example rent plus accommodation services). Vivin supports this with Dual Pricing / Local Rent Cap on the Payments tab (/settings/payments).
| Control | Purpose |
|---|---|
| Enable Dual Pricing | Turns the feature on for the account. When off, units do not show Local Rent Cap and new bookings are not split. |
| Others category for the difference | Which Others payment category receives the amount above the cap on each rent line (chosen from your account’s payment categories). Required for the split to run. |
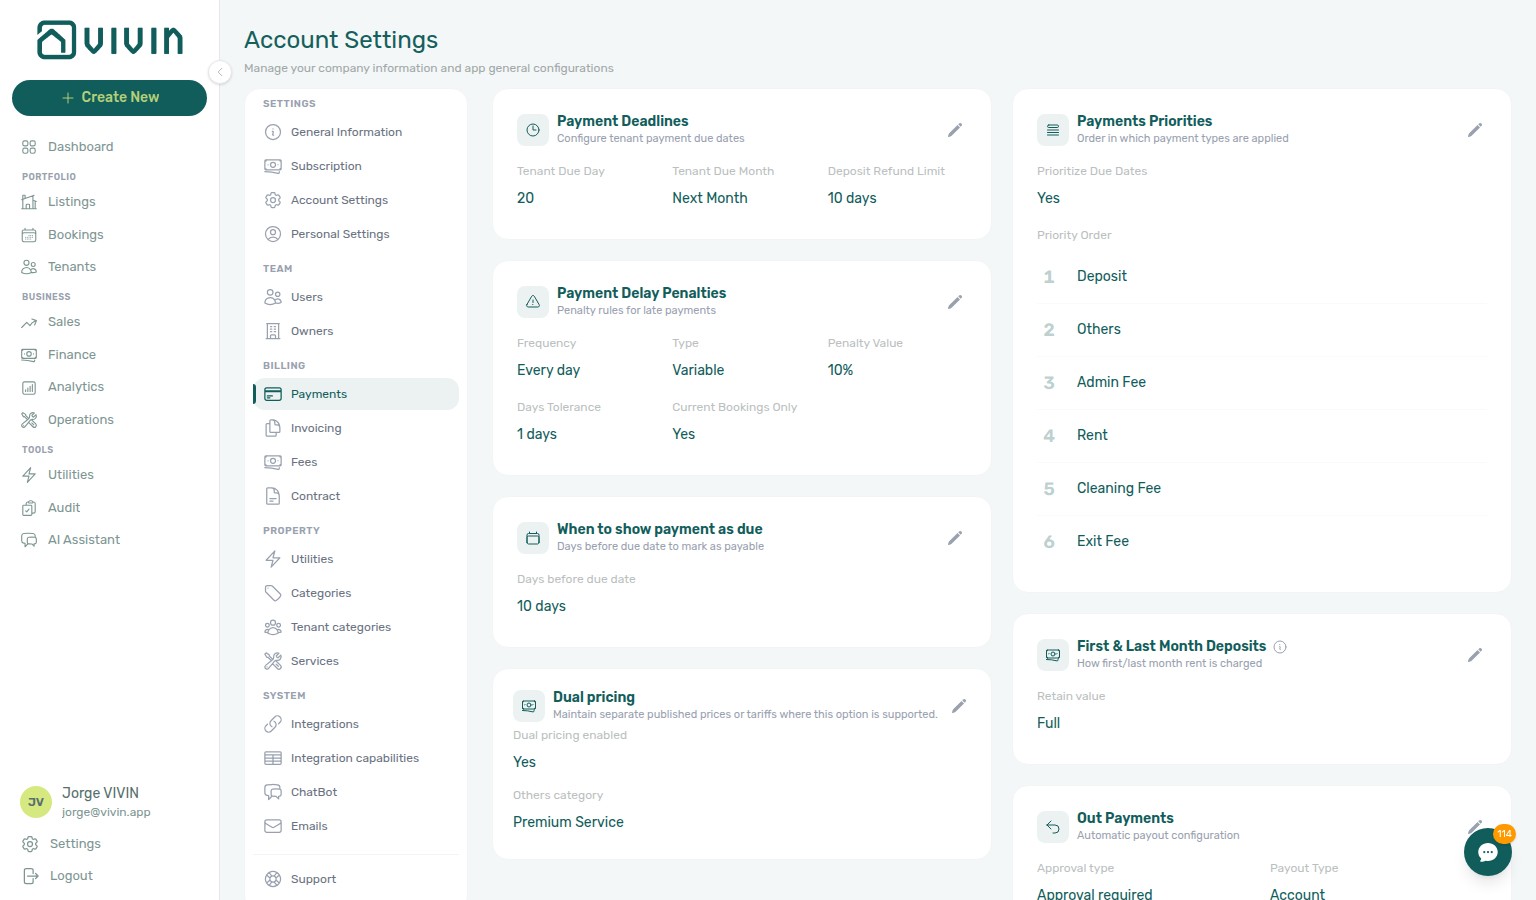
How the split works on new bookings
Dual pricing applies only when all of the following are true at booking creation:
- Enable Dual Pricing is on and an Others category is saved on this tab.
- The unit has a Local Rent Cap set under Listings (greater than zero and below the unit’s monthly rent).
- The booking is created after those settings are in place.
Partner listing JSON still shows the full advertised rent — the cap is not a catalogue field — Listings & Availability — Local rent cap.
The product then freezes useDualPricingRentSplit on the booking. For each generated Rent line on the payment schedule, Vivin:
- Keeps the Rent row at min(local rent cap, full rent) for that month.
- Adds a matching Others row for rent − cap, labelled with your configured Others category.
Example: monthly rent €800, cap €600 → €600 Rent + €200 Others per month. Incoming payments still allocate across both lines using your Payments priorities order.
- Changing Enable Dual Pricing or the Others category here affects new bookings only — existing schedules are not retroactively re-split.
- Toggling dual pricing off does not remove caps already saved on units; operators can still see Local Rent Cap on listings that have a value.
- On dual-pricing bookings, operators may edit Local Rent Cap on Contract Info (within product limits); the API regenerates rent and Others lines. See Bookings — Dual pricing.
- After Finance invoices rent for a month, lowering that month's net below the exported total is blocked by the invoiced floor — use credit notes in your accounting system when you truly need a lower invoiced amount. See FAQ — Lower rent below invoiced.
Contract templates can expose {LocalRentCap} and {RentCapDifference} — see the contract variables table.
Invoicing (VAT rates & Hostkit series)
Connect Integrations (VIVIN Invoicing, Hostkit, Invoice-xpress, NetSuite, or Sage50c) before saving tax codes — that connection is what turns invoicing on (there is no separate billing switch). Vivin loads the Tax VAT dropdown from your active invoicing provider. With VIVIN Invoicing, Tax VAT names must match the Tax rates catalogue. Hostkit invoice series blocks Finance — Invoice automation until the FR code matches Hostkit Faturação → Séries.
Tax Codes
Not sure how to reach this card? Ask AI Chat “Where do I open Invoicing under Account Settings Billing to configure Tax Codes and line-type VAT rates?” — then open Settings → Billing → Invoicing (ai-chat-product-context-invoicing-tax-codes-reply.png, ai-chat-product-context-invoicing-tax-codes-flow.mp4).
The right-hand Tax Codes card maps each invoice line type to a tax from your provider’s catalogue, plus optional Code (external product code) and Description (invoice line label).
Connect an invoicing provider first under Integrations — Billing from the invoicing connection — without VIVIN Invoicing, Hostkit, Invoice-xpress, NetSuite, or Sage50c, Vivin cannot load tax options. After you connect (or switch) a provider, open Tax Codes, click the pencil, and pick a Tax VAT for every line type you invoice.
| Invoice item | What you set |
|---|---|
| Rent | Tax VAT for monthly rent lines, plus optional product Code and Description |
| Cleaning Fee | Tax VAT / code / description for cleaning charges |
| Admin Fee | Tax VAT / code / description for administrative fees |
| Exit Fee | Tax VAT / code / description for exit charges |
| Deposit | Tax VAT for security deposits (often a zero-rate code — deposits are held in trust, not revenue) |
| Others | Default Tax VAT / code / description for miscellaneous and marketplace charges |
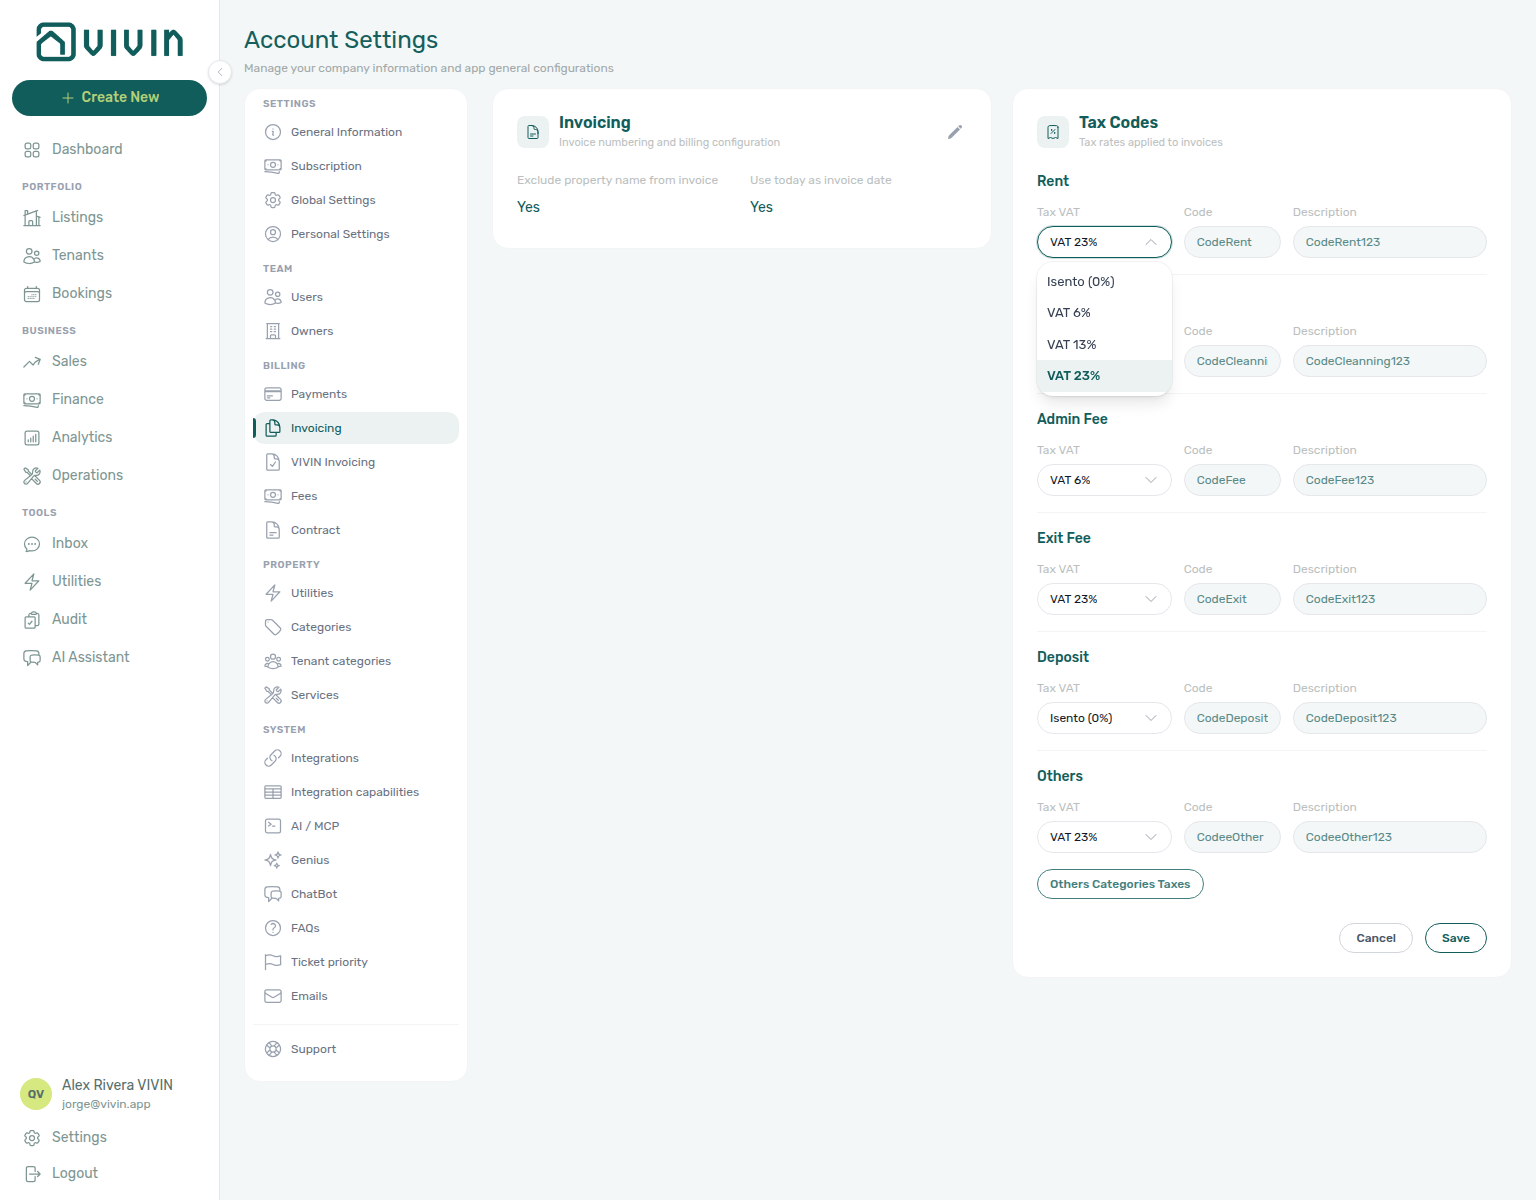
Tax VAT is a dropdown, not a free-typed percentage. Options come from the tax catalogue on your connected invoicing provider:
| Provider | How options look |
|---|---|
| VIVIN Invoicing | Rate names from Tax rates (for example IVA23, Isento) — edit mode often shows them as VAT 23% / Isento (0%). Saved view mode keeps the catalogue name (for example IVA23). |
| Invoice-xpress / Hostkit (Portugal) | Names like IVA23 display as VAT 23% |
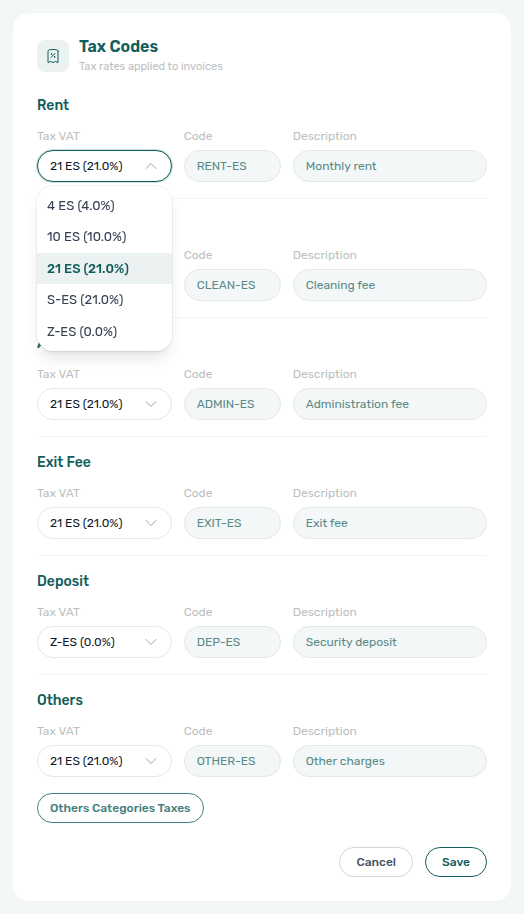
| NetSuite (Spain) | Catalogue codes such as 21 ES, S-ES, or Z-ES display as 21 ES (21%) / S-ES (21%) / Z-ES (0%) |
When VIVIN Invoicing is active, define rates on VIVIN Invoicing → Tax rates first, then pick the same names here — invoice lines resolve VAT by name. When you switch invoicing providers, re-select every Tax VAT from the new catalogue — a Portuguese IVA23 name will not resolve in a NetSuite account (and the reverse is also true). Save the Tax Codes card before your first Issue allocation / Invoice selected.
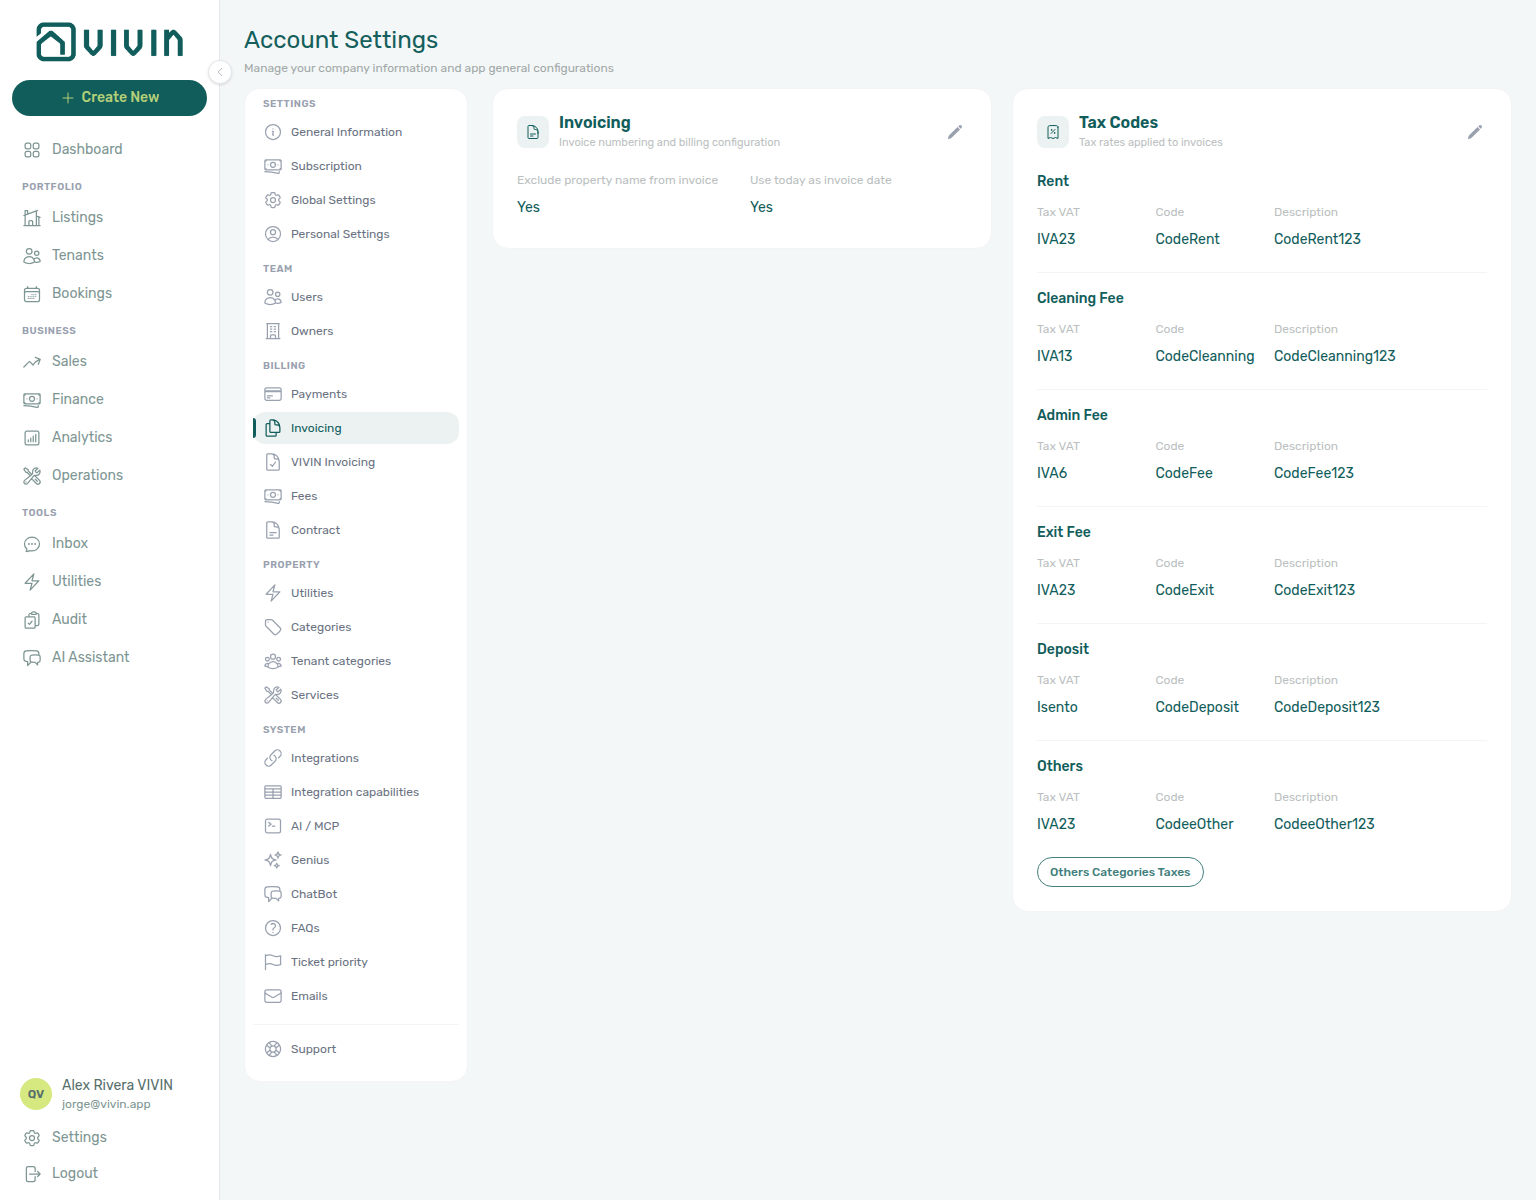
Tax Codes with NetSuite
When NetSuite is the active provider, the same Tax Codes card loads Spanish catalogue codes instead of VIVIN / Portuguese names:
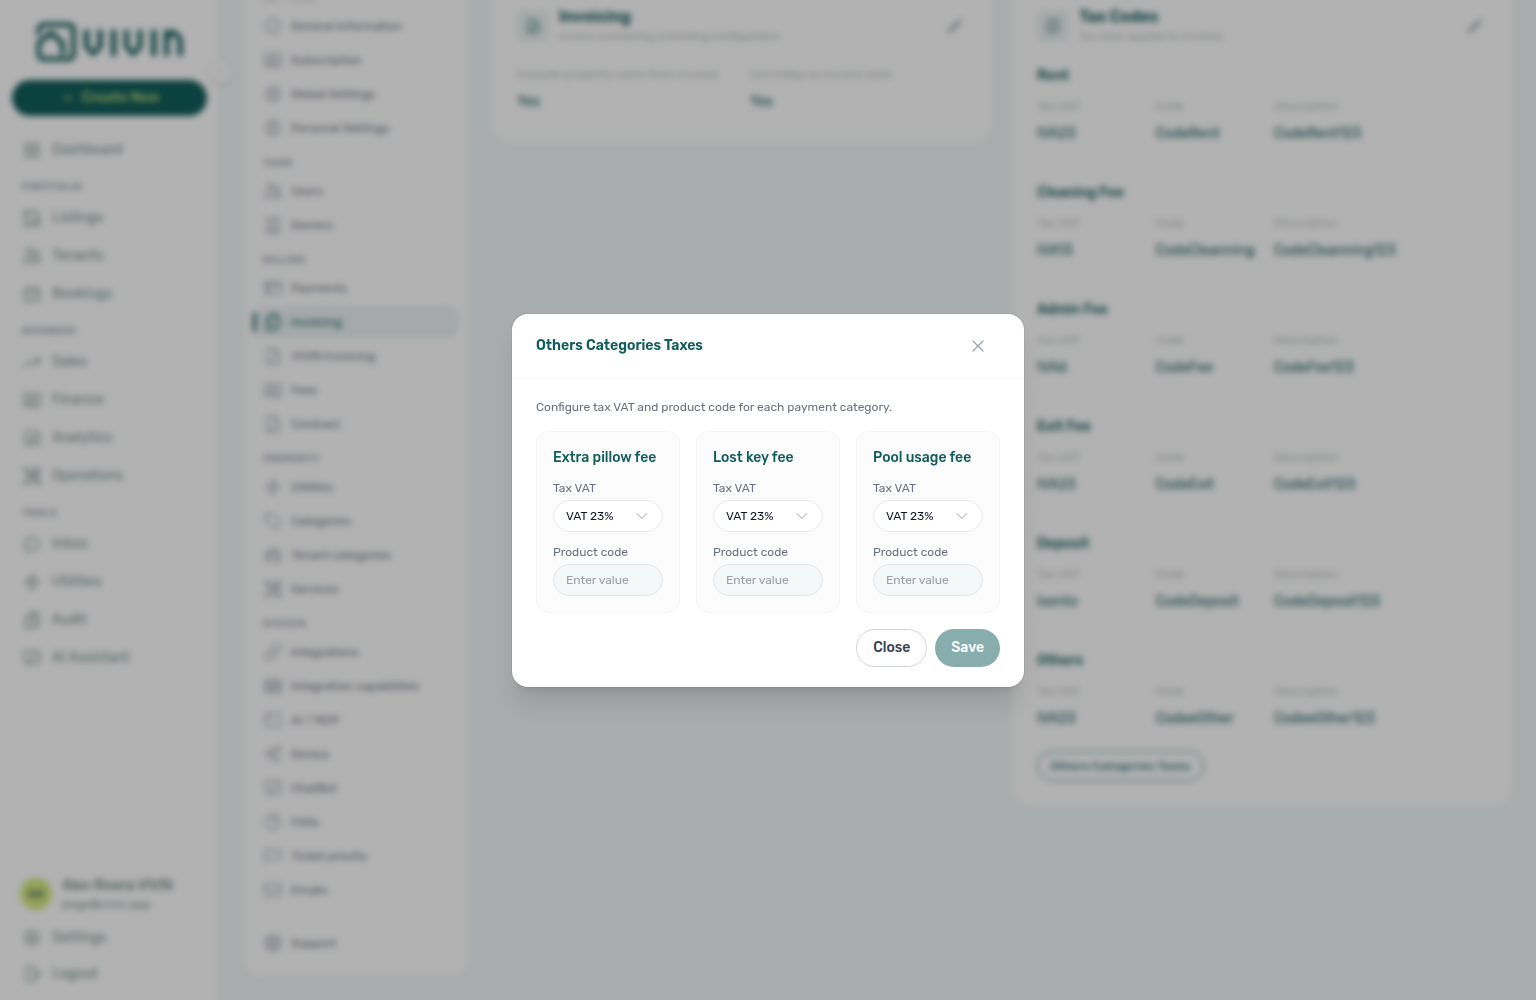
Others Categories Taxes
The Others row on Tax Codes is the default for miscellaneous lines. When you also use Others Items Categories (booking extra charges and Services invoicing categories), open Others Categories Taxes at the bottom of the Tax Codes card to set Tax VAT and optional Product code per category label.
That keeps marketplace and add-charge lines from all falling back to the single Others default when categories need different rates or product codes.
- Create the labels you need under Categories → Others Items Categories first — the modal lists those payment categories (empty state points you back to Categories when none exist).
- On Account Settings → Invoicing → Tax Codes, click Others Categories Taxes (visible in view mode; you do not need to open the Tax Codes pencil first).
- For each category card, pick Tax VAT from your provider catalogue and optionally enter a Product code.
- Click Save to write the mappings, or Close to discard.
Tax VAT options follow the same catalogue as the Tax Codes card (for example VAT 23% / Isento (0%) when VIVIN Invoicing is active). Names must still match rates you defined under VIVIN Invoicing → Tax rates when that provider is connected.
Consult your accountant or local tax authority before you map line types. In many jurisdictions, security deposits use a zero-rate code because they are held in trust. Residential rent may be exempt or reduced depending on country and contract type.
Default invoice date
The Invoicing tab includes a Use today as invoice date toggle (label may read Use today as default invoice date in the UI). This controls which calendar date Vivin sends when your account issues invoices from Finance or related flows.
| Setting | Behaviour |
|---|---|
| On (default) | Each new invoice uses today’s date at issue time. |
| Off | A fixed Invoice date field appears. Pick the date operators should use for all invoices until you change it again — useful for month-end batches or correcting a single posting date across many documents. |
When a fixed date is active, Finance Transactions shows an amber role="status" banner in three places (same copy everywhere): directly above the search field and invoice filter pills (full-width inline on the tab); as a compact toolbar chip in the floating bulk-action row when you select ledger rows that have pending or failed allocations ready to invoice; and again in transaction detail as a full-width strip above Allocations when the open payment has allocation rows. Copy references the saved date (for example “A custom invoice date is set in Settings (1 Jun 2026)…”). See Finance > Transactions for screenshots of each layout. Change the toggle back to on, or pick a new date, then Save on the Invoicing tab.
A fixed invoice date applies workspace-wide, not per booking. Turn Use today as invoice date back on when you want day-of-issue dating again.
In edit mode on the Invoicing section, turn Use today as invoice date off to reveal the Invoice date picker. Save to apply the fixed date account-wide; Cancel discards unsaved edits.
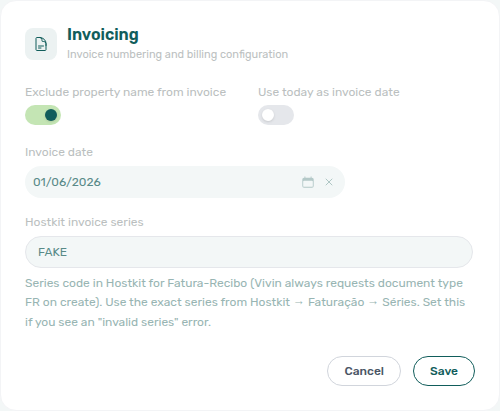
On Finance → Transactions, the same fixed date shows as an amber inline banner directly above the search field and invoice filter pills:

Fixed Invoice date batches pair with Common Workflows — Month-end invoicing (fixed date) (hub matrix — settings-invoicing-invoice-date-toggle.png, finance-transactions-bulk-toolbar-fixed-invoice-date-banner.png), Finance — Month-end invoicing with a fixed date, Portfolio KPI review — Month-end invoicing (fixed date) (Step 7 sign-off), Onboarding a New Property — Month-end invoicing (fixed date) (first month-end on new inventory), and Cancelling a Booking — Month-end invoicing (fixed date) (settlement batch during Step 6b). Turn Use today as invoice date back on after the batch completes.
Hostkit invoice series
This field appears on the Invoicing tab only when Hostkit is connected under Account Settings → Integrations (Hostkit, Invoice-xpress, and NetSuite are mutually exclusive invoicing providers).
| Field | Purpose |
|---|---|
| Hostkit invoice series | Series code in Hostkit for Fatura-Recibo. Vivin always sends document type FR when creating invoices. Copy the exact code from Hostkit Faturação → Séries — mismatches surface as invalid series errors from Hostkit. |

Vivin blocks Hostkit invoice creation when this field is empty or whitespace-only — the product does not call Hostkit with an omitted series (Hostkit would otherwise fall back to its default series and produce documents Vivin cannot reconcile). If you try to issue before saving a series, Finance shows an error such as Hostkit invoice series is not configured for this account. Set Settings → Invoicing → Hostkit invoice series before issuing invoices. Save the exact FR series code from Hostkit, then retry Issue allocation / Invoice selected.
Hostkit identifies each document by series code and numeric id together — the id is only unique within a series. Vivin stores issued references as {series}/{id} (for example 2025/42) and resolves Hostkit API lookups with both values so Finance see invoice links and booking Files PDF tiles attach the correct document. If invoice creation fails or links look wrong, confirm the Hostkit invoice series field matches the active FR series in Hostkit — do not rely on the bare sequence number alone.
Connect Hostkit and add per-listing API keys before relying on automated invoicing — see Integrations — Hostkit. Month-end Issue allocation / Invoice selected on many rows paces Hostkit and retries HTTP 429 — large batches can take several minutes (FAQ — Bulk Hostkit invoicing slow; Finance — Invoice automation).
InvoiceXpress document remarks
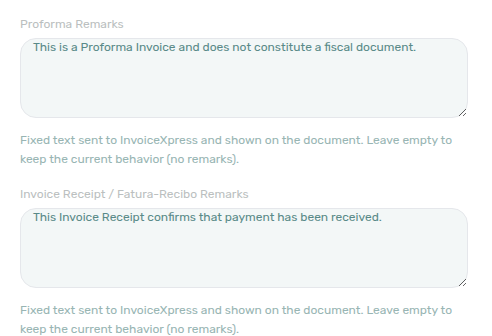
When Invoice-xpress is your active invoicing provider, the Invoicing tab shows two optional remarks fields below the invoice-date controls. They do not appear for Hostkit, NetSuite, or Sage50c — document-level observations are an InvoiceXpress-only feature.
| Field (English UI) | Sent to InvoiceXpress on |
|---|---|
| Proforma Remarks | Proforma documents Vivin creates before final receipt issuance |
| Invoice Receipt / Fatura-Recibo Remarks | Invoice Receipt / Fatura-Recibo (FR) documents when allocations are invoiced |
Each field is a multi-line text area. Vivin trims leading and trailing whitespace but preserves internal line breaks, so you can paste short legal disclaimers or payment confirmations that render on the PDF.
| Setting state | Behaviour |
|---|---|
| Empty | Vivin omits observations on new documents — same as before remarks existed (no change for accounts that leave both fields blank). |
| Filled | The saved text is sent as InvoiceXpress observations on every new document of that type until you clear or edit the field. Proforma and receipt remarks are independent — receipt text never appears on proformas and vice versa. |
Use the Invoicing section pencil control to edit; Save persists account-wide defaults. Cancel discards unsaved edits.
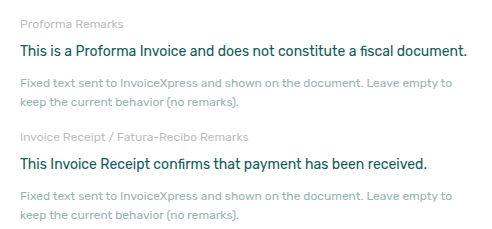
Example copy operators often configure:
- Proforma — This is a Proforma Invoice and does not constitute a fiscal document.
- Invoice Receipt — This Invoice Receipt confirms that payment has been received.
Remarks are not sent to Hostkit or Sage50c. If you switch invoicing providers, the saved remark values remain in account settings but have no effect until you connect InvoiceXpress again.
After you change remarks, only newly issued documents pick up the text. Already-finalized InvoiceXpress PDFs linked from Finance → Transactions or booking Files are unchanged — re-issue only when your fiscal process allows it.
Fees (booking fee toggles and invoice labels)
Fee visibility and custom invoice labels live on Account Settings → System → Global Settings (English tab label Global Settings; this guide still uses Preferences for that page). There is no separate Fees sidebar tab — /settings/fees redirects to Global Settings. Scroll to the Fee visibility and Custom fee names cards.
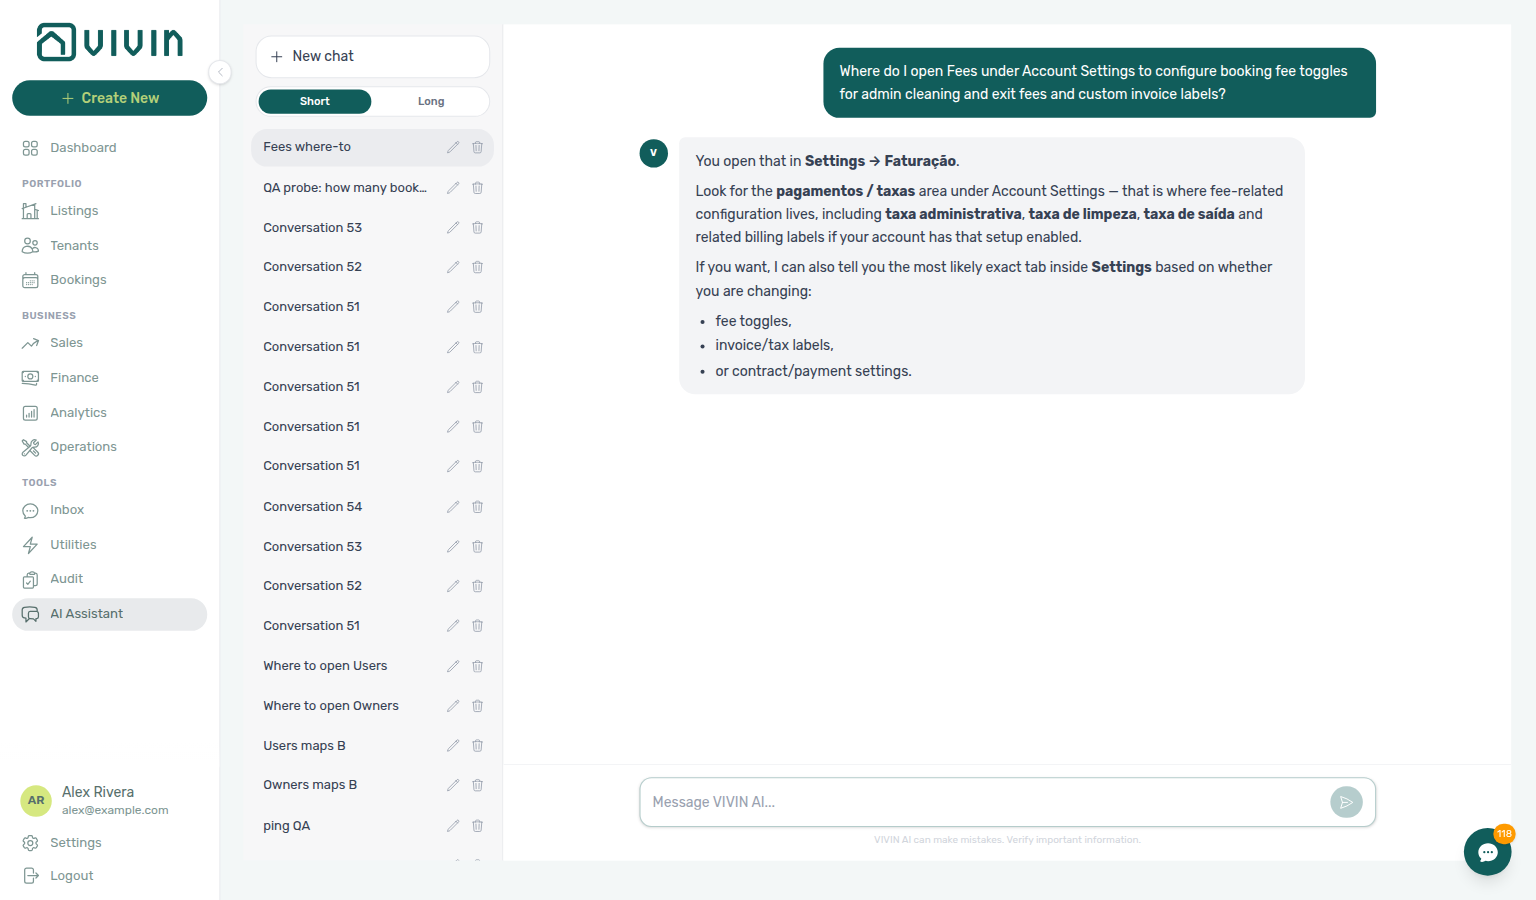
Ask AI Chat “Where do I open Fees under Account Settings to configure booking fee toggles for admin cleaning and exit fees and custom invoice labels?” — then open Global Settings and find the fee cards (ai-chat-product-context-fees-reply.png, ai-chat-product-context-fees-flow.mp4). The assistant may still say Settings → Faturação and point at a pagamentos / taxas area (sometimes naming taxa administrativa, taxa de limpeza, or taxa de saída); follow Settings → System → Global Settings and scroll to Fee visibility / Custom fee names instead — there is no separate Fees sidebar tab. Same grounding external MCP clients get from get-vivin-context-finance (or get-vivin-context-platform). Distinct from due-day / penalty rules on Payments and from line-type VAT on Invoicing. Per-property euro amounts stay under Listings — Contract Information.
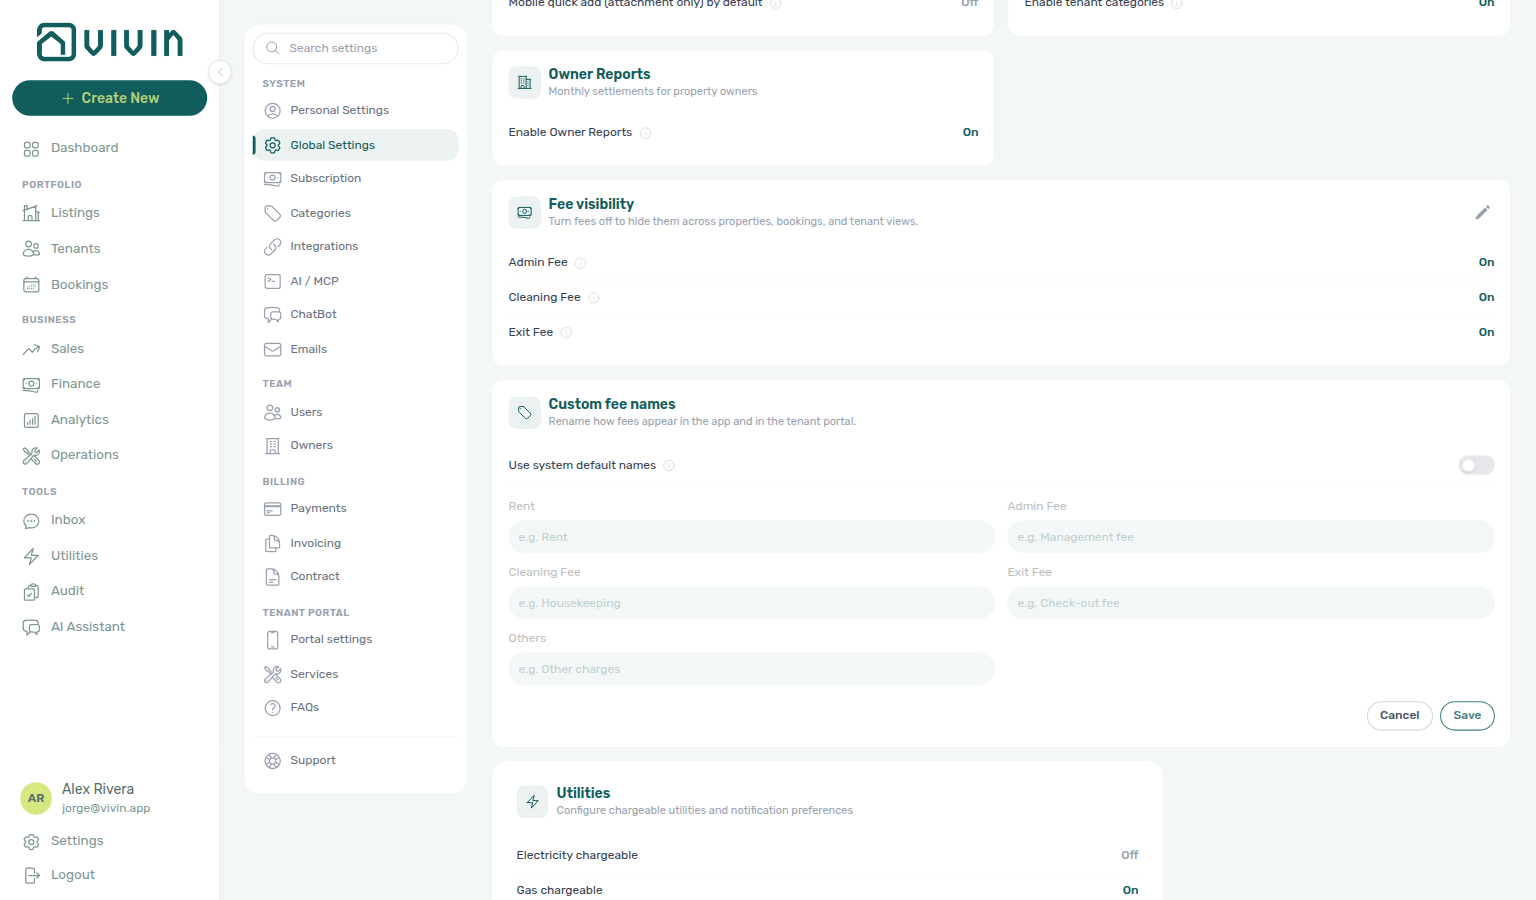
Custom fee names here override tenant-facing labels on Contract templates and the Tenant Portal payment schedule — per-property amounts still live under Listings — Contract Information.
The Fee visibility and Custom fee names cards on Global Settings control whether admin, cleaning, and exit fees are offered on new bookings and how those line types appear on tenant-facing invoices. They do not replace per-property fee amounts in Listings > Extra payments — they set account-wide availability and wording.
Editing these cards is gated by account_settings.fees (separate from other Global Settings cards and Personal Settings — see Users and roles). Without that permission, the fee cards stay read-only or hidden.
Fee availability
The Fee visibility card (subtitle: fees turned off are hidden across properties, bookings, and tenant views) lists three toggles:
| Toggle | When disabled |
|---|---|
| Admin fee | The fee is hidden and not added to new bookings. Existing bookings keep their current admin fee values. Disabling may zero defaults on properties (the product shows a confirmation before save). When on, each property can use a fixed admin fee or Per stay duration tiers in Listings — Contract Information. |
| Cleaning fee | Same pattern for cleaning charges on new bookings. When on, operators still set per-property frequency (monthly vs one-time) under Listings — Contract Information. |
| Exit fee | Same pattern for exit / check-out fees on new bookings. Listing JSON and partner POST /bookings omit this amount — Listings & Availability — Exit fee. |
After a booking exists, operators can still override admin, cleaning, and exit euro amounts on that reservation from Bookings → Contract Info without changing property defaults.
Payment Plan columns — On Bookings → Payment Plan, each fee type gets its own column only when the account toggle is on or that booking already has a non-zero amount for the fee (legacy bookings keep the column after a toggle-off). Deposit and Others columns are always shown. The Total column sums Rent, each visible fee column, Deposit, and Others for that due date — hidden fee columns are excluded from Total, but Deposit always counts so deposit-only rows still align with Paid.
New accounts start with all three fees on (visible and available for new bookings). In view mode each row shows On or Off; use the pencil control to enter edit mode with toggle switches.
In edit mode, an information icon beside each fee label explains the same rules as the table above (hidden everywhere when off, not added to new bookings, existing bookings unchanged). Those hints appear on hover in the product UI.
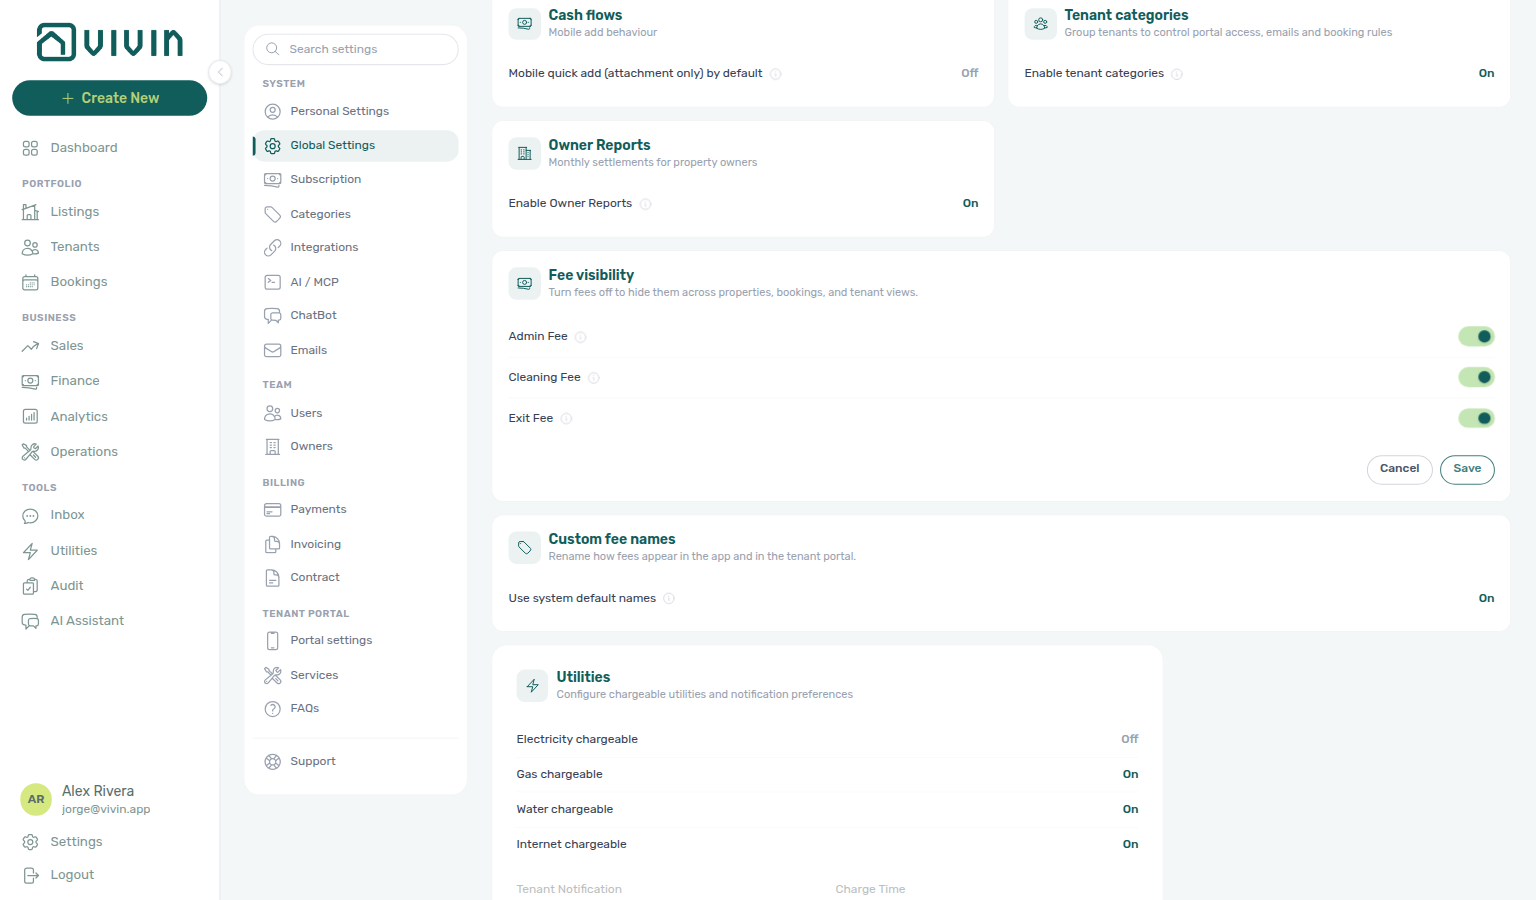
Use the pencil control on the Fee visibility card to edit toggles, then Save. Turning a fee off after it was on opens a warning step before anything is persisted; enabling fees or saving without disabling any fee applies immediately with no extra dialog.
Disable confirmation
When you save after turning one or more fees off, Vivin shows a Disable fee? modal (warning style). The body lists each fee you are disabling. For each fee turned off, the copy follows this pattern (English UI):
- Admin fee — “Turning Admin Fee off will zero out the admin fee on all properties (existing bookings are preserved).”
- Cleaning fee — same pattern for the cleaning fee.
- Exit fee — same pattern for the exit fee.
If you disable more than one fee in the same save, those sentences are concatenated in one modal (one paragraph). The primary action is Yes, disable; while the save runs the button shows Saving....
| Control | Result |
|---|---|
| Cancel | Closes the modal without saving; you remain in edit mode on the card. |
| Yes, disable | Saves the toggle changes and exits edit mode. |
To abandon the edit entirely after canceling the modal, use Cancel on the Fee visibility card — that restores the last saved toggle values.
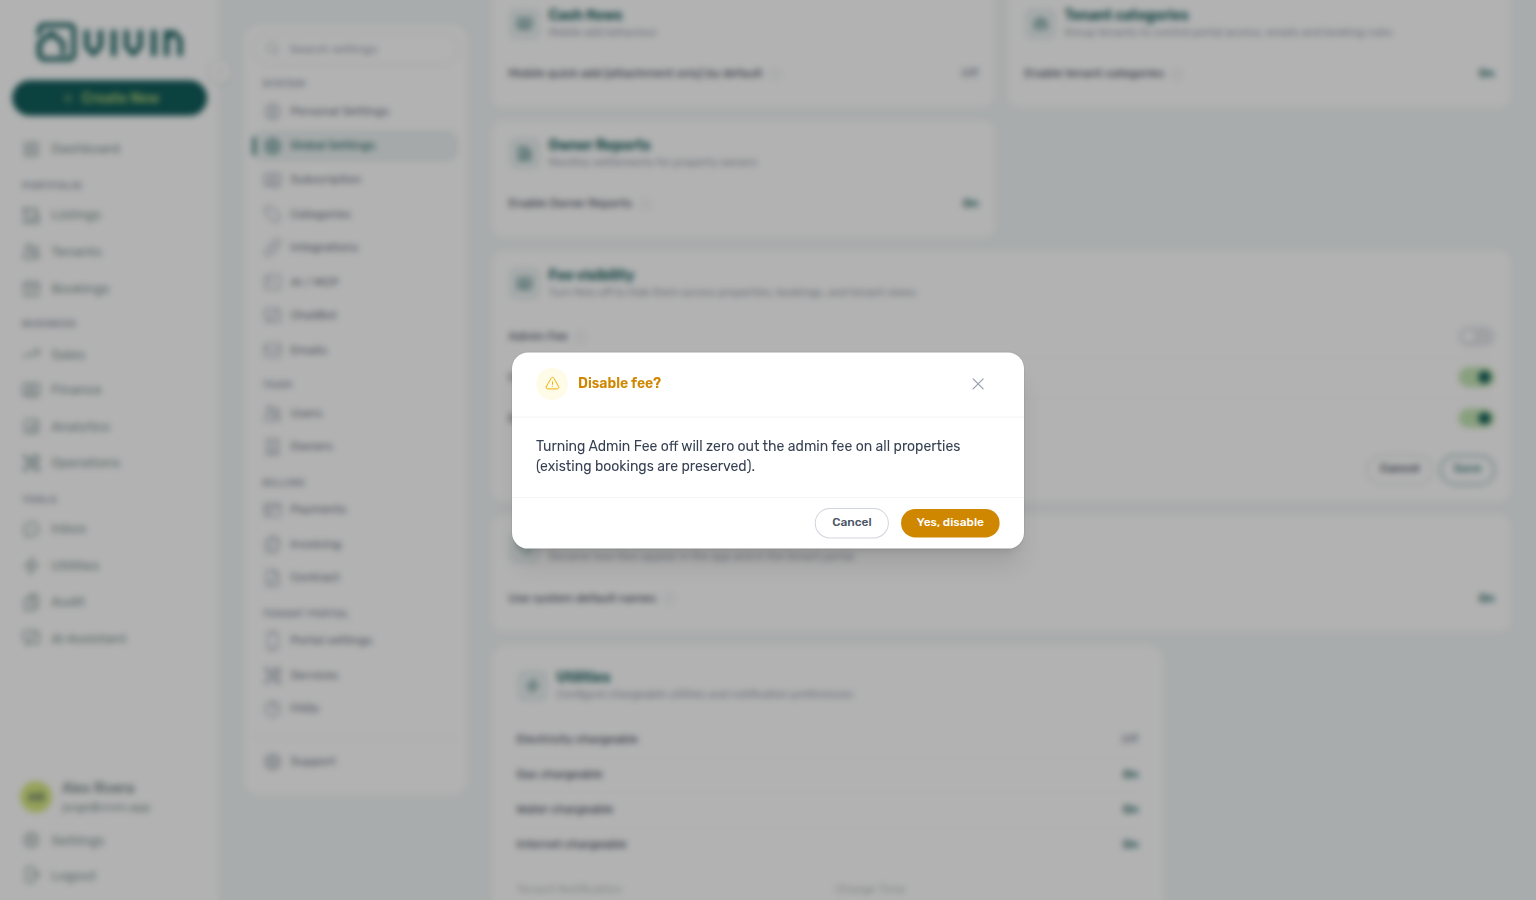
Disabling a fee changes account-wide defaults. On a shared live workspace, prefer a throwaway test account for exploratory toggles, or only open the modal for screenshots and cancel both the modal and the card without confirming Yes, disable.
Invoice line labels
The Custom fee names card (subtitle: rename how fees appear in the app and in the tenant portal) lets you override the text tenants see for:
- Rent
- Admin fee
- Cleaning fee
- Exit fee
- Other items
Choose Use system default names to revert to Vivin’s built-in wording, or turn that off and enter custom names (each up to 60 characters, matching the API validation cap). Labels apply to invoice presentation and tenant-facing fee names; they do not change underlying charge math.
While a fee is off in Fee visibility, the matching Admin fee, Cleaning fee, and Exit fee name fields on this card are disabled until you enable that fee again (hint: “Enable this fee above to edit its name.”). Rent and Other items labels stay editable regardless of fee visibility toggles.
Payments, Invoicing & Utilities section cross-reference
Use the sections above for this settings area. Related setup pages are linked from Related below when present, or from Account Settings.
Related
Related below links this Account Settings tab to modules, workflows, concepts, and escalation paths.
Documentation map & escalation
- Account Settings hub — Tab pairing matrix across workspace configuration
- Payment Allocation — How the two-layer payment model and allocation priority work in detail
- Glossary — Term definitions used across settings and module docs
- FAQ & Troubleshooting — Quick answers when payment or invoicing behaviour does not match expectations
- FAQ — Does picking a second property close the Rent adjustment menu? — Step 2 Select properties / Select categories stay-open
- FAQ — Does opening a booking from Rent adjustment close the preview? — Step 2 teal tenant name opens booking details on top of the preview
- Get Help & Support — Escalate when Hostkit series mapping or virtual IBAN provisioning blocks exports
Upstream & downstream workflows
- Processing a New Booking — Confirmation and check-in payment defaults applied when a reservation is first created
- Handling a Late Payment — Step 1 — Identify overdue charges when penalty rules fire or a payment overdue alert row-click brought you here
- Notification triage — Payment-received and payment overdue in-app alerts when penalty rules fire (Step 4)
- Managing a Check-out & Deposit Refund — Deposit refund timing and invoicing exports after departure-week settlement
- Entering Monthly Utility Bills — Utility overage workflow after Utilities types are enabled on this page
- Portfolio KPI review — Step 7 Finance reconciliation when payment priorities and invoice exports disagree with ledger rows
- Cancelling a Booking — Settlement receipts and refund types during partial-refund cancellations
Deeper workflow reads
See Upstream & downstream workflows above for the same guides.
Related Account Settings tabs
- Contract templates — PDF wording vs Custom fee names labels on Global Settings
- VIVIN Invoicing — Built-in provider Tax rates catalogue that feeds Tax Codes when VIVIN Invoicing is active
- Categories — Others Items labels listed in Others Categories Taxes
- Categories — Bookings — Booking tags that populate Rent adjustment Select categories (stays open on Step 2)
- Services — Marketplace rows whose Invoicing category resolves VAT via Others Categories Taxes
- Integrations — Hostkit series mapping and platform virtual IBANs paired with invoicing exports
- Preferences — Move-in requirements, auto-cancel, deposit disputes, and portal toggles paired with due-date settings
- Preferences — Enable deposit disputes — Account toggle before operators use Mark as Disputed on booking deposits
- Preferences — In-app notifications — Account-wide Payments alert masters paired with penalty settings
- Emails — Payment due-date and debt-threshold Communication Rules tied to deadlines configured on this page
Operator modules
- Finance module — Where payments, deposits, and invoices are tracked
- Finance — Transactions tab — Ledger Reject selected and Issue allocation behaviour driven by settings on this page
- Finance — Deposits — Portfolio refund queue governed by Deposit Refund Limit configured on this page
- Bookings — Confirmation and check-in payments — Per-property overrides on top of account defaults here
- Bookings — Discounts and payment adjustments — Line-level reductions on Contract Values after priorities are configured here
- Bookings — Changing contract dates and rent — Single-booking Change monthly rent vs portfolio Rent adjustment on this tab (Select properties / Select categories stay open; View booking details stays on the preview)
- Listings — Contract Details — Where Confirmation and Check-in Payments are configured per property
- Utilities module — Where utility bills and overage calculations are managed
- Audit — Discounts tab — Portfolio-wide discount triage and CSV/Excel export
Deeper concept reads
- Tenant Portal — Custom fee names and Fee visibility labels tenants see on the payment schedule
- FAQ — Tenant contract signing blocked — No PDF yet, mandatory Your Details gates, category locks, or Lease purpose; portal signing vs paper upload on Contract Info
- Services Marketplace — Ancillary charges on Payment plan after fee types are enabled on this tab
- Integrations & Distribution — Hostkit invoice series and Invoice-xpress keys pair with invoicing connections on the Integrations tab
- Integrations — Billing from the invoicing connection — Connecting a provider turns invoicing on; this tab maps Tax Codes after that
- Payment Allocation — Two-layer receipts, invoiced-floor rent edits, and credit note reject/revert warnings
- Booking Lifecycle — Computed status model for stays whose payment schedules follow settings on this page
Companion API guides
- API Reference hub — Hub pairing matrix across integration guides
- Booking lifecycle validations — Payment schedule created when bookings are accepted via the integration API
- AI usage API —
utility_bill_extractionledger rows when Utilities Upload PDF runs at month-end
Module documentation hubs
- Bookings — Operator UI for reservations whose payment plans follow account defaults here
- Listings — Property wizard and per-property payment overrides
- Sales — Portfolio availability and channel manager connections
- Operations — Maintenance tickets, cash flows, and check-in/out coordination
- Dashboard — Post-login KPI snapshot with bell notification triage
- Analytics — Month-range portfolio KPI charts
- Tenants — Tenant directory and With Debt segmentation
- Inbox — Portfolio-wide WhatsApp workspace
- Notifications — Full
/notificationshistory - Notifications — Payment overdue alerts (in-app) — Operator Payments category rows when scheduled charges are overdue
- AI Chat — AI Assistant for portfolio Q&A
- Audit — Portfolio-wide Manual Blocks and Discounts review
- Booking engine details — Rich marketplace payload editor via the Full integration pill
- Properties workspace — Legacy
/propertiesURL redirects into Listings
Operator habit hubs
Day-to-day operator habits (lockout catch-up, pending receipts, payment triage, handoffs, and related playbooks) live on the Common Workflows habit hub.
Deep-link anchors for habit hubs
Pending manual receipt approval
Reject/revert mistaken receipts
Lockout catch-up after password recovery
Portfolio segmentation by tenant category
Notification row-click navigation
Payment alert to receivables triage
Confirmation alert triage
Finance debt receivables triage
Handling a Late Payment collections
Finance Income status drill-down
Cash flow forecast drill-down
Key glossary terms
- Credit note (payment reject/revert) — Accounting follow-up when Reject / Revert clears already-invoiced charges; concept walkthrough: Payment Allocation — Correcting mistaken receipts; workflow hub: Common Workflows — Reject/revert mistaken receipts
- Invoiced floor (rent) — Rent edits blocked below exported invoice totals after Issue allocation / Invoice selected
- Glossary — Rent adjustment — Portfolio percentage raise on Payments; Step 2 Select properties / Select categories stay open and View booking details stays on the preview
- FAQ — Lower rent below invoiced — Change monthly rent clamps and Contract Values → Edit amount blocks net below exported invoice totals; use credit notes in accounting when you truly need a reduction
- Glossary — Fixed invoice date — Account-wide Invoice date before bulk Issue allocation / Invoice selected; amber banner on Finance → Transactions until you turn Use today as invoice date back on
- Glossary — End-of-Booking cost split — Charge Time → End of Booking splits daily overage across every occupied unit; still-staying roommates stay in the denominator
- Glossary — Change history — Operator-initiated edits on Listings setup and Bookings Changelog; create-time defaults excluded
- Glossary — Full term list