Users
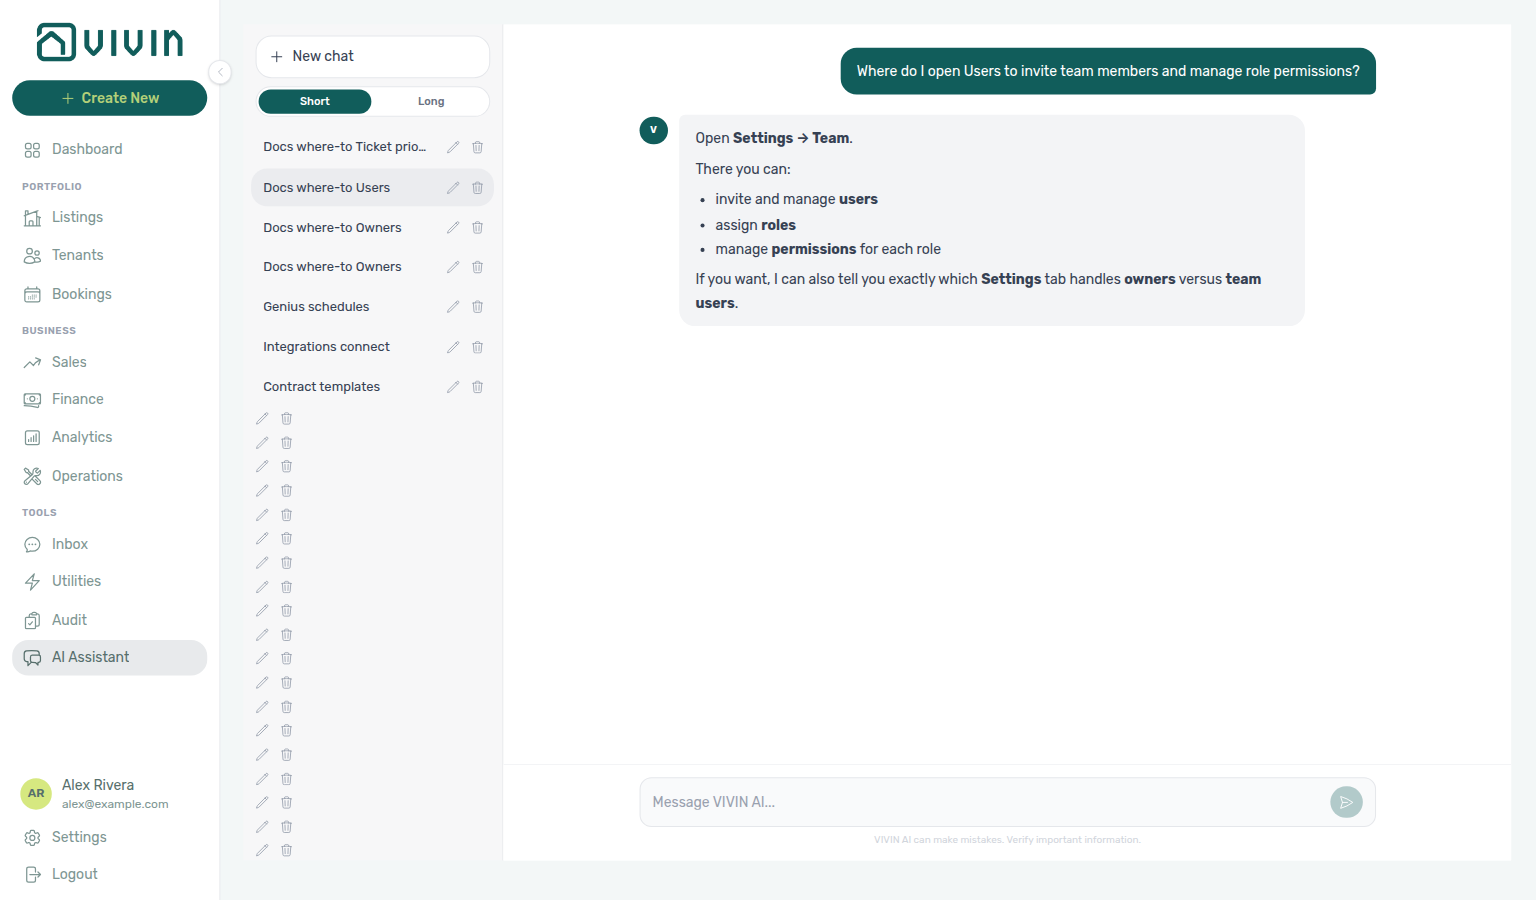
Ask AI Chat “Where do I open Users to invite team members and manage role permissions?” — then open this Users tab (ai-chat-product-context-users-reply.png, ai-chat-product-context-users-flow.mp4). The assistant typically says Settings → Team (invite and manage users, assign roles, manage permissions) and may stop before naming the English Users tab — open Settings → Team → Users. Same grounding external MCP clients get from get-vivin-context-platform. Distinct from landlord records on Owners and from your own name fields on My Profile.
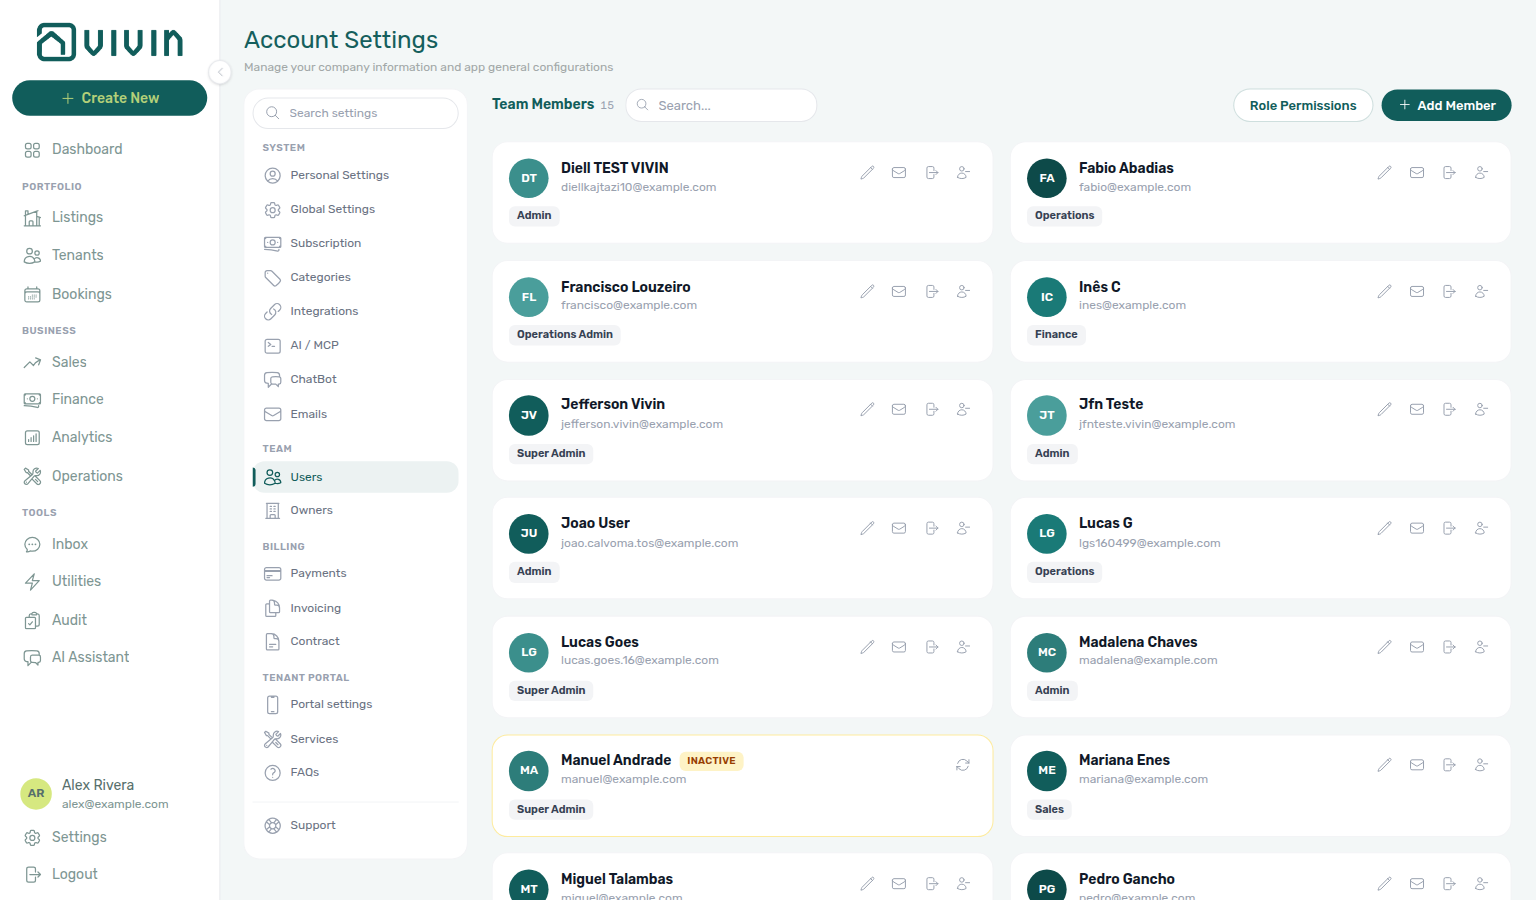
The Users tab manages team members (your staff): who can access your Vivin account and what they are permitted to do through their role. Property owners are a separate concern — register and maintain them on the Owners tab (/settings/owners), not on this page.
Complete Getting Started — Recommended Setup Sequence step 3 (this tab — team roles before greyed-out + Create New shortcuts) after steps 1–2 on General Information and Preferences — full tab map: Recommended setup order. Finish steps 13–15 in Listings, Bookings, and Tenants, then Onboarding a New Property — Step 7. Guided steps 4–12: Onboarding a New Property. Lockout catch-up: Getting Started. Workflow pairing after go-live: Account Settings — Setup sequence after go-live.
Start with Team Members invites, then audit Role Permissions before go-live. Property owners are on Owners — not this tab. Operational rules: Key Rules. Habit-specific shortcuts live under Related below.
Prerequisites
- An active Vivin account with Settings access that includes the Users tab (typically Super Admin or Admin; other roles may see this tab read-only or not at all depending on your permission matrix).
Open this tab at platform.vivin.app/settings/users. It lives under Account Settings in the app shell (gear / account entry), in the Team section of the settings sidebar. See Deep Links for neighbouring routes such as Owners (/settings/owners).
Register landlords on Owners before Listings property setup, and point each teammate to Personal Settings (/settings/personal) for interface language and per-user notification opt-outs. Grant account_settings.module (see Role Permissions) before scripting AI usage API polls — integration Bearer keys return 401. Hub: Recommended setup order.
Team Members
New invites should complete Getting Started — Accessing the Platform — pair role changes with Role Permissions before finance or settings access goes live.
Team members are the people in your organization who use Vivin. Each member has a role that determines their permissions across all modules.
Adding a Team Member
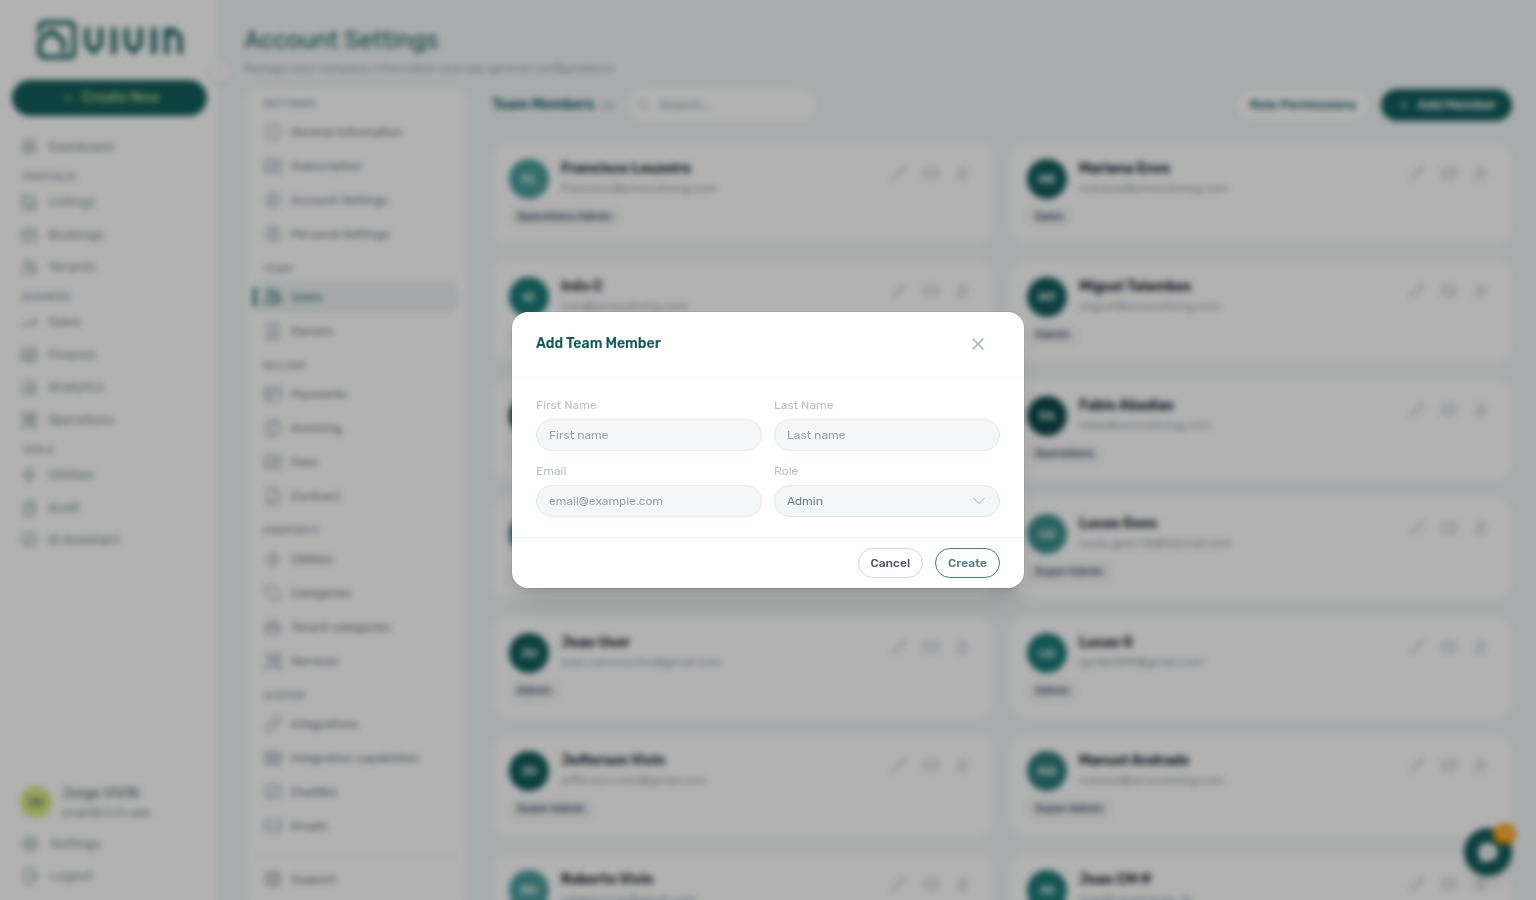
To add a team member, click Add Member (the primary button with a plus icon in the Team Members header). The dialog title is Add Team Member. Fill in:
- First Name, Last Name, and Email — the member will receive an email invitation to create their account
- Role — select from your available roles (see Role Permissions below)
The Add Team Member dialog does not include a phone field. After the invite is created, open the member’s card and set Phone Number under Editing a Team Member to link WhatsApp Genius.
The Invitation Flow
When you add a team member:
- The system sends an invitation email to the address you provided.
- The new member clicks the link in the email to set their password and activate their account — or, when the hub shows Sign in with Google, they can open platform.vivin.app and use the Google account that matches this invite email (even before they set a password).
- Once signed in, the member sees only the modules and actions allowed by their role.
Use the same email you expect them to use with Google if your team relies on Sign in with Google. Changing the Users email later means they must sign in with the new address (Google or password).
If a team member says they did not receive the invitation email, check the spelling of the email address in the team member list. You can resend the invitation from the member's detail view.
Available Roles
| Role | Typical Access Level |
|---|---|
| Super Admin | Full access to all modules and settings, including the ability to add/remove team members and change financial settings. |
| Admin | Full operational access to bookings, listings, finance (see note), sales, and operations. Cannot modify account-level settings. |
| Finance | Strong access to Finance (Overview, Income, Contract Values) and limited Bookings/Listings. Transactions / Payouts / Deposits require Approve payments unless your role matrix grants it. |
| Sales | Access to Sales (pricing, channels), Listings, and Bookings. No Finance or account settings. |
| Operations Admin | Access to Operations (tickets, check-ins/check-outs) and limited Bookings. Sees all maintenances. |
| Operations | Access to Operations with own maintenances only. No Bookings sidebar or Finance. |
Default presets for Admin and Finance roles do not include Approve payments. Users with those roles still see Finance Overview, Income, and Contract Values, but not the Transactions, Payouts, or Deposits tabs until Approve payments is turned on for their role (or a custom permission profile) in Role Permissions. Super Admin always has full Finance access. On Transactions, Reject selected and Revert payment show accounting follow-up copy when charges may already be invoiced — see Glossary — Credit note (payment reject/revert). Rent edits on bookings respect the invoiced floor once months are exported — see FAQ — Lower rent below invoiced.
Editing a Team Member
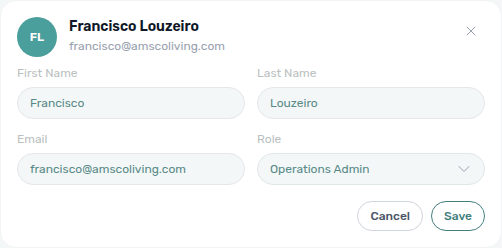
Click Edit on a team member card to open that member’s inline detail state. From here you can:
- Change their role — the new permissions take effect immediately the next time the member navigates to a page or refreshes. There is no need for them to log out and back in.
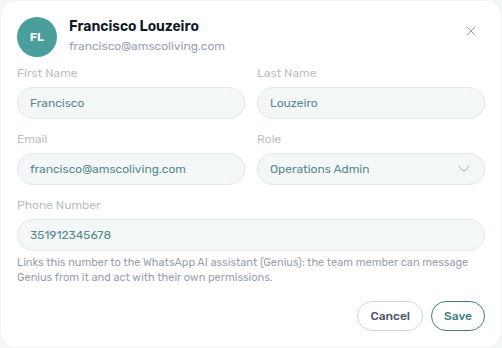
- Update their first name, last name, email, or Phone Number — if their email address changes, update it here so they continue receiving system notifications. See WhatsApp Genius phone linking below for the optional Phone Number field.
- Resend password reset email — if a team member is locked out, click the envelope icon on their card (tooltip Resend password) to send a new recovery link to their email. This is the admin-assisted path when self-service reset at platform.vivin.app/reset-password is not enough — see Resetting a Management User Password.
WhatsApp Genius phone linking
Landlord-side Genius is separate from the tenant ChatBot. Concept overview: Automation & AI — WhatsApp Genius. Troubleshooting: FAQ — Genius does not recognize my number.
After the teammate exists, open Edit on their card and set Phone Number (optional):
- Enter digits in international format (country code + number, no spaces required — the UI formats the badge).
- Read the helper under the field: it explains that the number links to the WhatsApp AI assistant (Genius) so the member can message Genius and act with their own role permissions.
- Click Save. Each phone can link to one user per account while set — saving a number already linked to another teammate returns an error.
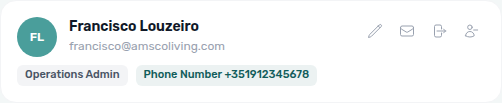
- In view mode, the card shows a teal Phone Number badge with the formatted international number. Hover the badge for the tooltip Linked to the WhatsApp AI assistant (Genius). Clearing the field and saving unlinks Genius for that user.
Deactivating or Removing a Team Member
When a team member leaves your organization:
- Open their detail view and remove or deactivate them.
- Their account is immediately locked — they can no longer log in.
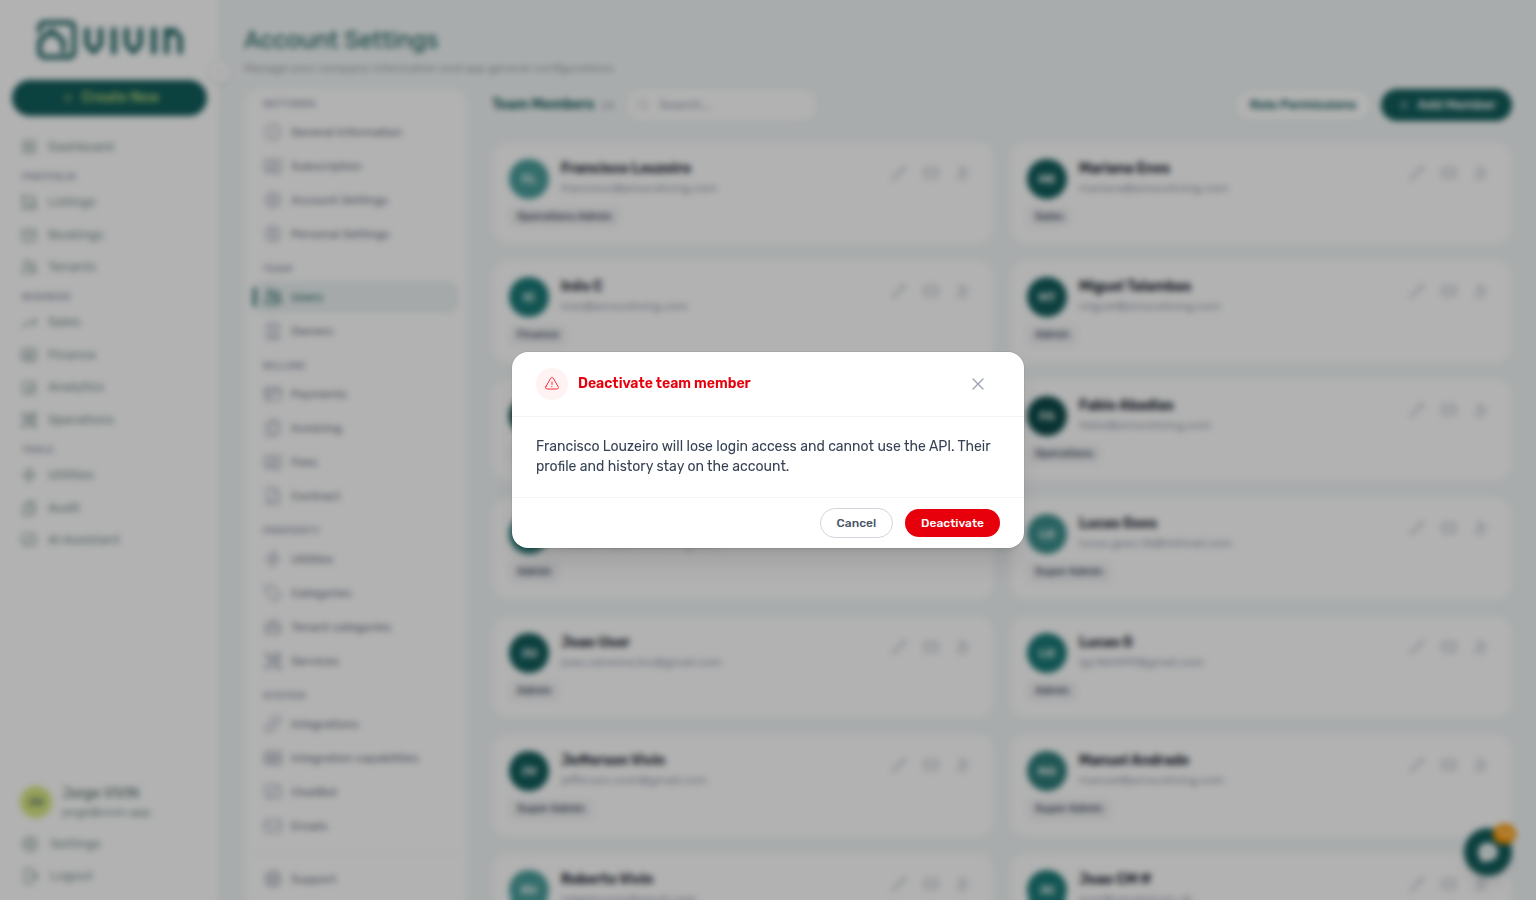
The product asks you to confirm before deactivation so you do not lock out the wrong person. The dialog names the member and explains that they will lose access immediately; choose Deactivate to proceed or Cancel to keep the account active.
Removing a team member does not delete their historical activity. Bookings they created, payments they recorded, and tickets they resolved remain in the system with their name attached for audit purposes. However, any tickets currently assigned to them will need to be reassigned manually — check the Operations > Tickets tab for open tickets under their name.
Owners
Owner records are edited under Account Settings > Team > Owners (/settings/owners), not inside the Users tab. The guidance below matches that screen.
Property owners are the individuals or companies that own the properties you manage. Adding owners there allows you to:
- Associate properties with their correct owner
- Generate owner statements and payout records
- Display owner details on contracts and legal documents
Adding an Owner
When adding an owner, fill in:
| Field | Description |
|---|---|
| Name | The owner's display name. |
| Legal Name | (Optional) The owner's full legal name as it should appear on documents. |
| The owner's email address for correspondence. | |
| Phone | (Optional) Contact number. |
| Fiscal ID / NIF | The owner's tax identification number (VAT), required for invoicing and legal documents. |
| Address | (Optional) The owner's registered address, used on contracts and payment statements. |
| IBAN | (Optional) The owner's bank account for payout transfers. |
An owner record must exist before you can create a property assigned to that owner. If an owner is not in this list, the Owner dropdown in the property creation wizard will not show them.
When an Owners email matches a Users invite (either order), that teammate’s login becomes owner-linked: portfolio modules and Inbox only show that landlord’s properties. Use distinct emails when a staff user should keep full-account access.
Editing an Owner
Click on any owner row to update their details. Common reasons to edit an owner record:
- IBAN change — the owner has a new bank account for payout transfers
- Fiscal ID update — the owner's tax information has changed
- Address change — update for accurate contracts and invoices
Changes to an owner's details (name, fiscal ID, address) affect future documents only. Contracts and invoices that have already been generated retain the values they were created with.
Owner Visibility on Documents
Owner information is used in several places:
- Contract templates — Single-brace tokens such as
{OwnerName},{OwnerFiscalId},{OwnerFiscalAddress},{OwnerEmail},{OwnerPhone}, and{OwnerIdDocumentType}pull from the owner record on the booking’s property. There are no{{OwnerFullName}}/{{OwnerAddress}}double-brace aliases — use the catalogue names above (see FAQ — Owner contract tokens). - Finance > Payouts — Payout records display the owner name and property.
- Property detail view — The owner is displayed in the property's General Information tab.
Role Permissions
Approve payments and communication.send_now gates control Finance — Transactions and Emails — Send now — audit the matrix before month-end collections. Deposit bookings.refund / bookings.dispute permissions pair with Glossary — Deposit lifecycle status on Finance → Deposits and booking Deposit tab.
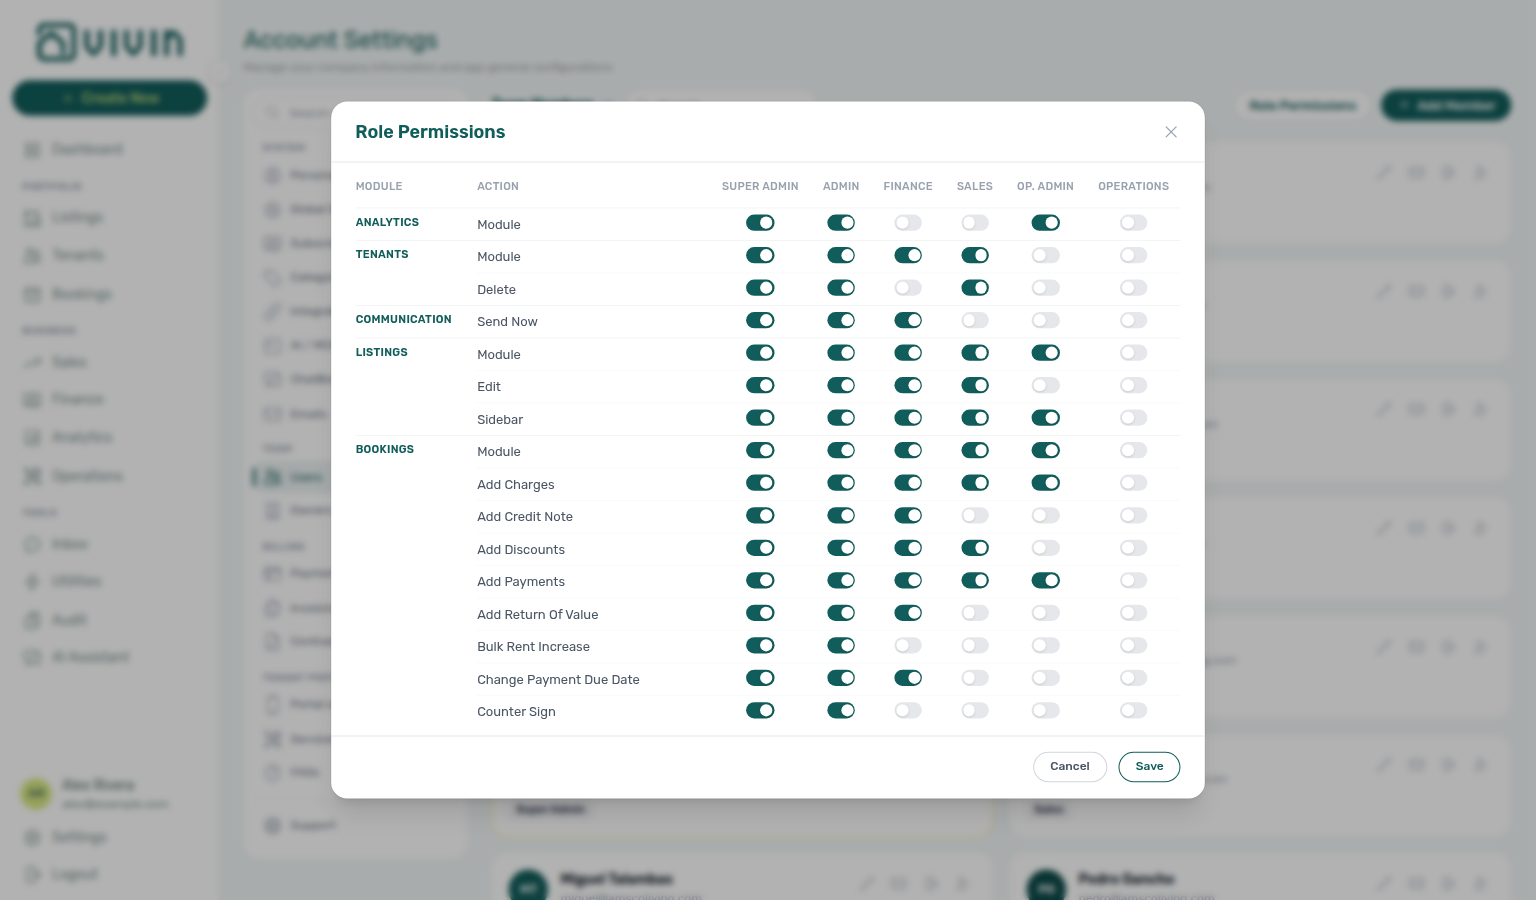
Click the Role Permissions button to open a full permissions matrix. This table shows, for every role, exactly which actions are allowed or blocked across each module. Common permission categories include:
- Listings: View, Create, Edit, Delete properties and units. Shared property/unit pickers used from Operations, Bookings, Sales, Utilities, and Finance are not gated by Listings module access — they use dedicated picker allowlists so an Operations (or Finance) teammate can name a building or unit on a ticket, filter, or bill without receiving the whole Listings module.
- Bookings: View, Create, Edit, Cancel bookings;
bookings.edit_items(edit or delete scheduled charge lines on Contract Values);bookings.change_payment_due_date;bookings.bulk_rent_increase(Bulk Rent Increase — Rent adjustment on Payments; default Admin on, default Finance off);bookings.add_discounts(per-line and booking-scoped discounts);bookings.add_return_of_value(return-of-value adjustments on Contract Values — not-invoiced cash only; see Manage return of value);bookings.refund(record deposit refunds and transfers on the booking Deposit tab and from Finance → Deposits);bookings.dispute(mark or resolve deposit disputes when Enable deposit disputes is on) - Sales: Pricing and channel integrations
- Finance: Module access, payment actions, Approve payments (ledger tabs: Transactions, Payouts, Deposits; see Finance module), and Assign payments to other bookings (move an in-payment to another booking in the same account — including a booking that belongs to a different tenant — from Finance Transactions or a booking Transactions tab — see Finance > Assign a payment)
- Operations:
operations.module— open Operations;operations.see_checkin_checkout— Check-in & Check-out tab and/operations/check-in-out(without it, the tab is hidden and that URL redirects to Overview);operations.planning— Planning day dispatch board and/operations/planning(Planning (schedule board) — off by default for every role; grant it for supervisors who assign work on the board — see Operations — Planning);operations.see_all_maintenancesvsoperations.see_own_maintenances— whether Tickets lists every maintenance or only rows assigned to the signed-in user; create/resolve ticket actions follow the broader Operations rows in the matrix. Ticket Category options and the resolution-proof rule load from a maintenance-settings endpoint that Operations roles can call without Account Settings access. - Utilities:
utilities.module— open the Utilities module;utilities.edit_connections— edit contract IDs on Utilities → Connections (without it, the matrix is read-only with an amber banner) - Settings: View and Edit account-level settings — including granular tabs such as
account_settings.personal(Personal Settings: interface language, your email preferences, tab order, Operations ticket columns) andaccount_settings.fees(Fees: fee visibility and custom invoice labels on Global Settings — not a Billing sidebar tab). Preferences (account_settings.preferences) remains separate for workspace defaults (notifications, auto-cancel, contract signing, and similar). - Communications:
communication.send_now— use the Now filter and create or run immediate-send communication rules (Emails > Communication Rules). After a blast, the rule is Inactive on Now while queued messages still send — Send now is fire-once. - Chatbot:
account_settings.chatbot— view and edit Account Settings → System → Chatbot (tenant-facing WhatsApp/email automation; see Automation & AI). On by default only for Super Admin; a Super Admin can switch it on or off for any other role. It works on its own: a role does not also need Account Settings → Module to open ChatBot and FAQs. - AI / MCP:
account_settings.mcp— the role may open Account Settings → System → AI / MCP, use Tools → AI Assistant and connect an external AI client (AI / MCP settings); without it the assistant gets no tools at all. On by default for Super Admin and Admin, off for the other roles. Editing the account-wide Landlord MCP tool permissions, API keys, and per-user AI overrides additionally requires the Admin or Super Admin role: every other role with this flag opens the tab read-only — My permissions for its own effective access plus the connection card — and the API refuses the management calls. - Support:
support.module— open Help & Support (floating control on desktop), the Support entry in Account Settings, and/settings/supportroutes. In the matrix this row is under the Support group. Only Administrator and Super administrator roles can be assigned Support; other presets cannot enable it even if toggles appear during editing. A user may have Support without any Account Settings tab permissions — they then see the support-only browse layout at/settingsinstead of editable tabs.
Use this matrix to verify that each team member's role matches what they need access to — and nothing more.
Follow the principle of least privilege: assign each team member the most restrictive role that still allows them to do their job. For example, a cleaning coordinator only needs the Operations role — they do not need access to Finance or Settings.
Blocked actions in the app
Vivin enforces role permissions on the server for every mutating API call. When a signed-in user tries an action their role cannot perform — saving a booking change, approving a payment, editing Settings, and so on — the management app shows a red error toast:
You do not have permission to perform this action.
The message is localized with your interface language (English default). It replaces the generic API Forbidden resource text so operators get a clear explanation instead of engineering jargon.
| Outcome | What you see |
|---|---|
| Generic RBAC denial | The localized toast above |
| Specific business rule | The API’s own message (for example validation when a booking cannot be cancelled) |
Role Permissions hides or disables many controls up front (+ Create New greys out rows you cannot use; Finance Transactions tabs stay hidden without Approve payments). Other surfaces still render buttons that look available until you click them — a 403 at save time means the signed-in role lacks the granular key for that API route. Ask an administrator to adjust the matrix in Role Permissions; changes take effect on the user’s next page load — no logout required.
See FAQ — Permission denied toast.
Interface overview
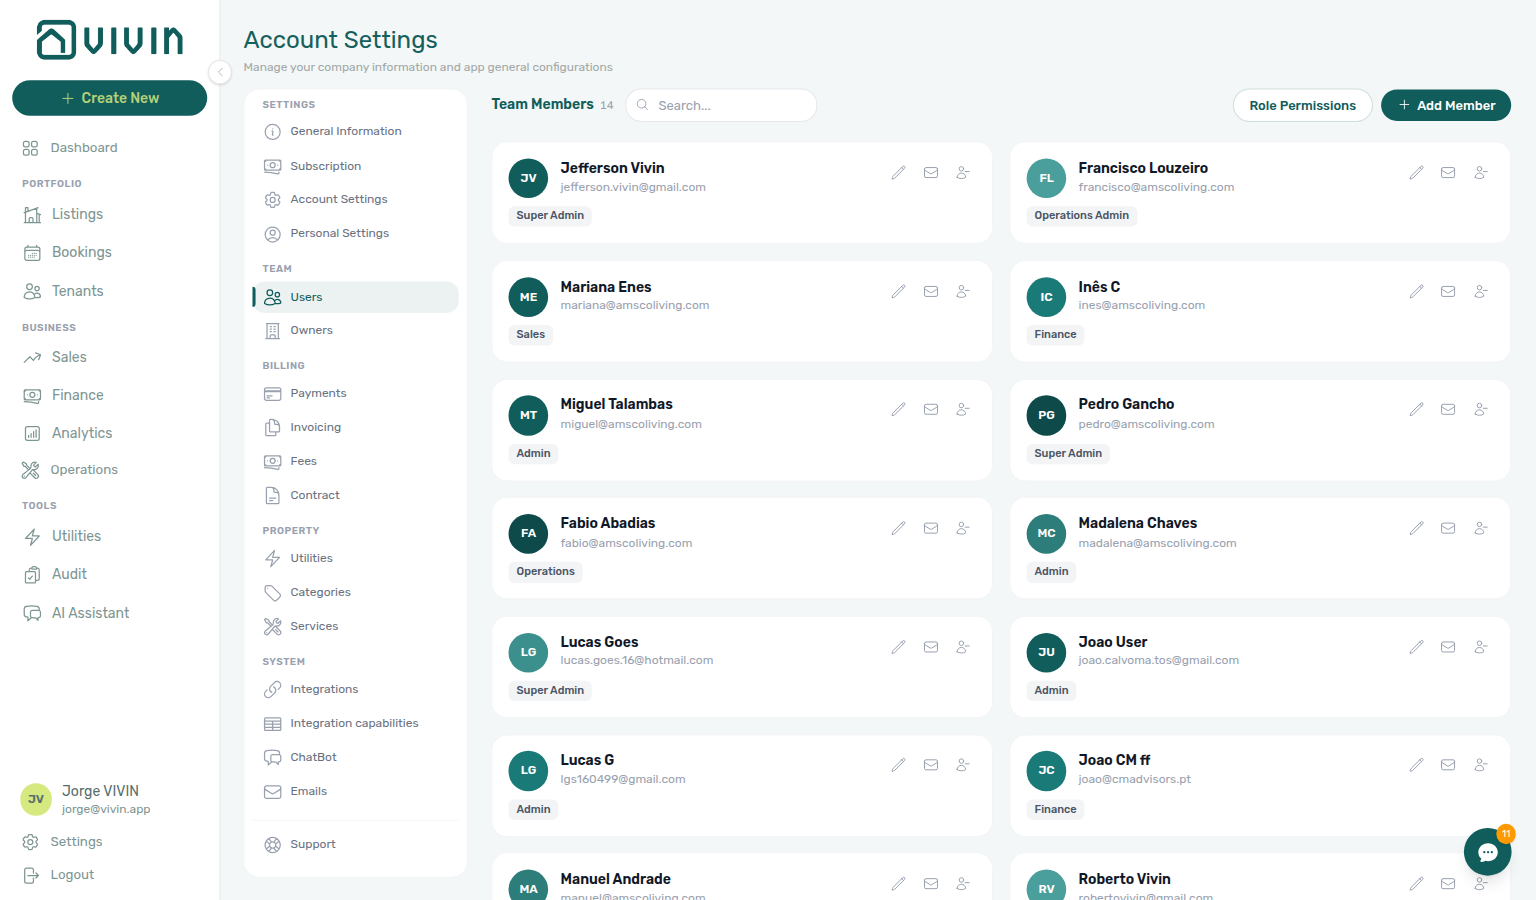
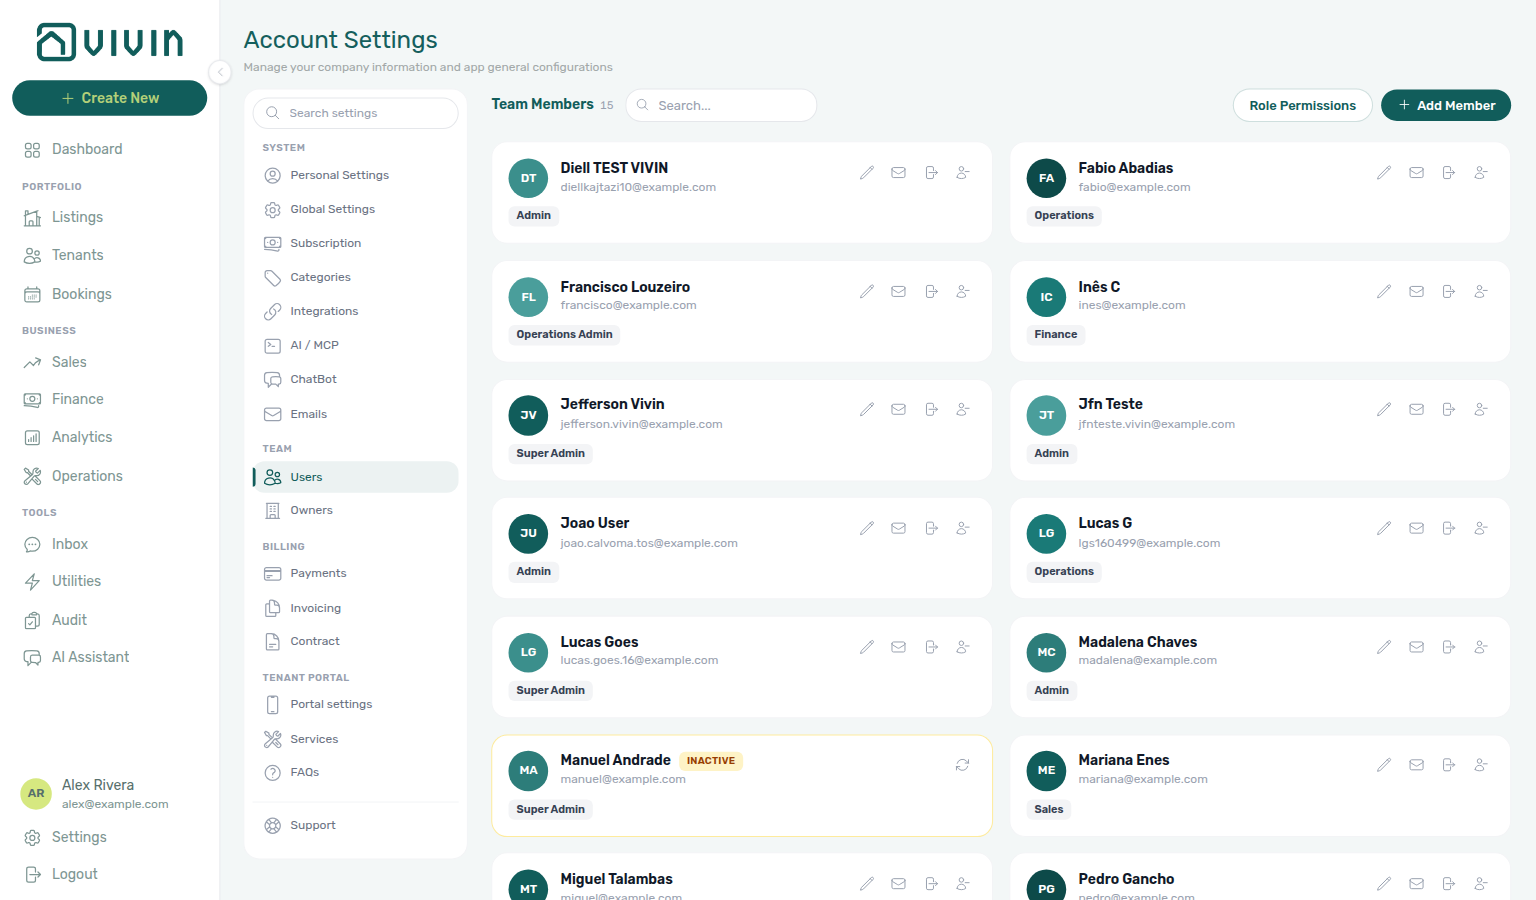
The section header uses the product title Team Members with a count of members next to it. The main surface is a responsive card grid (one card per person). Each card shows avatar initials, name, email, role, and status, with Edit for inline changes, invitation resend, or deactivation. The Search… field beside the title filters cards by name or email.
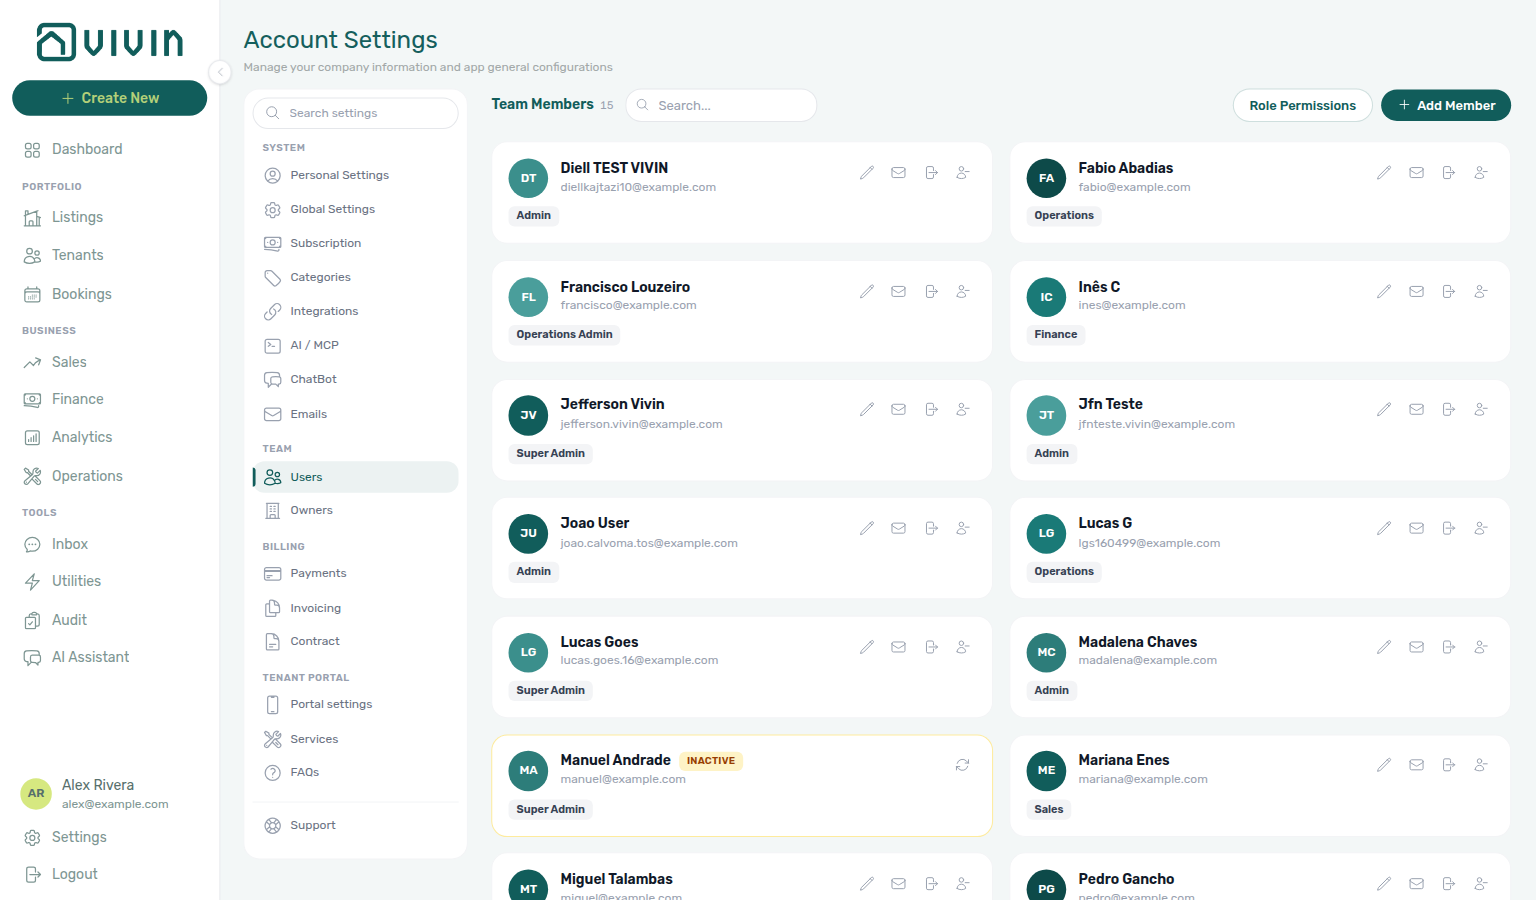
Toolbar (right side of the Team Members header)
- Role Permissions — outline pill; opens the full permissions matrix modal (grouped rows by module, columns per role) so you can review or adjust what each role may do, within what your own role is allowed to change.
- Add Member — filled primary action; opens the invite form (first name, last name, email, role) titled Add Team Member.
For the property-owner list and forms, use the Owners tab; see the Owners section above for field meanings and business rules.
Screenshots
Team Members (/settings/users) — card grid with search, Role Permissions, and Add Member in the section header (full app shell):
Role Permissions — matrix of modules and actions by role (Super Admin, Admin, Finance, Sales, Operations Admin, Operations); use toggles to adjust what each role may do within what your own role is allowed to change:
Key Rules
Deactivating a teammate preserves audit history but leaves Operations — Tickets assigned rows orphaned — reassign open tickets before removal.
-
Roles take effect immediately. When you change a team member's role, the new permissions apply on their next page load — no logout required.
-
Owners must exist before properties. You cannot assign an owner to a property unless they are registered here first. Plan your owner setup before onboarding properties.
-
Removal does not erase history. Deactivating or removing a team member preserves all their past activity for audit purposes. Only their future access is blocked.
-
Reassign open tickets after removal. When removing a team member, manually reassign any tickets still assigned to them to prevent tasks from being forgotten.
-
Owner details feed into contracts and payouts. Keep owner records up to date — especially fiscal IDs and IBANs — to ensure accurate document generation and payment processing.
-
Blocked saves show a permission toast. When the API denies an action for RBAC reasons, operators see You do not have permission to perform this action. — adjust Role Permissions rather than retrying the same click. See Blocked actions in the app.
Users section cross-reference
Use the sections above for this settings area. Related setup pages are linked from Related below when present, or from Account Settings.
Related
Related below links this Account Settings tab to modules, workflows, concepts, and escalation paths.
Documentation map & escalation
- Account Settings hub — Tab pairing matrix across workspace configuration
- Deep Links — Account Settings — Bookmarkable
/settings/userswhen escalating permission toasts - FAQ & Troubleshooting — Permission denied toast and role matrix questions
- Get Help & Support — Escalation when admin Resend password or role edits are blocked
Upstream & downstream workflows
- Onboarding a New Property — Requires owner registration as the first step
- Resetting a Management User Password — Self-service and admin-assisted account recovery flow
- Using in-app support — Grant Support (
support.module) for Vivin product tickets - Notification triage — Payment-received and payment overdue alerts teammates cannot clear when roles lack Finance or Bookings access (Step 4)
- Handling a Late Payment — Step 1 — Identify overdue charges when teammates lack Finance access to triage payment overdue alert row-clicks
- Managing a Check-out —
bookings.disputeand deposit roles during move-out week
Deeper workflow reads
See Upstream & downstream workflows above for the same guides.
Related Account Settings tabs
- Owners — Landlord records that Finance and Listings roles must reach before payout or property setup
- Personal Settings — Per-user locale, notification opt-outs, tab order, and Operations ticket columns (requires
account_settings.personal) - Subscription — Platform billing when Finance or Admin roles need card-on-file updates
- Preferences — Enable deposit disputes — Account toggle paired with
bookings.disputepermission - Preferences — In-app notifications — Account-wide alert categories teammates cannot triage without module access
- Integrations — Who can connect platforms that drive billing and webhook traffic
- Categories — Listing and ticket category permissions paired with role create toggles
- Contract templates — Dynamic variables that reference owner data
Operator modules
- Finance module — Approve payments, Reject selected, and deposit disputes gated by role permissions
- Bookings module — Reservation workflows gated by Bookings module and sub-permissions
- Operations — Tickets — Ticket assignments reference team members
- Analytics module —
analytics.modulepermission in the role matrix - Audit module — Cross-portfolio block review when
audit.moduleis restricted - Inbox module — Portfolio WhatsApp triage permission paired with Bookings module access
- AI Chat module — assistant gated by the AI / MCP role permission rather than by a module permission
Deeper concept reads
- Integrations & Distribution — Sales and Listings permissions gate marketplace linking
- Tenant Portal — Tenant categories and Preferences permissions shape tenant self-serve
- FAQ — Tenant contract signing blocked — No PDF yet, mandatory Your Details gates, category locks, or Lease purpose; portal signing vs paper upload on Contract Info
- Payment Allocation — Two-layer receipts and credit note reject/revert warnings
- Booking Lifecycle — Computed status model
Companion API guides
- API Reference — Management session — JWT sign-in and permission matrix behind management HTTP routes
- AI usage API — Operator JWT ledger (
GET /ai-usage,GET /ai-usage/summary) gated byaccount_settings.moduleon Role Permissions
Module documentation hubs
- Dashboard — Post-login KPI snapshot
- Listings — Property wizard and channel connections
- Sales — Portfolio availability and pricing
- Utilities — Bills Included ceiling model
- Tenants — Tenant directory
- Notifications — Full
/notificationshistory - Notifications — Payment overdue alerts (in-app) — Operator Payments category rows when scheduled charges are overdue
- Booking engine details — Marketplace payload editor
- Properties workspace — Legacy
/propertiesredirects
Operator habit hubs
Day-to-day operator habits (lockout catch-up, pending receipts, payment triage, handoffs, and related playbooks) live on the Common Workflows habit hub.
Deep-link anchors for habit hubs
Lockout catch-up after password recovery
Pending manual receipt approval
Reject/revert mistaken receipts
Notification row-click navigation
Payment alert to receivables triage
Confirmation alert triage
Finance debt receivables triage
Handling a Late Payment collections
Finance Income status drill-down
Cash flow forecast drill-down
Key glossary terms
- Glossary — Permission denied toast — Management UI copy for generic
Forbidden resource403 - Credit note (payment reject/revert) — Reject / Revert modals when Finance roles lack Approve payments; concept walkthrough: Payment Allocation — Correcting mistaken receipts; workflow hub: Common Workflows — Reject/revert mistaken receipts
- Invoiced floor (rent) — Rent edits blocked below exported months for Finance and Admin roles
- FAQ — Lower rent below invoiced — Change monthly rent clamps and Contract Values → Edit amount blocks net below exported invoice totals; use credit notes in accounting when you truly need a reduction
- Glossary — Fixed invoice date — Account-wide Invoice date before bulk Issue allocation / Invoice selected; amber banner on Finance → Transactions until you turn Use today as invoice date back on
- Glossary — End-of-Booking cost split — Charge Time → End of Booking splits daily overage across every occupied unit; still-staying roommates stay in the denominator
- Glossary — Full term list