Onboarding a New Property
This workflow is the guided walkthrough for Getting Started — Recommended Setup Sequence steps 4–12 — complete steps 1–3 (General Information, Preferences, Users) per Account Settings — Recommended setup order first. After steps 13–15 in Listings, Bookings, and Tenants, finish with Step 7 — Verify in Listings before daily operational guides. Lockout catch-up: Getting Started — Lockout catch-up after password recovery. Workflow pairing: Common Workflows — Setup sequence after go-live.
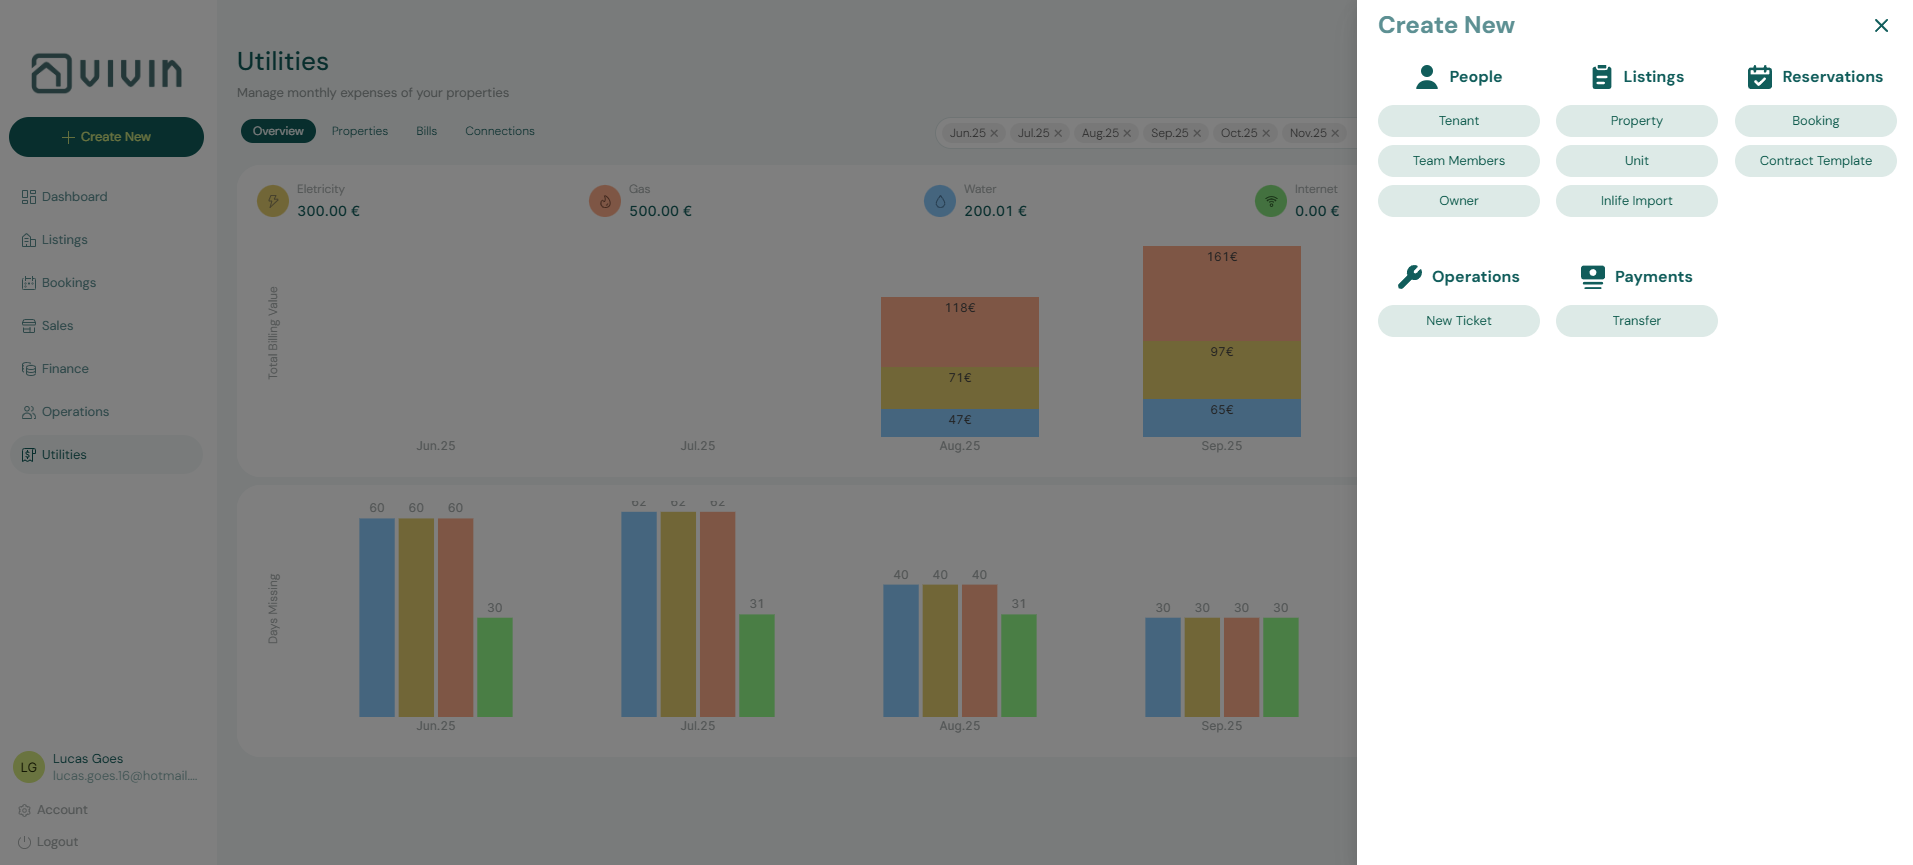
Work steps 1–7 in order — start with Step 1 — Register the owner and Step 2 — Create the property, finish with Step 7 — Verify in Listings go-live checks. Optional channel setup: Step 5 — (Optional) Connect to external platforms. Non-linear operator habits (Lockout catch-up, Payment alert to receivables triage, Pending manual receipt approval, Reject/revert mistaken receipts, Month-end invoicing (fixed date), Bulk Hostkit invoicing, Rent reduction after invoicing, Utility overage collections, Check-out final utilities handoff, Check-in to check-out handoff, Check-out collections before refund, Check-out ledger cleanup before refund, Finance debt receivables triage, Handling a Late Payment collections, Cancellation collections before void, Same-day turnover coordination, Occupancy KPI to block hygiene handoff, Deposit missing on Finance Deposits, Partly collected security deposit, Wrong tenant on a booking, Cancel Booking vs Delete Booking, Portfolio retirement decisions, Directory list load failures, Booking sidebar tab load failures, Confirmation alert triage, Portfolio segmentation by tenant category) have matching Related subsections below. Full pairing matrix: Onboarding a New Property section cross-reference · Common Workflows section cross-reference.
This workflow walks you through adding a new property to your portfolio, from initial setup to listing the first unit. Complete these steps in order — each step depends on the previous one.
After go-live, run Processing a New Booking for the first reservation and Portfolio KPI review when you need a baseline before rate changes — after the first full month, poll AI usage API (utility_bill_extraction + landlord_chat) during Portfolio KPI review — Step 7 to baseline AI adoption on new inventory. Step-to-module pairing: Onboarding a New Property section cross-reference. Full pairing matrix: Common Workflows — Workflow cross-reference.
Before starting, ensure you have:
- Completed Getting Started — Recommended Setup Sequence steps 1–3 (General Information, Preferences, Users) when this is your first workspace — Steps 1–6 of this workflow align with setup steps 4–12
- Access to the property's utility account IDs (from electricity, gas, water, and internet statements)
- The property owner's legal name, fiscal ID, and IBAN (if not already registered)
- Your desired contract terms (payment frequency, deposit type, confirmation payments)
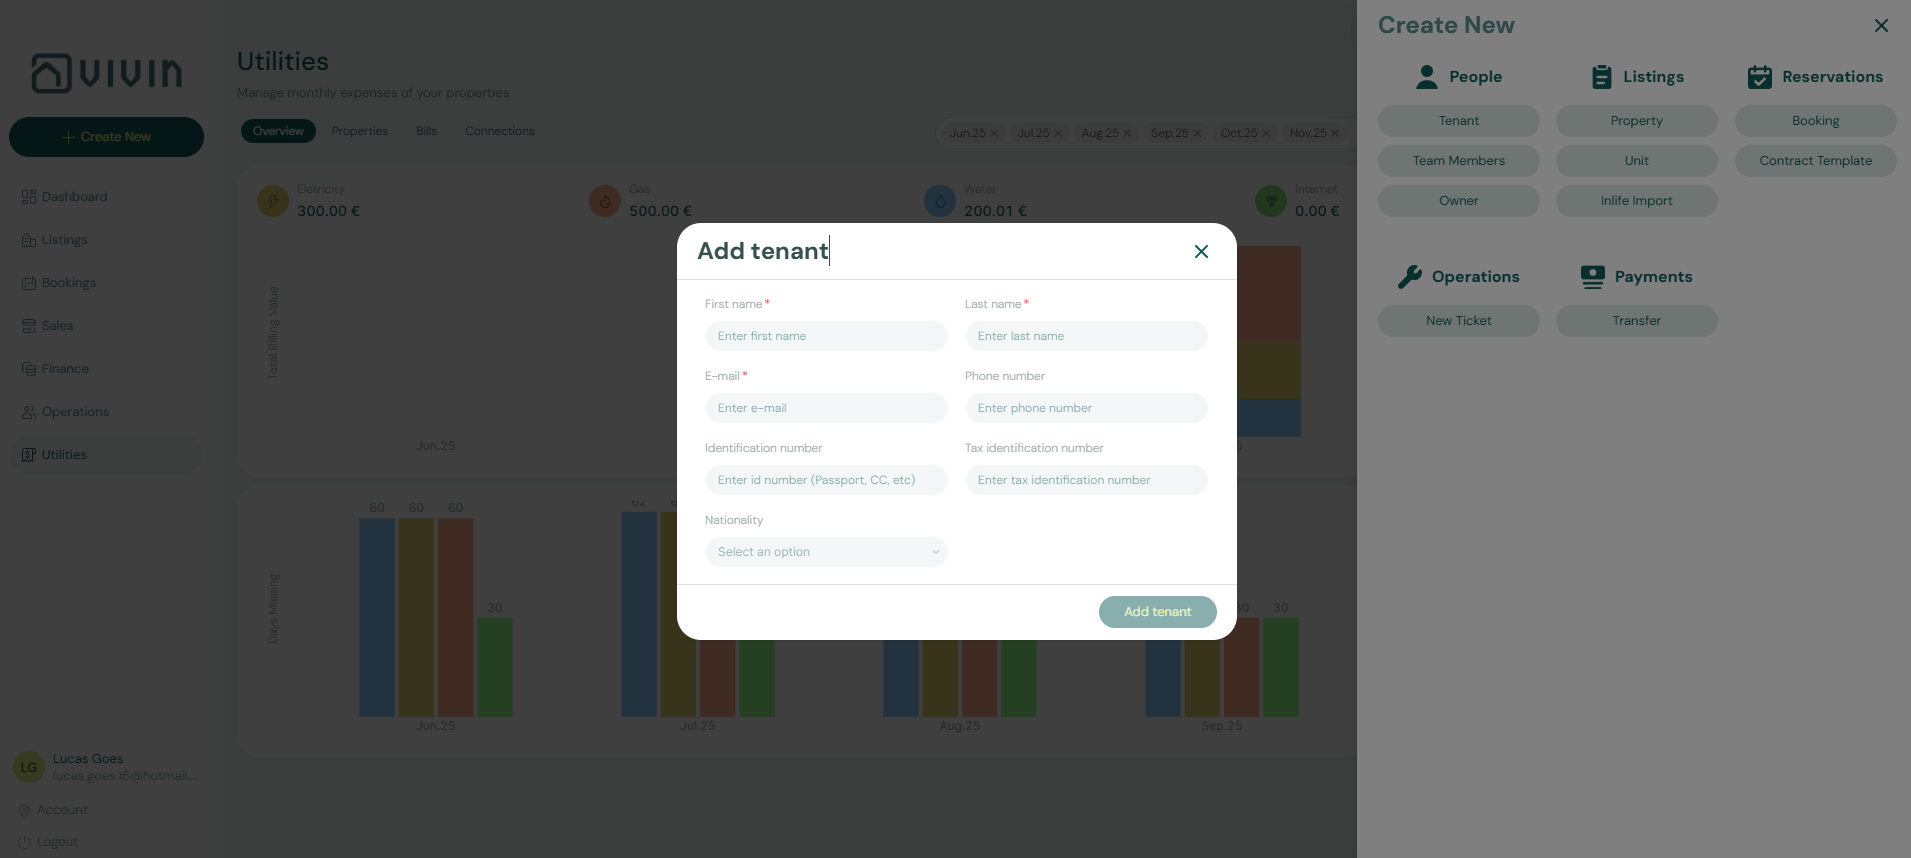
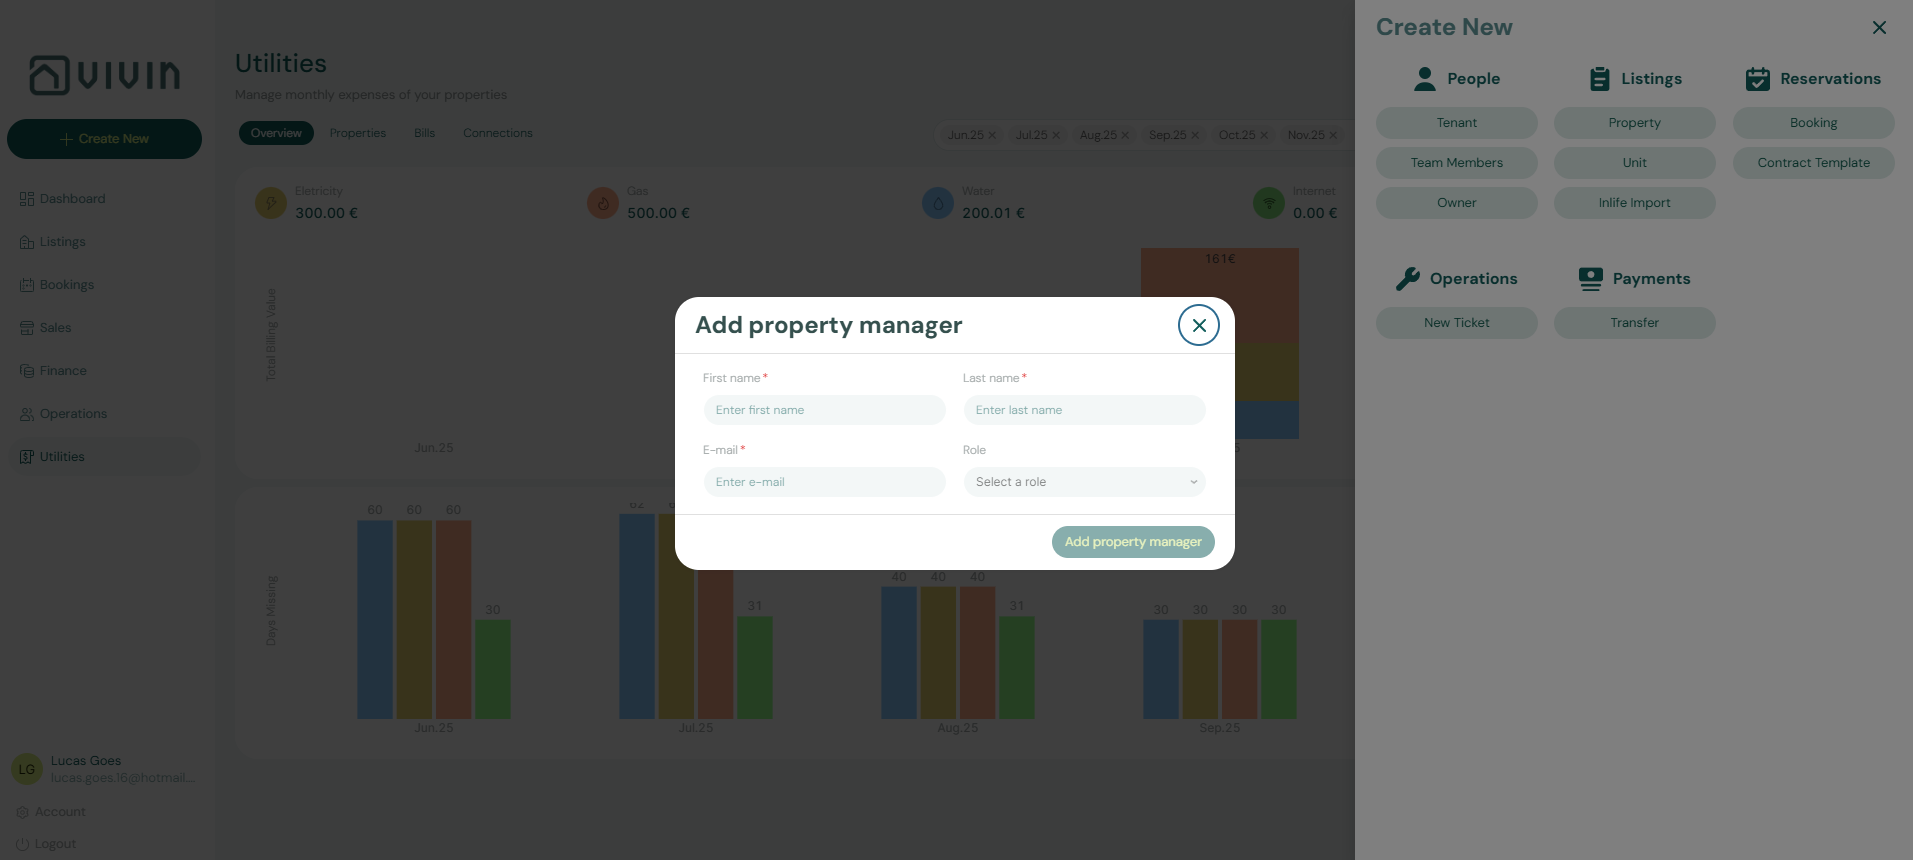
Step 1 — Register the owner.
Owner setup pairs with Settings > Owners, list-owners / create-owner on Landlord MCP, and Settings > Invoicing & Payments (payout IBAN). Downstream: Step 2 (property wizard owner field). Full pairing matrix: Onboarding a New Property section cross-reference.
Navigate to Settings > Owners and verify the property owner already exists. If not, click + Add Owner and fill in their legal name, fiscal ID, contact details, and IBAN. The owner must exist before you can create a property.
Account-scoped Landlord MCP list-owners confirms the owner row exists before create-property — create-owner mirrors + Add Owner when an external client onboards several buildings for the same landlord. External tools cannot attach Settings > Contract templates; finish template links in the UI before MCP property writes.
Full pairing matrix: Onboarding a New Property section cross-reference.
Step 2 — Create the property.
Property wizard pairs with Listings — Creating a New Property, create-property on Landlord MCP, and contract fields that drive Processing a New Booking. Upstream: Step 1. Downstream: Step 3 (units under the building). Full pairing matrix: Onboarding a New Property section cross-reference.
In Listings, open + Create New and choose Property, then complete all four steps of the wizard:
- Property details — name, address, and owner
- Utility bills — account IDs for electricity, gas, water, and internet (from your utility statements)
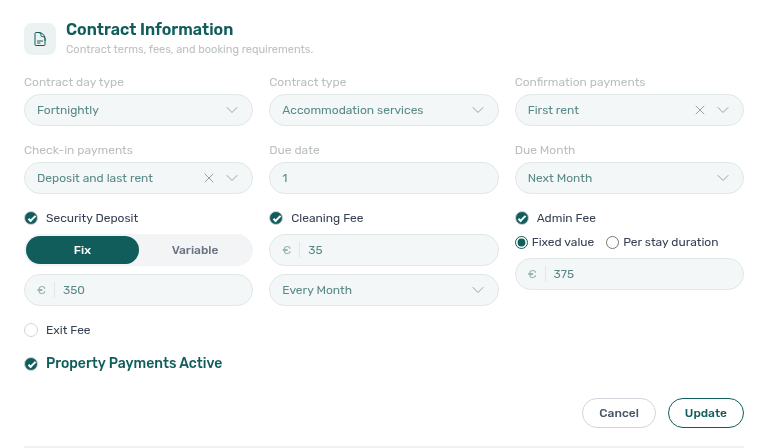
- Extra payments — security deposit type, cleaning fee, admin fee (fixed € only in the wizard), and Bills Included ceilings

To charge admin fees by stay length (Per stay duration tiers), finish the wizard first, then open the property in Listings → Edit property → Contract Information and switch Admin fee to Per stay duration (full reference).
- Contract details — payment frequency (Monthly/Fortnightly/Daily), confirmation payments, and check-in payments

Pay close attention to Steps 3 and 4 — these settings directly control what tenants are charged and when. See Creating a New Property for detailed field descriptions.
Account-scoped Landlord MCP create-property mirrors the four-step Property wizard when an integration seeds buildings programmatically — prefer the UI wizard for utility IDs, deposit tiers, and confirmation-payment timing you will audit visually. After save, get-property / list-properties (paginate with nextOffset) verify address, owner link, and contract fields match Listings before you create units in Step 3.
Full pairing matrix: Onboarding a New Property section cross-reference.
The cleaning fee frequency defaults to Every Month and cannot be changed during creation. If you need One-Time Fee at Booking Confirmation or One-Time Fee at Move-in, edit the property after creation in Contract Information (Payments tab).
Step 3 — Create units.
Unit creation pairs with Listings — Rent Value tab, create-listing on Landlord MCP, and Sales → Channels readiness in Step 5. Upstream: Step 2. Downstream: Step 4 (property edit tabs). Full pairing matrix: Onboarding a New Property section cross-reference.
Click + Create New > Unit for each rentable space in the property. Set the unit name, type, base rent, capacity, and min/max stay periods. If rent varies by season or demand, choose "Variable Rent" and configure pricing ranges afterward in the unit's Rent Value tab.

Account-scoped Landlord MCP create-listing creates a unit under a property id — pair with get-listing and get-listing-pricing-table when variable-rent spans need verification before channel linking in Step 5. set-listing-pricing-month adjusts monthly grid rows the UI Rent Value tab shows; external clients cannot upload booking-engine photo galleries — use the Full integration pill in Step 4 for partner payload.
Full pairing matrix: Onboarding a New Property section cross-reference.
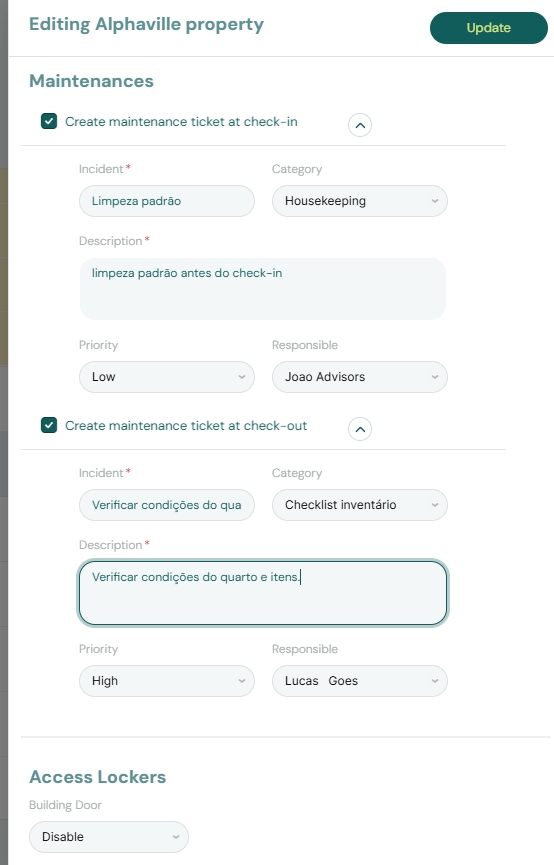
Step 4 — Configure property settings.
Property settings pair with Settings > Tenant categories, Communication Rules audience, Listings — Access Lockers, and get-chatbot-rules on Tenant MCP. Upstream: Step 3. Downstream: Step 5 (channel links). Full pairing matrix: Onboarding a New Property section cross-reference.
After creation, open the property's edit view (pencil icon in Listings) and review these tabs:
- Payments tab: Confirm the cleaning fee Frequency (Every Month, One-Time Fee at Booking Confirmation, or One-Time Fee at Move-in) — it defaults to Every Month and cannot be changed during creation
- Maintenances tab: Set up automatic check-in/check-out tickets if desired — far-future schedule dates may show Draft (display status) in Operations → Tickets until the date nears; link paid contractor rows from the ticket Cost allocation panel when you reconcile Cash Flows. Individual reservations can still opt out on Add booking (#1140) — see Glossary — Per-booking maintenance ticket opt-out
- Email Customization tab: Add any property-specific messages to tenant emails
Before your first reservation, confirm Settings > Tenant categories defines the segments you will assign on tenant profiles — categories drive portal modules, Communication Rules audience, and portfolio filters on Bookings, Finance, and Tenants during month-end review. Mark Default for integration-created tenants before high-volume channel imports in Step 5; direct bookings still need manual assignment in Processing a New Booking — Step 2 (FAQ — Assign tenant category for direct booking). Mirror segment checks on Bookings → Other filters Tenant → Tenant category or Tenants — Tenant category filter when Finance cache parity lags — see Glossary — Tenant category and FAQ — Finance tenant category filter parity. Month-end segment review: Portfolio KPI review — Step 6.
Booking-scoped Tenant MCP clients inherit the tenant-category and chatbot work you finish in Step 4 — get-chatbot-rules and get-chatbot-persona mirror Settings > Chatbot IF/THEN guidance, and get-portal-links surfaces the same self-service URLs tenants see once the first reservation is live in Processing a New Booking. Confirm portal access by tenant category before external assistants hand over keys or payment links. For portfolio-wide vacancy reads during channel setup (Step 5–7), pair with Landlord MCP instead of tenant-scoped tools.
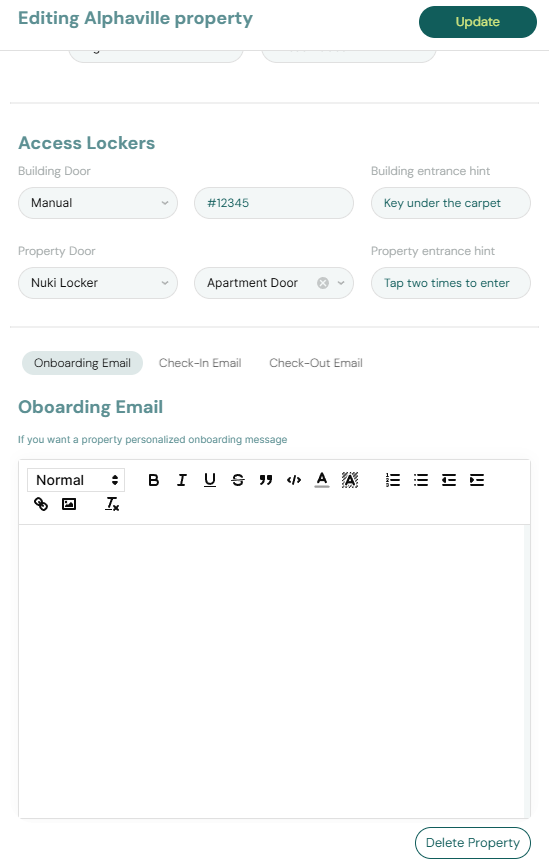
- Access Lockers tab: Enter building and unit access codes or link Nuki devices
Standard Listings Setup pill tabs cover contract, payments, access, and email customization. For integration and marketplace payload fields (extra copy blocks, amenities, rules, bilingual content, partner-platform sections), switch to the Full integration pill; use Photos for booking-engine galleries. The three pills replaced the legacy Go to details header (#2082). See Glossary — Property edit sidebar pills, Property & listing details (booking engine), and bookmark patterns in Deep Links — Booking engine details layer.
Full pairing matrix: Onboarding a New Property section cross-reference.
Step 5 — (Optional) Connect to external platforms.
Channel linking pairs with Sales → Channels, Settings > Integrations, and Processing a New Booking — Step 1 (duplicate import checks). Upstream: Step 4. Downstream: Step 7 (Multicalendar after first import). Full pairing matrix: Onboarding a New Property section cross-reference.
Navigate to Sales > Channels (/sales/channels) and verify the property's units are linked to their counterpart listings on Airbnb, Booking.com, or other platforms. This enables automatic calendar sync. Platform connections are configured in Settings > Integrations.
Account-scoped Landlord MCP list-listings and get-listing-calendar mirror Sales → Channels per-unit link status and availability bars when external clients verify outbound iCal before the first import — property context uses list-properties / get-property. When a unit still shows unexpected blocks after you toggle a channel link, get-listing includes unavailabilities (manual and channel holds) the same way Processing a New Booking — Step 1 resolves overlap before create-booking — pair with Manual block hygiene when stale holds survive an import test. get-booking-summary after the first marketplace import lands so occupancy counts match Sales → Overview without opening Bookings. Inbound partner webhooks (Housing Anywhere, Uniplaces, Channex) still deliver paid/cancelled events through Core API callbacks — wire those in Settings > Integrations and confirm Integration Swagger paths in Webhooks & Notifications and API Reference — iCal feeds; MCP does not replace Sales → Channels link toggles or iCal export URLs.
Booking-scoped Tenant MCP is not the right surface for channel setup — portfolio-wide listing links stay on Landlord MCP or the management UI. After the first marketplace booking lands, list-bookings-by-email in Processing a New Booking — Step 1 confirms the guest row before you create a duplicate manually; get-portal-links is the tenant-facing read once Processing a New Booking — Step 6 sends contract mail. notify-landlord alerts your team when a guest messages through a chatbot about a missing import — it does not link units on Channels. Surface-choice contrast: Automation & AI — Workflow pairing for surface choice.

Use Export on the Channels toolbar when you need a spreadsheet of outbound iCal URLs and link status for the rows you filtered — see Sales > Channel Manager.
Full pairing matrix: Onboarding a New Property section cross-reference.
Step 6 — Verify utility connections (recommended)
Utility Connections pairs with Utilities → Connections, get-property on Landlord MCP, and Entering Monthly Utility Bills — Step 5 (missing bill gaps). Upstream: Step 2 (wizard utility IDs). Downstream: Step 7 before first bill cycle. Full pairing matrix: Onboarding a New Property section cross-reference.
After the wizard saves utility account IDs, open Utilities > Connections and confirm each new property shows the expected Electricity, Gas, Water, and Internet rows (contract IDs and account numbers match your supplier statements). For SIMAR (Loures e Odivelas) water, compare Cód. Local on the supplier PDF — not Nº de Contador — and strip leading zeros (#2110); see Glossary — SIMAR water contract ID. Use Select properties or Search connections when your portfolio is large so the grid focuses on the building you just onboarded. Gaps here block AI bill upload matching and monthly Entering Monthly Utility Bills overage math — fix account IDs in the property editor Utility bills step before your first bill-entry cycle.
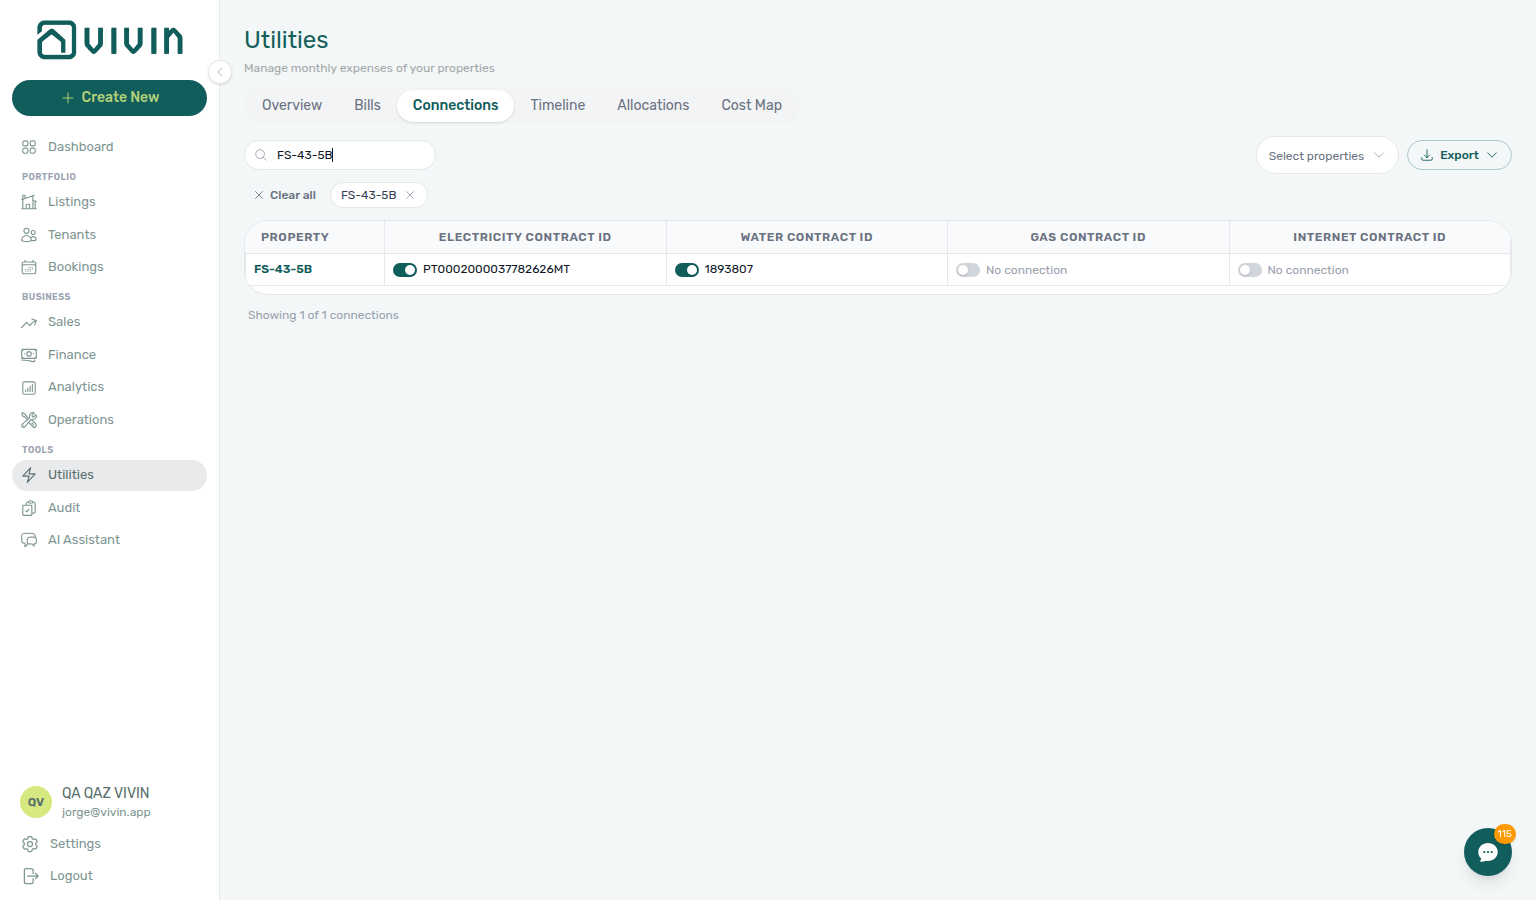
Account-scoped Landlord MCP get-property confirms the wizard Utility bills account IDs saved on the property record — compare each Electricity, Gas, Water, and Internet field against the Utilities → Connections matrix before your first bill cycle. list-bills, get-bill, and create-bill cover monthly supplier invoices in Entering Monthly Utility Bills — they do not replace this Connections verification grid or inline cell edits (operator UI with utilities.edit_connections). When chasing Missing gaps after go-live, list-bills plus get-property mirror Entering Monthly Utility Bills — Step 5 before you re-run bill upload.
Full pairing matrix: Onboarding a New Property section cross-reference.
Step 7 — Verify in Listings.
Go-live verification pairs with Common Workflows — Property setup to first arrival handoff (Step 7 → Managing a Check-in — Step 1; listings-property-edit-access-lockers-tab.png, workflows-operations-check-in-out-planning-view.png), Common Workflows — New inventory to first booking handoff (Step 7 → Processing a New Booking — Step 1 / Step 6; workflows-onboarding-property-wizard.mp4), Listings portfolio table, Bookings → Timeline, Processing a New Booking, Managing a Check-in, and Notification triage — Step 4 (first alerts). Upstream: Steps 1–6. Downstream: Portfolio KPI review baseline. Full pairing matrix: Onboarding a New Property section cross-reference.
Open the Listings module and confirm the property and all its units appear correctly with the right rent values and availability dates. After your first reservation, use Bookings → Timeline or Sales → Multicalendar to confirm stay bars and channel blocks look correct on the unit row — see Processing a New Booking — Visual overlap check. When unexpected manual holds or channel blocks survive verification, run Manual block hygiene before you escalate calendar defects — Manual block hygiene — Step 6 when Multicalendar edits stay blocked. When the first payment overdue or booking-created alert arrives, triage from Notification triage — Step 4 before you chase collections in Handling a Late Payment — Step 1 — when row-click or read-state APIs fail on first-booking alerts, continue Notification triage — Step 6 before you file Vivin support. Plan the first arrival in Managing a Check-in once confirmation payments clear — when the deposit transfer is short, triage Partially paid on the booking Deposit tab or Finance → Deposits → Partial paid lifecycle card on Finance → Deposits before move-in (Partly collected security deposit); confirm portal gates in Processing a New Booking — Step 6 before you send contract mail; when access-code or Nuki defects block arrival week, pair with Managing a Check-in — Step 6. When a channel import is a duplicate or wrong guest, cancel with Cancelling a Booking and close related prep work in Cancelling a Booking — Step 6 before you create a manual replacement — clear lingering cancellation alerts and settlement receipts in Cancelling a Booking — Step 6b at month-end. Clear first-booking alerts in Notification triage — Step 5 after verification. At month-end on new inventory, pair lingering Pending confirmation receipts (Processing a New Booking — Step 6b), move-in requirement rows (Managing a Check-in — Step 6b), and utility overage receipts (Entering Monthly Utility Bills — Step 4b) with Portfolio KPI review — Step 7, segment baselines in Portfolio KPI review — Step 6, and collections-week Pending rows in Handling a Late Payment — Step 6b when confirmation and rent receipts share the same ledger queue — segment-wide arrears on new inventory may still need Handling a Late Payment — Step 6 after the mesh settles. If a management lockout delayed go-live verification, recover access with Resetting a Management User Password (Step 3) before you rerun Step 7 — refresh Landlord MCP Bearer JWT after Step 3 there; catch up first-booking alerts in Notification triage — Step 5 (file Step 6 when row-click fails), finish Entering Monthly Utility Bills — Step 5 / Step 4b when the first bill cycle lagged during lockout, then plan first arrivals in Managing a Check-in.
Booking-scoped Tenant MCP get-portal-links, get-chatbot-rules, and get-chatbot-persona inherit the Step 4 segment and chatbot work once Processing a New Booking creates the first stay — confirm portal access by tenant category before external assistants hand tenants keys or payment URLs. list-bookings-by-email resolves the correct bookingId when a guest has more than one active reservation.
Account-scoped Landlord MCP list-properties (paginate with nextOffset) and list-listings mirror the portfolio table and unit rows you confirm here — get-vacant-units-next-month and get-booking-summary give occupancy snapshots after channels connect (Step 5) without opening Sales → Multicalendar. Write tools such as create-property / create-listing belong to setup (Steps 2–3), not this read-only pass.
Finish Steps 1–6 and channel link toggles on Sales → Channels before you open a Vivin support ticket — portfolio table gaps and Multicalendar holds are usually operator configuration, not product defects. After your first reservation, triage confirmation Pending receipts with Processing a New Booking — Step 5b and month-end lingering rows with Processing a New Booking — Step 6b before Finance → Contract Values looks wrong. File Using in-app support when Vivin behaviour blocks verification despite correct operator steps:
- Create New → Property wizard cannot Submit though required fields are filled — attach property name and owner id (Listings module).
- Utilities → Connections rows stay Missing after you saved account IDs in the property editor — attach the property id (Utilities module).
- Channel link toggles on Sales → Channels fail without a clear integration error in Settings > Integrations — attach unit internal name and platform (Sales module).
- Landlord MCP
create-propertyorcreate-listingreturns persistent validation errors while the UI wizard succeeds on the same payload — attach request ids (Settings module).
Use the Help & Support drawer from Listings when screenshots should include the wizard or portfolio table — Deep Links — Support. If a management lockout delayed go-live verification, recover access with Resetting a Management User Password before you rerun Step 7 — refresh Landlord MCP Bearer JWT after Step 3 there; catch up first-booking alerts in Notification triage — Step 5 (file Step 6 when row-click fails), finish Entering Monthly Utility Bills — Step 5 / Step 4b when the first bill cycle lagged during lockout, then plan first arrivals in Managing a Check-in. Pair with Manual block hygiene — Step 6 when unexpected Multicalendar holds survive onboarding verification.
Account-scoped Landlord MCP list-properties, list-listings, get-listing (unavailabilities), and get-property attach portfolio context before you file support — channel toggles and wizard Submit remain operator UI. Booking-scoped Tenant MCP is not the right surface for property onboarding verification. Surface-choice contrast: Automation & AI — Workflow pairing for surface choice.
After onboarding, follow the Processing a New Booking workflow to create the first reservation for your new property.
Full pairing matrix: Onboarding a New Property section cross-reference.
Onboarding a New Property section cross-reference
Use this table when one step in this workflow naturally leads into another module, concept page, or downstream workflow — each row links to the docs you should read before or after that step.
| Workflow step / section | Pair with these docs |
| ---------------------------------------------------------------------------------------------------- | ----------------------------------------------------------------------------------------------------------------------------------------------------------------------------------------------------------------------------------------------------------------------------------------------------------------------------------------------------------------------------------------------------------------------------------------------------------------------------------------------------------------------------------------------------------------------------------------------------------------------------------------------------------------------------------------------------------------------------------------------------------------------------------------------------------------------------------------------------------------------------------------------------------------------------------------------------------------------------------------------------------------------------------------------------------------------------------------------------------------------------------------------------------------------------------------------------------------------------------------------------------------------------------------------------------------------------------------------------------------------------------------------------------------------------------------------------------------------------------------------------------------------------------------------------------------------------------------------------------------------------------------------------------------------------------------------------------------------------------------------------------------------------------------------------------------------------------------------------------------------------------------------------------------------------------------------------------------------------------------------------------------------------------------------------------------------------------------------------------------------------------------------------------------------------------------------------------------------------------------------------------------------------------------------------------------------------------------------------------------------------------------------------------------------------------------------------------------------------------------------------------------------------------------------------------------------------------------------------------------------------------------------------------------------------------------------------------------------------------------------------------------------------------------------------------------------------------------------------------------------------------------------------------------------------------------------------------------------------------------------------------------------------------------------------------------------------------------------------------------------------------------------------------------------------------------------------------------------------------------------------------------------------------------------------------------------------------------------------------------------------------------------------------------------------------------------------------------------------------------------------------------------------------------------------------------------------------------------------------------------------------------------------------------------------------------------------------------------------------------------------------------------------------------------------------------------------------------------------------------------------------------------------------------------------------------------------------------------------------------------------------------------------------------------------------------------------------------------------------------------------------------------------------------------------------------------------------------------------------------------------------------------------------------------------------------------------------------------------------------------------------------------------------------------------------------------------------------------------------------------------------------------------------------------------------------------------------------------------------------------------------------------------------------------------------------------------------------------------------------------------------------------------------------------------------------------------------------------------------------------------------------------------------------------------------------------------------------------------------------------------------------------------------------------------------------------------------------------------------------------------------------------------------------------------------------------------------------------------------------------------------------------------------------------------------------------------------------------------------------------------------------------------------------------------------------------------------------------------------------------------------------------------------------------------------------------------------------------------------------------------------------------------------------------------------------------------------------------------------------------------------------------------------------------------------------------------------------------- | ---------------------------------------------------------------------------------------------------------------------------------------------------------------------------------------------------------------------------------------------------------------------------------------------------------------------------------------------------------------------------------------------------------------------------------------------------------------------------------------------- |
| Step 1 — Register the owner | Settings > Owners, Settings > General Information, Settings > Invoicing & Payments, Landlord MCP — Extended account tools (list-owners, create-owner) |
| Step 2 — Create the property | Create New menu — Property, Listings — Creating a New Property, Settings > Contract templates, Landlord MCP — Bookings, properties, and listings (create-property, get-property, list-properties with nextOffset pagination) |
| Step 3 — Create units | Listings — Rent Value tab, Sales — Pricing tab, API Reference — Property & unit mapping, Landlord MCP — Bookings, properties, and listings (create-listing, get-listing), Landlord MCP — Extended account tools (get-listing-pricing-table, set-listing-pricing-month) |
| Step 4 — Configure property settings | Operations module, Settings > Emails, Settings > Tenant categories, Bookings — Other filters tenant category, Tenants — Tenant category filter, Finance — Tenant category filter, Processing a New Booking — Step 2, Portfolio KPI review — Step 6, Glossary — Tenant category, FAQ — Assign tenant category for direct booking, FAQ — Finance tenant category filter parity, Property & listing details (booking engine), Services Marketplace, Tenant MCP — Chatbot configuration (read-only) (get-chatbot-rules, get-chatbot-persona), Tenant MCP — Property, payments, and portal tools (get-portal-links), Tenant Portal — Portal access by tenant category |
| Step 5 — (Optional) Connect to external platforms | Settings > Integrations, Integrations & Distribution, Sales — Channel Manager, API Reference — Listings & Availability, API Reference — iCal feeds, Webhooks & Notifications (inbound partner callbacks), Processing a New Booking — Step 1 (get-listing unavailabilities overlap habit), Manual block hygiene (stale holds after channel link tests), Automation & AI — Workflow pairing for surface choice, Landlord MCP — Bookings, properties, and listings (list-listings, get-listing with unavailabilities, get-listing-calendar, list-properties, get-property), Landlord MCP — Read-only and intelligence (get-booking-summary after first import), Tenant MCP — Booking and contract data (list-bookings-by-email after first import — Processing a New Booking — Step 1), Tenant MCP — Property, payments, and portal tools (get-portal-links after contract mail; notify-landlord for missing-import chatbot escalations) |
| Step 6 — Verify utility connections | Utilities — Connections tab, Entering Monthly Utility Bills — Step 5 (list-bills / get-property missing-gap habit), Entering Monthly Utility Bills — Step 6 (escalation when Connections still block AI extraction), Entering Monthly Utility Bills, Settings > Utilities, Users and roles — utilities.edit_connections, Landlord MCP — Bookings, properties, and listings (get-property — wizard utility IDs vs Connections matrix), Landlord MCP — Extended account tools (list-bills, get-bill, create-bill — monthly bills, not Connections grid or inline edits) |
| Step 7 — Verify in Listings | Getting Started — Recommended Setup Sequence (setup steps 13–15 before this verification pass), Getting Started — Lockout catch-up after password recovery (when go-live lagged during sign-in recovery), Processing a New Booking, Processing a New Booking — Step 5b (first confirmation receipts), Processing a New Booking — Step 6b (month-end lingering confirmation receipts), Processing a New Booking — Step 6 (portal after first reservation), Cancelling a Booking (duplicate or wrong channel import), Cancelling a Booking — Step 6 (prep ticket closure after duplicate cancel), Cancelling a Booking — Step 6b (cancellation settlement alerts on new inventory), Bookings — Timeline view, Sales — Multicalendar tab, Notification triage, Notification triage — Step 4 (first booking or payment alerts), Notification triage — Step 5 (clear first-booking alerts after verification), Notification triage — Step 6 (row-click blocked on first-booking alerts), Handling a Late Payment — Step 1 (first collections on live bookings), Handling a Late Payment — Step 6 (segment-wide arrears on new inventory), Handling a Late Payment — Step 6b (collections Pending on new inventory at month-end), Managing a Check-in (first arrival after confirmation), Managing a Check-in — Step 6 (access-code / Nuki blockers before first arrival), Managing a Check-in — Step 6b (move-in Pending on new inventory at month-end), Manual block hygiene, Manual block hygiene — Step 6 (unexpected Multicalendar holds), Using in-app support, Using in-app support — New Support Ticket modal, Portfolio KPI review, Portfolio KPI review — Step 6 (baseline segment filters once bookings accumulate), Portfolio KPI review — Step 7 (month-end Total Debt on new inventory), Entering Monthly Utility Bills (first bill cycle after Step 6), Entering Monthly Utility Bills — Step 5 (lockout-delayed first bill cycle), Entering Monthly Utility Bills — Step 4b (utility overage Pending on new inventory), Entering Monthly Utility Bills — Step 6 (AI extraction blocked after first bill cycle), Resetting a Management User Password — Step 3 (lockout-delayed go-live verification; refresh Landlord MCP JWT, then catch up Notification triage — Step 5 / Step 6 and utility bill Steps 5 / 4b), Automation & AI — Workflow pairing for surface choice, Landlord MCP — Read-only and intelligence (get-vacant-units-next-month, get-booking-summary), Landlord MCP — Bookings, properties, and listings (list-properties, list-listings, get-listing with unavailabilities, get-property — read-only portfolio pass), Landlord MCP — Permissions and safety, Tenant MCP — Property, payments, and portal tools (get-portal-links after first reservation), Tenant MCP — Chatbot configuration (read-only) (get-chatbot-rules, get-chatbot-persona), Tenant MCP — Booking and contract data (list-bookings-by-email when multiple active stays) |
| Lockout catch-up after password recovery | Sign-in restored; wizard or Step 7 delayed during lockout | Common Workflows — Lockout catch-up, Getting Started — Lockout catch-up, Resetting a Management User Password — Step 3 |
| Pending manual receipt approval | First confirmation receipts still pending after go-live | Common Workflows — Pending manual receipt approval, Processing a New Booking — Step 5b, Finance — Pending manual payments |
| Reject/revert mistaken receipts | Duplicate confirmation receipts on first reservations | Common Workflows — Reject/revert mistaken receipts, Payment Allocation — Correcting mistaken receipts, Glossary — Credit note |
| Month-end invoicing (fixed date) | First month-end fixed Invoice date before bulk export on new inventory | Common Workflows — Month-end invoicing (fixed date), Invoicing — Default invoice date, Processing a New Booking — Step 6b (settings-invoicing-invoice-date-toggle.png) |
| Bulk Hostkit invoicing | First Issue allocation / Issue credit notes Hostkit pacing after go-live | Common Workflows — Bulk Hostkit invoicing, FAQ — Bulk Hostkit invoicing slow, Portfolio KPI review — Step 7 |
| Check-out final utilities handoff | Charge Time / Connections before first departure final overages | Common Workflows — Check-out final utilities handoff, Step 7 — Verify in Listings, Managing a Check-out — Step 6 (utilities-allocations-review-flow.mp4, bookings-detail-payment-plan-tab-schedule.png) |
| Check-in to check-out handoff | First Ongoing stay on go-live inventory needs departure planning | Common Workflows — Check-in to check-out handoff, Step 7 — Verify in Listings, Managing a Check-out — Step 1 (operations-check-in-out-check-outs-next-7-days.png, bookings-timeline-view.png) |
| Check-out collections before refund | First departure-week rent arrears on go-live inventory | Common Workflows — Check-out collections before refund, Step 7 — Verify in Listings, Managing a Check-out — Step 6 (workflows-check-out-coordination-flow.mp4, bookings-detail-payment-plan-tab-schedule.png, finance-contract-values-in-debt-filter.png) |
| Check-out ledger cleanup before refund | Duplicate departure transfer on first go-live booking | Common Workflows — Check-out ledger cleanup before refund, Step 7 — Verify in Listings, Managing a Check-out — Step 6 (bookings-detail-transactions-revert-modal-info-banner.png, finance-transactions-bulk-reject-selected-bar.png) |
| Payment alert to receivables triage | First payment overdue alert after go-live on new inventory | Common Workflows — Payment alert to receivables triage, Step 7 — Verify in Listings, Processing a New Booking — Payment alert to receivables triage (notifications-row-navigate-to-booking-detail.png, notifications-row-navigation-flow.mp4) |
| Finance debt receivables triage | First portfolio Top debtors after go-live confirmation settles | Common Workflows — Finance debt receivables triage, Step 7 — Verify in Listings, Processing a New Booking — Step 5 (finance-overview-income-chart-debt-aging.png, finance-overview-debt-aging-walkthrough-flow.mp4, finance-transactions-pending-pill.png) |
| Handling a Late Payment collections | Go-live Debt Aging outliers → collections Steps 1–4 on Step 7 |
| Finance Income status drill-down | First receivables — Income → In debt vs Debt Aging after go-live on Step 7 | Common Workflows — Finance Income status drill-down, Step 7 — Verify in Listings, Finance debt receivables triage (finance-overview-income-status-in-debt-modal.png, finance-overview-income-drill-down-flow.mp4) |
| Cash flow forecast drill-down | First collections — Cash flow forecast vs Dashboard rent-due after go-live on Step 7 | Common Workflows — Cash flow forecast drill-down, Step 7 — Verify in Listings, Finance Income status drill-down (finance-overview-cash-flow-all-payments-modal.png, finance-overview-cash-flow-drill-down-flow.mp4) |
| Cancellation collections before void | Pre-cancel rent arrears on first go-live booking | Common Workflows — Cancellation collections before void, Step 7 — Verify in Listings, Cancelling a Booking — Step 2 (finance-contract-values-in-debt-filter.png, bookings-detail-transactions-approve-payment-modal.png, bookings-cancel-booking-modal-refund-types.png, workflows-cancel-booking-refund-modal-flow.mp4) |
| Rent reduction after invoicing | Invoiced floor on first live bookings after month-end export | Common Workflows — Rent reduction after invoicing, Processing a New Booking — Step 3, Glossary — Invoiced floor (rent) (bookings-detail-change-monthly-rent-modal.png) |
| Same-day turnover coordination | High-turnover unit needs Maintenances auto tickets on Step 7 | Common Workflows — Same-day turnover coordination, Step 7 — Verify in Listings, FAQ — Same-day turnovers (operations-add-ticket-modal.png, bookings-timeline-day-week-month-and-sidebar.mp4) |
| Occupancy KPI to block hygiene handoff | Unexpected Multicalendar holds on Step 7 go-live pass | Common Workflows — Occupancy KPI to block hygiene handoff, Step 7 — Verify in Listings, FAQ — Analytics (KPI workspace) (analytics-kpi-occupancy-tab.png, audit-manual-blocks-filter-scroll.mp4) |
| Deposit missing on Finance Deposits | First check-out deposit triage after go-live | Common Workflows — Deposit missing on Finance Deposits, Step 7 — Verify in Listings, FAQ — Deposit missing on Finance Deposits (finance-deposits-date-range-toolbar-default.png, finance-deposits-date-range-clear-flow.mp4) |
| Partly collected security deposit | First confirmation deposit shortfall after go-live | Common Workflows — Partly collected security deposit, Processing a New Booking — Step 5, Finance — Deposits status summary cards, FAQ — Partly collected security deposit |
| Wrong tenant on a booking | First channel import linked wrong tenant profile | Common Workflows — Wrong tenant on a booking, Step 7 — Verify in Listings, FAQ — Wrong tenant on a booking (bookings-detail-change-tenant-control.png, bookings-detail-change-tenant-flow.mp4) |
| Cancel Booking vs Delete Booking | Test import cleanup after go-live — Delete not building Archive | Common Workflows — Cancel Booking vs Delete Booking, Step 7 — Verify in Listings, FAQ — Cancel Booking vs Delete Booking (bookings-cancel-booking-modal-refund-types.png, bookings-list-canceled-tab.png, workflows-cancel-booking-refund-modal-flow.mp4) |
| Portfolio retirement decisions | Mistaken Archive during go-live — use Unarchive | Common Workflows — Portfolio retirement decisions, Step 7 — Verify in Listings, FAQ — Portfolio retirement decisions (listings-archived-populated-table.png, finance-transactions-type-summary-cards.png) |
| Directory list load failures | Listings portfolio fails on go-live verify | Common Workflows — Directory list load failures, Step 7 — Verify in Listings, FAQ — Directory list load failures (notifications-module-load-failure.png, audit-manual-blocks-load-failure.png) |
| Booking sidebar tab load failures | Go-live verify opened booking, Tickets tab red | Common Workflows — Booking sidebar tab load failures, Step 7 — Verify in Listings, FAQ — Communication or Tickets load failure (bookings-detail-communication-tab-whatsapp-thread.png, bookings-detail-tickets-tab.png) |
| Confirmation alert triage | First Booking created alert after go-live | Common Workflows — Confirmation alert triage, Step 7 — Verify in Listings, FAQ — Processing a New Booking hub (notifications-row-navigate-to-booking-detail.png, bookings-detail-transactions-approve-payment-modal.png) |
| Portfolio segmentation by tenant category | Assign and verify tenant segments on new inventory | Common Workflows — Portfolio segmentation, Settings > Tenant categories, Glossary — Tenant category |
Related
Related below links this workflow to modules, concepts, settings, and escalation paths. Pair Documentation map & escalation with Common Workflows hub — Documentation map & escalation; pair Upstream & downstream workflows with Common Workflows — Workflow cross-reference. Topic-to-section pairing in sections above: Onboarding a New Property section cross-reference. Full hub matrix: Common Workflows section cross-reference.
Documentation map & escalation
Documentation-map bullets pair with Introduction — Section cross-reference and FAQ — Section cross-reference. Hub parity: Common Workflows hub — Documentation map & escalation. Full pairing matrix: Onboarding a New Property section cross-reference · Common Workflows section cross-reference.
- Common Workflows — Hub pairing matrix across all operator guides
- Getting Started — Recommended Setup Sequence — Account-wide configuration steps 1–12 before this workflow’s property wizard; after setup steps 13–15, return here for Step 7 — Verify in Listings
- Getting Started — Lockout catch-up after password recovery — Operational backlog mesh when sign-in was restored mid-onboarding
- Glossary — Term definitions referenced in the steps above
- FAQ & Troubleshooting — Quick answers when a step does not match live product behaviour
- Get Help & Support — Escalate when permissions or account state block property setup
- Using in-app support — Vivin product tickets when onboarding steps are blocked; Step 7 when wizard submit or Utilities → Connections verification fails
Upstream & downstream workflows
Workflow bullets pair with Common Workflows — Workflow cross-reference for inter-guide step pairing. Full pairing matrix: Onboarding a New Property section cross-reference · Common Workflows section cross-reference.
- Processing a New Booking (section cross-reference; Deeper workflow reads; hub) — First reservation workflow after the property wizard
- Processing a New Booking — Step 5b (section cross-reference; Deeper workflow reads; hub) — Approve first confirmation receipts after channel import (Step 7)
- Processing a New Booking — Step 6b (section cross-reference; Deeper workflow reads; hub) — Month-end lingering confirmation receipts on new inventory (Step 7)
- Handling a Late Payment — Step 1 (section cross-reference; Deeper workflow reads; hub) — Collections on the first live bookings; upstream path from Notifications — Payment overdue alerts
- Notification triage (section cross-reference; Deeper workflow reads; hub) — First booking-created or payment alerts on new inventory (Step 4 (section cross-reference; Deeper workflow reads; hub))
- Notification triage — Step 5 (section cross-reference; Deeper workflow reads; hub) — Clear first-booking alerts after Step 7 verification
- Cancelling a Booking (section cross-reference; Deeper workflow reads; hub) — Duplicate or wrong channel import before manual replacement (Step 7)
- Cancelling a Booking — Step 6 (section cross-reference; Deeper workflow reads; hub) — Close prep tickets after duplicate cancel (Step 7)
- Cancelling a Booking — Step 6b (section cross-reference; Deeper workflow reads; hub) — Clear cancellation alerts and lingering settlement receipts on new inventory (Step 7)
- Processing a New Booking — Step 6 (section cross-reference; Deeper workflow reads; hub) — Portal gates before first contract mail (Step 7)
- Handling a Late Payment — Step 6 (section cross-reference; Deeper workflow reads; hub) — Segment-wide arrears on new inventory after first bookings (Step 7)
- Handling a Late Payment — Step 6b (section cross-reference; Deeper workflow reads; hub) — Collections Pending on new inventory at month-end (Step 7)
- Managing a Check-in — Step 6 (section cross-reference; Deeper workflow reads; hub) — Access-code or Nuki blockers before first arrival (Step 7)
- Managing a Check-in — Step 6b (section cross-reference; Deeper workflow reads; hub) — Move-in Pending on new inventory at month-end (Step 7)
- Notification triage — Step 6 (section cross-reference; Deeper workflow reads; hub) — Row-click blocked on first-booking alerts (Step 7)
- Managing a Check-in (section cross-reference; Deeper workflow reads; hub) — First arrival-week prep after the first reservation is confirmed (Step 7)
- Entering Monthly Utility Bills (section cross-reference; Deeper workflow reads; hub) — First monthly bill cycle after utility IDs are saved (Step 6)
- Portfolio KPI review (section cross-reference; Deeper workflow reads; hub) — Month-end pass once the property has bookings
- Portfolio KPI review — Step 6 (section cross-reference; Deeper workflow reads; hub) — Baseline tenant-segment filters once bookings accumulate (Step 7)
- Portfolio KPI review — Step 7 (section cross-reference; Deeper workflow reads; hub) — Month-end Total Debt and Pending pill triage on new inventory (Step 7)
- Manual block hygiene (section cross-reference; Deeper workflow reads; hub) — Audit pass when Step 7 Multicalendar still shows unexpected holds; Step 6 (section cross-reference; Deeper workflow reads; hub) when calendar edits are blocked
- Resetting a Management User Password (section cross-reference; Deeper workflow reads; hub) — Recover access when a lockout delayed go-live verification (Step 7); refresh Landlord MCP JWT after Step 3 (section cross-reference; Deeper workflow reads; hub), then catch up Notification triage — Step 5 (section cross-reference; Deeper workflow reads; hub) / Step 6 (section cross-reference; Deeper workflow reads; hub) and Entering Monthly Utility Bills — Step 5 (section cross-reference; Deeper workflow reads; hub) / Step 4b (section cross-reference; Deeper workflow reads; hub)
- Entering Monthly Utility Bills — Step 4b (section cross-reference; Deeper workflow reads; hub) — Utility overage Pending on new inventory at month-end (Step 7)
- Entering Monthly Utility Bills — Step 6 (section cross-reference; Deeper workflow reads; hub) — AI extraction or overage posting blocked after the first bill cycle (Step 7)
Navigation & bookmarks
Bookmark routes pair with Management Frontend Deep Links and Create New menu. Full pairing matrix: Onboarding a New Property section cross-reference · Common Workflows section cross-reference.
- Create New menu — Property and Unit wizard shortcuts from any screen
- FAQ — Permission denied toast — Red You do not have permission to perform this action. toast when RBAC blocks a save; fix in Users → Role Permissions
- Management Frontend Deep Links — Booking engine details — Bookmarkable
?propertyDetails=1/?listingDetails=1URLs (Vivin internal)
Concepts & settings that shape this workflow
Concept and settings bullets pair with Concepts hub subsection index and Concept cross-reference and Account Settings — Tab cross-reference. Full pairing matrix: Onboarding a New Property section cross-reference · Common Workflows section cross-reference.
- Integrations & Distribution — Enable platforms in Settings, then link each unit on Sales Channels (Steps 5–6) (section cross-reference; Deeper workflow reads; hub)
- Tenant Portal — Portal branding and self-service before the first tenant moves in (section cross-reference; Deeper workflow reads; hub)
- FAQ — Tenant contract signing blocked — No PDF yet, mandatory Your Details gates, category locks, or Lease purpose; portal signing vs paper upload on Contract Info
- Tenant MCP — Booking-scoped
get-chatbot-rules,get-chatbot-persona, andget-portal-linkswhen external assistants inherit Step 4 segment and chatbot setup (Step 4);list-bookings-by-emailafter the first channel import (Step 5 → Processing a New Booking — Step 1);get-portal-linksafter contract mail andnotify-landlordfor missing-import chatbot escalations (Step 5);get-portal-linksand chatbot reads after the first reservation in Step 7 (section cross-reference; Deeper workflow reads; hub) - Landlord MCP —
list-owners/create-ownerbefore property setup (Step 1);create-property,get-property,list-propertiesduring the wizard (Step 2);create-listing,get-listing,get-listing-pricing-table,set-listing-pricing-monthfor units (Step 3);list-listings,get-listing(unavailabilities),get-listing-calendar,get-booking-summary, and property reads during channel verification (Step 5);get-propertyfor utility IDs vs Utilities → Connections matrix, pluslist-bills/get-bill/create-billcontrast for monthly bills (Step 6; inline Connections edits remain operator UI);list-properties,list-listings,get-vacant-units-next-month,get-booking-summaryfor post-onboarding verification (Step 7); hub (section cross-reference; Deeper workflow reads; hub) - Automation & AI — Landlord vs Tenant MCP surface choice during channel linking (Step 5) (section cross-reference; Deeper workflow reads; hub)
- Payment Allocation — Two-layer payment model before the first confirmation receipt (section cross-reference; Deeper workflow reads; hub)
- Booking Lifecycle — Status progression after the first reservation is created (section cross-reference; Deeper workflow reads; hub)
- Services Marketplace — Configure Services catalogue before the first tenant moves in (section cross-reference; Deeper workflow reads; hub)
- Settings > General Information — Company branding before the property wizard
- Settings > Tenant categories — Default segment and default for integrations before marketplace channel imports (Step 4); assign on Tenant Info in Processing a New Booking — Step 2 for direct reservations; mirror Bookings/Tenants filters when Finance cache parity lags (FAQ — Finance tenant category filter parity)
- Settings > Categories — Seed ticket, booking, and listing tags before the first turnover
- Settings > Preferences — Tenant Portal — Portal permissions and contract-signing gates
- Settings > Preferences — Enable deposit disputes — Account toggle before first move-out disputes
- Settings > Emails — Lifecycle templates and Communication Rules before move-in
Listings, sales & channel surfaces
Listings, sales & channel surfaces bullets pair with the matching topic rows in Onboarding a New Property section cross-reference. Full pairing matrix: Onboarding a New Property section cross-reference · Common Workflows section cross-reference.
- Listings module — Property wizard, unit setup, and sidebar tabs
- Sales — Overview tab — Post-onboarding occupancy heatmap after channels connect (Step 5)
- Sales — Channel Manager — Per-unit link status and iCal export (Step 5)
- Property & listing details (booking engine) — the Full integration pill for partner payload (Step 4)
- Dashboard module — Vacant Units and Today KPIs once channels and listings are live
Utilities, operations & finance surfaces
Utilities, operations & finance surfaces bullets pair with the matching topic rows in Onboarding a New Property section cross-reference. Full pairing matrix: Onboarding a New Property section cross-reference · Common Workflows section cross-reference.
- Utilities module — Verify Connections after utility IDs are saved (Step 6)
- Operations module — Automatic turnover tickets from Maintenances (Step 4)
- Operations — Linking cash flows to a ticket — Cost allocation when contractor invoices follow setup
- Finance module — Portfolio ledgers once live bookings accumulate Contract Values
Deeper workflow reads
Concept workflow reads pair with Concepts hub subsection index and Concept cross-reference. Each concept sub-guide reciprocates with [Deeper workflow reads](../workflows/onboarding-a-new-property.md#deeper-workflow-reads) anchors on Onboarding a New Property bullets — hub parity: Common Workflows hub — Deeper workflow reads. Full pairing matrix: Onboarding a New Property section cross-reference · Common Workflows section cross-reference.
- Booking Lifecycle — Computed status model, list filters, and Timeline (section cross-reference; Deeper workflow reads; hub)
- Tenant Portal — Booking-scoped tenant self-service, contract signing, and payments (section cross-reference; Deeper workflow reads; hub)
- Tenant MCP — Booking-scoped external AI clients and portal-link tools (section cross-reference; Deeper workflow reads; hub)
- Automation & AI — Channel map, chatbot, in-app assistant, and MCP clients (section cross-reference; Deeper workflow reads; hub)
- Integrations & Distribution — Marketplace calendar sync, booking imports, and white-label engine (section cross-reference; Deeper workflow reads; hub)
- Services Marketplace — Portal add-on catalogue and fulfilment on Payment plan (section cross-reference; Deeper workflow reads; hub)
- Create New Menu — Global + slide-out shortcuts into module create flows (section cross-reference; Deeper workflow reads; hub)
- Management Frontend Deep Links — Bookmarkable management routes and notification deep links (section cross-reference; Deeper workflow reads; hub)
Deeper API reads
API reads pair with API Reference hub subsection index and API guide cross-reference. Hub parity: Common Workflows — Deeper API reads. Full pairing matrix: Onboarding a New Property section cross-reference · Common Workflows section cross-reference.
- Listings & Availability — Partial
GET /listingspulls paired with Step 5 — Connect to external platforms verification (section cross-reference; Deeper workflow reads; hub) - Property & Unit Mapping — External listing IDs before channel imports land in Listings (section cross-reference; Deeper workflow reads; hub)
- Full listing feeds — Partner full JSON feeds behind marketplace Channels setup (section cross-reference; Deeper workflow reads; hub)
- iCal feeds — Calendar retrofeed imports on Sales → Channels (Step 5) (section cross-reference; Deeper workflow reads; hub)
- Authentication — Integration Bearer keys vs management JWT before you enable platforms (section cross-reference; Deeper workflow reads; hub)
- Creating Bookings — First reservation verification after Step 7 — Verify in Listings (section cross-reference; Deeper workflow reads; hub)
Lockout catch-up after password recovery
Property wizard progress during lockout pairs with Resetting a Management User Password. Hub parity: Common Workflows — Lockout catch-up after password recovery. Full pairing matrix: onboarding-a-new-property-section-cross-reference · Common Workflows section cross-reference.
- Common Workflows — Lockout catch-up after password recovery — Hub matrix when sign-in was restored mid-workflow
- Getting Started — Lockout catch-up after password recovery — Canonical operational backlog mesh
- Resetting a Management User Password — Step 3 — Recover sign-in before rerunning wizard steps
- Step 7 — Verify in Listings — Go-live verification delayed by lockout
- Notification triage — Step 5 — Clear go-live alerts after recovery
Pending manual receipt approval
First confirmation receipts on newly onboarded inventory pair with Processing a New Booking — Step 5b. Hub parity: Common Workflows — Pending manual receipt approval. Full pairing matrix: onboarding-a-new-property-section-cross-reference · Common Workflows section cross-reference.
- Common Workflows — Pending manual receipt approval — Hub matrix when recorded transfers still await Approve payments
- Glossary — Pending manual in-payment (Finance) — Definition and three-surface triage
- Glossary — Pending manual receipt approval hub — Surface table + per-guide/module mesh reciprocal hub
- FAQ — Pending manual receipt approval hub — Symptom table + per-guide/module mesh
- Processing a New Booking — Step 5b — First confirmation receipts after Step 7
- Finance — Pending manual payments — Amber Pending chip on new inventory
- FAQ — Manual receipt still pending — Why KPIs lag until approval
- Notification triage — Pending manual receipt approval — First Payment received alert on Step 4 (
notifications-row-navigate-to-booking-detail.png) - Portfolio KPI review — Pending manual receipt approval — First month-end sign-off (Step 7)
- Processing a New Booking — Pending manual receipt approval — Confirmation mesh on Step 5b / Step 6b (
finance-transactions-pending-approve-flow.mp4)
Utility overage collections
First supplier bill cycles on newly onboarded inventory pair with Step 7 — Verify in Listings before utility overage lines post to tenant Payment Plan — hub: Common Workflows — Utility overage collections. Full pairing matrix: onboarding-a-new-property-section-cross-reference · Common Workflows section cross-reference.
- Common Workflows — Utility overage collections — Hub matrix (
utilities-allocations-row-breakdown-expanded.png,utilities-allocations-review-flow.mp4) - Step 7 — Verify in Listings — Go-live before first Utilities → Bills entry
- Entering Monthly Utility Bills — Step 2 — First landlord bill on new property
- Settings — Utilities — Tenant Notification (None / Charge / Notify & Charge) before overages post
- Processing a New Booking — Step 6 — First Upcoming import before bill cycle
- Portfolio KPI review — Step 7 — Month-end segment-wide overage arrears sign-off
Check-out final utilities handoff
Charge Time, Tenant Notification, and Utilities → Connections on Step 4 — Configure property settings / Step 6 — Verify utility connections pair with Step 7 — Verify in Listings before the first departing stay posts final overages — hub: Common Workflows — Check-out final utilities handoff. Full pairing matrix: onboarding-a-new-property-section-cross-reference · Common Workflows section cross-reference.
- Common Workflows — Check-out final utilities handoff — Hub matrix (
utilities-allocations-review-flow.mp4,utilities-bills-tab-missing-toggle.png) - Step 4 — Configure property settings — Charge Time (Every Month vs End of Booking) before first departure
- Step 6 — Verify utility connections — Supplier IDs before final meter reads
- Entering Monthly Utility Bills — Step 2 — First landlord bill on go-live inventory
- Managing a Check-out — Step 6 — Downstream settlement on first departure
- Glossary — End-of-Booking cost split — Deferred posting when Charge Time is End of Booking
Check-in to check-out handoff
First Ongoing stay on go-live inventory pairs Step 7 — Verify in Listings with downstream Managing a Check-in — Step 4 → Managing a Check-out — Step 1 — hub: Common Workflows — Check-in to check-out handoff. Hub parity: Property setup to first arrival handoff. Full pairing matrix: onboarding-a-new-property-section-cross-reference · Common Workflows section cross-reference.
- Common Workflows — Check-in to check-out handoff — Hub matrix (
operations-check-in-out-check-outs-next-7-days.png,workflows-operations-check-in-out-planning-view.png) - Glossary — Check-in to check-out handoff hub — Surface table + per-guide/module mesh
- Step 7 — Verify in Listings — Go-live before first departure-week planning
- Managing a Check-in — Step 4 — First key handover on new inventory
- Managing a Check-out — Step 1 — ~7 days before first departure
- Common Workflows — Property setup to first arrival handoff — Upstream onboarding mesh
- FAQ — Managing a Check-in hub — Arrival-week symptom table
Check-out collections before refund
First departure-week rent arrears on go-live inventory pair with Step 7 — Verify in Listings before Managing a Check-out — Step 5 — hub: Common Workflows — Check-out collections before refund. Hub parity: Property setup to first arrival handoff. Full pairing matrix: onboarding-a-new-property-section-cross-reference · Common Workflows section cross-reference.
- Common Workflows — Check-out collections before refund — Hub matrix (
workflows-check-out-coordination-flow.mp4,bookings-detail-payment-plan-tab-schedule.png,finance-contract-values-in-debt-filter.png) - Step 7 — Verify in Listings — Go-live before first departure-week collections
- Handling a Late Payment — Step 1 — Collections on unpaid rent/fee rows
- Managing a Check-out — Step 6 — Settlement before Ready To Refund
- Processing a New Booking — Step 6 — First Ongoing stay before departure week
- Portfolio KPI review — Step 7 — Month-end departure arrears sign-off
Check-out ledger cleanup before refund
Duplicate departure transfers on the first go-live booking after Step 7 — Verify in Listings pair with Reject / Revert on booking Transactions before Managing a Check-out — Step 5 — hub: Common Workflows — Check-out ledger cleanup before refund. Distinct from rent Check-out collections before refund. Full pairing matrix: onboarding-a-new-property-section-cross-reference · Common Workflows section cross-reference.
-
Common Workflows — Check-out ledger cleanup before refund — Hub matrix (
bookings-detail-transactions-revert-modal-info-banner.png,finance-transactions-bulk-reject-selected-bar.png) -
Step 7 — Verify in Listings — First departure-week duplicate on go-live inventory
-
Reject/revert mistaken receipts — Reject selected on first confirmation duplicates (Step 5b mesh)
-
Managing a Check-out — Step 6 — Downstream settlement before refund
-
Processing a New Booking — Reject/revert mistaken receipts — Upstream confirmation duplicate mesh
-
Portfolio KPI review — Step 7 — Month-end duplicate cleanup sign-off
-
FAQ — Check-out ledger cleanup before refund hub — Symptom table for phantom In Debt / Ready To Refund blocked when tenant paid once
Cancellation collections before void
Pre-cancel rent arrears on the first go-live booking pair with Step 7 — Verify in Listings before Cancelling a Booking — Step 2 — hub: Common Workflows — Cancellation collections before void. Distinct from departure-week Check-out collections before refund. Full pairing matrix: onboarding-a-new-property-section-cross-reference · Common Workflows section cross-reference.
- Common Workflows — Cancellation collections before void — Hub matrix (
finance-contract-values-in-debt-filter.png,bookings-cancel-booking-modal-refund-types.png,workflows-cancel-booking-refund-modal-flow.mp4) - Step 7 — Verify in Listings — Go-live before first policy void
- Cancelling a Booking — Step 2 — Settlement before Step 4
- Handling a Late Payment — Step 1 — Collections on unpaid rent/fee rows
- Check-out collections before refund — Departure-week contrast when stay completes normally
- Portfolio KPI review — Step 7 — Month-end pre-cancel arrears sign-off
Notification row-click navigation
First Payment received / payment overdue alerts after go-live pair with Notification triage — Step 4 on Step 7 — Verify in Listings — contrast Upcoming confirmation paths with Ongoing receivables. Hub parity: Common Workflows — Notification row-click navigation. Full pairing matrix: onboarding-a-new-property-section-cross-reference · Common Workflows section cross-reference.
- Common Workflows — Notification row-click navigation — Hub matrix (
notifications-row-navigate-to-booking-detail.png,notifications-row-navigation-flow.mp4) - Glossary — Notification row navigation — Target-field order and bell General contrast
- Glossary — Notification row navigation hub — Surface table + per-guide/module mesh
- FAQ — Notification row-click navigation hub — First Payment received on Step 7 go-live symptom table
- Processing a New Booking — Notification row-click navigation — Upstream confirmation alerts on Step 6
- Notification triage — Step 4 — First Payment received alert (
notifications-row-navigate-to-booking-detail.png) - Step 7 — Verify in Listings — Go-live verification when first alerts appear
- Pending manual receipt approval — First confirmation Pending on Step 5b (
finance-transactions-pending-pill.png) - Portfolio KPI review — Notification row-click navigation — First month-end alert batch
WhatsApp per-booking messaging
First tenant WhatsApp threads after go-live pair with Bookings → Communication on Step 7 — Verify in Listings when ChatBot settings — Status Bot shows Connected — contrast bell Inbox on first New WhatsApp message from … alerts. Hub parity: Glossary — WhatsApp per-booking messaging hub · Common Workflows — WhatsApp per-booking messaging. Full pairing matrix: onboarding-a-new-property-section-cross-reference · Common Workflows section cross-reference.
- Common Workflows — WhatsApp per-booking messaging — Hub matrix (
bookings-detail-communication-tab-whatsapp-composer.png,inbox-module-triage-flow.mp4) - Glossary — WhatsApp per-booking messaging hub — Surface table + per-guide/module mesh reciprocal hub
- FAQ — WhatsApp per-booking messaging hub — First tenant threads after go-live on Step 7 symptom table
- Step 7 — Verify in Listings — Go-live verification when first message alerts appear
- ChatBot settings — Status Bot — Connected before tenant threads work
- Processing a New Booking — WhatsApp per-booking messaging — Downstream confirmation follow-up on Step 6
- Notification triage — Step 2 — First message ping triage
- Inbox module — Cross-booking triage before opening one booking
Bot reasoning (audit)
First tenant bot threads on Step 7 go-live — expand Reasoning under mint Bot bubbles on Bookings → Communication → WhatsApp to audit automated replies before editing ChatBot persona or IF/THEN rules. Hub parity: Glossary — Bot reasoning (audit) hub · Common Workflows — Bot reasoning (audit). Full pairing matrix: onboarding-a-new-property-section-cross-reference · Common Workflows section cross-reference.
- Common Workflows — Bot reasoning (audit) — Hub matrix (
bookings-detail-communication-tab-bot-reasoning-expanded.png) - Glossary — Bot reasoning (audit) hub — Surface table + per-guide/module mesh reciprocal hub
- FAQ — Bot reasoning (audit) hub — Symptom table for Reasoning vs ChatBot settings
- ChatBot settings — Bot reasoning audit — Read-only thread audit vs editable persona / IF/THEN
- Bookings — Communication tab — Reasoning control on Bot bubbles
- Glossary — ChatBot settings hub — Edit persona / IF/THEN after thread audit
- Step 7 — Verify in Listings — Workflow step where bot replies surface
ChatBot settings
Pair Account Settings → ChatBot (Persona, IF/THEN, Status Bot) with thread review on Communication when first tenant bot threads on step 7 go-live. Hub parity: Glossary — ChatBot settings hub · Common Workflows — ChatBot settings. Full pairing matrix: onboarding-a-new-property-section-cross-reference · Common Workflows section cross-reference.
- Common Workflows — ChatBot settings — Hub matrix (
settings-chatbot-tab-overview.png,settings-chatbot-status-bot-connected.png,settings-chatbot-save-rule-flow.mp4) - Glossary — ChatBot settings hub — Surface table + per-guide/module mesh reciprocal hub
- FAQ — ChatBot settings hub — Symptom table for pairing, persona, and IF/THEN tuning
- ChatBot settings — Persona, IF/THEN rules, Status Bot WhatsApp pairing
- Glossary — Bot reasoning (audit) hub — Thread Reasoning audit after rule changes
- Onboarding a New Property — Step 4 — Setup-step pairing for tenant chatbot rules
Payment notification (operator)
First Payment received alerts after Step 7 — Verify in Listings go-live require account Receive payment notifications and each operator's Payment notification emails on /settings/personal before teammates report missing rows. Hub parity: Common Workflows — Payment notification (operator). Full pairing matrix: onboarding-a-new-property-section-cross-reference · Common Workflows section cross-reference.
- Common Workflows — Payment notification (operator) — Hub matrix (
notifications-row-navigate-to-booking-detail.png,notifications-row-navigation-flow.mp4) - Glossary — Payment notification (operator) — Three row types + opt-in layers
- FAQ — Payment notification (operator) hub — Symptom table + per-guide/module mesh
- Settings — Preferences — Notifications & emails — Account Receive payment notifications master
- Settings — Interface language — Your email preferences — Per-user Payment notification emails
- Step 7 — Verify in Listings — First confirmation alerts after go-live
- Processing a New Booking — Payment notification (operator) — Confirmation-week row types
- Settings — Preferences — Notifications & emails — Account master during setup steps 1–3
- Settings — Interface language — Your email preferences — Per-user opt-in
Payment alert to receivables triage
First Payment received / payment overdue alerts after go-live pair with Notification triage — Step 4 on Step 7 — Verify in Listings — contrast Upcoming confirmation paths with Ongoing receivables. Hub parity: Common Workflows — Payment alert to receivables triage. Full pairing matrix: onboarding-a-new-property-section-cross-reference · Common Workflows section cross-reference.
- Common Workflows — Payment alert to receivables triage — Hub matrix (
notifications-row-navigate-to-booking-detail.png,notifications-row-navigation-flow.mp4) - Glossary — Payment alert to receivables triage — Ongoing/Ended payment overdue before Debt Aging
- Glossary — Payment alert to receivables triage hub — Surface table + per-guide/module mesh
- FAQ — Payment alert to receivables triage hub — First Payment received on Step 7 go-live symptom table
- Processing a New Booking — Payment alert to receivables triage — Upstream confirmation alerts on Step 5 / Step 6
- Notification triage — Step 4 — First Payment received alert (
notifications-row-navigate-to-booking-detail.png) - Step 7 — Verify in Listings — Go-live verification when first alerts appear
- Pending manual receipt approval — First confirmation Pending on Step 5b (
finance-transactions-pending-pill.png) - Portfolio KPI review — Payment alert to receivables triage — First month-end alert batch
Finance debt receivables triage
First portfolio Top debtors after go-live pair with Step 7 — Verify in Listings when first confirmation charges settle — not Debt Aging until Processing a New Booking — Step 5 / Step 6 complete. Hub parity: Common Workflows — Finance debt receivables triage. Full pairing matrix: onboarding-a-new-property-section-cross-reference · Common Workflows section cross-reference.
- Common Workflows — Finance debt receivables triage — Hub matrix (
finance-overview-income-chart-debt-aging.png,dashboard-kpi-total-debt-tooltip.png) - Processing a New Booking — Finance debt receivables triage — Upstream confirmation arrears on Step 5 / Step 6
- Step 7 — Verify in Listings — Go-live verification when Total Debt first appears
- Pending manual receipt approval — First confirmation Pending on Step 5b (
finance-transactions-pending-pill.png) - Notification triage — Step 4 — First Payment received alert (
notifications-row-navigate-to-booking-detail.png) - Portfolio KPI review — Finance debt receivables triage — First month-end sign-off
- Glossary — Finance debt receivables triage hub — Surface table + per-guide/module mesh reciprocal hub
- FAQ — Finance debt receivables triage hub — First Top debtors after go-live symptom table
Handling a Late Payment collections
First Top debtors after go-live on Step 7 — Verify in Listings may need Handling a Late Payment — Steps 1–4 when first bookings owe confirmation or move-in charges. Hub parity: Common Workflows — Handling a Late Payment collections hub. Full pairing matrix: onboarding-a-new-property-section-cross-reference · Common Workflows section cross-reference.
- Common Workflows — Handling a Late Payment collections hub — Hub matrix (
finance-overview-income-chart-debt-aging.png,notifications-row-navigate-to-booking-detail.png) - Step 7 — Verify in Listings — First receivables after go-live
- Processing a New Booking — Step 5 — Unpaid confirmation on first bookings
- Handling a Late Payment — Steps 1–4 — Collections when first charges stay unpaid
- Notification triage — Clear go-live alert backlog before collections
- Glossary — Handling a Late Payment collections hub — Surface table + per-guide/module mesh reciprocal hub
- FAQ — Handling a Late Payment collections hub — Go-live collections symptom table
Dashboard Total Debt subtitle
First reservations on new inventory may move Total Debt from zero — pair Step 7 with Finance → Overview when headline and Uncovered Debt diverge. Hub parity: Common Workflows — Finance debt receivables triage. Full pairing matrix: onboarding-a-new-property-section-cross-reference · Common Workflows section cross-reference.
- FAQ — Dashboard Total Debt subtitle — Headline vs >15 days subtitle (
dashboard-kpi-total-debt-tooltip.png) - Processing a New Booking — Step 5b — First confirmation Pending lag
- Finance debt receivables triage — Debt Aging on first live portfolio debt
- Portfolio KPI review — Dashboard Total Debt subtitle — First month-end baseline
- Getting Started — Recommended Setup Sequence — Setup order before KPI reads
Uncovered Debt KPI
First reservations on new inventory may move Total Debt from zero — when Uncovered Debt tracks Total Debt after Step 7, deposit cushions are thin on early debtors. Hub parity: Common Workflows — Finance debt receivables triage. Full pairing matrix: onboarding-a-new-property-section-cross-reference · Common Workflows section cross-reference.
- FAQ — Uncovered Debt KPI — Deposit coverage vs Total Debt (
finance-overview-kpi-cards.png) - Glossary — Uncovered Debt — First live-portfolio receivables baseline
- Finance debt receivables triage — Debt Aging on first portfolio debt
- Processing a New Booking — Step 5 — Confirmation deposits vs arrears
- Dashboard Total Debt subtitle — Ongoing-only
/vs Finance strip
Finance Income status drill-down
First portfolio receivables after go-live on Step 7 — learn Income → In debt (payment lines) vs Debt Aging (booking rows) before escalation. Hub parity: Common Workflows — Finance Income status drill-down. Full pairing matrix: onboarding-a-new-property-section-cross-reference · Common Workflows section cross-reference.
- FAQ — Finance Income status drill-down — Income chart (Paid / Scheduled / In debt); month-scoped payment-line modal (
finance-overview-income-status-in-debt-modal.png) - Glossary — Finance income status — In debt segment vs Debt Aging booking rows
- Finance debt receivables triage — Top debtors when you need ranked debtors, not payment lines (
finance-overview-debt-aging-expanded-bucket.png) - FAQ — Bookings that owe money — Booking-level receivables on Debt Aging
- Step 7 — Verify in Listings — First Finance → Overview receivables read
- Glossary — Finance Income status drill-down hub — Surface table + per-guide/module mesh reciprocal hub
- FAQ — Finance Income status drill-down hub — First portfolio Income read symptom table
Cash flow forecast drill-down
First collections after go-live on Step 7 — learn Cash flow forecast (actual received) vs Dashboard Cash Flow Forecast (rent due). Hub parity: Common Workflows — Cash flow forecast drill-down. Full pairing matrix: onboarding-a-new-property-section-cross-reference · Common Workflows section cross-reference.
- FAQ — Cash flow forecast drill-down — Cash flow forecast chart (Month / Day); All payments modal (
finance-overview-cash-flow-all-payments-modal.png) - Glossary — Cash flow forecast (Finance Overview) — Collections history vs Dashboard rent-due chart vs Income status
- Finance Income status drill-down — Paid / Scheduled / In debt when scheduled vs collected mismatch
- Dashboard — Cash Flow Forecast — Rent due timing (
dashboard-cash-flow-forecast-chart.png) — not Finance collections - Step 7 — Verify in Listings — First Finance → Overview collections read
- Glossary — Cash flow forecast drill-down hub — Surface table + per-guide/module mesh reciprocal hub
- FAQ — Cash flow forecast drill-down hub — First collections read symptom table
Reject/revert mistaken receipts
Duplicate confirmation receipts on first reservations pair with Payment Allocation — Correcting mistaken receipts. Hub parity: Common Workflows — Reject/revert mistaken receipts. Full pairing matrix: onboarding-a-new-property-section-cross-reference · Common Workflows section cross-reference.
-
Common Workflows — Reject/revert mistaken receipts — Hub matrix when duplicate receipts need Reject / Revert
-
Glossary — Credit note warning (reject/revert) — Modal banners and Not issued credit note queue
-
Glossary — Reject/revert mistaken receipts hub — Surface table + per-guide/module mesh reciprocal hub
-
Glossary — Credit note warning (reject/revert) hub — Modal-banner surface table + per-guide/module mesh
-
FAQ — Credit note warning (reject/revert) hub — Symptom table + per-guide/module mesh
-
Payment Allocation — Correcting mistaken receipts — Reject duplicate confirmation transfers
-
Glossary — Credit note (payment reject/revert) — Accounting follow-up on first reservations
-
Finance — Row actions on in-payment rows — Bulk Reject selected (
finance-transactions-bulk-reject-selected-bar.png) -
Processing a New Booking — Step 5b — Reject selected duplicate confirmation after first reservation (
bookings-detail-transactions-reject-modal-credit-note-banner.png) -
Notification triage — Reject/revert mistaken receipts — First Payment received alert on Step 4
-
Portfolio KPI review — Reject/revert mistaken receipts — First month-end sign-off (Step 7)
-
FAQ — Reject/revert mistaken receipts hub — First confirmation receipts symptom table
Month-end invoicing (fixed date)
First month-end after go-live — save a fixed Invoice date in Settings → Invoicing before the first bulk Issue allocation on new inventory — pair Bulk Hostkit invoicing on the same amber toolbar banner. Hub parity: Common Workflows — Month-end invoicing (fixed date). Full pairing matrix: onboarding-a-new-property-section-cross-reference · Common Workflows section cross-reference.
- Common Workflows — Month-end invoicing (fixed date) — Hub matrix (
settings-invoicing-invoice-date-toggle.png,finance-transactions-fixed-invoice-date-banner.png,finance-transactions-bulk-toolbar-fixed-invoice-date-banner.png) - Invoicing — Default invoice date — Toggle Use today as invoice date off + Save
- Finance — Month-end invoicing with a fixed date — Six-step operator habit on Transactions
- Common Workflows — Bulk Hostkit invoicing — Issue allocation after fixed date is saved
- FAQ — Month-end invoicing (fixed date) hub — Symptom table + toggle reset after batch
- Glossary — Fixed invoice date — Account-wide until you change it
Bulk Hostkit invoicing
Bulk Issue allocation / Invoice selected and Issue credit notes (N) pace Hostkit per listing key — pair Month-end invoicing (fixed date) when every document must share one saved Invoice date. Hub parity: Common Workflows — Bulk Hostkit invoicing. Full pairing matrix: onboarding-a-new-property-section-cross-reference · Common Workflows section cross-reference.
- Common Workflows — Bulk Hostkit invoicing — Hub matrix (
finance-transactions-bulk-selection-bar.png,settings-invoicing-hostkit-series.png) - FAQ — Bulk Hostkit invoicing hub — Symptom table + per-guide mesh
- Common Workflows — Month-end invoicing (fixed date) — Fixed Invoice date before bulk export (
finance-transactions-bulk-toolbar-fixed-invoice-date-banner.png) - Common Workflows — Reject/revert mistaken receipts — Issue credit notes (N) after invoiced Reject / Revert
- FAQ — Bulk Hostkit invoicing slow — HTTP 429 pacing — leave batch running; refresh Transactions before re-issue
- Processing a New Booking — Step 6b — Month-end confirmation mesh on new inventory
- Portfolio KPI review — Step 7 — First month-end sign-off after go-live
- Finance — Invoice automation — Bulk Issue allocation / Invoice selected
- Managing a Check-in — Bulk Hostkit invoicing — First arrivals after go-live (Step 6b mesh)
- Processing a New Booking — Bulk Hostkit invoicing — First confirmation month-end export
Rent reduction after invoicing
First month-end after go-live may hit invoiced floor on live bookings — goodwill repricing pairs with Bulk Hostkit invoicing when external credit notes need Issue credit notes (N) — same Hostkit pacing as first-time Issue allocation. Hub parity: Common Workflows — Rent reduction after invoicing. Full pairing matrix: onboarding-a-new-property-section-cross-reference · Common Workflows section cross-reference.
- Common Workflows — Rent reduction after invoicing — Hub matrix: invoiced-floor modals + MP4 (
bookings-detail-change-monthly-rent-modal.png,bookings-detail-contract-values-invoiced-floor-edit-amount.png,bookings-rent-reduction-invoiced-floor-flow.mp4) - FAQ — Rent reduction after invoicing hub — First month-end invoiced floor on new inventory symptom table
- Common Workflows — Bulk Hostkit invoicing — Issue credit notes Hostkit pacing after external rent relief (
finance-transactions-bulk-selection-bar.png) - Glossary — Invoiced floor (rent) — Change monthly rent clamp vs Edit amount Save block
- FAQ — Lower rent below invoiced — External credit note path when in-product net cannot drop
- Bookings — Changing contract dates and rent — Repricing entry on booking sidebar
- Processing a New Booking — Step 3 — Schedule still editable before first Issue allocation
- Portfolio KPI review — Step 7 — First month-end repricing sign-off on new inventory
- Finance — Invoiced floor and rent edits — Why edits start on the booking, not Transactions
Same-day turnover coordination
Step 7 — Verify in Listings Multicalendar and Timeline passes on newly onboarded inventory should flag units with frequent same-day turnover — configure Maintenances tab auto tickets before the first Processing a New Booking reservation. Hub parity: Common Workflows — Same-day turnover coordination. Full pairing matrix: onboarding-a-new-property-section-cross-reference · Common Workflows section cross-reference.
- Common Workflows — Same-day turnover coordination — Hub matrix (
workflows-operations-check-in-out-planning-view.png,bookings-timeline-day-week-month-and-sidebar.mp4) - Glossary — Same-day turnover coordination hub — Surface table + per-guide/module mesh
- Step 7 — Verify in Listings — Go-live Multicalendar / Timeline turnover planning
- Listings — Maintenances tab — Auto check-in/out ticket toggles before first stay
- Processing a New Booking — Step 1 — Downstream overlap on first reservation
- Managing a Check-in — Step 1 — First arrival-week turnover coordination
Occupancy KPI to block hygiene handoff
Step 7 — Verify in Listings Multicalendar and Timeline passes on newly onboarded inventory often surface unexpected manual holds — clear them via Manual block hygiene before the first Processing a New Booking reservation. Hub parity: Common Workflows — Occupancy KPI to block hygiene handoff. Full pairing matrix: onboarding-a-new-property-section-cross-reference · Common Workflows section cross-reference.
- Common Workflows — Occupancy KPI to block hygiene handoff — Hub matrix (
listings-module-overview.png,audit-manual-blocks-workspace.png) - Glossary — Occupancy KPI to block hygiene handoff hub — Surface table + per-guide/module mesh reciprocal hub
- FAQ — Occupancy KPI to block hygiene handoff hub — Go-live Multicalendar hold symptom table
- Step 7 — Verify in Listings — Go-live Multicalendar hold check
- Manual block hygiene — Step 1 — Portfolio Audit when new units look blocked
- Processing a New Booking — Step 1 — Downstream overlap on first reservation
- Sales — Multicalendar — Availability timeline without rent cells
Deposit missing on Finance Deposits
First check-out deposit triage on Step 7 — Verify in Listings should clear Finance → Deposits toolbar date range when the first departing stay falls outside the default ~3 months window — not only partly collected shortfalls. Hub parity: Common Workflows — Deposit missing on Finance Deposits. Full pairing matrix: onboarding-a-new-property-section-cross-reference · Common Workflows section cross-reference.
- Common Workflows — Deposit missing on Finance Deposits — Hub matrix (
finance-deposits-date-range-toolbar-default.png,finance-deposits-date-range-clear-flow.mp4) - Step 7 — Verify in Listings — First reservation go-live before portfolio deposit triage
- Processing a New Booking — Deposit missing on Finance Deposits — Upstream confirmation Deposit tab vs Finance row
- Managing a Check-out — Deposit missing on Finance Deposits — Downstream refund mesh on completed stays
- Glossary — Finance Deposits date range — Intersection rule on check-in, check-out, Refund Due Date
- Portfolio KPI review — Deposit missing on Finance Deposits — First month-end sign-off after go-live
Deposit lifecycle status
After Step 7 — Verify in Listings, the first confirmation deposit on a new unit surfaces depositStatus transitions — pair with Processing a New Booking — Step 5. Hub parity: Common Workflows — Deposit lifecycle status. Full pairing matrix: Onboarding A New Property section cross-reference · Common Workflows section cross-reference.
- Step 7 — Verify in Listings — First reservation deposit triage after go-live
- Processing a New Booking — Deposit lifecycle status — Confirmation deposit recording
- Common Workflows — Deposit lifecycle status — Hub matrix
- Glossary — Deposit lifecycle status —
depositStatuspill vocabulary
Partly collected security deposit
First confirmation deposit shortfalls pair with Processing a New Booking — Step 5 after Step 7 — Verify in Listings go-live — chase remaining before the first Managing a Check-in — Step 4. Hub parity: Common Workflows — Partly collected security deposit. Full pairing matrix: onboarding-a-new-property-section-cross-reference · Common Workflows section cross-reference.
- Common Workflows — Partly collected security deposit — Hub matrix (
finance-deposits-lifecycle-partial-paid-card.png,finance-deposits-partial-collection-walkthrough.mp4) - Processing a New Booking — Step 5 — Confirmation payment that may leave Partially paid on Deposit
- Step 7 — Verify in Listings — Go-live pass before first deposit triage
- Managing a Check-in — Partly collected security deposit — Chase shortfall before first arrival (Step 3)
- Deposit missing on Finance Deposits — Clear toolbar range when Partial paid card is empty after go-live
- FAQ — Partly collected security deposit — Distinct from Partial Paid rent on Payment Plan
- Glossary — Deposit lifecycle status —
depositStatuspill vocabulary
Wrong tenant on a booking
First channel imports after Step 7 — Verify in Listings may link the wrong existing tenant profile — use Change tenant on Contract Info while the booking is still Upcoming, not Delete Booking when dates and unit are correct. Hub parity: Common Workflows — Wrong tenant on a booking. Full pairing matrix: onboarding-a-new-property-section-cross-reference · Common Workflows section cross-reference.
- Common Workflows — Wrong tenant on a booking — Hub matrix (
bookings-detail-change-tenant-flow.mp4) - Processing a New Booking — Step 1 — Duplicate row → Delete, not Change tenant
- Processing a New Booking — Step 6 — Post-import profile verification
- Bookings — Change tenant — Reassign booking before first contract mail
- Common Workflows — Cancel Booking vs Delete Booking — Decision table contrast
- Glossary — Cancel Booking vs Delete Booking hub — Contrast duplicate import → Delete, not Change tenant
- Glossary — Wrong tenant on a booking hub — Surface table + per-guide/module mesh reciprocal hub
- FAQ — Wrong tenant on a booking — Picker mistake vs duplicate import
Cancel Booking vs Delete Booking
Go-live channel imports on Step 7 — Verify in Listings may include test or duplicate bookings — use Delete Booking on mistaken rows, Cancel booking for real voids that need settlement. Building sunsetting uses Archive property — a third scope. Hub parity: Common Workflows — Cancel Booking vs Delete Booking. Full pairing matrix: onboarding-a-new-property-section-cross-reference · Common Workflows section cross-reference.
- Common Workflows — Cancel Booking vs Delete Booking — Hub matrix (
bookings-cancel-booking-modal-refund-types.png,finance-transactions-type-summary-cards.png) - Glossary — Cancel Booking vs Delete Booking hub — Surface table + per-guide/module mesh reciprocal hub
- Step 7 — Verify in Listings — First import cleanup after go-live
- Processing a New Booking — Step 1 — Duplicate channel imports
- FAQ — Delete Booking on integration reservation — provider platform guard (#2076)
- Portfolio retirement decisions — Unarchive mistaken building Archive — not reservation Delete
- Bookings — Delete Booking (soft archive) — Soft-archive test rows
Portfolio retirement decisions
Go-live on Step 7 — Verify in Listings adds inventory — building Archive is for sunsetting only. Mistaken test bookings from channel imports use Delete Booking or Cancel booking — not Archive property. Hub parity: Common Workflows — Portfolio retirement decisions. Full pairing matrix: onboarding-a-new-property-section-cross-reference · Common Workflows section cross-reference.
- Common Workflows — Portfolio retirement decisions — Hub matrix (
listings-archived-populated-table.png) - Glossary — Portfolio retirement decisions hub — Surface table + per-guide/module mesh reciprocal hub
- Step 7 — Verify in Listings — Confirm property is on Portfolio, not Archived, after go-live
- FAQ — Archive a property — Unarchive when setup was archived by mistake
- Processing a New Booking — Step 1 — Duplicate imports before first real confirmation
- Glossary — Archived property — Building-level Archive vs reservation cleanup
- Manual block hygiene — Portfolio sunsetting after inventory is live
Provider platform Delete Booking guard
Go-live test bookings after Step 7 — Verify in Listings may need Delete Booking on duplicate channel imports — Reject or assign provider platform in-payment before soft-archive (#2076). Hub parity: Common Workflows — Provider platform Delete Booking guard. Full pairing matrix: onboarding-a-new-property-section-cross-reference · Common Workflows section cross-reference.
- Common Workflows — Provider platform Delete Booking guard — Hub matrix (
bookings-detail-provider-platform-payment-field.png,bookings-provider-platform-reject-delete-flow.mp4) - Glossary — Provider platform Delete Booking guard hub — Surface table + per-guide/module mesh reciprocal hub
- Step 7 — Verify in Listings — Go-live test imports after inventory is live
- Processing a New Booking — Provider platform Delete Booking guard — Duplicate imports on Step 1
- Cancel Booking vs Delete Booking — Delete for test rows — not building Archive
- Bookings — Provider platform payment — Integration in-payment field
- FAQ — Delete Booking on integration reservation — Clear in-payment before Delete (#2076)
Archived booking ledger visibility
Go-live test bookings after Step 7 — Verify in Listings may use Delete Booking on duplicate imports — Manual Transactions hide on Finance → Transactions afterward (#1897). Building Archive is sunsetting only; it does not hide ledger rows. Hub parity: Common Workflows — Archived booking ledger visibility. Full pairing matrix: onboarding-a-new-property-section-cross-reference · Common Workflows section cross-reference.
- Common Workflows — Archived booking ledger visibility — Hub matrix (
finance-transactions-type-summary-cards.png) - Glossary — Archived booking ledger visibility hub — Surface table + per-guide/module mesh reciprocal hub
- Step 7 — Verify in Listings — Delete on test imports — manual rows hide (#1897)
- Cancel Booking vs Delete Booking — Delete for test rows; Cancel for real voids
- Portfolio retirement decisions — Unarchive if building archived by mistake
- Provider platform Delete Booking guard — Clear in-payment before Delete (#2076)
- Processing a New Booking — Archived booking ledger visibility — Duplicate import cleanup
- FAQ — Manual payments after Delete Booking — Symptom table (#1897)
Archive property (building-level)
Go-live verification on Step 7 — Verify in Listings may surface accidental Archive during setup — use Unarchive from Listings → Archived. Building Archive is portfolio sunsetting only, not go-live cleanup. Hub parity: Common Workflows — Archive property (building-level). Full pairing matrix: onboarding-a-new-property-section-cross-reference · Common Workflows section cross-reference.
- Common Workflows — Archive property (building-level) — Hub matrix (
listings-archived-unarchive-sidebar.png) - Glossary — Archive property (building-level) hub — Surface table + per-guide/module mesh reciprocal hub
- Step 7 — Verify in Listings — Unarchive if building archived by mistake
- Portfolio retirement decisions — Archive is sunsetting — not wizard rollback
- Processing a New Booking — Archive property (building-level) — Delete on test imports — not building Archive
- Listings — Archived properties — Archived tab review
- Manual block hygiene — Archive property (building-level) — Hold cleanup before sunsetting
- FAQ — Archive a property — Archive / Unarchive steps
Directory list load failures
Go-live verification on Step 7 — Verify in Listings can show Failed to load listings. Please try again. on the Portfolio table — Retry after connectivity recovers. That is distinct from a successful fetch returning zero rows on a brand-new account. Hub parity: Common Workflows — Directory list load failures · Glossary — Directory list load failures hub. Full pairing matrix: onboarding-a-new-property-section-cross-reference · Common Workflows section cross-reference.
- Common Workflows — Directory list load failures — Hub matrix (
notifications-module-load-failure.png) - FAQ — Directory list load failures hub — Listings portfolio Retry on Step 7 go-live verify
- Step 7 — Verify in Listings — Listings → Portfolio Retry before first-booking handoff
- Listings — Portfolio table loading — First-fetch failure pattern
- Common Workflows — New inventory to first booking handoff — Downstream after Step 7 loads
- Processing a New Booking — Directory list load failures — Bookings list Retry on first import triage
- FAQ — Directory list load failures — Whole-module vs empty portfolio
Booking sidebar tab load failures
Go-live verification on Step 7 — Verify in Listings may open the first live booking — if Tickets shows Could not load tickets. Try again., use banner Retry while Contract Info and Payment Plan stay available. That is tab-scoped recovery, not Listings portfolio list Retry. Hub parity: Glossary — Booking sidebar tab load failures hub · Common Workflows — Booking sidebar tab load failures. Full pairing matrix: onboarding-a-new-property-section-cross-reference · Common Workflows section cross-reference.
- Common Workflows — Booking sidebar tab load failures — Hub matrix (
bookings-detail-tickets-tab.png) - Glossary — Booking sidebar tab load failures hub — Surface table + per-guide/module mesh reciprocal hub
- FAQ — Booking sidebar tab load failures hub — First booking tab Retry on Step 7
- Step 7 — Verify in Listings — First booking tab Retry after go-live handoff
- Processing a New Booking — Booking sidebar tab load failures — Contract thread on Step 4
- Directory list load failures — Listings portfolio Retry — whole-module pattern
- Bookings — Sidebar tab load failures — Module reference
- FAQ — Communication or Tickets load failure — Tab-scoped vs list failure
Confirmation to check-in handoff
First Upcoming reservation after Step 7 — Verify in Listings follows Processing a New Booking — Steps 1–6 before Managing a Check-in — Step 1 ~7 days before the first arrival. Pair New inventory to first booking handoff upstream. Hub parity: Common Workflows — Confirmation to check-in handoff. Full pairing matrix: onboarding-a-new-property-section-cross-reference · Common Workflows section cross-reference.
- Common Workflows — Confirmation to check-in handoff — Hub matrix (
workflows-onboarding-property-wizard.mp4,workflows-operations-check-in-out-planning-view.png) - Glossary — Confirmation to check-in handoff — Upcoming portal gates → arrival week ~7 days before move-in
- Glossary — Confirmation to check-in handoff hub — Surface table + per-guide/module mesh
- Step 7 — Verify in Listings — Go-live inventory before first confirmation
- Processing a New Booking — Step 6 — First-import portal gates
- New inventory to first booking handoff — Upstream first Upcoming reservation
- Managing a Check-in — Step 1 — First arrival-week planning
- Confirmation alert triage — First Booking created / Payment received alerts
- FAQ — Confirmation to check-in handoff — Go-live first-arrival handoff symptom table
Confirmation alert triage
Go-live verification on Step 7 — Verify in Listings often coincides with the first Upcoming Booking created or Payment received alerts — row-click via Notification triage — Step 4, run Processing a New Booking — Step 5b / Step 6 on the first live reservation, then clear unread in Step 5. Hub: New inventory to first booking handoff. Hub parity: Common Workflows — Confirmation alert triage. Full pairing matrix: onboarding-a-new-property-section-cross-reference · Common Workflows section cross-reference.
- Common Workflows — Confirmation alert triage — Hub matrix (
notifications-row-navigate-to-booking-detail.png,bookings-detail-transactions-approve-payment-modal.png,notifications-row-navigation-flow.mp4) - Glossary — Confirmation alert triage — Upcoming Booking created / Payment received before mark-read
- Glossary — Confirmation alert triage hub — Surface table + per-guide/module mesh
- Step 7 — Verify in Listings — First Booking created / Payment received after go-live
- New inventory to first booking handoff — Upstream Listings pass before first alert
- Processing a New Booking — Confirmation alert triage — Canonical Steps 5b / 6 mesh
- Confirmation to check-in handoff — Downstream when alerts quiet ~7 days out
- Pending manual receipt approval — Pending manual in-payment on first import (
finance-transactions-pending-pill.png) - FAQ — Confirmation alert triage hub — First confirmation alerts symptom table
Portfolio segmentation by tenant category
Assign Category on Tenant Info before contract mail pairs with Settings > Tenant categories. Hub parity: Common Workflows — Portfolio segmentation by tenant category. Full pairing matrix: onboarding-a-new-property-section-cross-reference · Common Workflows section cross-reference.
- Common Workflows — Portfolio segmentation by tenant category — Hub matrix when workflows must align across reservations, receivables, and profiles
- Glossary — Portfolio segmentation by tenant category hub — Surface table + per-guide/module mesh reciprocal hub
- FAQ — Portfolio segmentation by tenant category hub — Segment filter symptom table
- Settings > Tenant categories — Default for integration-created tenants before channel imports
- Bookings — Other filters — Verify segment on first direct bookings
- Tenants — Tenant category filter — Profile-count cross-check after assignment
Key glossary terms
Glossary rows pair with Glossary cluster cross-reference. Full pairing matrix: Onboarding a New Property section cross-reference · Common Workflows section cross-reference.
-
Glossary — End-of-Booking cost split — Charge Time → End of Booking splits daily overage across every occupied unit; still-staying roommates stay in the denominator (#2111)
-
Operations — Property-level ticket search — Property-name matches share the top relevance tier with unit hits; building-scoped rows float first under an active Property filter (#2089)
-
Glossary — Change history — Operator-initiated edits on Listings setup and Bookings Changelog; create-time defaults excluded (#2093)
-
FAQ — Booking Changelog scope — Operator-initiated edits only; create-time defaults excluded (#2093)
-
Glossary — Archived booking ledger visibility — Delete Booking hides manual/provider_platform rows on Finance → Transactions; vIBAN and credit card stay visible (#1897)
-
Bookings — Provider platform payment — Non-rejected provider platform in-payment blocks Delete Booking until Reject or assign (#2076)
-
FAQ — Delete Booking on integration reservation — Clear pending provider platform in-payment with Reject or assign before soft-archive (#2076)
-
Listings — Property edit sidebar pills — Setup / Full integration / Photos pills on property and unit edit sidebars; replaced the old Go to details shortcut (#2082)
-
Glossary — Finance tenant category cache refresh — Recategorizing a tenant on Tenants → Tenant Info force-refreshes Finance caches so Contract Values, Overview, and Deposits filters match within seconds (#2088)
-
Glossary — SIMAR water contract ID — SIMAR (Loures e Odivelas) water bills use Cód. Local in Connections — not Nº de Contador; leading zeros stripped (#2110)
-
FAQ — SIMAR water bill property match — Cód. Local in Connections — not Nº de Contador; strip leading zeros (#2110)
-
Glossary — Per-booking maintenance ticket opt-out — Add booking checkboxes skip automatic CI/CO tickets for one reservation only; property rule unchanged (#1140)
-
FAQ — Cancel Booking vs Delete Booking — Cancel for real stays with settlement; Delete soft-archives mistaken/test rows (#1897 / #2076)
-
Glossary — Archived property — Archive retires a building to Listings → Archived without deleting bookings; distinct from Delete Booking (reservation soft-archive) — Listings — Archived properties
-
FAQ — Archive a property — Edit property sidebar Archive / Unarchive on Listings; building-level — not Delete Booking or Cancel booking
-
FAQ — Portfolio retirement decisions — Archive property (building) vs Cancel booking vs Delete Booking (reservation soft-archive) — three-way decision table
-
Glossary — Draft ticket (display status) — Far-future Schedule date prep jobs from Maintenances
-
Glossary — Ticket — linked cash flows — Contractor spend linked from Operations tickets
-
Glossary — Invoiced floor (rent) — Mid-stay repricing guards once Finance exports rent
-
FAQ — Bulk Hostkit invoicing slow — Vivin paces Hostkit API calls and retries HTTP 429 during bulk Issue allocation / Invoice selected; refresh Transactions before re-issuing
-
Glossary — Credit note (payment reject/revert) — Rejecting invoiced confirmation receipts
-
FAQ — Lower rent below invoiced — Rent edits after invoicing
-
FAQ — AI token usage — Poll GET /ai-usage / GET /ai-usage/summary with management JWT;
landlord_chat+utility_bill_extraction; no management UI screen yet -
FAQ — Automatic check-in email — Trigger matrix, 15-day cutoff, paper upload vs portal signing, Nuki-only toggle, Send / Resend on Contract Info
-
FAQ — WhatsApp and email per booking — Bookings → Communication tab when tenant chatbot is enabled; Inbox for portfolio-wide triage
-
FAQ — Deposit missing on Finance Deposits — Default ~3 months date range; clear or widen before triaging older move-outs or dispute row actions
-
FAQ — Pending manual in-payment on /notifications — Alert persists until Approve payments clears Finance or booking Transactions
-
FAQ — Uncovered Debt KPI — Finance Total Debt minus deposit offsets; pair with Debt Aging and In debt drill-down
-
FAQ — Dashboard Total Debt subtitle — Post-login Total Debt card headline vs >15 days subtitle; ongoing bookings only
-
FAQ — Analytics (KPI workspace) — Portfolio KPIs vs Sales/Listings/Dashboard; load-failure Try again
-
FAQ — Reject or revert an incoming payment — Reject pending rows or Revert confirmed ones; Finance → Transactions uses Reject selected bulk-only; modals warn about credit notes when Finance already invoiced
-
FAQ — Finance Income status drill-down — Overview Income chart (Paid / Scheduled / In debt); click a segment for month-scoped payment-line modal; Debt Aging for booking-level receivables
-
FAQ — Phone shows Operations only — Mobile phone user agent locks operators with Operations access to
/operations; iPads and narrow desktop browsers keep the full module list -
FAQ — Notification row-click navigation — On
/notifications, row click marks unread then openslink,bookingId,tenantId,listingId, orpropertyId(first match); Dashboard bell General rows stay in-panel unlesslinkis set -
FAQ — Bookings that owe money — Top debtors and overdue buckets on Finance → Overview; Total Debt KPI is not a table
-
FAQ — Fixed rent on variable unit — Variable listing + equal rent every contract month → booking stores fixed headline Monthly rent; payment plan unchanged
Module documentation hubs
Module hub bullets pair with Modules — Module cross-reference. Full pairing matrix: Onboarding a New Property section cross-reference · Common Workflows section cross-reference.
- Analytics module — Month-range portfolio KPI charts (section cross-reference; Deeper workflow reads; hub)
- Tenants module — Tenant directory and profile sidebars (section cross-reference; Deeper workflow reads; hub)
- Listings module — Property wizard, unit setup, Channels tab, and Archived when sunsetting inventory (section cross-reference; Deeper workflow reads; hub)
- Booking engine details — Rich marketplace payload via the Full integration pill) (section cross-reference; Deeper workflow reads; hub)
- Finance module — Portfolio ledgers once live bookings accumulate Contract Values (section cross-reference; Deeper workflow reads; hub)
- Bookings module — Reservation lifecycle after the first booking (section cross-reference; Deeper workflow reads; hub)
- Audit module — Manual Blocks and Discounts review (section cross-reference; Deeper workflow reads; hub)
- Inbox module — Portfolio-wide WhatsApp workspace (section cross-reference; Deeper workflow reads; hub)
- Notifications module — Full
/notificationshistory (section cross-reference; Deeper workflow reads; hub) - AI Chat module — Vivin-internal AI Assistant (section cross-reference; Deeper workflow reads; hub)
- Properties workspace — Legacy
/propertiesURL redirects into Listings (section cross-reference; Deeper workflow reads; hub) - Account Settings — Workspace-wide financial policies and integrations (hub subsection index; Deeper workflow reads; hub)
- API Reference hub — Partner HTTP contracts and partial vs full feeds (hub subsection index; hub)